This post is intended to show you the robust functionality of the Local Test Manager(LTE). Here, we are creating a Native OAuth Provider using Local Test Environment (LTE) and API Designer replicating the steps shown in this knowledge center tutorial-
NativeOauthProviderTutorialThe pre-requisite for following this post is you have installed LTE and it’s running. If you haven’t installed yet, here’s the blog post detailing the installation steps –
https://developer.ibm.com/apiconnect/2019/08/23/intall-local-test/I have installed the LTE and it is running
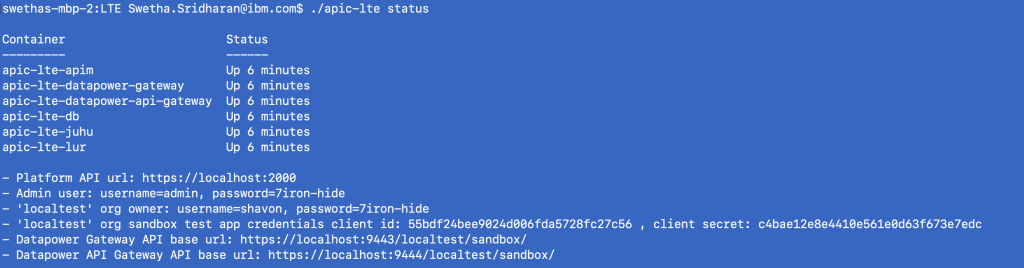
Now, login into LTE as the admin user.
$apic loginserver? https://localhost:2000 Realm? admin/default-idp-1Username? adminPassword? 7iron-hide 
Before we start creating Authentication URL user registry, you will need the integration information of the authentication url and org url.
$apic integrations:list-all -s https://localhost:2000 $apic orgs:list -s https://localhost:2000
We will be using the localtest porg's org url.
Create the user registry file. In this example, I have created the user registry usingauthurl.yaml that contains authentication url integration information. You have successfully completed steps 1 – 6 in the tutorial (link above)
$apic user-registries:create -s https://localhost:2000 -o admin authurl.yml
Create an OAuth provider of type native. I have created the oauth provider oauthapp.yml file for admin porg. With this, you have successfully completed steps 7 – 18 in the tutorial.
$apic oauth-providers:create -s https://localhost:2000 -o admin mainprovideroa.yml
Next steps include configuring my catalog with newly created resources - user registry and Oauth provider. Before proceeding to that, login as shavon
$apic loginserver? https://localhost:2000realm? provider/default-idp-2username? shavonpassword? 7iron-hide 
To add the user registry to the sandbox catalog, I have my user registry url along with catalog URL, org url and integration url information as part of apiur.yml
$apic catalogs:list -s https://localhost:2000 -o localtest $apic configured-api-user-registries:create -s https://localhost:2000 -o localtest -c sandbox --scope catalog configur.yml
The configoauth.yml contains the OAuth provider url information.
$apic configured-oauth-providers:create -s https://localhost:2000 -o localtest -c sandbox --scope catalog configoauth.yml
With this, you have successfully completed steps 20-30 in the tutorial.
Since we are using the Sandbox catalog, we can skip the steps for creating an app/subscription as we will be using the default test app that comes with sandbox. We can skip the section " Verify or create test application credentials" in the tutorial.
We will follow the exact same steps listed in Adding OAuth Security to an API section of the tutorial using API Designer.
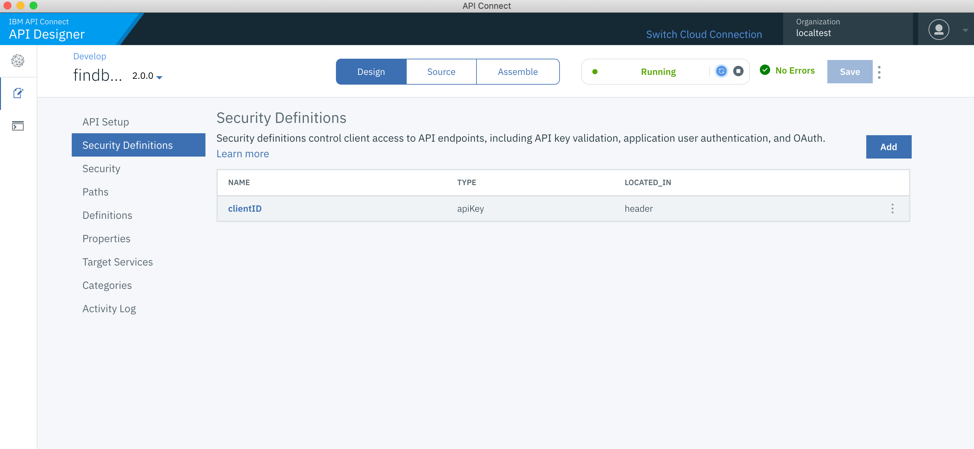
Open the API Designer connecting to LTE. Open an API and go to Security Definitions. As seen from the screenshot, I’m able to select the OAuth provider “mainprovideroa” that we just created.
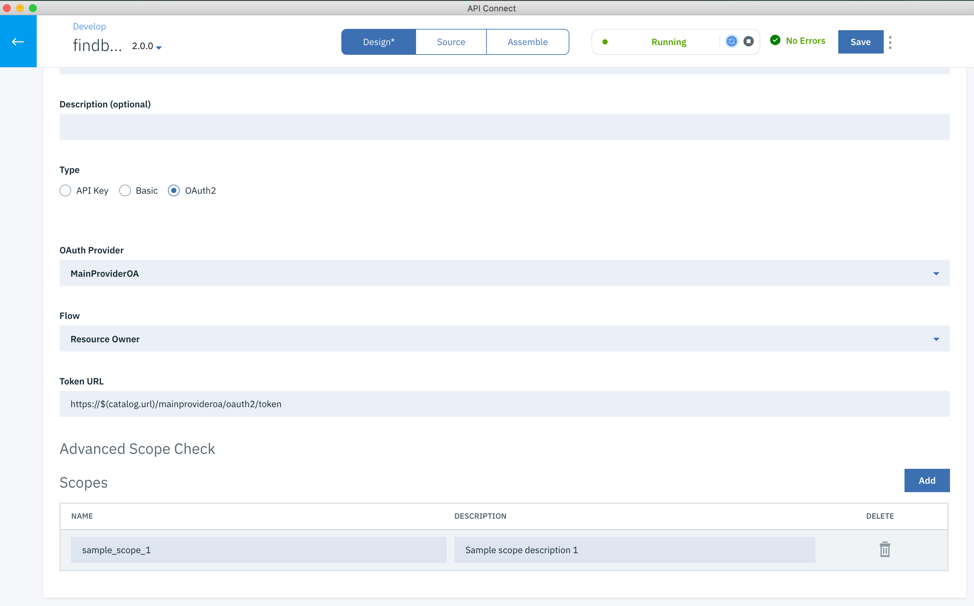
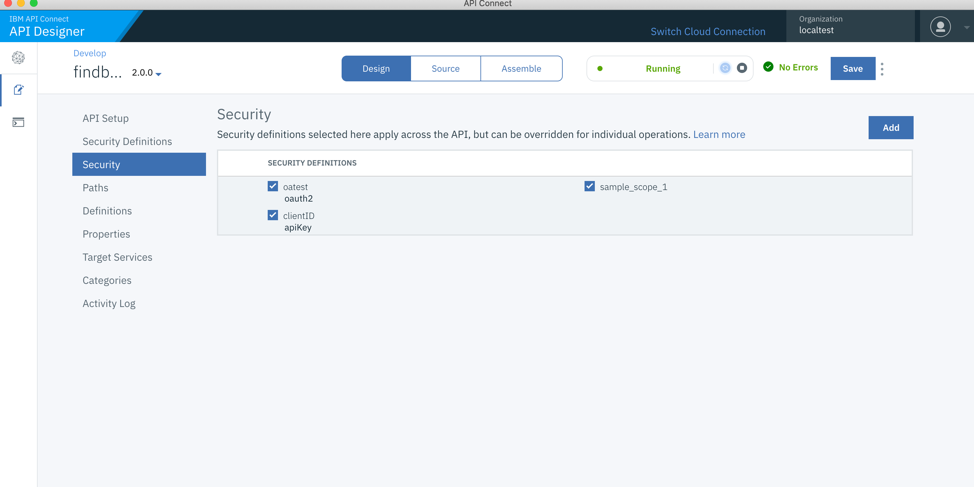
Click on security and choose the OAuth resource that was added in the previous step.
Click save and republish this API.
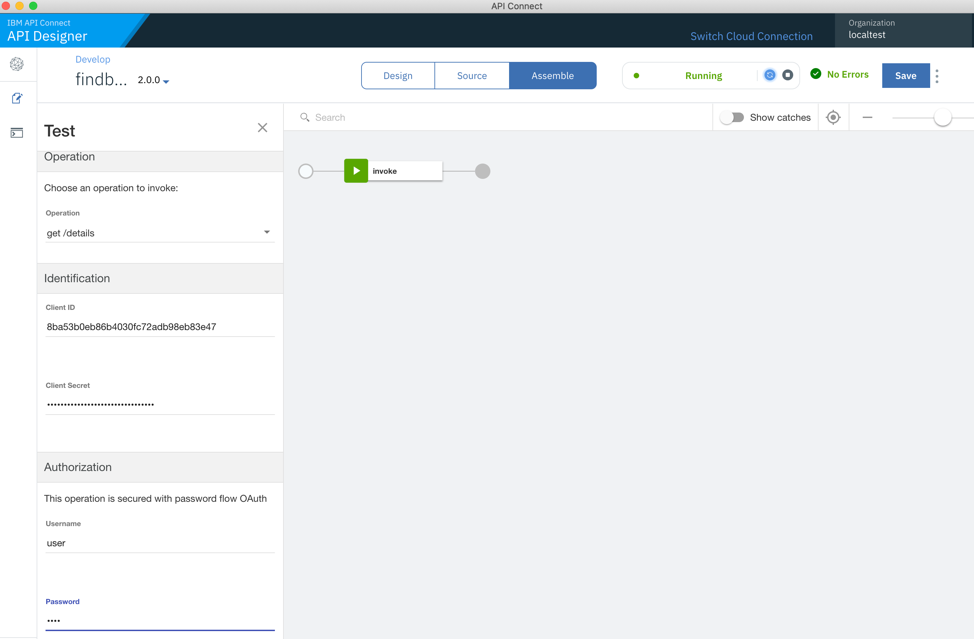
Click on the Assemble and then click Test icon.

Select
get /details in the
Operation field and enter
user in the
Username field. Enter
pass in the
Password field.

The next step is to obtain an OAuth token. In this case, cURL is used to obtain the token using the following command.
curl -k -v https://gateway_url/org_name/sandbox/mainprovideroa/oauth2/token -d "grant_type=password&scope=sample_scope_1&username=user&password=pass&client_id=app_client_id&client_secret=app_client_secret"
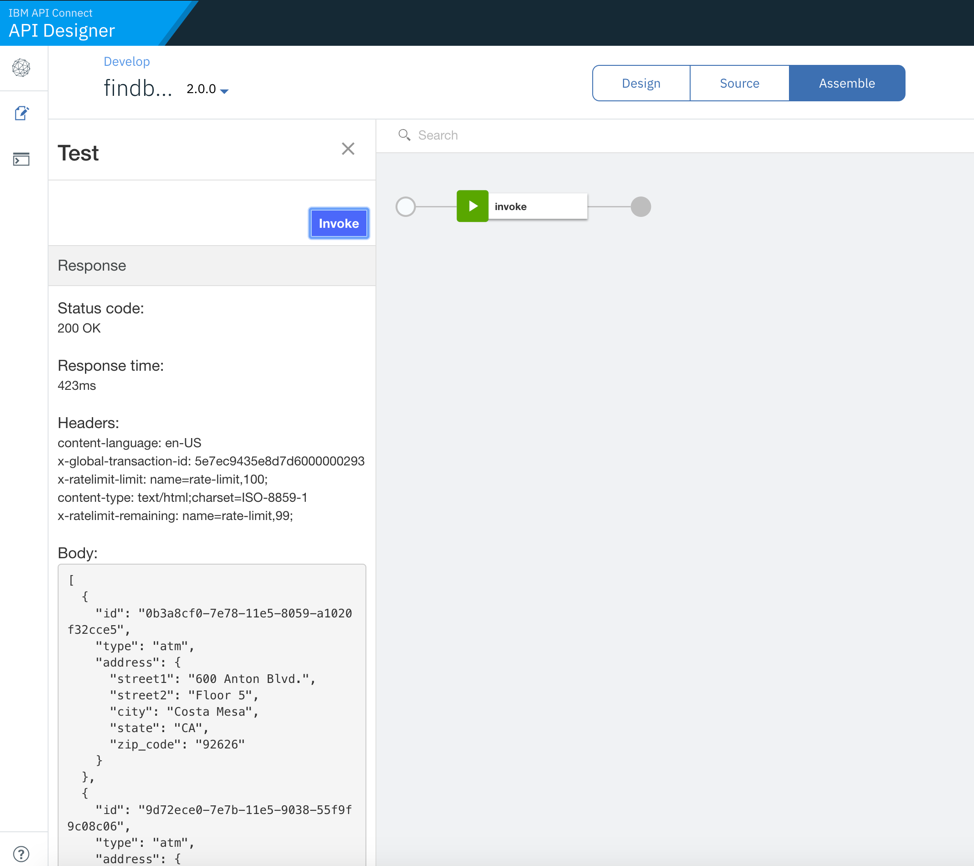
Enter or paste the access token in the
access_token field. Here is an example token.
AAIgOGJhNTNiMGViODZiNDAzMGZjNzJhZGI5OGViODNlNDevWkg77RzWWMHJj6tciDizINWEj4F0fkEPTvR_h71YvBziKM1YCWWnhWs1fQvL14dxLPYpkTT7bXoTt-x08M2rKZg__DQrI-35taU7jETJEQ
Click Invoke
I have also called the FindBranch API's endpoint using curl on CLI.
$curl -k -H "X-IBM-Client-Id: 8ba53b0eb86b4030fc72adb98eb83e47" -H "Authorization: Bearer AAIgOGJhNTNiMGViODZiNDAzMGZjNzJhZGI5OGViODNlNDevWkg77RzWWMHJj6tciDizINWEj4F0fkEPTvR_h71YvBziKM1YCWWnhWs1fQvL14dxLPYpkTT7bXoTt-x08M2rKZg__DQrI-35taU7jETJEQ" -X GET https://localhost:9444/localtest/sandbox/findbranch/details
The yaml files used in this demo can be found in this
repositoryWith LTE you can manage authentication and security of APIs locally on your laptop without having to connect to API Manager cloud instance. Developers can enjoy the ability to develop and test APIs independently with LTE.
Get started
here to install LTE and try out these exciting features.
Here's a
video snippet showing this. However, it does not show the end to end scenario explained above. It will be updated shortly.
#APIConnectv.2018.1#APIDevelopers#APIEconomy#APImanagement#ProductCapabilities