Introduction
Operational Decision Manager (ODM) is a product that allows you to create and manage business rules. ODM allows for describing business logic using simple language called rules. Rules can be easily updated by business users without the need for deep technical knowledge. For example, a Java developer may create a conditional statement like this:
if(taxiObj.distanceTravelled() > 100) {
 taxiObj.incrementFare(50)
}
However, a business rule may look something like this:
IF the distance traveled in the taxi is more than 100km
THEN add $50 to the total fare charge
As you can see, the business rule is easier to read and write than the equivalent Java rule. This article will show how to process business rules written in ODM in real time using IBM Streams.
Problem/Scenario
We have a fictional taxi company that monitors the whereabouts of its taxis in real-time. Each of its taxis is equipped with a sensor that sends back location and occupancy information every so often. This data is consumed by a Streams application that analyzes this data and displays the taxi’s whereabouts on a map in a browser.
Our taxi company also has a set of ODM rules that are used to calculate taxi fare based on distance traveled and an initial meter drop charge.
The goal of the article is to run the fare calculation ODM rules in the Streams application and calculate taxi fares in real time using the geo-location data from the taxis.
There are three exercises in this article. In the first exercise, we are going to focus on how to execute an ODM rule in a Streams application. In the second exercise, we are going to work on hot update of business rules, and see the effects of changes in the business logic without having to restart the Streams application. In the third exercise, we are going to add a new business rule and deploy it without restarting the Streams application.
Data
The data for this article is located in the “Taxi/data/taxidata” directory within the SPL project. The data comes from the cabspotting project (cabspotting.org), which collected geospatial data for a number of San Francisco’s taxi cabs as they travelled throughout the Bay Area. There is a pre-written composite that will open the files and provide the data to your application.
The data is structured as:
stream< rstring ID, // The identifier for the taxi
        float64 latitude,
        float64 longitude,
        boolean occupied, // is taxi occupied (has a fare)
        int64 currentTaxiTime, //timestamp of the observation
        int64 fareStartTime, //  timestamp when the taxi became occupied
        float64 fareDistanceTravelled, // distance driven this fare
        float64 fareTotalCharge, // The total fare charge
        float64 totalDistanceTravelled, // taxi total distance
        float64 meterDropCharge, // The meter drop charge (set via ODM rules)
        float64 chargePerKM, // The cost per KM (set via ODM rules)
        int64 timeOfLastMovement, // The last time the taxi moved
        boolean hasAlert > // Whether or not the taxi has an alert set
Technology
This tutorial will focus on using the com.ibm.streams.rules toolkit. This toolkit provides streams applications with the ability to stream data through an ODM Rules Execution Server. This enables business analysts to construct rules and automate decisions in real time.
Prerequisites
- Operational Decision Manager (ODM) with Decision Center Enterprise installed
- Streams Studio, available for free on the Streams Quick Start Edition if you do not have it already installed.
- Firefox (not tested with IE or Chrome)
Setup
- Install ODM.
- Set the
ODM_HOME environment variable to the location where ODM is installed (add this to your ~/.bashrc)
- Import the projects found in TaxiDemoProjects into the ODM Rule Designer (see below).
- Deploy the Rule App Project
- Import the TaxiDemo SPL project from TaxiDemoSPLProject into Streams Studio (see below).
Quick Start Edition (QSE) Setup
These steps assume that the ODM server is installed on a separate server (referred to below as the ODM server).
- Create a directory path on the QSE VM that is the same as the ODM directory path on the ODM server (i.e. /opt/ibm/ODM).
- Copy the ‘executionserver/lib’ directory from the ODM server’s home directory to the directory created in Step 1
- For example, this should result in the following path: ‘/opt/ibm/ODM/executionserver/lib’
- Set the ODM_HOME environment variable to point to this location (add this to your
~/.bashrc).
- If the rules are deployed to the file system on the ODM server, you will need to setup a shared directory so that the rules can be accessed from the VM
- On the ODM server, NFS export the directory where the rules are deployed
- On the QSE VM, mount the exported directory to a location that is readable by the ‘streamsadmin’ user
- Import the projects found in “TaxiDemoProject.zip” into the ODM Rule Designer on the ODM server
- Deploy the Rule App Project
- Import the TaxiDemo SPL project from “TaxiDemoSPLProject.zip” into Streams Studio on the QSE VM
Operators to Use
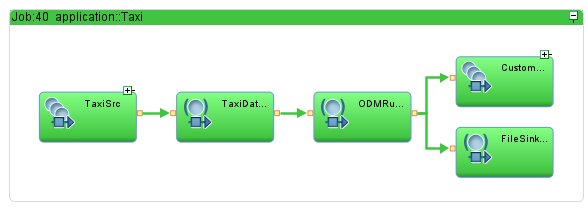
The com.ibm.streams.rules contains one operator called the ODMRulesetExecutor operator. The ODMRulesetExecutor operator maps tuples to input parameters that are used as an input for executing the deployed rules. The operator passes these parameters to the ODM rules engine, which executes the rules and sends a response object that contains the results to the operator. The operator converts the output parameters to tuples.
Exercise 1 – Getting Started
Problem Statement
This exercise will focus on adding parameters to the ODMRulesetExecutor operator in order to execute ODM rules in a Streams application.
Configuring the Operator
- Open Streams Studio by double-clicking on the icon on the desktop
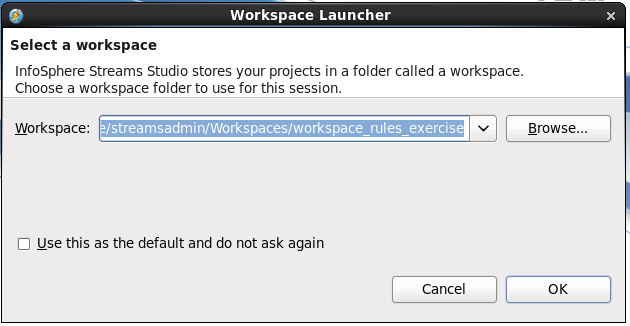
- Navigate to the “workspace_rules_exercise” workspace and click OK
- Expand the “Taxi” project and then expand the “application” namespace.

- Right-click on “Taxi [Build:Distributed]” and select “Open With>SPL Graphical Editor”
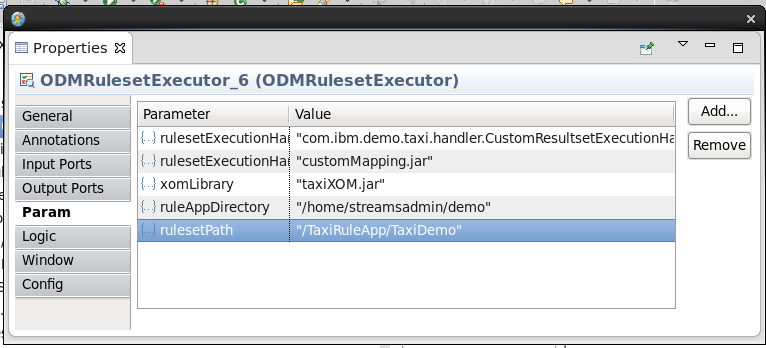
- In the Graphical Editor, there should be an error marker on the ODMRulesetExecutor operator. Hovering over this marker will indicate that the rulesetPath parameter is not set.
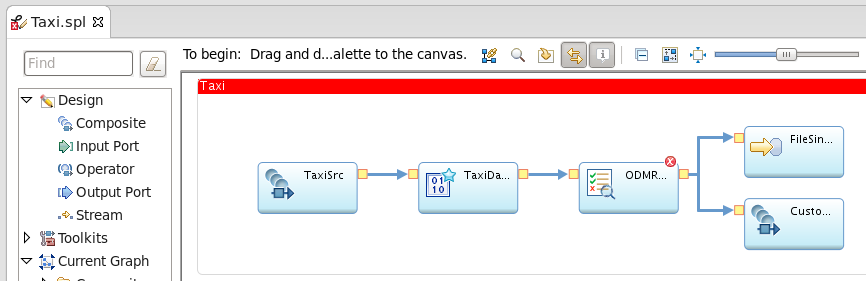
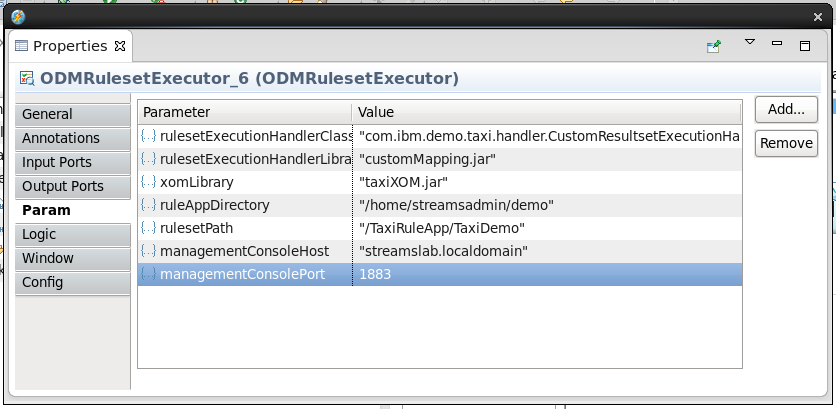
- Right-click on the ODMRulesetExecutor operator and select “Edit” to open the op-erator’s properties.
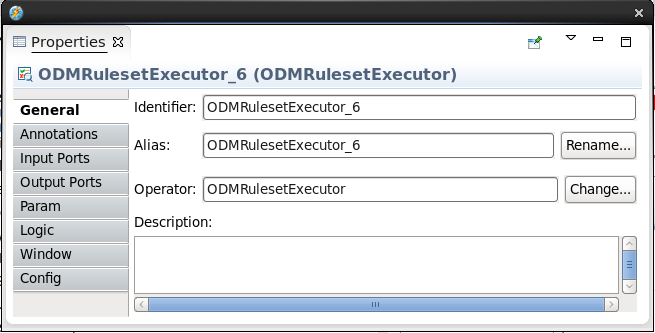
- Click on the “Param” tab to open the Param property page

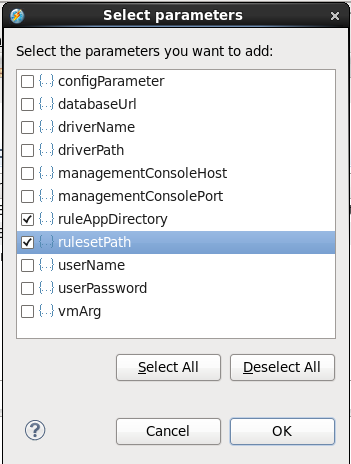
- Click the “Add” button
- In the dialog that opens, select the “rulesetPath” and “rulesetAppDirectory” parameters, then click OK.
- Click in the “Value” column next to “rulesetAppDirectory” and add the following, including quotes:
“/home/streamsadmin/demo”
This is the directory where the ODM rules are deployed on the file system.
- Click in the “Value” column next to rulesetPath and the following, including quotes:
“/TaxiRuleApp/TaxiDemo”
This is the path to the rule application that was already deployed.
- Navigate to File > Save or press Ctrl+S to save the changes. The SPL application will build and there should be no errors.
Launch Streams Application
In the following steps, we will launch our application to the Streams instance.
- Expand the “Taxi” project and then expand the “application” namespace.

- Right-click on “Taxi [Build: Distributed]” and select “Launch Active Build Config”
- Click “Continue” in the dialog that appears
- Open the “Streams Explorer” view which is next to the “Project Explorer” view
- Expand “InfoSphere Streams 3.2.0.0”
- Expand “Instances”
- Right-click on the “default” instance and select “Show Instance Graph”

- The Instance Graph view will be made visible and will show the application running.

Viewing the Map
Windows Users:
If you are running Streams Studio on Windows, you will need to frequently “Synchronize” the project’s data folder in order to download the latest result files. Alternatively, you can start an httpd daemon on your Linux system and configure it to point to your project’s data folder. This will allow you to access the taximap.html file on your remote system using a URL (i.e. http://mylinuxserver/~jcancilla/Taxi/data/taximap.html). Leave me a comment if you have question on how to set this up
In the following steps, we will view the results of the running application.
- Expand the “Taxi” project.
- Expand the “Resoures” folder.
- Expand the “data” folder
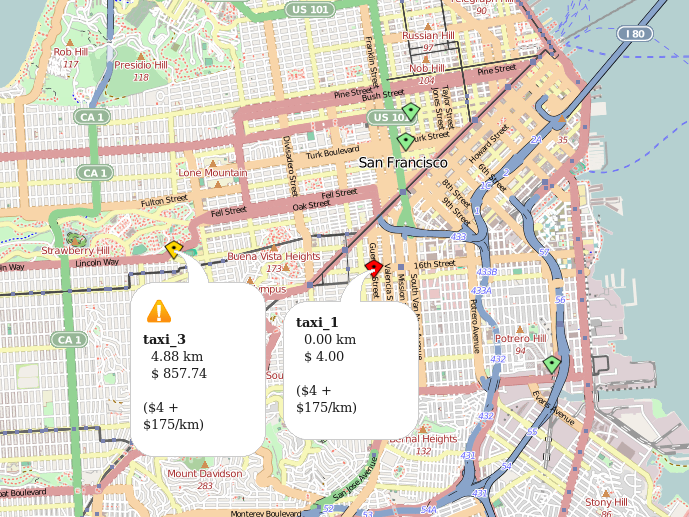
- Right-click on the “taximap.html” and click “Open with…>Web Browser”. This will open an external web browser and should display a map with markers. The markers represent the taxis that the application is tracking. The markers are updated every couple of seconds. When a taxi is occupied (has a fare), information about the fare is updated in the marker popup.
Exercise 2 – ODM Rule Refresh
Problem Statement
In this exercise we will demonstrate how to configure and launch an SPL application in such that it can detect updates to rules and use the new ruleset without having to restart the application. With the SPL application running, we will use ODM’s Decision Console to modify an existing rule and deploy it.
Open a new workspace
- Shut down Streams Studio if it is already started
- Start Streams Studio again
- Select the following workspace to open: workspace_rules_exercise2
Cancel a Streams Job
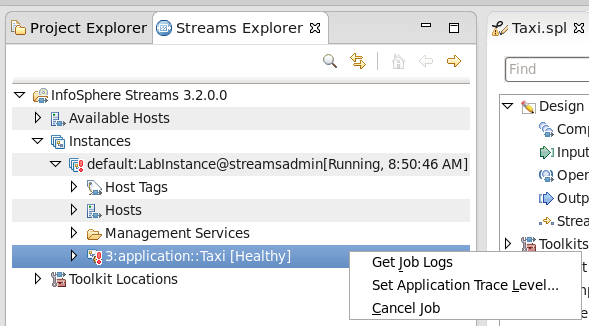
Before launching a new job, we need to cancel the SPL job that was launched in Exercise 1.
- Open the “Streams Explorer” view which is next to the “Project Explorer” view
- Expand “InfoSphere Streams 3.2.0.0”
- Expand “Instances”
- Under “Instances” you should see the running job. Right click on the job and select “Cancel Job”. Click “Yes” to confirm that you want to cancel the job.
Configuring the Operator
In order to configure the ODMRulesetExecutor operator to detect that a ruleset has been refreshed, we need to add the “managementConsoleHost” and “managementConsolePort” parameters to the operator.
- Expand the “Taxi” project and then expand the “application” namespace.
- Right-click on “Taxi [Build:Distributed]” and select “Open With>SPL Graphical Editor”
- Right-click on the ODMRulesetExecutor operator and select “Edit” to open the operator’s properties.

- Click on the “Param” tab to open the Param property page
- Click the “Add” button
- In the dialog that opens, select the “managementConsoleHost” and “manage-entConsolePort” parameters, then click OK. |
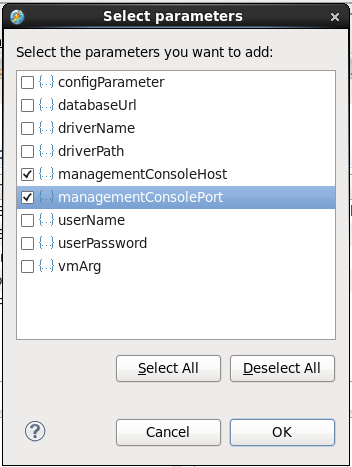
- Click in the “Value” column next to “managementConsoleHost” and the following, including quotes:“streamslab.localdomain”
- Click in the “Value” column next to “managementConsolePort” and the following:1883
- Navigate to File>Save or press Ctrl+S to save the changes. The SPL application will build and there should be no errors.
Launch Streams Application
In the following steps, we will launch our application to the Streams instance.
- Expand the “Taxi” project and then expand the “application” namespace.
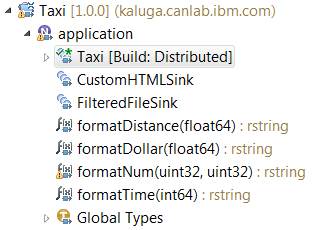
- Right-click on “Taxi [Build: Distributed]” and select “Launch Active Build Config”
- Click “Continue” in the dialog that appears
- Open the “Streams Explorer” view which is next to the “Project Explorer” view
- Expand “InfoSphere Streams 3.2.0.0”
- Expand “Instances”
- Right-click on the “default” instance and select “Show Instance Graph”
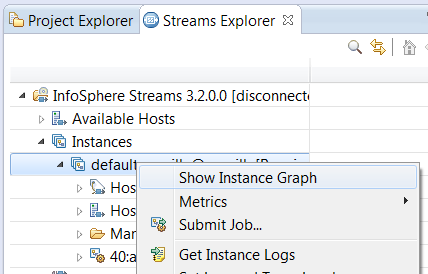
- The Instance Graph view will be made visible and will show the application running.
Viewing the Map
In the following steps, we will view the results of the running application.
- Expand the “Taxi” project.
- Expand the “Resoures” folder.
- Expand the “data” folder
- Right-click on the “taximap.html” and click “Open with…>Web Browser”. This will open an external web browser and should display a map with markers. The markers represent the taxis that the application is tracking. The markers are updated every couple of seconds. When a taxi is occupied (has a fare), information about the fare is updated in the marker popup.
Modify the Existing Rule
- Open a new tab in your web browser and then open the Decision Center Enterprise console (http://localhost:9081/teamserver)
- Note: The URL for the Decision Center Enterprise console may be on a different port depending on how ODM was setup on your system)
- If you are prompted to login, the login credentials are: streamsadmin/passw0rd
- At the top, click the “Explore” tab

- On the left side, expand “Business Rules” if it is not already expanded, then click on

- On the right side, click on “baseChargeRule”
- Click “Edit” on the toolbar below the title

- On the left side, click on “Step 2: Content”
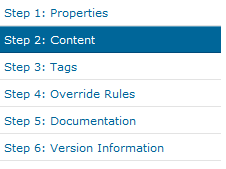
- On the right side, click on “175” and change this to “1.75”

- Click on “Finish”
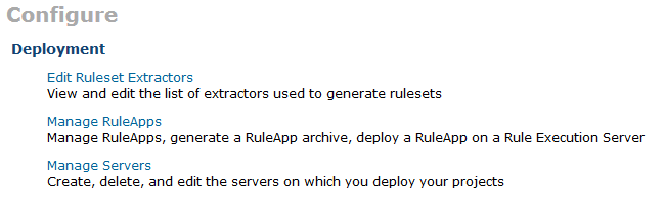
- At the top, click the “Configure” tab

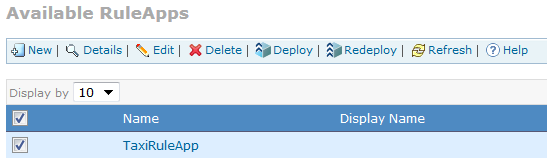
- Under “Deployment”, select “Manage RuleApps”
- Put a check next to “TaxiRuleApp”
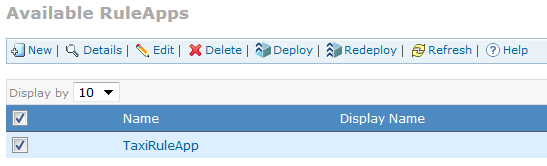
- Click “Deploy” on the toolbar
- Click “Next” through each of the options and then finally click “Deploy”
- Switch back to the map and notice that the fare prices are more reasonable
Exercise 3 – Add a new Business Rule (Optional)
In this exercise we will add a new rule to the Decision Center. In Exercise 2, we configured the ODMRulesetExecutor operator to detect changes to a ruleset while the application is running.
The rule we will be adding will check if a taxi is operating between a certain time. If it is, the meter drop charge will be set to a defined value.
Open a new workspace
- Shut down Streams Studio if it is already started
- Start Streams Studio again
- Select the following workspace to open: workspace_rules_answer2
Adding the Rule
- Open Decision Center Enterprise console (http://localhost:9081/teamserver)
- NOTE: The URL for the Decision Center Enterprise console may be on a different port depending on how ODM was setup on your system)
- At the top, click the “Explore” tab
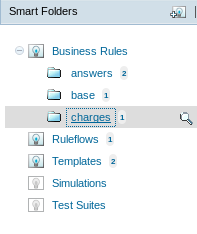
- On the left side, expand “Business Rules” if it is not already expanded, then click on “charges”
- On the right side, click “New” to add a new Rule

- On the left side, under “Start from a template”, ensure that the “rushHourChargesTemplate” is selected, then click “OK” on the right side
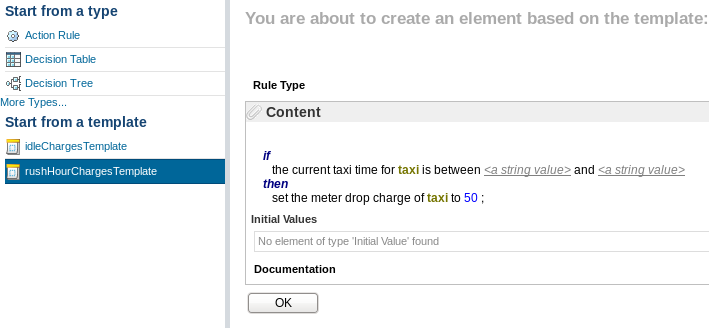
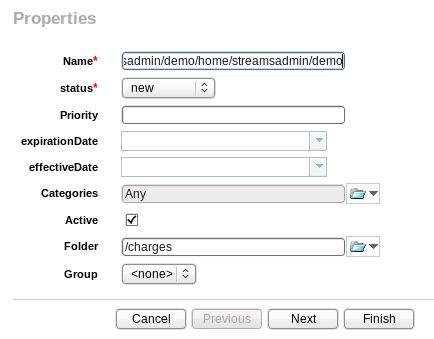
- Set the “Name” to “rushHourCharges”, then click “Next”
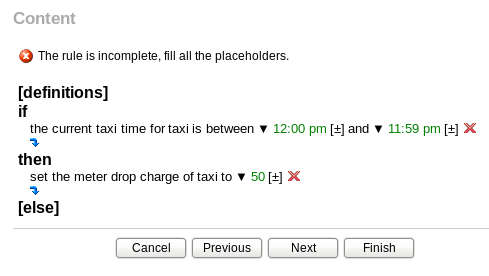
- Click on the first “<enter a string>” and set the value to “12:00 pm” (without the quotes, but keep the space before ‘pm’)
- click on the second “<enter a string>” and set the value to “11:59 pm” (without the quotes, but keep the space before ‘pm’)
- When complete, the rule should look as follows:
- Click on “Finish”
- At the top, click the “Configure” tab
- Under “Deployment”, select “Manage RuleApps”

- Put a check next to “TaxiRuleApp”
- Click “Deploy” on the toolbar
- Click “Next” through each of the options and then finally click “Deploy”
- Switch back to the map and you will eventually see that the cost of a trip is at least $50
Summary
This article demonstrated how the ODMRulesetExecutor operator can be used to apply rules on streaming data in order to analyze the data and automate decisions in real time.
Useful links
Rules toolkit documentationThis article was written by James Cancilla.#CloudPakforDataGroup