Tutorial
Developing full-stack mobile apps for Android
Building a run-tracking app with Android SDK and KotlinIn this tutorial, we are going to use Android SDK and the Kotlin language to build a simple run-tracking mobile app. This app should be able to track the user's running data, including run time, duration, distance, and location. To accomplish that, we will access the device GPS and use it to show the user’s location on Google Maps. Afterward, the data should be backed up in the cloud so that the user doesn't have to worry about losing their data. We’re going to use the IBM Cloudant NoSQL DB service to provide the backend for our app.
Now that we have an idea of what kind of application we are going to be building, let's start with the development process.
What you'll need to build your app
Creating a new Android project
As always, the first step when creating an Android app is to set up the development environment. Fortunately, it's easy to do using the Android SDK. You simply have to download Android Studio and install it on your system. Once the installation and the initialization are done, you will have all of the necessary tools to start your Android project.
The next step is to create a new Android project using Android Studio. In the dialog menu that pops up, don't forget to activate Kotlin support, because that's the language we're going to be using. We’re going with Kotlin instead of Java™ for our app because Kotlin requires much less code compared to Java, which results in faster code writing.
As for the API level, you should go with API level 15 because our app doesn't require advanced features that exist in the latest SDK.
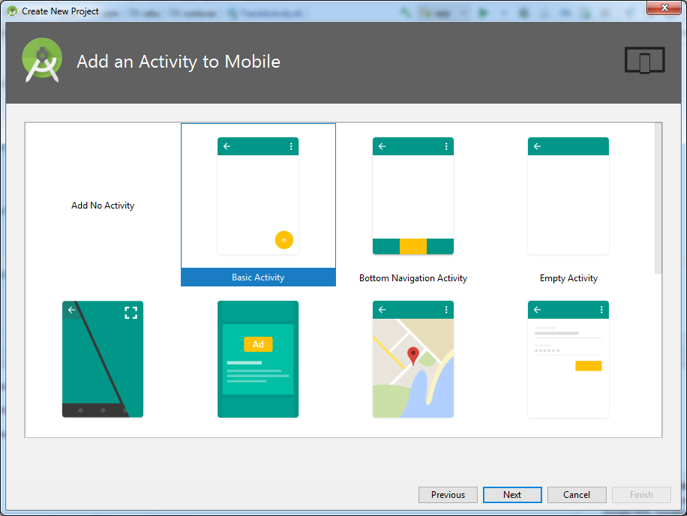
The last part in the project creation process is the main Activity of the app. For our run-tracking app, the main activity should show a list of all previous runs and a button to track a new run. So, with that in mind, let's name it HomeActivity and use Basic Activity as the template for our initial Activity (see Figure 1).
Figure 1. New Activity template dialog
And with that, we have a new Android project that is ready to be worked on.
All right, let’s talk about how our app will function. We have three separate Activities for our app:
- An Activity that shows a list of the user’s previous runs
- An Activity that tracks the user’s run data
- An Activity that shows the detailed data of each run
We will use the Activity we just created, HomeActivity, as the Activity that shows a list of runs. However, we don't have any run data to list yet, so let’s first create the Activity that will track the data.
Tracking run data
Create another Activity, and this time name it TrackActivity, with Empty Activity as the template. Now you should have two Activity files in our project folder, as you can see in Figure 2.
Figure 2. Activity files

Before you start working on TrackActivity, you need a way for the user to navigate to this second Activity. To do that, on the TrackActivity file, simply add the following code to the fab object click listener:
fab.setOnClickListener {
startActivity(Intent(this, TrackActivity::class.java))
}
Now, when the Floating Action Button (FAB) on HomeActivity is clicked, the app will open TrackActivity.
Tracking the run duration by creating a timer
Create another Activity, and this time name it TrackActivity, with Empty Activity as the template. Now you should have two Activity files in our project folder, as in Figure 2.
In the TrackActivity screen, there are two main things that we should track. The first is run duration and the second is the route of the run. Let’s start with tracking run duration.
To track run duration, add a button that the user can use to toggle the tracking process as well as a timer that counts how long the run is taking place. We can add the necessary interface component to res/layout/activity_track.xml with the XML lines in the following listing.
<TextView
   android:id="@+id/text_duration"
   android:layout_width="wrap_content"
   android:layout_height="wrap_content"
   android:layout_marginBottom="4dp"
   android:layout_marginLeft="16dp"
   android:layout_marginStart="16dp"
   android:text="00:00:000"
   android:textSize="36sp"
   android:textStyle="bold"
   app:layout_constraintBottom_toTopOf="@+id/button_track"
   app:layout_constraintStart_toStartOf="parent" />

<Button
   android:id="@+id/button_track"
   android:layout_width="0dp"
   android:layout_height="wrap_content"
   android:layout_marginBottom="16dp"
   android:layout_marginLeft="16dp"
   android:layout_marginRight="16dp"
   android:enabled="false"
   android:paddingBottom="20dp"
   android:paddingTop="20dp"
   android:text="Start"
   android:textSize="20sp"
   app:layout_constraintBottom_toBottomOf="parent"
   app:layout_constraintEnd_toEndOf="parent"
   app:layout_constraintStart_toStartOf="parent" />
If you run the app and open TrackActivity, it should show a user interface similar to Figure 3.
Figure 3. Timer user interface

Because our TrackActivity has a couple of user interface elements, let's access them so that we can configure our user interface further. Get the interface objects using the findViewById function, and then add a listener to the button to handle starting and stopping the timer. To accomplish that, add the code in the following listing to the TrackActivity class:
class TrackActivity : AppCompatActivity() {
   private var mTracking: Boolean = false

   override fun onCreate(savedInstanceState: Bundle?) {
       super.onCreate(savedInstanceState)
       setContentView(R.layout.activity_track)
       setSupportActionBar(toolbar)

       var buttonTrack: Button = findViewById(R.id.button_track)
       var textDuration: TextView = findViewById(R.id.text_duration)

       buttonTrack.setOnClickListener {
           if (mTracking) {
               //Stop tracking process
           } else {
               //Start tracking process
           }

           mTracking = !mTracking
       }
   }
}
Now that you have the text user interface element, implement the timer system on it. Implementing a timer in an Android app is a bit complicated because Android apps are usually functioning based on events instead of real-time. So, to get a working timer, we're going to have to rely on multithreading and use the Handler class, as can be seen in the following code listing:
var duration: Long = 0

var handler: Handler = Handler()

buttonTrack.setOnClickListener {
   if (mTracking) {
       handler.removeCallbacksAndMessages(null)
   } else {
       startTime = System.currentTimeMillis()

       handler.post(object: Runnable {
           override fun run() {
               duration = System.currentTimeMillis() - startTime
               var formatter = SimpleDateFormat("mm:ss:SSS")
               textDuration.text = formatter.format(Date(duration))

               handler.postDelayed(this, 20)
           }
       })
   }
}
So, how does our timer system work? Before starting the Handler loop, it first records the system's current millisecond with the System.currentTimeMillis function. Then, inside the Handler loop, it simply counts the current time difference to get tracking duration and update the text. After that, we call the same Handler function again with a delay of 20 milliseconds. And lastly, don't forget to stop the handler with the removeCallbacksAndMessages function when user stops the tracking.
Displaying a map to use to track the user's position
With the time part of the tracking covered, we'll move on to the positional part. For positional tracking, there are two interface components that we need to add: a Google Maps component (which class is called MapView in the codes) and a distance counter. To do that, add the following lines to the activity_track.xml file:
<TextView
   android:id="@+id/text_distance"
   android:layout_width="wrap_content"
   android:layout_height="wrap_content"
   android:layout_marginBottom="4dp"
   android:layout_marginEnd="16dp"
   android:layout_marginRight="16dp"
   android:text="0.00 m"
   android:textSize="36sp"
   android:textStyle="bold"
   app:layout_constraintBottom_toTopOf="@+id/button_track"
   app:layout_constraintEnd_toEndOf="parent" />

<com.google.android.gms.maps.MapView
   android:id="@+id/map"
   android:layout_width="0dp"
   android:layout_height="0dp"
   android:layout_marginBottom="8dp"
   android:layout_marginEnd="16dp"
   android:layout_marginLeft="16dp"
   android:layout_marginRight="16dp"
   android:layout_marginStart="16dp"
   android:layout_marginTop="16dp"
   app:layout_constraintBottom_toTopOf="@+id/text_duration"
   app:layout_constraintEnd_toEndOf="parent"
   app:layout_constraintStart_toStartOf="parent"
   app:layout_constraintTop_toTopOf="parent" />
After adding MapView and a distance counter to TrackActivity, the Activity should look like Figure 4.
Figure 4. MapView on TrackActivity

MapView isn't included by default with the Android SDK, but fortunately Android Studio automatically downloads the required library and adds the correct dependencies to the project. However, to use MapView further, we will have to register a Google Map API key. To do that, take the Google Map API we created earlier and register it on app/manifests/AndroidManifest.xml by inserting the following lines below the <application> tag:
<meta-data
   android:name="com.google.android.geo.API_KEY"
   android:value="INSERT API KEY HERE" />
To properly use the MapView and to be able to track the user's position, we have to ask permission from the user. There are two parts in this process; the first one is simply to add the required permission to the app manifest, which we can do by adding the following lines:
<uses-permission android:name="android.permission.INTERNET" />
<uses-permission android:name="android.permission.ACCESS_NETWORK_STATE" />
<uses-permission android:name="android.permission.ACCESS_FINE_LOCATION" />
<uses-permission android:name="android.permission.ACCESS_COARSE_LOCATION" />
The other part is to actively request the user for permission when the app is running. In this app, the best place to ask for permission is right before the user enters TrackActivity. So, let's get back to HomeActivity for a moment and modify the FAB click listener to include permission checking, as can be seen in the following listing.
var permission = Manifest.permission.ACCESS_FINE_LOCATION
var granted = PackageManager.PERMISSION_GRANTED

if (ActivityCompat.checkSelfPermission(this, permission) == granted) {
   startActivity(Intent(this, TrackActivity::class.java))
} else {
   ActivityCompat.requestPermissions(this, arrayOf(permission), 1)
}
Now, whenever we try to open TrackActivity in our app, it will ask the user for location permission if it hasn’t been given before (see Figure 5). This way, we won’t encounter any permission issue inside TrackActivity.
Figure 5. Request location permission dialog

With the permission part taken care of, we should put our focus back on the MapView. Unlike other user interface elements, integrating MapView to our Activity requires some additional work. For MapView to work correctly, we have to handle its lifecycle alongside the Activity’s lifecycle. To do that, we need to override the lifecycle functions like onStart, onStop, and so on on TrackActivity, and then call the corresponding functions from MapView, as the following listing shows:
override fun onStart() {
   super.onStart()
   findViewById<MapView>(R.id.map).onStart()
}

override fun onResume() {
   super.onResume()
   findViewById<MapView>(R.id.map).onResume()
}

override fun onPause() {
   findViewById<MapView>(R.id.map).onPause()
   super.onPause()
}

override fun onStop() {
   super.onStop()
   findViewById<MapView>(R.id.map).onStop()
}

override fun onDestroy() {
   findViewById<MapView>(R.id.map).onDestroy()
   super.onDestroy()
}

override fun onSaveInstanceState(outState: Bundle) {
   super.onSaveInstanceState(outState)
   findViewById<MapView>(R.id.map).onSaveInstanceState(outState)
}

override fun onLowMemory() {
   super.onLowMemory()
   findViewById<MapView>(R.id.map).onLowMemory()
}
Afterward, you should initialize the MapView and configure it further after the initialization is finished. For this app, we want the user to not be able to interact with the MapView, so we will disable various control options on it. All of that can be done by adding the code in following listing to the TrackActivity class:
var mapView: MapView = findViewById(R.id.map)

var map: GoogleMap? = null

mapView.onCreate(savedInstanceState)
mapView.getMapAsync(object : OnMapReadyCallback {
   override fun onMapReady(googleMap: GoogleMap?) {
       map = googleMap;

       if (map != null) {
           map!!.setMinZoomPreference(16f)
           map!!.isMyLocationEnabled = true
           map!!.uiSettings.isZoomControlsEnabled = false
           map!!.uiSettings.isScrollGesturesEnabled = false
           map!!.uiSettings.isMyLocationButtonEnabled = false
       }
   }

})
Updating the map by tracking the user's position
With the MapView implemented, we can move on to tracking the user's position, or the route of the run. We can get the user's continuous position by using the FusedLocationProviderClient API and by calling the requestLocationUpdates function. Before calling that function, we should configure what kind of location data that our app needs and how often we want it. We can do that by instantiating a RequestLocation object and then specifying the interval and priority parameter.
Then, after we get the position data, we should update the MapView position with map.moveCamera() function. We should also save the latest position data and compare it to the previous data using Location.distanceBetween function so that we can calculate how far has the user moved since the last position update.
And of course, we should stop the continuous location request by calling the removeLocationUpdates function when the user switches off the tracking process. We can implement all of these functionalities with the following lines of code:
var textDistance: TextView = findViewById(R.id.text_distance)

var duration: Long = 0
var startCoordinate: LatLng? = null
var finishCoordinate: LatLng? = null

var locationListener: LocationCallback = object : LocationCallback(){
   override fun onLocationResult(result: LocationResult?) {
       if (result != null) {
           var previousCoordinate: LatLng? = finishCoordinate

           var lastLoc = result.lastLocation
           finishCoordinate = LatLng(lastLoc.latitude, lastLoc.longitude)

           if (startCoordinate == null) {
               startCoordinate = finishCoordinate;
           }

           if (map != null) {
               map!!.moveCamera(CameraUpdateFactory.newLatLng(finishCoordinate))
           }

           if (previousCoordinate != null) {
               var results: FloatArray = floatArrayOf(0.0f)
               Location.distanceBetween(
                       previousCoordinate.latitude,
                       previousCoordinate.longitude,
                       finishCoordinate!!.latitude,
                       finishCoordinate!!.longitude,
                       results)

               distance += results[0]
               textDistance.text = String.format("%.2f m", distance)
           }
       }
   }
}

buttonTrack.setOnClickListener {
   if (mTracking) {
       var locationProvider = LocationServices.getFusedLocationProviderClient(this)
       locationProvider.removeLocationUpdates(locationListener)
   } else {
       distance = 0f
       startCoordinate = null
       finishCoordinate = null

       var request: LocationRequest = LocationRequest().apply {
           priority = LocationRequest.PRIORITY_HIGH_ACCURACY
           fastestInterval = 1000
           interval = 10000
       }

       var builder = LocationSettingsRequest.Builder()
       builder.addLocationRequest(request)
       LocationServices.getSettingsClient(this).checkLocationSettings(builder.build())

       var provider = LocationServices.getFusedLocationProviderClient(this)
       provider.requestLocationUpdates(request, locationListener, Looper.myLooper())
   }
}
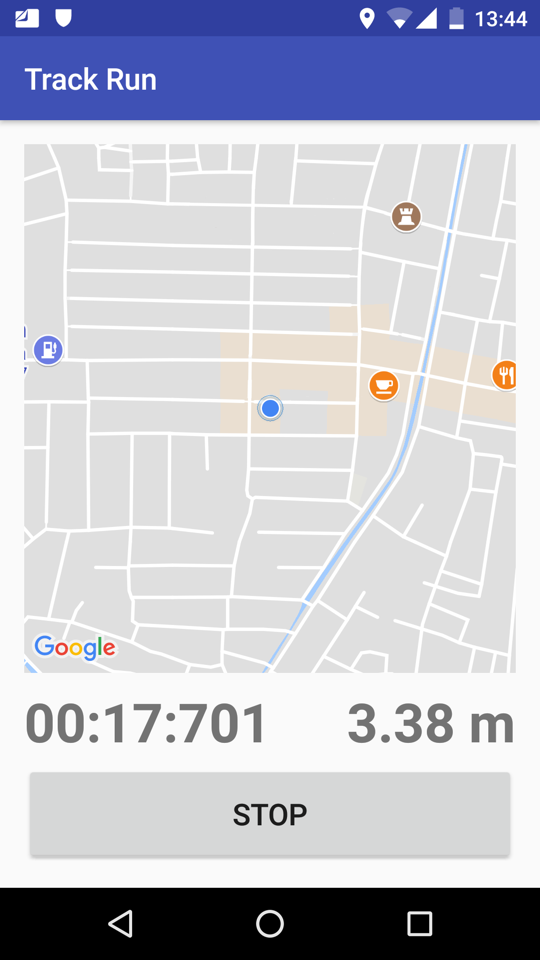
And that's it for the run tracking functionality. If you run the app and try to track a run, it should display a screen similar to the one in Figure 6.
Figure 6. TrackActivity tracking a run
Displaying run data
Now that our app can capture the data of a run, it should also be able to display it again, so let's implement data display functionality for our app. To do that, we should create our third Activity that we can use to show the details of a run.
Before we create this Activity, let's first create a class that holds the data of a run and is capable of exporting and importing a HashMap of said data. The latter point is important, because we're going to move the data around between activities and between client-server as a HashMap. We'll call this class RunData, and the full implementation of that class can be in the RunData.kt file in my runlover Github repo that contains all of the code for this project.
Create another activity called DetailActivity that uses Empty Activity as the template. Users should be able to navigate to this Activity by clicking on a save button in TrackActivity after they finish tracking their run. To achieve that, insert the following code to the button click listener so that it opens DetailActivity and sends along the recorded run data:
var buttonSave: Button = findViewById(R.id.button_save)

buttonSave.setOnClickListener {
   var data: HashMap<String, Any> = RunData.CreateMap(
         startTime, duration, distance, startCoordinate, finishCoordinate)

   var detailIntent: Intent = Intent(this, DetailActivity::class.java)
   detailIntent.putExtra(DetailActivity.EXTRA_DATA, data)

   finish()
   startActivity(detailIntent)
}
In DetailActivity, you should use the data that was sent from TrackActivity and display it on the screen. To accomplish that, the first step is to retrieve the data and construct a RunData object from it, which can be done by adding the following code to DetailActivity:
class DetailActivity : AppCompatActivity() {
   companion object {
       const val EXTRA_DATA = "data"
   }

   private lateinit var mData: RunData

   override fun onCreate(savedInstanceState: Bundle?) {
       super.onCreate(savedInstanceState)
       setContentView(R.layout.activity_detail)
       setSupportActionBar(toolbar)

       var extra = intent.getSerializableExtra(EXTRA_DATA) as Map<String, Any>
       mData = RunData(extra)
   }
}
Before you can display the data, you need to add a few interface components on the Activity. The layout for DetailActivity is similar to TrackActivity, with a MapView and a couple of text views to display the data of a run. You can use the XML codes in my activity_detail.xml file to set up the necessary interface to DetailActivity.
Now that you have the user interface for DetailActivity, you can add the following code to DetailActivity and make it show the correct data:
var textDate: TextView = findViewById(R.id.text_date)
var textDuration: TextView = findViewById(R.id.text_duration)
var textDistance: TextView = findViewById(R.id.text_distance)

var dateFormatter = SimpleDateFormat("dd/MM/yyyy")
var timeFormatter = SimpleDateFormat("mm:ss:SSS")
var durationString = timeFormatter.format(Date(mData.getDurationInMillis()))

textDate.text = dateFormatter.format(Date(mData.getDateInMillis()))
textDistance.text = String.format("Distance: %.2f m", mData.getDistance())
textDuration.text = "Duration: $durationString"
If you run the app and save the run data, the app should look similar to Figure 7.
Figure 7. DetailActivity showing run detail

And with that, we've finished implementing the data display functionality of the app.
Connecting to the cloud
The app shouldn’t only capture and display the user’s run data, it should also store it to the cloud. To add this functionality, first you need to set up the backend server that will store this data.
Instead of creating your own backend system, we'll use the IBM Cloudant NoSQL DB service as the backend for our app. By using this service, you don't have to worry about provisioning or configuring the remote server, and you can fully focus on building the mobile app.
Setting up the Cloudant NoSQL DB service
Setting up the Cloudant NoSQL DB service is simple. First, log in to your IBM Cloud account and use it to create an instance of the Cloudant NoSQL DB service from here. Then, after the service is created, launch the service dashboard and access the Databases menu on the left. You need at least one database here, so create a new one using the Create Database button at the top, and remember the name of this new database.
Figure 8. Cloudant NoSQL DB service dashboard

That's it for setting up the service. The backend is ready to retrieve and store data. That said, don't close the dashboard just yet, because we're going to need it again very soon.
Adding Cloudant Sync to our Android project
With our remote database ready, we need a way to access it from the mobile app. Fortunately, Cloudant provides an Android library called Cloudant Sync that provides that access. To add Cloudant Sync library to our project, open up build.gradle(Project) and insert the following lines:
allprojects {
   repositories {
       mavenLocal()
       mavenCentral()
   }
}
Insert the following lines to build.gradle(App):
dependencies {
   implementation 'com.cloudant:cloudant-sync-datastore-android:latest.release'
}
The Cloudant Sync library has two major functionalities that we are using in our project. The first one is the DocumentStore API that handles storing and retrieving the data locally on the device, which allows our app to operate even when offline. The other one is the Replicator API that handles replicating or syncing local and remote data. Using these two functionalities correctly is key in connecting our app with the backend.
To connect our mobile app with our Cloudant NoSQL DB service, we have to provide the library with the proper URL. You can get this URL from the IBM Cloud dashboard we opened earlier. Go to the Service credentials menu on the left, and open the single credential entry in the list; the URL address that we need should be written there.
Sending data to the backend
We have everything we need to connect to the backend, so it's time to implement the cloud functionality in our app. In the save button, click listener on TrackActivity, add the following code to save the run data locally, and then upload it to the remote database.
buttonSave.setOnClickListener {
   var data: HashMap<String, Any> = RunData.CreateMap(
         startTime, duration, distance, startCoordinate, finishCoordinate)

   var document: DocumentRevision = DocumentRevision()
   document.body = DocumentBodyFactory.create(data)

   var directory = getDir("DocumentStore", Context.MODE_PRIVATE)
   var store: DocumentStore = DocumentStore.getInstance(directory)
   store.database().create(document)

   var databaseURI: URI = URI("$BACKEND_URL/$DATABASE_NAME")
   var uploader = ReplicatorBuilder.push().from(store).to(databaseURI).build()
   uploader.start()
}
We can store run data on the backend by first creating a DocumentRevision object containing the run data. We then store this object on a local file by calling the database.create function of the DocumentStore API. Afterward, sync it to the remote database by calling the push function of the Replicator API. That’s all you need to do to send data to the backend.
Retrieving data from the backend
Our app is now capable of storing data in the cloud, but why do that if we're not going to retrieve the data again? That's exactly what we're going to work on next. Let's go back to the first Activity we created, HomeActivity, and have it display a list of all runs the user has done.
Before we can display that list, we first need to retrieve all the data. Add the following code to HomeActivity to read all the run data that was saved locally by calling database.read function of the DocumentStore API:
class HomeActivity : AppCompatActivity() {
   private var mStore: DocumentStore? = null

   private var mHistory: ArrayList<RunData> = ArrayList<RunData>()

   override fun onCreate(savedInstanceState: Bundle?) {
       super.onCreate(savedInstanceState)
       setContentView(R.layout.activity_home)
       setSupportActionBar(toolbar)

       var directory = getDir("DocumentStore", Context.MODE_PRIVATE)
       mStore = DocumentStore.getInstance(directory)
   }

   override fun onStart() {
       super.onStart()

       readHistoryData()
   }

   private fun readHistoryData() {
       if (mStore != null) {
           var database = mStore!!.database();

           if (mHistory.count() != database.documentCount) {
               mHistory.clear()

               var documentList = database.read(0, database.documentCount, true)
               for (document in documentList) {
                   mHistory.add(RunData(document.body.asMap()))
               }
           }
       }
   }
}
We also need to check our remote database and download any new run data stored there. To accomplish that, simply call the pull function of the Replicator API and create listener functions to detect when the download is finished, as shown in the following listing:
override fun onCreate(savedInstanceState: Bundle?) {
   //Other initialization here

   var databaseURI: URI = URI("$BACKEND_URL/$DATABASE_NAME")
   mDownloader = ReplicatorBuilder.pull().from(databaseURI).to(mStore).build()
   mDownloader!!.eventBus.register(this)
   mDownloader!!.start()
}

@Subscribe
public fun onComplete(event: ReplicationCompleted) {
   mDownloader!!.eventBus.unregister(this)
   mDownloader = null

   readHistoryData()
}

@Subscribe
public fun onError(event: ReplicationErrored) {
   mDownloader!!.eventBus.unregister(this)
   mDownloader = null
}
Displaying a list of run data
Right now, we have a working TrackActivity that tracks the user’s run data and a working DetailActivity that shows a user’s run data. All that’s left is an Activity that shows all the previous runs that the app has tracked. So, let’s get back to HomeActivity and make it show a list of run data.
Preparing the user interface
We need a user interface on HomeActivity to display all of the data we have captured. To accomplish that, insert a RecyclerView to the Activity by adding the following lines to res/layout/content_home.xml:
<android.support.v7.widget.RecyclerView
   android:id="@+id/recycler_history"
   android:layout_width="match_parent"
   android:layout_height="match_parent"
   tools:listitem="@layout/view_history"/>
RecyclerView is essentially an interface component to display multiple items in list, grid, or other formats. To define how each item in the list would look, we have to create a separate layout file for those items. Use this XML file, and put it on the layout folder so that you can later use it for the data list.
Handling and displaying a list
Just like how a RecyclerView has two separate layout information, displaying data on it also requires two separate classes. One of these classes is RecyclerView.Adapter, which handles the full list of items to be displayed. The other one is RecyclerView.ViewHolder, which should handle how each item would be presented.
Let's start by creating a new class called HistoryAdapter that inherits from RecyclerView.Adapter. Then in this class, create an internal class called HistoryViewHolder that inherits from RecyclerView.ViewHolder. In HistoryViewHolder, query each item interface component so that it can display the corresponding data later, as shown in the following listing:
class HistoryAdapter(): RecyclerView.Adapter<HistoryAdapter.HistoryViewHolder>() {

   class HistoryViewHolder constructor(view: View) : RecyclerView.ViewHolder(view) {
       public var textDate: TextView
       public var textDuration: TextView
       public var textDistance: TextView

       init {
           textDate = view.findViewById(R.id.text_date)
           textDuration = view.findViewById(R.id.text_duration)
           textDistance = view.findViewById(R.id.text_distance)
       }
   }
}
With ViewHolder ready, you can now work on the rest of the HistoryAdapter class. Add the following code to override several functions in the class so that it returns the correct result:
class HistoryAdapter(private var mHistory: List<RunData>):
       RecyclerView.Adapter<HistoryAdapter.HistoryViewHolder>() {

   override fun onCreateViewHolder(parent: ViewGroup, vType: Int): HistoryViewHolder {
       var inflater: LayoutInflater = LayoutInflater.from(parent.context)
       var view: View = inflater.inflate(R.layout.view_history, parent, false)

       return HistoryViewHolder(view)
   }

   override fun onBindViewHolder(holder: HistoryViewHolder, position: Int) {
       var distance = mHistory[position].getDistance()
       var duration = Date(mHistory[position].getDurationInMillis())
       var date = Date(mHistory[position].getDateInMillis())

       holder.textDistance.text = String.format("%.2f m", distance)
       holder.textDuration.text = SimpleDateFormat("mm:ss:SSS").format(duration)
       holder.textDate.text = SimpleDateFormat("dd/MM/yyyy").format(date)
   }

   override fun getItemCount(): Int {
       return mHistory.count()
   }
}
With the HistoryAdapter class and the HistoryViewHolder class ready, our RecyclerView should be able to properly show data. To have it show all the run data we have tracked, we must provide it with that data. Insert the following lines of code to HomeActivity to access RecyclerView and update it with the user's run data:
override fun onCreate(savedInstanceState: Bundle?) {
   var orientation = DividerItemDecoration.VERTICAL
   var recycler: RecyclerView = findViewById(R.id.recycler_history)
   recycler.addItemDecoration(DividerItemDecoration(this, orientation))
   recycler.setHasFixedSize(true)

   recycler.layoutManager = LinearLayoutManager(this)
   recycler.adapter = HistoryAdapter(mHistory)
}

private fun readHistoryData() {
   //Reading new data

   var recycler: RecyclerView = findViewById(R.id.recycler_history)
   recycler.adapter.notifyDataSetChanged()
   recycler.recycledViewPool.clear()
   recycler.invalidate()
}
And with that, our app should properly display a list of the user's run data on HomeActivity, as can be seen in Figure 9.
Figure 9. HomeActivity showing a list of runs

Creating a clickable list
With the list ready, there is one last thing that we have to do. We should provide the user with a way to navigate to DetailActivity when they click on an item in the run data list. To achieve that, first add a click listener to the HistoryViewHolder by using the code in the following listing:
class HistoryAdapter(private var mHistory: List<RunData>,
                    private var mListener: OnItemClickListener):
       RecyclerView.Adapter<HistoryAdapter.HistoryViewHolder>() {

   interface OnItemClickListener {
       fun onItemClick(data: RunData)
   }

   class HistoryViewHolder constructor(view: View) : RecyclerView.ViewHolder(view) {

       public fun setOnClickListener(listener: OnItemClickListener, data: RunData) {
           itemView.setOnClickListener {
               listener.onItemClick(data)
           }
       }
   }

   override fun onBindViewHolder(holder: HistoryViewHolder, position: Int) {
       //Displaying data on TextView

       holder.setOnClickListener(mListener, mHistory[position])
   }
}
Then, we add the activity navigation functionality when we're constructing the HistoryAdapter on HomeActivity with these lines:
var clickListener = object : HistoryAdapter.OnItemClickListener{
   override fun onItemClick(data: RunData) {
       var dataMap = RunData.CreateMap(
               data.getDateInMillis(),
               data.getDurationInMillis(),
               data.getDistance(),
               data.getStartCoordinate(),
               data.getFinishCoordinate())

       var detailIntent = Intent(applicationContext, DetailActivity::class.java)
       detailIntent.putExtra(DetailActivity.EXTRA_DATA, dataMap)

       startActivity(detailIntent)
   }
}

recycler.adapter = HistoryAdapter(mHistory, clickListener)
If you run the app, you should be able to quickly access the detail of each run by tapping the item on the list.
Build and run the app
We’ve implemented all of the required functionalities, so all that’s left to do is to build the app with the Build > Build APK(s) menu.
That’s it. You now have a fully functioning mobile app that can track user's run data and store it in the cloud.
There are some minor details like displaying position marker on the map that aren’t included here, but you can check out the full project in my GitHub repo for yourself.
Summary and next steps
Now that you know how to build an Android application from scratch, there are many options that you can try next. You can build a new app that interests you, or you can learn further by adding even more features to this app. It could be as simple as adding a delete run feature, or it could be as complex as adding an authorization system.
Good luck!