Tutorial
Set up a highly available Elasticsearch cluster on Kubernetes, spanned over multiple zones
If one of the zones go down, the cluster is still availableElasticsearch is a is a popular open source search and analytics engine that is distributed in nature. The shard and replica management features of Elasticsearch make it robust and scalable. If you deploy Elasticsearch on Kubernetes instead of traditional virtual or physical machines, it is super easy to install, configure, and manage.
When it comes to enterprise-level deployment, you need to have a highly available Elasticsearch cluster spanned over multiple zones so if one of the zones go down, the cluster is still available. In this tutorial, you learn how to set up such a cluster.
In almost all types of cloud environments, you can have a Kubernetes cluster in a region that spans over multiple zones, which are typically data centers in close proximity. You want to have the application available even when few nodes in a zone - or an entire zone - becomes unavailable.
A typical production-level Elasticsearch cluster on Kubernetes consists of master pods, data pods, and ingest pods. The visualization component is A Kibana pod. Master pods control the Elasticsearch cluster including creating or deleting indexes, tracking members of the cluster, and allocating shards to different data pods. Elasticsearch requires a stable master node for its operation. Data pods hold the data and perform CRUD operations, search, and aggregations. Ingest nodes help with transformation and enrichment of data before it is stored in the index as documents. The data pod and master pod require persistent storage, so they are deployed in Kubernetes as StatefulSets. The Kibana and ingest pods do not require persistent storage and are deployed as Kubernetes deployment controllers.
An important requirement for Elasticsearch is to have local, solid-state drives (SSDs) for storage for best performance. In this tutorial you use local SSDs for Elasticsearch, and your example solution both achieves high availability and tolerates a single zone failure.
Prerequisites
Before you walk through this tutorial, make sure you have the following environment:
- A Kubernetes cluster spanned over three zones. If you are using IBM Cloud, creating a multizone cluster is simple with the Kubernetes service.
- A minimum of two worker nodes per zone, recommended is three worker nodes per zone.
- The worker nodes in the cluster that contain local solid state disks.
Estimated time
This tutorial takes about 30 minutes to complete.
An architecture overview
The following illustration shows the architecture of this solution. There are three zones, and you want to have at least one master pod available in each zone. Similarly, the data pods a minimum of one per zone. When you need to add more data pods, add a multiple of three (with one going to each zone).
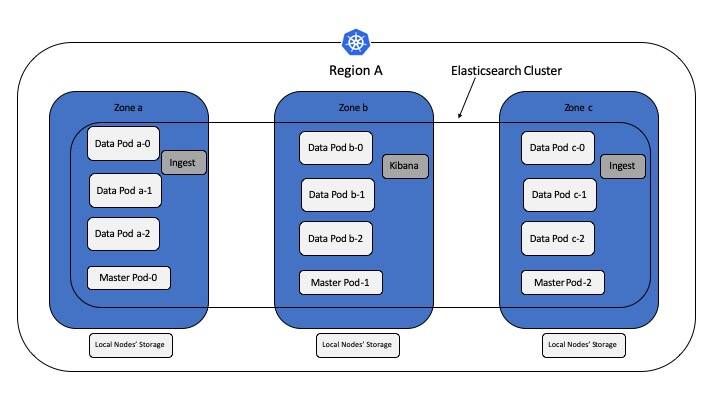
Elasticsearch has the ability to take your physical hardware configuration into account when allocating shards. If Elasticsearch knows which pods are in the same zone, it can distribute the primary shard and its replica shards to pods across zones. This distribution minimizes the risk of losing all shard copies in the event of a zone failure. You use this feature to identify respective zones for each of the data pods. Set up this way, the shards are allocated so that all the shards in a zone. Theirprimary or replica shards are available in the other two zones, a configuration that allows you to sustain one zone failure.
Examine the code available in Github. There is one StatefulSet to deploy three master pods. Then there are three other StatefulSets to deploy data pods. The difference between these three StatefulSets is in node affinity, which you deploy to nodes labeled by zone using nodeAffinity spec. Also, the zone attribute is defined in the container's node.attr.zone environment variable with values set to a or b or c in each data pod StatefulSet.
The es-config ConfigMap applies to all the data and ingest pods, while es-master-config ConfigMap applies to the Master pods. The cluster name in all these configurations is set to sandbox-es, which makes up one ElasticSearch cluster using pods from different StatefulSets and deployments.
Steps
Imagine a scenario where you have nine node cluster with three nodes in each zone. In the following steps, you set up an Elasticsearch cluster with two data pods in each zone and one master pod is each zone. Therefore, if one or more nodes in a zone become unavailable, your Elasticsearch cluster operations are unaffected.
You need a local-path storage provisioner to provision PersistentVolume on the nodes. Install the local-path storage provisioner:
kubectl apply -f https://raw.githubusercontent.com/rancher/local-path-provisioner/master/deploy/local-path-Label nodes to indicate which zone they are present in. You have three zones (a, b, c) and nine nodes (named r1, r2, r3, d1, d2, d3, r4, r5, r6) with three nodes in each zone:
 kubectl label node r1 r2 r3 zone=a
 kubectl label node d1 d2 d3 zone=b
 kubectl label node r4 r5 r6 zone=c
Note: When deploying in Cloud, you have the option to choose default labeling for zones, for example:
 failure-domain.beta.kubernetes.io/zone=dal12
 failure-domain.beta.kubernetes.io/region=us-south
 ibm-cloud.kubernetes.io/zone: dal12
 ibm-cloud.kubernetes.io/region=us-south
In Kubernetes 1.17 and more recent versions, with IBM Cloud, you can use the topology labels. If you decide to use any of these labels, make sure that you modify the yaml files to use these labels. In the example in the next step, you continue to use the custom label
zone=aorborc.Label the nodes to indicate which role they support, for example, Elastic data, or master:
 kubectl label node r1 r2 d1 d2 r4 r5 es-data=yes
 kubectl label node r3 d3 r6 es-master=yes
This way you have six data nodes and three master nodes so that one master node is available in each zone, and two data nodes are available in each zone. Since Elastic ingest nodes and Kibana do not use persistence storage, you leave them free to roam around on any nodes.
Look into
.yamlfiles for any customizations needed (for examplekibana.yamlfor service configuration).Clone the Git repo, create a namespace, and deploy:
 git clone https://github.com/ideagw/elasticsearch-k8s.git
 kubectl create ns es
 kubectl -n es apply -f ./multizone/
Review the list of pods:
 kubectl -n es get pods -o wide
 NAME                       READY   STATUS    RESTARTS   AGE   IP             NODE
 es-data-a-0                1/1     Running   0          25m   10.244.1.35    r1.sl.cloud9.ibm.com
 es-data-a-1                1/1     Running   0          25m   10.244.2.43    r2.sl.cloud9.ibm.com
 es-data-b-0                1/1     Running   0          25m   10.244.6.159   d1.sl.cloud9.ibm.com
 es-data-b-1                1/1     Running   0          25m   10.244.7.240   d2.sl.cloud9.ibm.com
 es-data-c-0                1/1     Running   0          25m   10.244.4.196   r4.sl.cloud9.ibm.com
 es-data-c-1                1/1     Running   0          25m   10.244.5.210   r5.sl.cloud9.ibm.com
 es-ingest-dbc9ddc8-8sqqc   1/1     Running   0          25m   10.244.3.143   r3.sl.cloud9.ibm.com
 es-ingest-dbc9ddc8-qf5f9   1/1     Running   0          25m   10.244.5.206   r6.sl.cloud9.ibm.com
 es-master-0                1/1     Running   0          25m   10.244.5.208   r6.sl.cloud9.ibm.com
 es-master-1                1/1     Running   0          25m   10.244.3.145   r3.sl.cloud9.ibm.com
 es-master-2                1/1     Running   0          25m   10.244.8.77    d3.sl.cloud9.ibm.com
 kibana-5fdfbcbc97-8wvsv    1/1     Running   0          25m   10.244.6.160   d1.sl.cloud9.ibm.com
As you can see, each zone has its own set of two
datapods each. There are twoingestpods, threemasterpods, with one in each zone and onekibanapod. It takes a few minutes for Elasticsearch to form the cluster, which you can confirm by looking at the logs ofdataormasterpods. To interact with Elasticsearch, use its REST APIs. Involke the REST APIs usingcurl, or you can use theDevToolsfeature of Kibana. The following steps use thecurlcommand.To invoke REST APIs, you need the IP address of the Elasticsearch cluster. Check the
elasticsearchservice IP address:kubectl -n es get service elasticsearch NAME TYPE CLUSTER-IP EXTERNAL-IP PORT(S) AGE elasticsearch ClusterIP 10.102.46.55 <none> 9200/TCP 25mAs you can see, there is no external IP exposed, which means you must run the
curlcommands from the Kubernetes master node. If you are using IBM Cloud, use the web terminal so that you have access to the internal pod network.Now you are ready to check the health of the cluster:
curl "http://10.102.46.55:9200/_cluster/health?pretty"In the JSON response, look for the field
status. If its value isgreen, the cluster is all ready to play with.Create an index named
twitterwith three shards and one replica each:curl -X PUT "http://10.102.46.55:9200/twitter?pretty" -H 'Content-Type: application/json' -d' { "settings" : { "index" : { "number_of_shards" : 3, "number_of_replicas" : 1 } } } 'The result is like the following example:
 {
 "acknowledged" : true,
     "shards_acknowledged" : true,
     "index" : "twitter"
 }
Verify that for each shard, the primary and replica allocation are in different zones:
 curl http://10.102.46.55:9200/_cat/shards/twitter?pretty=true

 twitter 2 p STARTED 0 230b 10.244.7.242 es-data-b-1
 twitter 2 r STARTED 0 230b 10.244.4.197 es-data-c-0
 twitter 1 p STARTED 0 230b 10.244.1.36  es-data-a-0
 twitter 1 r STARTED 0 230b 10.244.5.212 es-data-c-1
 twitter 0 p STARTED 0 230b 10.244.2.44  es-data-a-1
 twitter 0 r STARTED 0 230b 10.244.6.161 es-data-b-0
Insert some data into the
twitterindex:curl -X POST "http://10.102.46.55:9200/twitter/_doc/" -H 'Content-Type: application/json' -d' { "user" : "elasticuser", "post_date" : "2019-11-15T14:12:12", "message" : "trying out Elasticsearch" } 'The response is like the following example:
{
  "_index" : "twitter",
  "_type" : "_doc",
  "_id" : "352akW8B4tm0-AjGic8M",
  "_version" : 1,
  "result" : "created",
  "_shards" : {
    "total" : 2,
    "successful" : 2,
    "failed" : 0
  },
  "_seq_no" : 0,
  "_primary_term" : 1
}
Simulate the zone failure by bringing down the pods. An easy way to do bring down the pods is just to scale down
statefulsetsso that zonecmaster and data pods go away:kubectl -n es scale sts es-master --replicas=2 kubectl -n es scale sts es-data-c --replicas=0This step removes the
es-master-2pod and the two data pods from zonec.Now check the shards:
curl http://10.102.46.55:9200/_cat/shards/twitter?pretty=true
twitter 1 p STARTED    0 283b 10.244.1.36  es-data-a-0
twitter 1 r UNASSIGNED
twitter 2 p STARTED    0 283b 10.244.7.242 es-data-b-1
twitter 2 r UNASSIGNED
twitter 0 p STARTED    0 283b 10.244.2.44  es-data-a-1
twitter 0 r STARTED    0 283b 10.244.6.161 es-data-b-0
As you can see,
shards 1(replica)and2(replica)become unassigned. However if there is any data in these shards, it is still be available when you do search. Similarly, you can still insert data in the cluster. The ability to call this API proves that the cluster is still accessible.Do a search to make sure you can still see the data:
curl http://10.102.46.55:9200/twitter/_search?q=user:elastic*The result looks like the following example:
{
        "user" : "elasticuser",
        "post_date" : "2019-11-15T14:12:12",
        "message" : "trying out Elasticsearch"
}
The search still works and you got your result. You can insert more records and test it out further.
Summary
As you can see from the shard allocation that you walked through in the previous steps, shard 0 is in zones a and b, shard 1 is in zones a and c, and shard 2 is in zones b and c. If zone a goes down, shard 0 (primary) and shard 1 (primary) are unavailable, but their replica shards are available in zones b and c respectively. Similarly, if any other zones go down, either the primary or replica shard of that zone is available in the other two zones. You saw this behavior in the previous zone c.
Therefore, you achieve high availability of the Elasticsearch cluster from within a region. If you have to plan for high availability across regions, then Elasticsearch's cross-cluster replication feature is useful. Now you have the knowledge to set up similar multiple zone Elasticsearch clusters in another region and set up cross-cluster replication between the two Elasticsearch clusters. This approach also gives you protection from region failure.