Tutorial
Set up internal vault with Agent Injector on OpenShift
Enable authentication with KubernetesArchive date: 2025-07-08
This content is no longer being updated or maintained. The content is provided “as is.” Given the rapid evolution of technology, some content, steps, or illustrations may have changed.Introduction
Deploy a Vault secrets engine to OpenShift and enable authentication by Kubernetes. Secrets engines store, generate, and encrypt sensitive data like credentials. You also install the Vault Agent, which uses the Mutating Webhook Vault Agent Sidecar Injector. This Vault agent injector automatically injects two sidecar containers: init and sidecar. The init container prepopulates a shared memory volume with the requested secrets prior to the other containers starting. The sidecar container continues to authenticate and render secrets to the same location while the pod runs. This allows your application authenticated access to the Key Management System (KMS) Vault, automatically retrieve and decrypt secrets, and read the decrypted secrets from a mounted path.
In the setup section, you will:
- Connect to OpenShift
- Install Vault using Helm chart
- Enable Kubernetes authentication
- Install the Vault Agent
- Install post-start script
Prerequisites
This tutorial was tested using:
- An IBM Cloud Pay-As-You-Go account
- A Red Hat OpenShift Kubernetes Service (ROKS) cluster on IBM Cloud, version 4.6, 4.7,
- IBM Cloud Shell, version 1.0.28, 1.0.33
- Helm, version 3
Set up Helm v3
In the IBM Cloud shell, create an alias for Helm v3.
bash
alias helm=helm3
Test the correct Helm version is available,
bash
$ helm version
version.BuildInfo{Version:“v3.2.1”, GitCommit:“fe51cd1e31e6a202cba7dead9552a6d418ded79a”, GitTreeState:“clean”, GoVersion:“go1.13.10"}
Connect to OpenShift
You can establish a session with your cluster, using the oc login command,
bash
oc login --token=<your-openshift-token> --server=<your-openshift-cluster-url>
Create a new project or namespace to install Vault.
bash
VAULT_NAMESPACE=my-vault-0
oc new-project $VAULT_NAMESPACE
Install Vault using Helm chart
The recommended way to run Vault on OpenShift is using the Helm chart.
bash
helm repo add hashicorp https://helm.releases.hashicorp.com
Create a custom values.yaml file to set custom defaults for the Vault Helm chart. The full default values.yaml for Vault Helm chart is found at hashicorp/vault-helm.
In the postStart hook in Vault, enable Kubernetes authentication and configure Vault to securely communicate with OpenShift.
bash
echo '# Custom values for the Vault chart
global:
  # If deploying to OpenShift
  openshift: true
server:
  dev:
    enabled: true
  serviceAccount:
    create: true
    name: vault-sa
injector:
  enabled: true
authDelegator:
  enabled: true' > my_values.yaml
Default settings:
- The
injector.enabledparameter is set totrue. Together with Vault, the Helm chart installed a Vault Agent injector admission webhook controller in Kubernetes. - The
global.openshiftparameter is set tofalse. If set totrue, it enables a configuration specific to OpenShift such as a NetworkPolicy, SecurityContext, and Route. - The
server.dev.enabledparameter is set to false. To enable thedevmode for the Vault server, you can experiment with Vault without needing to unseal.
A Vault server normally starts in a sealed state. A sealed Vault server can access the physical storage but cannot decrypt the data. When you unseal Vault, you allow access by giving the plaintext master key necessary to read the decryption key to decrypt the data.
The authDelegator.enabled parameter binds a ClusterRole binding to the Vault service account. This ClusterRole binding has the necessary privileges for Vault to use the Kubernetes auth method.
Install the Vault Helm chart with the values.yaml file to define custom configuration values.
bash
helm install vault hashicorp/vault -n $VAULT_NAMESPACE -f my_values.yaml
Verify that the installation was successful.
bash
$ oc get pods
NAME                                    READY   STATUS    RESTARTS   AGE
vault-0                                 1/1     Running   0          13s
vault-agent-injector-588c48db4b-h9xfv   1/1     Running   0          13s
Run the following code after the installation of Vault, exec into the Vault pod and configure Kubernetes authentication.
$ oc exec -it vault-0 -- /bin/sh

vault auth enable kubernetes
JWT=$(cat /var/run/secrets/kubernetes.io/serviceaccount/token)
echo $HWT
HOST="https://$KUBERNETES_PORT_443_TCP_ADDR:443"
echo $HOST
CA_CERT=@/var/run/secrets/kubernetes.io/serviceaccount/ca.crt
echo $CA_CERT
vault write auth/kubernetes/config token_reviewer_jwt=$JWT kubernetes_host=$HOST kubernetes_ca_cert=$CA_CERT

exit
Vault Agent
The Vault Agent performs three functions:
- It authenticates with Vault using the Kubernetes authentication method.
- It stores the Vault token in a
sink filelike/var/run/secrets/vaultproject.io/token, and keeps it valid by refreshing it at the appropriate time. - The
templateallows Vault secrets to be rendered to files usingConsulTemplate markup.
The Vault Agent runs as an init sidecar container and shares an in-memory volume in which the token is retrieved. The shared memory volume is mounted to /vault/secrets and used by the Vault Agent containers for sharing secrets with the other containers in the pod.
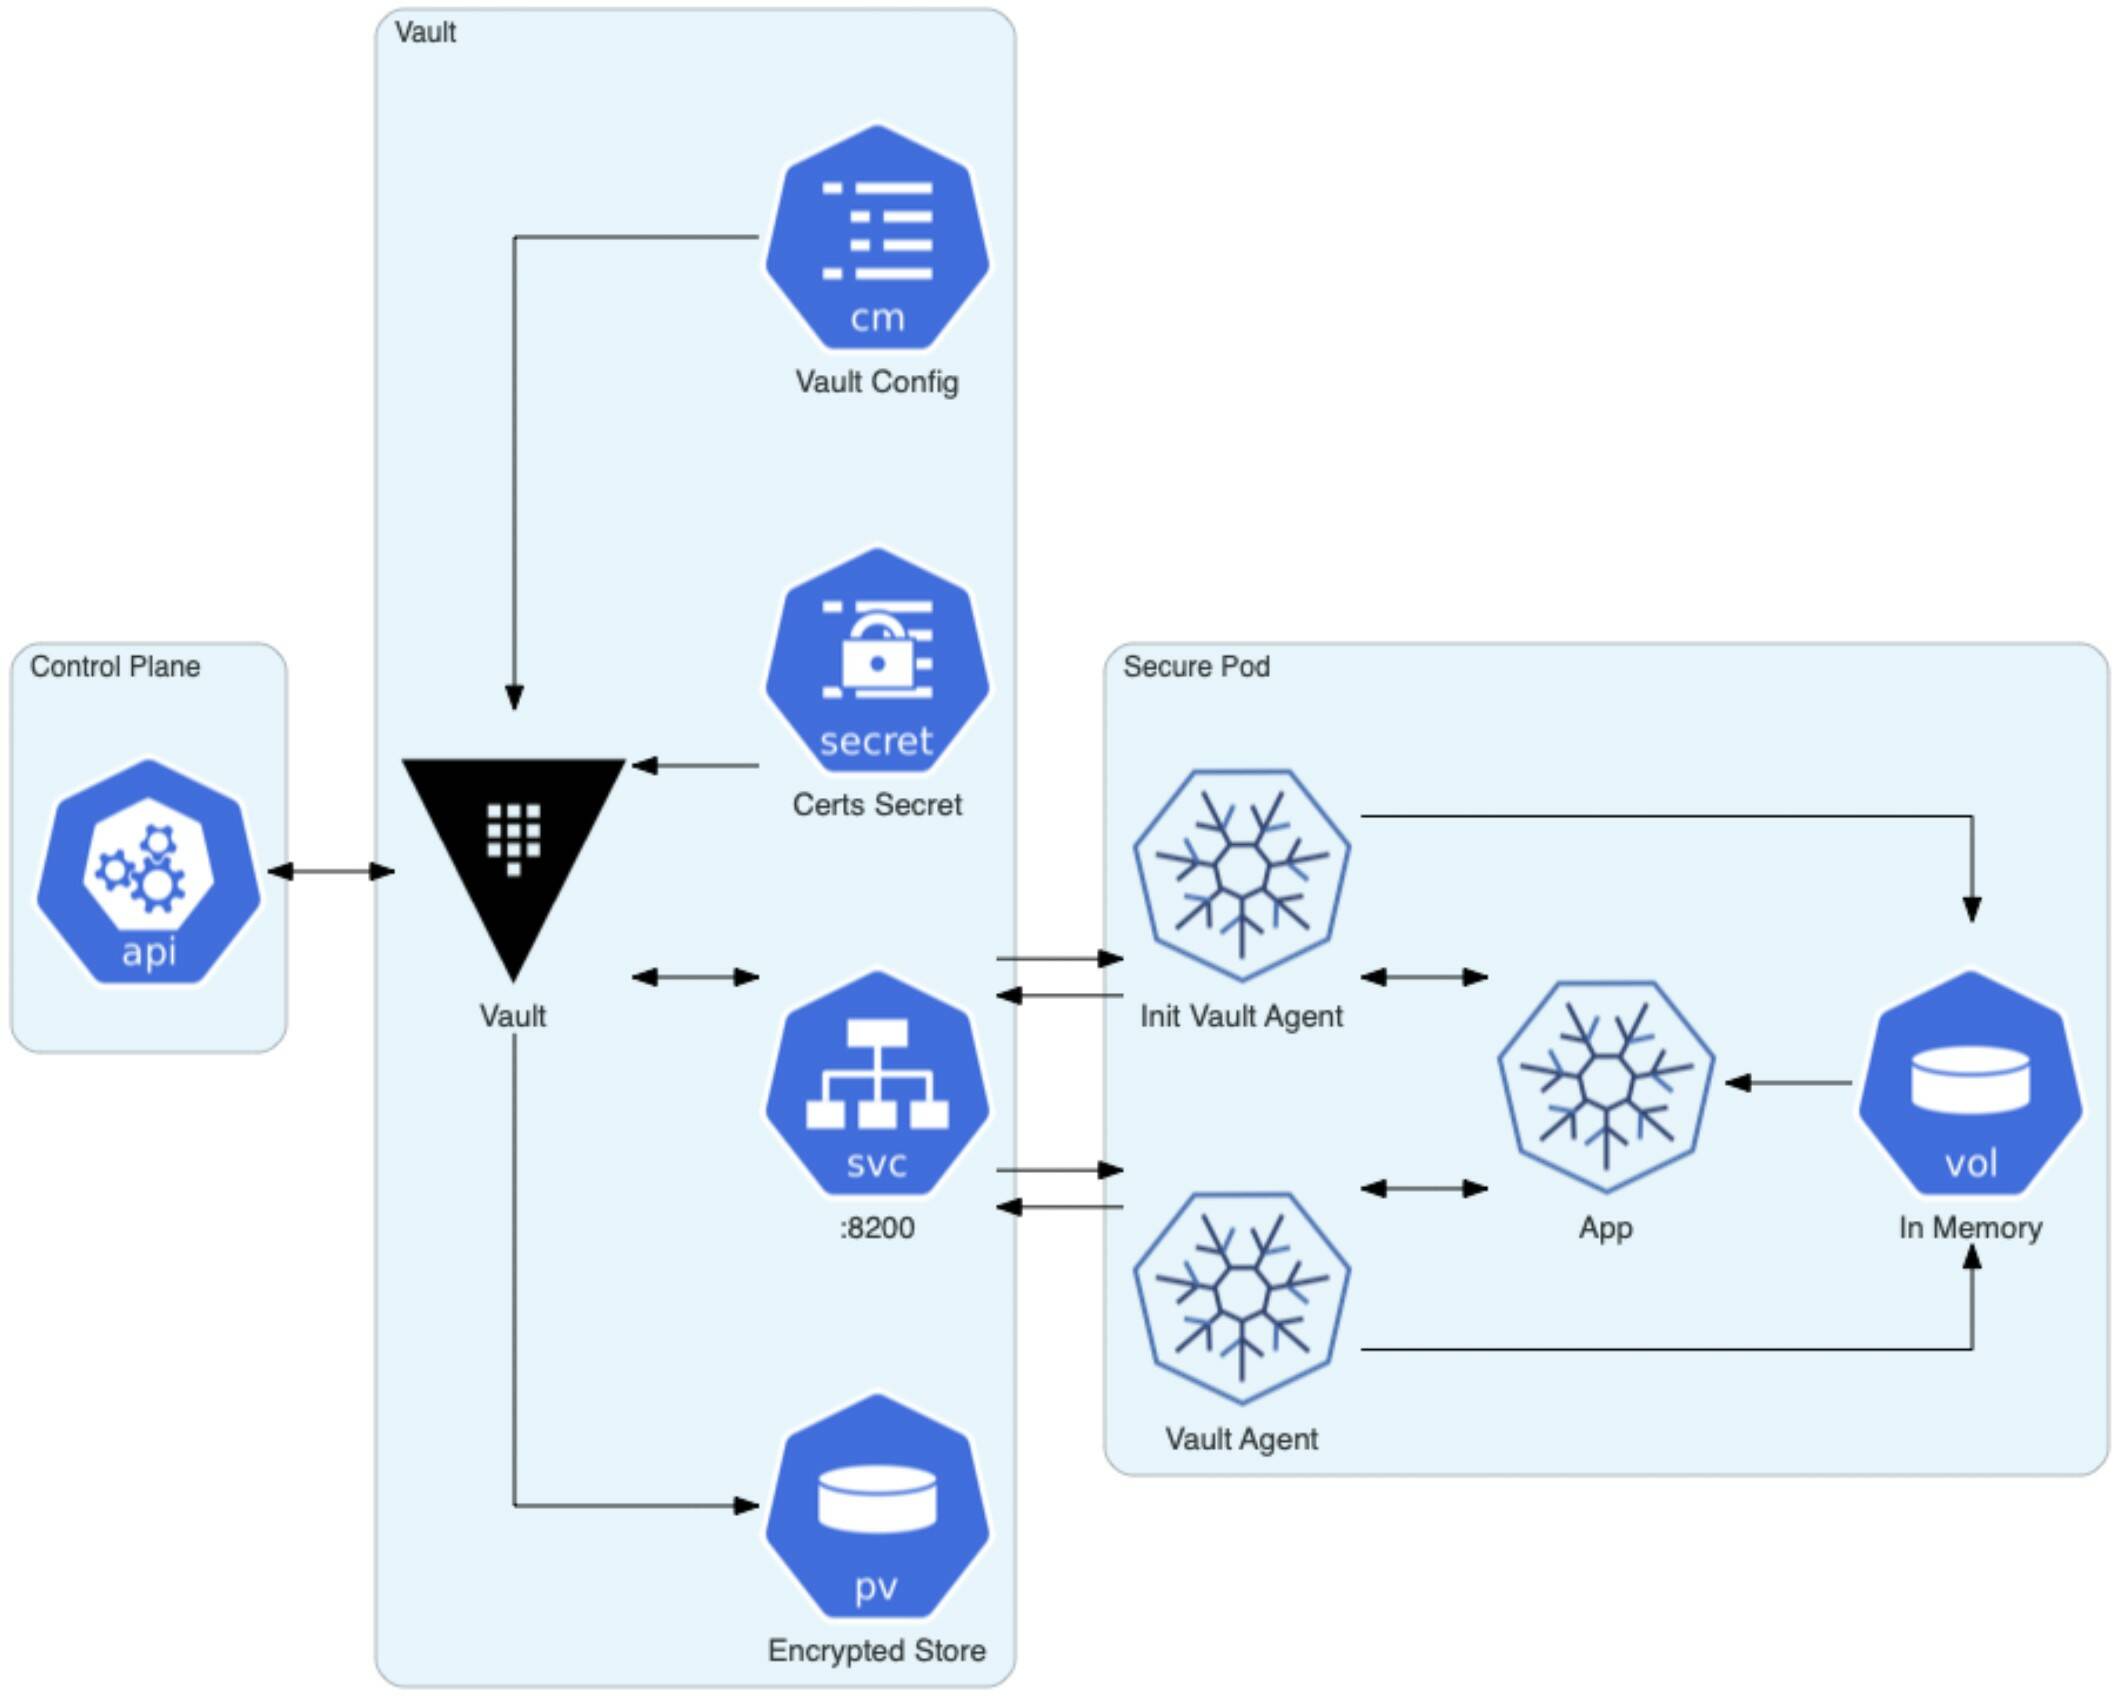 source: https://www.openshift.com/blog/integrating-hashicorp-vault-in-openshift-4
The Mutating Webhook Vault Agent Sidecar Injector automatically injects sidecar containers using a Kubernetes mutating admission controller. The vault-k8s binary integrates Vault and Kubernetes.
The Vault Agent injector intercepts pod CREATE and UPDATE events in Kubernetes. The controller parses the event and looks for the metadata annotation vault.hashicorp.com/agent-inject: true. If found, the controller alters the pod specification based on other annotations present.
Two types of Vault Agent containers can be injected:
- init The init container prepopulates the shared memory volume with the requested secrets prior to the other containers starting.
- sidecar The sidecar container authenticates and renders secrets to the same location as the pod runs.
You can disable the initialization and sidecar containers with annotations.
Two additional types of volumes can be optionally mounted to the Vault Agent containers. The secret volume containing TLS requirements such as client and CA (certificate authority) certificates and keys is the first. The configuration map containing Vault Agent configuration files is the second. This volume is useful to customize Vault Agent beyond what the provided annotations offer.
The primary method of authentication with Vault when using the Vault Agent Injector is the service account of the pod. For Kubernetes authentication, the service account must be bound to a Vault role and a policy granting access to the secrets in Vault.
There are two possible methods to configure the Vault Agent containers can be used to render secrets. You can use the vault.hashicorp.com/agent-inject-secret annotation, which I used in this tutorial, or a configuration map containing Vault Agent configuration files.
To configure secret injection, add one or more secret annotations, and the Vault role for accessing the secrets.
The annotation must have the format:
yaml
vault.hashicorp.com/agent-inject-secret-<unique-name>: /path/to/secret
 source: https://www.openshift.com/blog/integrating-hashicorp-vault-in-openshift-4
PostStart
You could alternatively have included the post installation configuration commands in a postStart hook of the values.yaml.
yaml
  postStart:
    - /bin/sh
    - -ec
    - >
      sleep 5;
      vault auth enable kubernetes;
      vault write auth/kubernetes/config token_reviewer_jwt="$(cat /var/run/secrets/kubernetes.io/serviceaccount/token)" kubernetes_host="https://$KUBERNETES_PORT_443_TCP_ADDR:443" kubernetes_ca_cert=@/var/run/secrets/kubernetes.io/serviceaccount/ca.crt
Container lifecycle hooks in Kubernetes run code implemented in a handler that are triggered by container lifecycle events. Two container hooks are exposed to containers: PostStart and PreStop.
The PostStart parameter enables the Kubernetes postStart hook, which executes commands immediately after a container is created, but there is no guarantee that the hook will execute before the container ENTRYPOINT. A related PreStop hook is executed before a container is terminated due to an API request or management event. If either a PostStart or PreStop hook fails, it kills the Container. If a handler fails for some reason, it broadcasts an event. For PostStart, this is the FailedPostStartHook event, and for PreStop, this is the FailedPreStopHook event. For more detail, see the Termination of Pods.
Congrats! You have installed Vault and the Vault agent injector. You are ready to consume encrypted secrets in your app.
Access Vault using Agent Injector annotations
With Vault and the Vault Agent Injector installed on OpenShift, you can deploy an application and configure the application to have read access to the Vault instance.
Create a Namespace
Create a new project or namespace to install the app.
bash
oc label namespace $VAULT_NAMESPACE vault.hashicorp.com/agent-webhook=enabled
Enable v2 of the KV Secrets Engine
bash
$ oc exec -it vault-0 -- /bin/sh

vault secrets enable -path=internal kv-v2
Create a Vault Policy
You need write access to create the policy file. To write to file, change to the current user $HOME directory. Then create the policy in Vault.
bash
cd $HOME
echo 'path "internal/data/mongodb/username-password" {
  capabilities = ["read"]
}' > my_policy.hcl
vault policy write guestbook my_policy.hcl

exit
Create Authentication Role to Allow Read Access to ServiceAccount in Namespace
In the Vault pod, create the Role to allow the ServiceAccount in the given namespace assigning read access.
bash
$ oc exec -it vault-0 -- env NS=$VAULT_NAMESPACE /bin/sh

APP_SA=vault-sa
APP_NAMESPACE=$NS
APP_ROLE_NAME=guestbook
VAULT_POLICY_NAME=guestbook

vault write auth/kubernetes/role/$APP_ROLE_NAME bound_service_account_names=$APP_SA bound_service_account_namespaces=$APP_NAMESPACE policies=$VAULT_POLICY_NAME ttl=24h
Create a Static Secret
Create a static secret at path guestbook/mongodb/username-password with a mongo-username and mongo-password.
bash
USERNAME=admin
PASSWORD=Passw0rd1
vault kv put internal/mongodb/username-password username=$USERNAME password=$PASSWORD
Retrieve the secret with the following code.
bash
/ $ vault kv get internal/mongodb/username-password

====== Metadata ======
Key              Value
---              -----
created_time     2021-03-06T00:32:59.879240011Z
deletion_time    n/a
destroyed        false
version          1

====== Data ======
Key         Value
---         -----
password    Passw0rd1
username    admin

/ $ exit
Deploy Guestbook
Create a secret to pull the image from a private repo on quay.io.
bash
REPO_USERNAME=<registry_username>
REPO_PASSWORD=<registry_password>
REPO_EMAIL=<registry_email>
REPO_URL=quay.io

oc create secret docker-registry quayiocred --docker-server=$REPO_URL --docker-username=$REPO_USERNAME --docker-password=$REPO_PASSWORD --docker-email=$REPO_EMAIL
Create the Guestbook Deployment file,
yaml
echo '---
apiVersion: apps/v1
kind: Deployment
metadata:
  name: guestbook
  labels:
    app: guestbook
spec:
  replicas: 1
  selector:
    matchLabels:
      app: guestbook
  template:
    metadata:
      annotations:
      labels:
        app: guestbook
    spec:
      serviceAccountName: vault-sa
      containers:
      - name: guestbook
        image: quay.io/remkohdev_us/guestbook-nodejs:1.0.0
        imagePullPolicy: Always
        ports:
        - name: http
          containerPort: 3000
      imagePullSecrets:
      - name: quayiocred' > guestbook-deployment.yaml
Create the Guestbook Service file,
yaml
echo '---
apiVersion: v1
kind: Service
metadata:
  name: guestbook
  labels:
    app: guestbook
spec:
  type: LoadBalancer
  ports:
  - port: 80
    targetPort: 3000
    name: http
  selector:
    app: guestbook' > guestbook-service.yaml
Create the Guestbook Deployment, Service and Route,
bash
oc create -f guestbook-deployment.yaml
oc create -f guestbook-service.yaml
oc expose service guestbook
ROUTE=$(oc get route guestbook -o json | jq -r '.spec.host')
echo $ROUTE
Test the deployment.
bash
curl -X POST http://$ROUTE/api/entries -H 'Content-Type: application/json' -H 'Accept: application/json' -d '{ "message": "hello1" }'
Deploy the App using Vault Annotation
Create a patch definition for the Guestbook deployment using Vault annotations.
bash
echo '---
spec:
  template:
    metadata:
      annotations:
        vault.hashicorp.com/agent-inject: "true"
        vault.hashicorp.com/role: "guestbook"
        vault.hashicorp.com/agent-inject-secret-guestbook-db-conf.txt: "internal/data/mongodb/username-password"' > guestbook-deployment-patch.yaml
Apply the patch.
bash
oc patch deployment guestbook --patch "$(cat guestbook-deployment-patch.yaml)"
Check the patch,
bash
$ oc get pods
NAME                                   READY   STATUS    RESTARTS   AGE
guestbook-7995fbf8b6-dhc9d             2/2     Running   0          3m24s
vault-0                                1/1     Running   0          41m
vault-agent-injector-7957f4c57-5fbtx   1/1     Running   0          41m
Exec into the Guestbook container and read the secrets file mounted by the Vault Agent,
bash
$ oc exec $(oc get pod --selector='app=guestbook' --output='jsonpath={.items[0].metadata.name}') --container guestbook -- cat /vault/secrets/guestbook-db-conf.txt

data: map[password:Passw0rd1 username:admin]
metadata: map[created_time:2021-04-04T13:52:59.891946224Z deletion_time: destroyed:false version:1]
Conclusion
Congratulations! You are now able to configure your deployment to use encrypted secrets from Vault!