Tutorial
Install Red Hat OpenShift Container Platform 4 on IBM zSystems and IBM LinuxONE
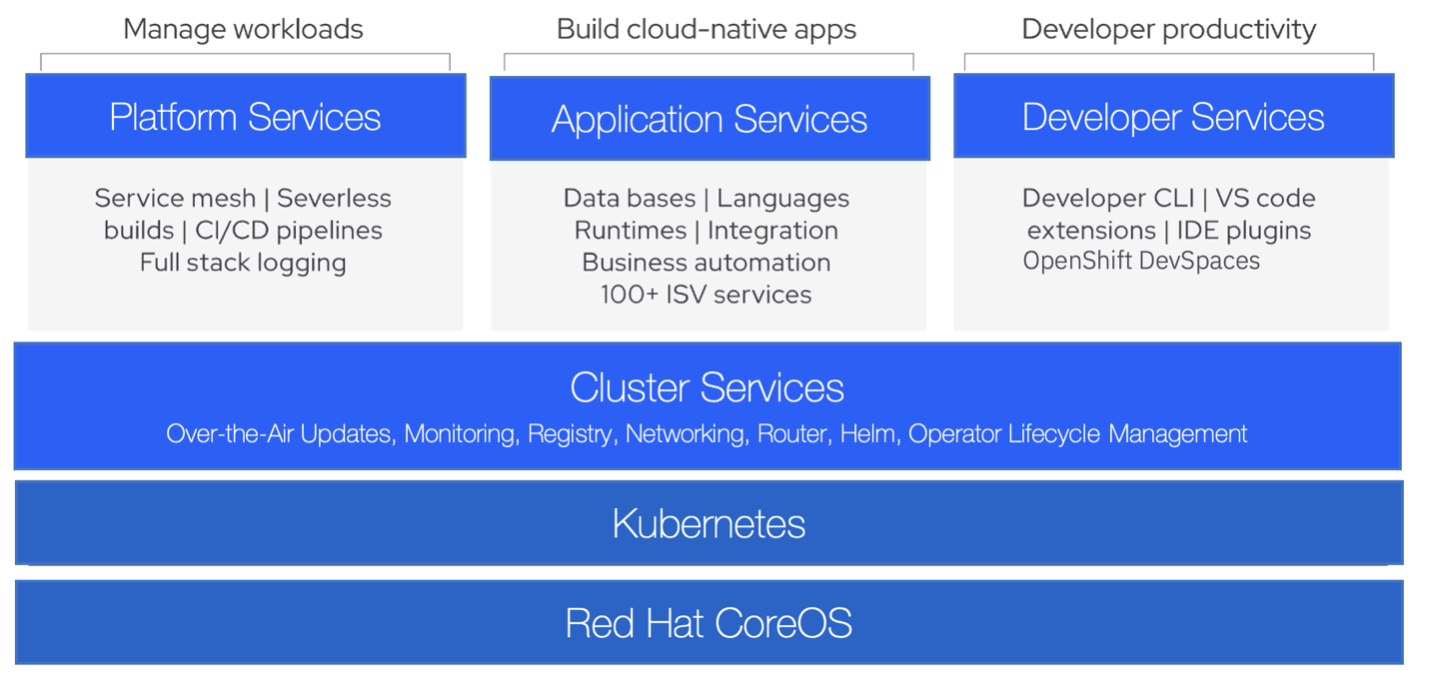
Learn how to deploy a Red Hat OpenShift Container Platform 4 cluster using minimum requirements and IBM z/VM as the hypervisorRed Hat OpenShift is a hybrid cloud, enterprise Kubernetes application platform that provides a set of container-based open source tools that enable digital transformation, accelerating application development while maintaining optimal use of infrastructure.
OpenShift is optimized to improve developer productivity and promote innovation. It includes an enterprise-grade Linux operating system, container runtime, networking, monitoring, registry, authentication, and authorization solutions. OpenShift also offers many more add-ons, such as service mesh (based on Istio), serverless (Knative) and Red Hat pipelines (based on Tekton), and support for a variety of persistent storage solutions such as Red Hat OpenShift Data Foundation (now part of IBM Storage Fusion) and IBM Container Native Storage Access using IBM Spectrum Scale.
OpenShift also ships with Red Hat OpenShift Dev Spaces, which is a containerized development framework that's built to speed up container native development. Users can automate lifecycle management to provide increased security, tailored operations solutions, easy-to-manage cluster operations, and application portability.
Figure 1. Technology stack
OpenShift stands out as a leader with a security-focused, supported Kubernetes platform – including a foundation based on Red Hat Enterprise Linux. But you probably already knew all that. The game changer for OpenShift is the release of Red Hat OpenShift Container Platform (RHOCP) version 4.x. OpenShift 4 is powered by Kubernetes Operators and Red Hat's commitment to full-stack security, so you can develop and scale big ideas for the enterprise. OpenShift started with distributed systems. It was later extended to IBM Power Systems and is now available on IBM zSystems. This creates a seamless user experience across major architectures such as x86_64, ppc64le, s390x, and arm64.
This tutorial demonstrates how to deploy RHOCP on an IBM zSystems/IBM LinuxONE system using the minimal architecture requirements and IBM z/VM hypervisor.
Prerequisites
In this tutorial, we use the minimum requirements to get our environment up and running. For production or performance testing, please refer to the preferred configuration from the official Red Hat documentation.
The minimum configuration requirements for a cluster with user-provisioned infrastructure (UPI) using a connected installation are as follows:
The smallest RHOCP clusters require the following hosts:
- One temporary bootstrap node
- Three control plane (or master) nodes
- At least two compute plane (or worker) nodes
- One Bastion (infrastructure) node (recommended)
The bootstrap node, control plane nodes (often called masters), and compute plane nodes (often called workers) must use Red Hat Enterprise CoreOS (RHCOS) as the underlying operating system (OS) layer. As for the Bastion node, it is recommended to use Red Hat Enterprise Linux (RHEL) which is the entitlement that's provided as part of the RHOCP subscription.
All nodes that form an OpenShift cluster using the UPI deployment model, require network access to the HTTP server (which usually runs on the Bastion node). During the OpenShift Container Platform installation process, nodes attempt to fetch the Ignition config files (master, worker, or bootstrap) as well as the RHCOS image (rootfs) from the HTTP server. The virtual machines under z/VM are configured with static IP addresses. No DHCP server is required. Figure 3 below illustrates what this layout looks like.
To install RHOCP on IBM zSystems/IBM LinuxONE, you can provide a direct attached OSA to each z/VM guest OS or use z/VM vSwitch, a traditional and more flexible network solution. For this tutorial, we use IBM z/VM virtual switch.
Note: When using IBM zVM vSwitch, please make sure it is using mode type 2 (Layer 2 vSwitch).
For people interested in installing RHOCP on IBM zSystems/IBM LinuxONE using IBM z/VM as the hypervisor in a disconnected/restricted network approach, please consult the official documentation from Red Hat.
Minimum resource requirements
Figure 2. Minimum requirements for Red Hat OpenShift Container Platform 4.12

RHCOS does not support multiple disks combined into a logical volume (LVM). To provide 100GB of disk storage for each node on IBM z/VM, Extended Address Volumes (EAVs) are required when using DASD. If using SCSI disks (FCP), then you should allocate 100GB LUNs to each z/VM guest VM.
Note: 100GB is the minimum requirement for all the OpenShift nodes; pay special attention to the compute nodes, and be sure to verify which workloads will run on your cluster as more disk space may be required.
Make sure to install OpenShift Container Platform using one of the following IBM zSystems/IBM LinuxONE hardware options:
- IBM z16 (all models), IBM z15 (all models), IBM z14 (all models), IBM z13, and IBM z13s
- IBM LinuxONE Emperor 4, IBM LinuxONE III (all models), IBM LinuxONE Emperor II, IBM LinuxONE Rockhopper II, IBM LinuxONE Emperor, and IBM LinuxONE Rockhopper
Note: Support for RHCOS functionality for IBM z13 (all models), IBM LinuxONE Emperor, and IBM LinuxONE Rockhopper is deprecated. These hardware models remain fully supported in OpenShift Container Platform 4.12, however Red Hat recommends that you use later hardware models with upcoming releases (such as OpenShift Container Platform 4.13).
Minimum hardware requirements:
- 1 logical partition (LPAR) with 6 IFLs (SMT2 enabled)
- 1 OSA or RoCE network adapter
Note: You can use dedicated or shared IFLs to assign sufficient compute resources. Resource sharing is one of the key strengths of IBM zSystems and IBM LinuxONE. However, you must adjust capacity correctly on each hypervisor layer and ensure that you have sufficient resources for every OpenShift Container Platform cluster. For this example, we used 6 dedicated IFLs (SMT2).
Operating system requirements:
- IBM z/VM 7.1 LPAR or newer (if using IBM z/VM 7.3, the minimum hardware requirement is IBM z14)
Estimated time
It should take about 45 minutes to complete this tutorial.
The environment
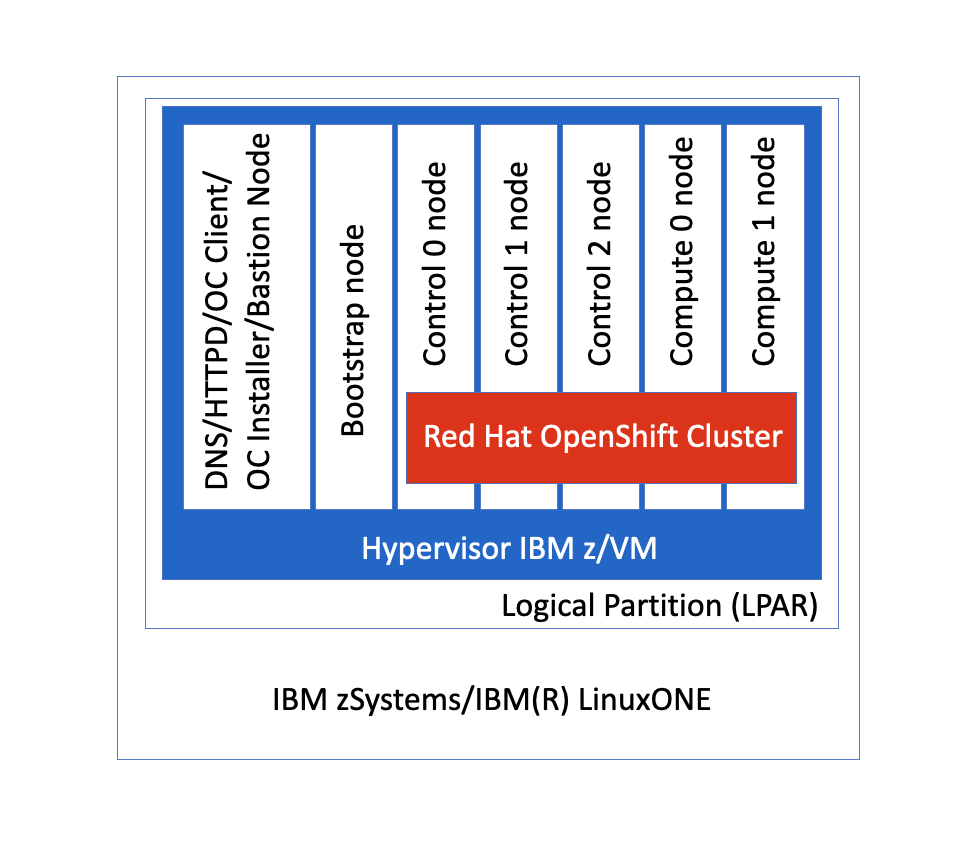
Figure 3 details the environment created to install RHOCP using minimum resource requirements. This tutorial describes an environment that is self-contained, so all services and nodes reside inside a single LPAR. In real-world deployments, services such as Domain Name Service (DNS) and External Load Balancer can be outside this environment (as long this LPAR is able to access it).
Figure 3. The environment
Network topology requirements
Note: For more information on network connectivity requirements, see the OpenShift documentation.
If your organization has a firewall that controls access to the internet site, make sure to review the firewall configuration requirements.
Before you can install RHOCP, you need to provision at least one layer-4 load balancer -- in this case, we used a single instance of HAProxy running on a Red Hat Enterprise Linux 8 in our Bastion node.
Here is an example of the HAProxy configuration file, /etc/haproxy/haproxy.cfg:
#---------------------------------------------------------------------
# Global settings
#---------------------------------------------------------------------
global
    log         127.0.0.1 local2

    chroot      /var/lib/haproxy
    pidfile     /var/run/haproxy.pid
    maxconn     4000
    user        haproxy
    group       haproxy
    daemon

    # turn on stats unix socket
    stats socket /var/lib/haproxy/stats

    # utilize system-wide crypto-policies
    ssl-default-bind-ciphers PROFILE=SYSTEM
    ssl-default-server-ciphers PROFILE=SYSTEM

defaults
    mode                    http
    log                     global
    option                  httplog
    option                  dontlognull
    option http-server-close
    option forwardfor       except 127.0.0.0/8
    option                  redispatch
    retries                 3
    timeout http-request    10s
    timeout queue           1m
    timeout connect         10s
    timeout client          1m
    timeout server          1m
    timeout http-keep-alive 10s
    timeout check           10s
    maxconn                 3000

listen ingress-http

    bind *:80
    mode tcp

    server worker1 <ip_address_worker1>:80 check
    server worker2 <ip_address_worker2>:80 check

listen ingress-https

    bind *:443
    mode tcp

    server worker1 <ip_address_worker1>:443 check
    server worker2 <ip_address_worker2>:443 check

listen api

    bind *:6443
    mode tcp

    server bootstrap <ip_address_bootstrap>:6443 check
    server master1 <ip_address_master1>:6443 check
    server master2 <ip_address_master2>:6443 check
    server master3 <ip_address_master3>:6443 check

listen api-int

    bind *:22623
    mode tcp

    server bootstrap <ip_address_bootstrap>:22623 check
    server master1 <ip_address_master1>:22623 check
    server master2 <ip_address_master2>:22623 check
    server master3 <ip_address_master3>:22623 check
Don't forget to open the respective ports on the system's firewall and set the SELinux boolean, as follows:
# firewall-cmd --add-port=443/tcp
# firewall-cmd --add-port=443/tcp --permanent

# firewall-cmd --add-port=80/tcp
# firewall-cmd --add-port=80/tcp --permanent

# firewall-cmd --add-port=6443/tcp
# firewall-cmd --add-port=6443/tcp --permanent

# firewall-cmd --add-port=22623/tcp
# firewall-cmd --add-port=22623/tcp --permanent

# setsebool -P haproxy_connect_any 1

# systemctl enable haproxy --now
Note: For more information on the load balancer requirements for UPI, see the OpenShift documentation.
Required DNS records
The following DNS records are required for an RHOCP cluster that uses user-provisioned infrastructure. In each record, <cluster_name> is the cluster name and <base_domain> is the cluster base domain that you specify in the install-config.yaml file.
| Component | Record | Description |
|---|---|---|
| Kubernetes API | api.<cluster_name>.<base_domain> |
A DNS A/AAAA or CNAME record, and a DNS PTR record, to identify the API load balancer. These records must be resolvable by both clients external to the cluster and from all the nodes within the cluster. |
| Kubernetes API | api-int.<cluster_name>.<base_domain> |
A DNS A/AAAA or CNAME record, and a DNS PTR record, to internally identify the API load balancer. These records must be resolvable from all the nodes within the cluster. *Important: The API server must be able to resolve the worker nodes by the hostnames that are recorded in Kubernetes. If the API server cannot resolve the node names, then proxied API calls can fail and you cannot retrieve logs from pods.* |
| Routes | *.apps.<cluster_name>.<base_domain> |
A wildcard DNS A/AAAA or CNAME record that refers to the application ingress load balancer. The application ingress load balancer targets the machines that run the Ingress Controller pods, which run on the compute machines by default. These records must be resolvable by both clients external to the cluster and from all the nodes within the cluster. For example, console-openshift-console.apps.<cluster_name>.<base_domain> is used as a wildcard route to the OpenShift Container Platform console. |
| Bootstrap machine | <bootstrap>.<cluster_name>.<base_domain> |
A DNS A/AAAA or CNAME record and DNS PTR record, to identify the bootstrap machine. These records must be resolvable by the nodes within the cluster. |
| Control plane machines | <master><n>.<cluster_name>.<base_domain> |
DNS A/AAAA or CNAME records and DNS PTR records to identify each machine for the control plane nodes (also known as the master nodes). These records must be resolvable by the nodes within the cluster. |
| Compute machines | <worker><n>.<cluster_name>.<base_domain> |
DNS A/AAAA or CNAME records and DNS PTR records to identify each machine for the worker nodes. These records must be resovable by the nodes within the cluster. |
Note: See the OpenShift documentation for an example of a DNS records for RHCOS as well as instructions for validating the DNS resolution for UPI.
Install and set up an HTTP server
In order to install RHOCP, the base operating system needs to be installed. This is an automated process that takes place during the RHOCP installation process. Red Hat CoreOS is the base OS and is installed using a network installation method. To provide the OS image during the installation process, an HTTP service is set up to provide access to this and other resources during installation.
In our environment, the HTTP server is installed on the Bastion node that was created earlier.
First, install the HTTP server:
# dnf install httpd
Then you need to enable the service:
# systemctl enable httpd
Created symlink /etc/systemd/system/multi-user.target.wants/httpd.service → /usr/lib/systemd/system/httpd.service.
Then start the service:
# systemctl start httpd
Now, you need to create the directory structure that will be used by the RHOCP install process.
For example:
# mkdir /var/www/html/ocp
Note: This directory structure can have any name -- we used ocp as an example. This directory will host the rootfs image as well as the ignition files later on in this guide.
Open httpd ports on the firewall:
# firewall-cmd --permanent --add-service=http
# firewall-cmd --reload
Download the OpenShift installation files
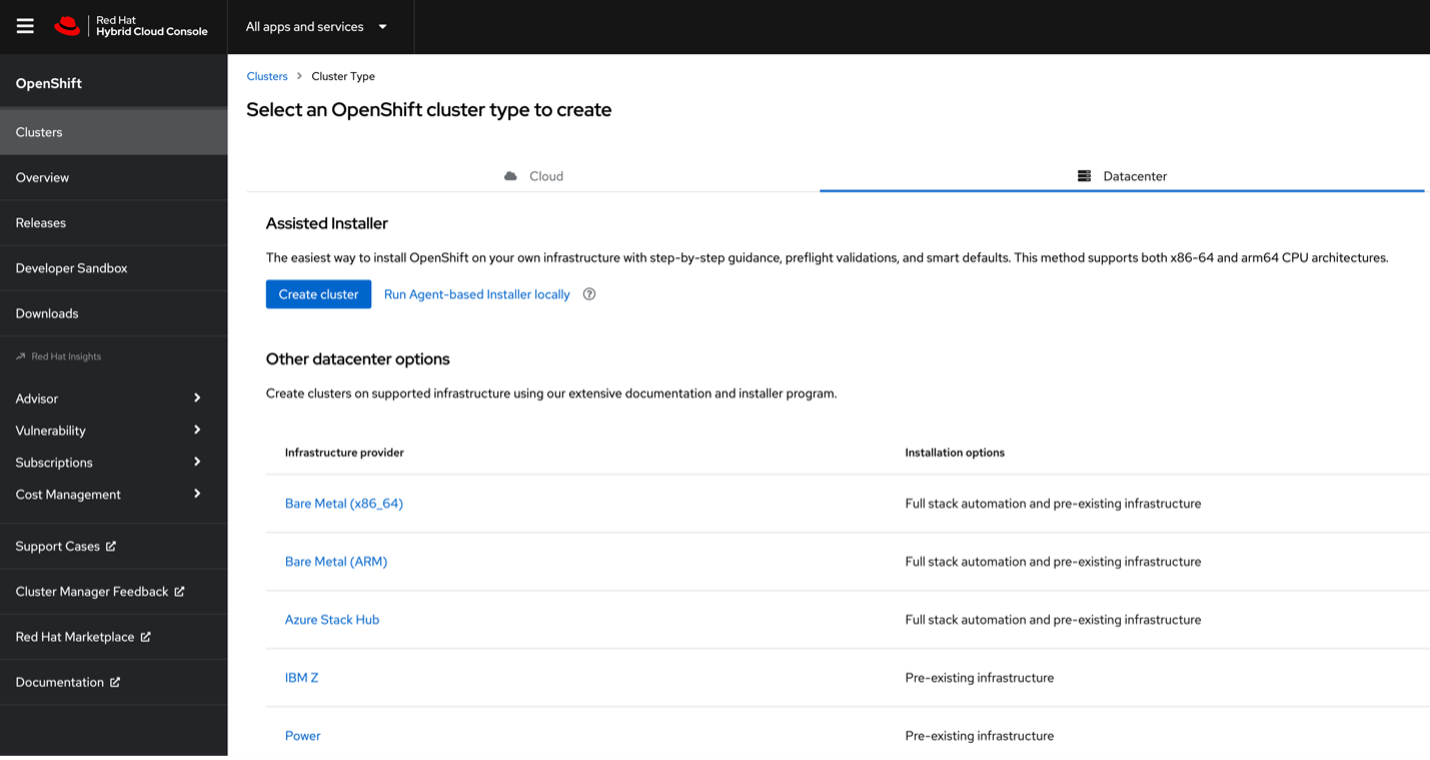
To access the files needed for the installation, go to cloud.redhat.com and login with your Red Hat login:
- Select OpenShift.
- Click on Create Cluster and select Datacenter.
- Click on IBM Z.
Figure 4. Download files
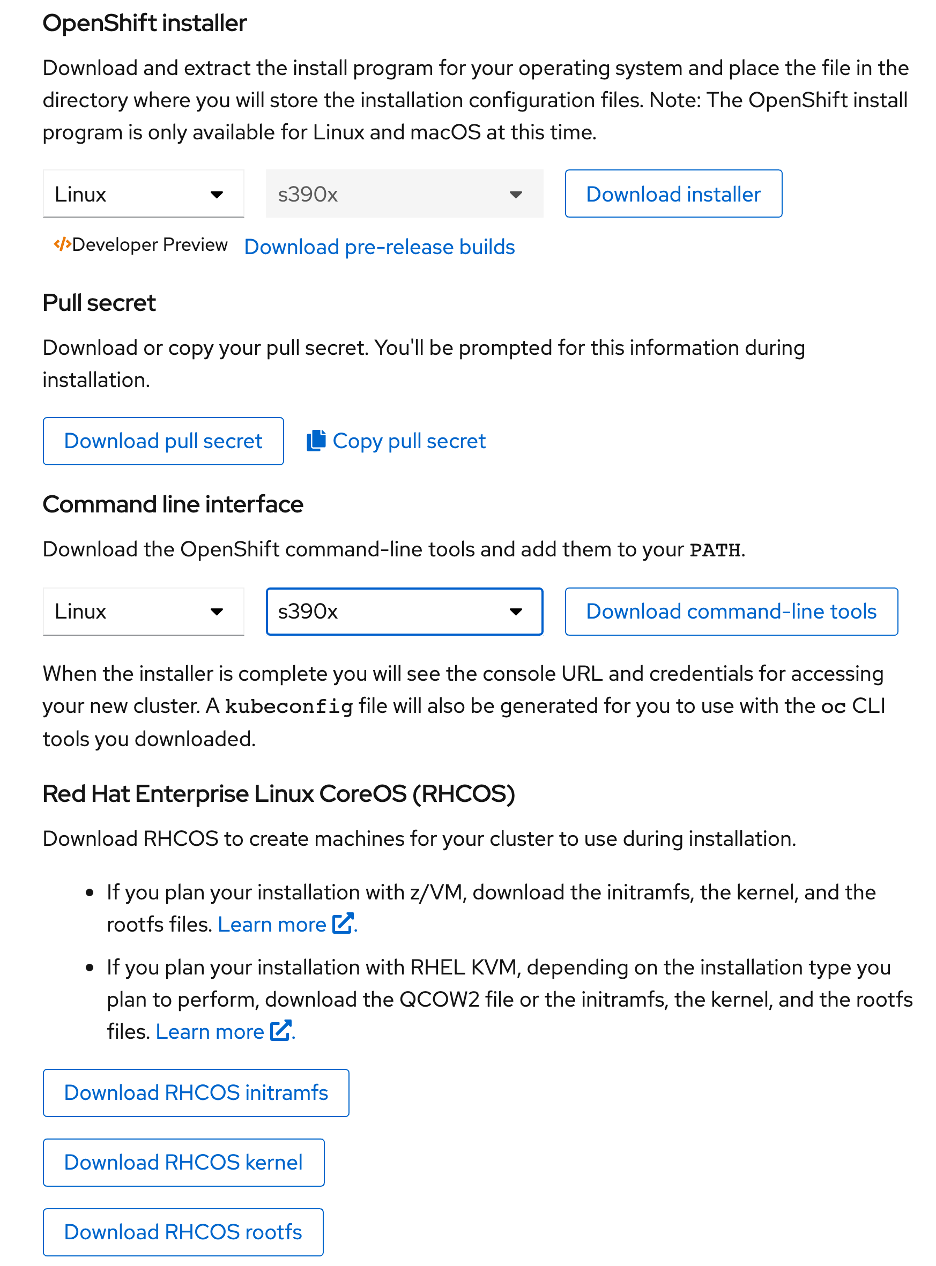
What you need to get started
You'll need to download the following items to get started:
- OpenShift Installer
- Pull secret
- Command-line interface
- RHCOS
rootfsimage
Note: The rootfs image is the same for FCP or DASD installs.
All of these files should be downloaded to your Bastion node as it will be used to serve the necessary files to provision the RHOCP.
Figure 5. OpenShift installer
Generate an SSH private key and add it to the agent
To generate the SSH private and public keys, follow the instructions below on the Bastion node. If you want to perform installation debugging or disaster recovery on your cluster, you must provide an SSH key to both your ssh-agent and to the installation program.
If you do not already have an SSH key that is configured for password-less authentication on your computer, create one. For example:
ssh-keygen -t ed25519 -N '' -f <path>/<file_name>
Verify the public SSH key:
$ cat  <path>/<file_name>
e.g $ cat ~/.ssh/id_rsa.pub
Note: For more details, see the OpenShift documentation.
Install the OpenShift Installer
Here’s how to install the OpenShift Installer on the Bastion node from the directory with the files downloaded earlier:
tar xvf openshift-install-linux.tar.gz
ls
openshift-install
Install the OpenShift CLI
Here’s how to install the OpenShift CLI on the Bastion node:
tar xvzf <file previously downloaded>
Next, move the oc binary to a directory on your PATH, and then check your PATH:
$ echo $PATH
/usr/local/bin:/usr/bin:/usr/local/sbin:/usr/sbin
Then test the oc command:
oc <command>
Manually create the installation configuration file
For RHOCP UPI installations, you need to manually generate your installation configuration file.
On the Bastion node, create an installation directory for your required installation assets:
# mkdir <installation_directory>
Example: # mkdir /ocpinst
Customize the install-config.yaml file template and save it in the <installation_directory>.
Sample install-config.yaml file for bare metal
You can customize the install-config.yaml file to specify more details about your RHOCP cluster’s platform or modify the values of the required parameters.
apiVersion: v1
baseDomain: <domain>
compute:
- hyperthreading: Enabled
  name: worker
  replicas: 0
  architecture: s390x
controlPlane:
  hyperthreading: Enabled
  name: master
  replicas: 3
  architecture: s390x
metadata:
  name: <cluster_name>
networking:
  clusterNetwork:
  - cidr: 10.128.0.0/14
    hostPrefix: 23
  networkType: OVNKubernetes
  serviceNetwork:
  - 172.30.0.0/16
platform:
  none: {}
fips: false
pullSecret: '<pull-secret>'
sshKey: '<ssh-public-key>'
Note: For a complete description of each parameter, refer to the official documentation.
If you need to configure your OpenShift installer to access a proxy for accessing the Red Hat repositories (an authentication proxy to access external resources), read Configuring the cluster-wide proxy during installation in the documentation.
After reviewing the Configuring the cluster-wide proxy during installation section, this is what the install-config.yaml file should look like if you need to provide all the options for the cluster-wide proxy configuration.
Note: The cluster-wide proxy configuration is optional, and only necessary if your network environment REQUIRES egress traffic to use a forward proxy to reach external sites.
apiVersion: v1
baseDomain: <domain>
proxy:
  httpProxy: http://<username>:<pswd>@<ip>:<port>
  httpsProxy: https://<username>:<pswd>@<ip>:<port>
  noProxy: example.com
additionalTrustBundle: |
    -----BEGIN CERTIFICATE-----
    <MY_TRUSTED_CA_CERT>
    -----END CERTIFICATE-----
additionalTrustBundlePolicy: <policy_to_add_additionalTrustBundle>
compute:
- hyperthreading: Enabled
  name: worker
  replicas: 0
  architecture: s390x
controlPlane:
  hyperthreading: Enabled
  name: master
  replicas: 3
  architecture: s390x
metadata:
  name: <cluster_name>
networking:
  clusterNetwork:
  - cidr: 10.128.0.0/14
    hostPrefix: 23
  networkType: OVNKubernetes
  serviceNetwork:
  - 172.30.0.0/16
platform:
  none: {}
fips: false
pullSecret: '<pull-secret>'
sshKey: '<ssh-public-key>'
Here is an example of how the noproxy should be defined:
no_proxy="127.0.0.1,localhost,bastion IP,bootstrap IP,master 1 IP,master 2 IP,master 3 IP,worker 1 IP,..,worker "n" IP,,api-int.CLUSTERNAME.DOMAIN,api.CLUSTERNAME.DOMAIN,etcd-0.CLUSTERNAME.DOMAIN,etcd-1.CLUSTERNAME.DOMAIN,etcd-2.CLUSTERNAME.DOMAIN,.CLUSTERNAME.DOMAIN"
Create the Kubernetes manifest and ignition config files
On the bastion node, make a copy of install-config.yaml to the <installation_directory>, then generate the Kubernetes manifests for the cluster:
$ ./openshift-install create manifests --dir=<installation_directory>

WARNING There are no compute nodes specified. The cluster will not fully initialize without compute nodes.
INFO Consuming "Install Config" from target directory
Modify the /<installation_directory>/manifests/cluster-scheduler-02-config.yml Kubernetes manifest file to prevent pods from being scheduled on the control plane machines.
- Open the manifests/cluster-scheduler-02-config.yml file.
- Locate the
mastersSchedulableparameter and set its value to false. - Save and exit the file.
Create the ignition config files:
./openshift-install create ignition-configs --dir=<installation_directory>
The following files are generated in the directory:
.
├── auth
│   ├── kubeadmin-password
│   └── kubeconfig
├── bootstrap.ign
├── master.ign
├── metadata.json
└── worker.ign
Copy the files master.ign, worker.ign, and bootstrap.ign to the Bastion node where you should have configured an HTTP server (Apache) to serve these files during the creation of the RHCOS VMs.
Create Red Hat Enterprise Linux CoreOS (RHCOS) machines
On the Bastion node, download the Red Hat Enterprise Linux CoreOS 4.12 installation files from the RHCOS image mirror to the chosen installation directory.
Download the following files:
- The initramfs:
rhcos-<version>-live-initramfs.s390x.img - The kernel:
rhcos-<version>-live-kernel-s390x
Now create the PARM files for each IBM z/VM virtual machine previously created by your IBM z/VM administrator. The following parameters are specific for a particular virtual machine:
- For
coreos.inst.install_dev=, specifydasdafor DASD installation. - For
rd.dasd=, specify the DASD where RHCOS will be installed.
The bootstrap machine ignition file is called bootstrap-0, the master ignition files are numbered 0 through 2, the worker ignition files from 0 upwards. All other parameters can stay as they are.
Here's the example parameter file we used on our environment, bootstrap-0.parm, for the bootstrap machine:
rd.neednet=1
coreos.inst.install_dev=<dasda>
coreos.live.rootfs_url=http://<http-server>:<port>/<rhcos-live-rootfs.s390x.img>
coreos.inst.ignition_url=http://<http-server>:<port>/bootstrap.ign
ip=<bootstrap-IP-address>::<gateway>:<netmask>:::none
nameserver=<nameserver-IP-address>
rd.znet=qeth,<0.0.1f00>,<0.0.1f01>,<0.0.1f02>,layer2=1,portno=0
cio_ignore=all,!condev
rd.dasd=<0.0.0201>
For FCP-type disks, this is an example of a PARM file :
rd.neednet=1
coreos.inst.install_dev=<sda>
coreos.live.rootfs_url=http://<http-server>:<port>/<rhcos-live-rootfs.s390x.img>
coreos.inst.ignition_url=http://<http-server>:<port>/bootstrap.ign
ip=<bootstrap-IP-address>::<gateway>:<netmask>:::none
nameserver=<nameserver-IP-address>
rd.znet=qeth,<0.0.1f00>,<0.0.1f01>,<0.0.1f02>,layer2=1,portno=0
cio_ignore=all,!condev
rd.fcp=<adapter>,<wwpn>,<lun>
if you are using multiple disks (FCP-type disks) during installation, you need to explicitly define in your parmfile which one to use:
coreos.inst.install_dev=/dev/disk/by-path/ccw-<fcpdev>-zfcp-0x<wwpn>:0x<lun>
Here's an example of that section of the parm file:
rd.zfcp=0.0.8003
coreos.inst.install_dev=/dev/disk/by-path/ccw-0.0.8003-zfcp-0x50050763040851e3:0x4000406100000000
Note: In your environment, rd.znet=, rd.dasd=, and coreos.inst.install_dev= will all be different from what you see here. Also, make sure that there are no newline symbols between the lines in the PARM file.
The PARM files must be sent to the z/VM virtual machines (control plane nodes, compute plane nodes, and bootstrap).
This guide demonstrates two different ways to send the PARM files. Choose Method 1 or Method 2 based on your experience with z/VM.
Method 1: Using vmur
The first method uses the vmur utility as a vehicle for transferring the files from your Bastion node to the z/VM guests. Note that none of the lines in the PARM file should exceed 80 bytes. Consider using Linux symbolic links for the path to the files (coreos.live.rootfs, ignition) to make the path shorter.
Here’s the example of how to create the symbolic link:
ln –s <short name eg rootfs.img> <the directory with the file>/rhcos-4.12.x-s390x-live-rootfs.s390x.img
Verify the new link for the rootfs file:
ls -l rootfs.img
rootfs.img -> rhcos-4.12.x-s390x-live-rootfs.s390x.img
Now you can use the symbolic link instead of specifying the full path and full name of the rootfs file in the PARM file:
rd.neednet=1
coreos.inst.install_dev=<sda>
coreos.live.rootfs_url=http://<http-server>:<port>/rootfs.img
coreos.inst.ignition_url=http://<http-server>:<port>/bootstrap.ign
ip=<bootstrap-IP-address>::<gateway>:<netmask>:::none
nameserver=<nameserver-IP-address>
rd.znet=qeth,<0.0.1f00>,<0.0.1f01>,<0.0.1f02>,layer2=1,portno=0
cio_ignore=all,!condev
rd.fcp=<adapter>,<wwpn>,<lun>
The symbolic links can be created for other files if needed.
The vmur utility is part of a collection of utilities for s390x that comes with the s390utils-base package.
Install the s390utils-base package on the Bastion node:
# dnf install s390utils-base
The vmur utility is used as follows:
# vmur vmur_command [command_options] [command_args]
For example:
# vmur pun –r –u <VM guest name> -N <REMOTEFILE> <LOCALFILE>
Here is what each vmur command does:
pun-- creates a file on the punch queue-r-- specifies that the punch or printer file is to be transferred to a reader-u-- specifies the z/VM user ID to whose reader the data is to be transferredVM guest name-- the z/VM user ID-N-- specifies a name and, optionally, a type for the z/VM spool file to be created by the punch or print functionREMOTEFILE-- the name of the file once punchedLOCALFILE-- the name of the local file to punch
Once the vmur utility is installed on the Bastion node, load and activate the virtual unit record devices (00c is the address of the virtual reader):
# cio_ignore -r c-e
# chccwdev -e c-e
Use the following command to punch the files to the reader, these files will be used for RHOCP installation:
vmur pun -r -u <VM guest name> -N kernel.img <path to the kernel file>/rhcos-4.12.x-s390x-live-kernel-s390x
vmur pun -r -u <VM guest name> -N generic.parm <path to the parm file>/bootstrap-0.parm
vmur pun -r -u <VM guest name> -N initrd.img <path to the iniramfs file>/4.12.x-s390x-live-initramfs.s390x.img
You need to repeat the process of punching files to the reader for all of the virtual guests, passing the corresponding PARM files for the control plane and compute plane nodes.
Note: It is imperative that you punch the files in the proper sequence: the kernel file first, then the PARM file, and initramfs as the last one.
Use the terminal 3270 emulator of your choice to log in to z/VM guest, and verify that the files have been sent to the reader by using the following z/VM commands (from the guest in CMS mode):
The Q RDR ALL command shows all the files in the reader's queue. Here's the output:
00: q rdr all
ORIGINID FILE CLASS RECORDS  CPY HOLD DATE  TIME     NAME      TYPE     DIST
ROCP2BA  0035 A PUN 00078957 001 NONE 09/14 15:29:30 kernel    img      ROCP2BA
ROCP2BA  0036 A PUN 00000006 001 NONE 09/14 15:29:31 generic   parm     ROCP2BA
ROCP2BA  0037 A PUN 00776467 001 NONE 09/14 15:29:31 initrd    img      ROCP2BA
The output of this command shows the three files placed on top of the queue -- the kernel, the PARM, and then the initramfs. For each file, the ID and the ORIGINID/DIST parameters can vary depending on your environment.
To purge the files from the reader’s queue, use this command PURGE RDR ALL. (Alternatively, you can use PURGE RDR xxxx, where xxxx is the file you want to remove.)
In the output above, the files are 0035-0037 for the kernel, PARM, and initramfs, respectively. If you need to purge any of those files, the format of the command would be:
PURGE RDR 0035
(The values are 0035 for kernel, 0036 for the PARM, and 0037 for initramfs.)
When all files have been successfully punched to each VM guest, you can start the Initial Program Load (IPL) process for the guest, issuing the command from each guest:
IPL 00C
Where 00C is the address of z/VM virtual reader. The bootstrap machine has to be IPL’ed first, and then you need to wait until the bootstrap VM is fully installed before you can IPL the control plane nodes (a.k.a masters).
Once the control plane nodes are fully installed, the last stage of the process is to IPL the compute plane nodes (a.k.a workers).
Make sure that you use the #CP DISC command to disconnect from the z/VM console. It is recommended that you issue #CP SET RUN ON first to ensure that the OS will continue to run even if something interrupts the console.
If the IPL does not succeed at first, you can shut down the guest using the #CP LOGOFF command, log back in, and then rerun the vmur sequence (the reader queue will be purged automatically by z/VM).
After all guests have been IPL’ed, continue to the section “Create the cluster” below
Method 2: Manually copy the necessary VM files to the A disk
Each VM on IBM z/VM requires access to the initramfs, kernel, and parameter (PARM) files on their internal disk. We used a shared disk among all the VMs part of the cluster, (bootstrap, master0, master1, .... worker1) so they all can have access to the files mentioned. Each cluster VM also has a dedicated disk for installing RHCOS, which is a separate disk (the 120GB EAV disk).
Transfer the initramfs, kernel, and all parameter (PARM) files to the repository VM's local A disk on z/VM from an external FTP server:
==> ftp <VM_REPOSITORY_IP>

VM TCP/IP FTP Level 710

Connecting to <VM_REPOSITORY_IP>, port 21
220 (vsFTPd 3.0.2)
USER (identify yourself to the host):
>>>USER <username>
331 Please specify the password.
Password:
>>>PASS ********
230 Login successful.
Command:
cd <repositoryofimages>
ascii
get <parmfile_bootstrap>.parm
get <parmfile_master>.parm
get <parmfile_worker>.parm
locsite fix 80
binary
get <kernel_image>.img
get <initramfs_file>
Here's an example of the VM definition (user ID = LNXDB030) for the bootstrap VM on IBM z/VM for this installation:
USER LNXDB030 LBYONLY 16G 32G
   INCLUDE DFLT
      CPU 00 BASE
   CPU 01
   CPU 02
   CPU 03
   MACHINE ESA 8
   OPTION APPLMON CHPIDV ONE
   POSIXINFO UID 100533
   MDISK 0191 3390 436 50 USAW01
   MDISK 0201 3390 1 END LXDBC0
A few clarifications:
USER LNXDB030 LBYONLY 16G 32Gis the user ID and memory definition (initial and max values).MDISK 0191 3390 436 50 USAW01is where you put the EXEC to run.MDISK 0201 3390 1 END LXDBC0is the mdisk mod54 for the RHCOS.
Note: In our lab, we experimented with a mod54 for the nodes, but for real-world scenarios use the EAV volumes that are 100GB in size.
Punch the files to the virtual reader of the z/VM guest virtual machine that is to become your bootstrap node.
Log in to CMS on the bootstrap machine:
IPL CMS
Create the exec file to punch the other files (kernel, PARM, initramfs) to start the Linux installation on each Linux server's part of the OpenShift cluster using the mdisk 191. This example shows the bootstrap exec file:
/* EXAMPLE EXEC FOR OC LINUX INSTALLATION  */

TRACE O
'CP SP CON START CL A *'
'EXEC VMLINK MNT3 191 <1191 Z>'
'CL RDR'
'CP PUR RDR ALL'
'CP SP PU * RDR CLOSE'
'PUN KERNEL IMG Z (NOH'
'PUN BOOTSTRAP PARM Z (NOH'
'PUN INITRAMFS IMG Z (NOH'
'CH RDR ALL KEEP NOHOLD'
'CP IPL 00C'
The line EXEC VMLINK MNT3 191 <1191 Z> shows that the disk from the repository VM will be linked to this VM's EXEC process, making the files we already transferred to the repository VM's local disk available to the VM where this EXEC file will be run (for example, the bootstrap VM).
Call the EXEC file to start the bootstrap installation process:
<BOOTSTRAP> EXEC
Once the installation of the Red Hat CoreOS finishes, make sure to re-IPL this VM so it will load the Linux OS from its internal DASD:
#CP IPL 201
When RHCOS loads from its internal disk, it should look like this:
Red Hat Enterprise Linux CoreOS 390x.<81.20200131.0>  4.12.x"
SSH host key: <SHA256key>"
SSH host key: : <SHA256key>"
SSH host key: <SHA256key>"
eth0:<ipaddress> fe80::3ff:fe00:9a"
bootstrap login:
Repeat this procedure for the other machines in the cluster, which means applying the same steps for creating the Red Hat Enterprise Linux CoreOS with the respective changes to master0, master1, master2, compute0, and compute1.
Make sure to include IPL 201 in the VM’s definition so that whenever the VM goes down, it will automatically IPL the 201 disk (RHCOS) when it gets started again. For example:
USER LNXDB030 LBYONLY 16G 32G
   INCLUDE DFLT
     CPU 00 BASE
   CPU 01
   CPU 02
   CPU 03
   IPL 201
   MACHINE ESA 8
   OPTION APPLMON CHPIDV ONE
   POSIXINFO UID 100533
   MDISK 0191 3390 436 50 USAW01
   MDISK 0201 3390 1 END LXDBC0
Create the cluster
To create the RHOCP cluster, wait for the bootstrap process to complete on the machines that you provisioned by using the ignition config files that you generated with the installation program.
Monitor the bootstrap process from the Bastion node:
./openshift-install --dir=<installation_directory> wait-for bootstrap-complete --log-level=debug
The bootstrap must be the first VM, as it provides most of the requirements for the Control nodes, which should be installed (all 3) after the bootstrap node is online. The compute nodes are the last ones that will join the RHOCP cluster. Once the bootstrap node is online and all the Control nodes have been installed successfully, the bootstrap node can be shut down; only then should you start the install process for the compute nodes.
After the bootstrap process is complete, remove the bootstrap machine from the load balancer configuration.
Log in to the cluster
From your Bastion node, you can log in to your cluster as a default system user by exporting the cluster kubeconfig file. This file contains information about the cluster that is used by the CLI to connect a client to the correct cluster and API server. The file is specific to a cluster and is created during OCP installation
Export the kubeadmin credentials:
export KUBECONFIG=<installation_directory>/auth/kubeconfig
Verify that you can run oc commands successfully using the exported configuration:
$ oc whoami
system:admin
Review the pending certificate signing requests (CSRs) and ensure that you see a client and server request with Pending or Approved status for each machine that you added to the cluster:
$ oc get csr
NAME        AGE   REQUESTOR                           CONDITION
csr-2qwv8   106m  system:node:worker1.<domain>        Approved,Issued
csr-2sjrr   61m   system:node:worker1.<domain>        Approved,Issued
csr-5s2rd   30m   system:node:worker1.<domain>        Approved,Issued
csr-9v5wz   15m   system:node:worker1.<domain>        Approved,Issued
csr-cffn6   127m  system:servi…:node-bootstrapper     Approved,Issued
csr-lmlsj   46m   system:node:worker1.<domain>        Approved,Issued
csr-qhwd8   76m   system:node:worker1.<domain>        Approved,Issued
csr-zz2z7   91m   system:node:worker1.<domain>        Approved,Issued
If you identify any Pending requests, then do this:
oc adm certificate approve <csr_name>
Initial operator configuration
After the control plane initializes, you must immediately configure some operators so that they all become available.
Watch the cluster components come online (wait until all are True in the AVAILABLE column):
$ watch -n5 oc get clusteroperators

NAME                   VERSION   AVAILABLE   PROGRESSING   DEGRADED   SINCE
authentication         4.12.x    True        False         False      69s
cloud-credential       4.12.x    True        False         False      12m
cluster-autoscaler     4.12.x    True        False         False      11m
console                4.12.x    True        False         False      46s
dns                    4.12.x    True        False         False      11m
image-registry         4.12.x    True        True          False      5m26s
ingress                4.12.x    True        False         False      5m36s
kube-apiserver         4.12.x    True        False         False      8m53s
kube-controller-manag  4.12.x    True        False         False      7m24s
kube-scheduler         4.12.x    True        False         False      12m
machine-api            4.12.x    True        False         False      12m
machine-config         4.12.x    True        False         False      7m36s
marketplace            4.12.x    True        False         False      7m54m
monitoring             4.12.x    True        False         False      7h54s
network                4.12.x    True        False         False      5m9s
node-tuning            4.12.x    True        False         False      11m
openshift-apiserver    4.12.x    True        False         False      11m
openshift-controller-  4.12.x    True        False         False      5m43s
openshift-samples      4.12.x    True        False         False      3m55s
operator-lifecycle-man 4.12.x    True        False         False      11m
operator-lifecycle-ma  4.12.x    True        False         False      11m
service-ca             4.12.x    True        False         False      11m
service-catalog-apiser 4.12.x    True        False         False      5m26s
service-catalog-contro 4.12.x    True        False         False      5m25s
storage                4.12.x    True        False         False      5m30s
Now, monitor for cluster completion:
$ ./openshift-install --dir=<installation_directory> wait-for install-complete
INFO Waiting up to 30m0s for the cluster to initialize...
This command succeeds when the Cluster Version Operator finishes deploying the RHOCP cluster from the Kubernetes API server.
INFO Waiting up to 30m0s for the cluster at https://api.<cluster_name>.<domain>:6443 to initialize...

INFO Waiting up to 10m0s for the openshift-console route to be created...

INFO Install complete!

INFO To access the cluster as the system:admin user when using 'oc', run 'export KUBECONFIG=/root/<installation-directory>/auth/kubeconfig'

INFO Access the OpenShift web-console here: https://console-openshift-console.apps.<cluster-name>.<domain>

INFO Login to the console with user: kubeadmin, password: 3cXGD-Mb9CC-hgAN8-7S9YG
Login using a web browser:
http://console-openshift-console.apps.<cluster-name>.<domain>
Summary
This tutorial has only covered the installation process. For day 2 operations, keep in mind that no persistent storage is configured for workloads that require persistent storage. For now, Red Hat OpenShift 4 is ready to be explored.
*Acknowledgements: Thanks go to the following people for contributing to this tutorial: Alexandre de Oliveira, Edi Lopes Alves, Alex Souza, Adam Young, Apostolos Dedes (Toly), Russ Popeil, Patrick Fruth, Anna Shugol, Pedro Ibanez Requena, Alexander Klein, Aaron Graves, Silke Niemann, Lakshmi Ravichandran, and Sándor Irmes.*