Tutorial
Prepare for LPIC-1 exam 1 - topic 104.1: Create partitions and filesystems
Divide and conquer your disk spaceOverview
In this tutorial, learn about disk partitions and Linux filesystems, including how to:
- Use
fdisk,gdisk, andpartedto create and modify MBR and GPT partitions - Use
mkfscommands to set up ext2, ext3, ext4, xfs, and vfat filesystems - Create and manage swap space
Dividing up your disk space
We'll start this tutorial with a review of block devices and partitions, and then show you more about the fdisk, gdisk, and parted commands, which is used to create, modify, or delete partitions on block devices. You will also learn about the various forms of the mkfs command (mkfs stands for make filesystem); mkfs commands are used to format partitions as a particular filesystem type.
Note: In addition to the tools and filesystems required for the LPI exams, you may encounter or need other tools and filesystems. Find a brief summary of some other available tools in Other tools and filesystems.
This tutorial helps you prepare for Objective 104.1 in Topic 104 of the Linux Server Professional (LPIC-1) exam 101. The objective has a weight of 2.
Prerequisites
To get the most from the tutorials in this series, you should have a basic knowledge of Linux and a working Linux system on which you can practice the commands covered in this tutorial. Sometimes different versions of a program will format output differently, so your results may not always look exactly like the listings and figures shown here.
You should also be familiar with the material in our tutorial, "Learn Linux 101: Hard disk layout."
The examples in this tutorial come from several different systems and Linux distributions. Several use relatively small 16GB USB flash drives as an easy way of reformatting a whole disk without significant loss of data. Your results on other Linux systems may differ. Your hardware will also have different disks attached, so use the examples here as illustrations only. We have given some indication of the Linux distribution actually used as a comment on the first command in each listing, or on multiple commands if we illustrate with different distributions.
Block devices and partitions
Our tutorial, "Learn Linux 101: Hard disk layout," introduced you to hard drive layouts, partitions, and some basic use of the fdisk and gdisk commands to view partition information. You learned about the Master Boot Record (MBR), partition tables, partitions, including primary, extended, and logical partitions. You were also introduced to GUID Partition Table s (GPT), a new format used to address the size limitations inherent in the MBR layout. Finally, you learned that a Linux filesystem contains files that are arranged on a disk or other block storage device in directories. As with many other systems, directories on a Linux system may contain other directories called subdirectories. That tutorial also discussed the considerations that guide you in making choices about partitioning.
This tutorial focuses on the LPI requirements related to the fdisk command for partitioning using MBR layouts and the gdisk command for partitioning using GPT layouts.
Block devices
A block device is an abstraction layer for any storage device that can be formatted in fixed-size blocks; individual blocks may be accessed independently of access to other blocks. Such access is often called random access.
The abstraction layer of randomly accessible fixed-size blocks allows programs to use these block devices without worrying about whether the underlying device is a hard drive, floppy, CD, solid-state drive, network drive, or some type of virtual device such as an in-memory file system.
Examples of block devices include the first IDE or SATA hard drive on your system (/dev/sda or /dev/hda) or the second SCSI, IDE, or USB drive (/dev/sdb). Use the ls -l command to display /dev entries. The first character on each output line is b for a block device, such as floppy, CD drive, IDE hard drive, or SCSI hard drive; and c for a character device, such as a or terminal (tty) or the null device. See the examples in Listing 1.
Listing 1. Linux block and character devices
[ian@attic‑f21 resent]$ ls ‑l /dev/null /dev/sd[ab] /dev/sr0 /dev/tty0  #Fedora 21
crw‑rw‑rw‑. 1 root root   1,  3 Jul 27 20:38 /dev/null
brw‑rw‑‑‑‑. 1 root disk   8,  0 Jul 30 07:46 /dev/sda
brw‑rw‑‑‑‑. 1 root disk   8, 16 Jul 30 07:46 /dev/sdb
brw‑rw‑‑‑‑+ 1 root cdrom 11,  0 Jul 27 20:38 /dev/sr0
crw‑‑w‑‑‑‑. 1 root tty    4,  0 Jul 27 20:38 /dev/tty0
Partitions
For some block devices, such as floppy disks and CD or DVD discs, it's common to use the whole media as a single filesystem. However, with large hard drives, and even with USB memory keys, it is more common to divide, or partition, the available space into several different partitions.
Partitions can be different sizes, and different partitions may have different filesystems on them, so a single disk can be used for many purposes, including sharing it between multiple operating systems. For example, I use test systems with several different Linux distributions and sometimes a Windows® system, all sharing one or two hard drives.
You will recall from the tutorial, "Learn Linux 101: Learn Linux, 101: Hard disk layout," that hard drives have a geometry, defined in terms of cylinders, heads, and sectors. Even though modern drives use logical block addressing (LBA), which renders geometry largely irrelevant, the fundamental allocation unit for MBR partitioning purposes is frequently still the cylinder.
Displaying partition information
Partition information is stored in a partition table on the disk. The table lists information about the start and end of each partition, information about its type, and whether it is marked bootable or not. To create and delete partitions, you edit the partition table using a program specially designed for the job. For the LPI exam, you need to know about the fdisk, gdisk, and parted programs, so those are what is covered here, although several other tools could be used. We will mention some at the end of this tutorial.
Displaying MBR partition information using fdisk
The fdisk command with the -l option is used to list partitions. Add a device name, such as /dev/sda, if you want to look at the partitions on a particular drive. Note that partitioning tools require root access. Listing 2 shows the partitions on the primary hard drives of two of my systems.
Listing 2. Listing MBR partitions using fdisk
ian@Z61t‑u14:~$ sudo fdisk ‑l /dev/sda #Ubuntu 14

Disk /dev/sda: 500.1 GB, 500107862016 bytes
255 heads, 63 sectors/track, 60801 cylinders, total 976773168 sectors
Units = sectors of 1  512 = 512 bytes
Sector size (logical/physical): 512 bytes / 512 bytes
I/O size (minimum/optimal): 512 bytes / 512 bytes
Disk identifier: 0xed1f86f7

   Device Boot      Start         End      Blocks   Id  System
/dev/sda1             63   185915519    92957728+   7  HPFS/NTFS/exFAT
/dev/sda2       185915520   195365519     4725000   12  Compaq diagnostics
/dev/sda3       195366910   976773119   390703105    5  Extended
/dev/sda5       195366912   293021695    48827392   83  Linux
/dev/sda6       293023744   312553471     9764864   82  Linux swap / Solaris
/dev/sda7       312555520   333035519    10240000   83  Linux

root@atticf20 ~fdisk ‑l /dev/sda #Fedora 22
Disk /dev/sda: 596.2 GiB, 640135028736 bytes, 1250263728 sectors
Units: sectors of 1  512 = 512 bytes
Sector size (logical/physical): 512 bytes / 512 bytes
I/O size (minimum/optimal): 512 bytes / 512 bytes
Disklabel type: dos
Disk identifier: 0x00064a1a

Device     Boot      Start        End    Sectors   Size Id Type
/dev/sda1               63    2040254    2040192 996.2M 83 Linux
/dev/sda2          2040255   22523129   20482875   9.8G 82 Linux swap / Solaris
/dev/sda4         22523191 1250258624 1227735434 585.4G  5 Extended
/dev/sda5         22523193  167397299  144874107  69.1G 83 Linux
/dev/sda6        167397363  310761359  143363997  68.4G 83 Linux
/dev/sda7       310761423  455442749  144681327    69G 83 Linux
/dev/sda8        455442813  600092009  144649197    69G 83 Linux
/dev/sda9        600092073  744436034  144343962  68.8G 83 Linux
/dev/sda10       744436098  918439935  174003838    83G 83 Linux
/dev/sda11       918441984 1079044095  160602112  76.6G 83 Linux
/dev/sda12      1079053983 1250258624  171204642  81.7G 83 Linux
Notes:
- The header information shows the disk size and geometry. Most large disks using LBA have 255 heads per cylinder and 63 sectors per track, making a total of 16065 sectors, or 8225280 bytes per cylinder.
- In the second example, a logical partition (/dev/sda7) is marked bootable (or active). This flag normally enables the standard DOS PC master boot record to boot the partition. However, that loader can only boot primary partitions. This flag has no significance for the LILO or GRUB boot loaders. Both example now use GRUB2 as the boot loader, and the fact that /dev/sda7 is marked bootable is probably an accident of the history of my use of this drive.
- The Start and End columns show the starting and ending cylinder for each partition. These must not overlap and will generally be contiguous, with no intervening space.
- The Blocks column shows the number of 1K (1024 byte) blocks in the partition. For most disks in use at the time of writing, the sector size is 512 bytes, so the maximum number of blocks in a partition is therefore half of the product of the number of cylinders (End + 1 - Start) and the number of sectors per cylinder. A trailing + sign indicates that not all sectors in the partition are used. Some disks can now be formatted with larger sectors
- The Id field indicates the intended use of the partition. Type 82 is a Linux swap partition, and type 83 is a Linux data partition. There are approximately 100 different partition types defined. The second disk is shared between several operating systems, including Windows/XP, hence the presence of Windows NTFS (and possibly FAT32) partitions.
Displaying GPT partition information using gdisk
Like the fdisk command for MBR formatted disks, the gdisk with the -l option is used to list partitions for GPT formatted disks. Add a device name, such as /dev/sda, if you want to look at the partitions on a particular drive. As with fdisk, gdisk require root access. shows the partition a GPT formatted hard drive of tone of my systems where the partition takes up almost half the available disk.
Listing 3. Listing GPT partitions using gdisk
root@attic‑f21 ~#Fedora 21
root@attic‑f21 ~gdisk ‑l /dev/sdc
GPT fdisk (gdisk) version 1.0.0

Partition table scan:
  MBR: protective
  BSD: not present
  APM: not present
  GPT: present

Found valid GPT with protective MBR; using GPT.
Disk /dev/sdc: 1953525168 sectors, 931.5 GiB
Logical sector size: 512 bytes
Disk identifier (GUID): E5D8C34A‑33BF‑49EA‑8800‑AE195E292F1D
Partition table holds up to 128 entries
First usable sector is 34, last usable sector is 1953525134
Partitions will be aligned on 2048‑sector boundaries
Total free space is 1004111213 sectors (478.8 GiB)

Number  Start (sector)    End (sector)  Size       Code  Name
   1            2048       949415935   452.7 GiB   0700
Note the presence of a protective MBR. This enables programs that are unaware of GPT formatting to see the disk as if the whole disk were occupied by a single partition. Current versions of fdisk are aware of GPT formatting and will also display the partitions on a GPT formatted disk.
Displaying partition information using parted
The parted command is a partition editor that will work with both MBR and GPT formatted disks. shows the second disk from Listing 2 and the disk from .
Listing 4. Listing MBR and GPT partitions using parted
root@attic‑f21 ~#Fedora 21
root@attic‑f21 ~parted /dev/sda p
Model: ATA WDC WD6401AALS‑0 (scsi)
Disk /dev/sda: 640GB
Sector size (logical/physical): 512B/512B
Partition Table   : msdos
Disk Flags:

Number  Start   End     Size    Type      File system     Flags
 1      32.3kB  1045MB  1045MB  primary   ext3
 2      1045MB  11.5GB  10.5GB  primary   linux‑swap(v1)
 4      11.5GB  640GB   629GB   extended
 5      11.5GB  85.7GB  74.2GB  logical   ext4
 6      85.7GB  159GB   73.4GB  logical   ext4
 7      159GB   233GB   74.1GB  logical   ext4            boot
 8      233GB   307GB   74.1GB  logical   ext3
 9      307GB   381GB   73.9GB  logical   ext3
10      381GB   470GB   89.1GB  logical   ext4
11      470GB   552GB   82.2GB  logical   ext3
12      552GB   640GB   87.7GB  logical   ext4

root@attic‑f21 ~parted /dev/sdc p
Model: ATA WDC WD1003FZEX‑0 (scsi)
Disk /dev/sdc: 1000GB
Sector size (logical/physical): 512B/4096B
Partition Table   : gpt
Disk Flags:

Number  Start   End    Size   File system  Name  Flags
 1      1049kB  486GB  486GB  ext4               msftdata
Note the different physical sector sizes on the two disks.
Partitioning a disk
You have just seen how to display partition information using the fdisk, gdisk, and parted commands. These commands also provide a menu-driven environment for editing the partition table to create or remove partitions.
Warnings
Before you start modifying partitions, there are some important things to remember. You risk losing your existing data if you do not follow these guidelines.
- Back up important data before you start, as with any operation that may cause data loss.
- Do not change partitions that are in use. Plan your actions and execute them carefully. Booting a live distribution from CD, DVD, or USB is one good way to ensure that no hard drive partitions are in use.
- Know your tool. The
fdiskcommand does not commit any changes to your disk until you tell it to. Other tools, includingparted, may commit changes as you go. - Stop if you do make a mistake. Partitioning tools write the partition table. Unless the tool you are using also includes the ability to move, resize, format, or otherwise write to the data area of your disk, your data will not be touched. If you do make a mistake, stop as quickly as possible and seek help. You may still be able to restore your previous partition table definitions and thus recover your partitions and data.
Partitioning an MBR disk using fdisk
If you need to change partitions that are normally in use, you will probably want to do it from a live CD or USB stick. For our first example of adding a partition using fdisk, we'll use a Knoppix 7.4.2 live DVD.
To start fdisk in interactive mode, simply give the name of a disk, such as /dev/sda or /dev/sdb, as a parameter. You will need root authority, and you will see output similar to Listing 5.
Listing 5. Starting interactive fdisk
knoppix@Microknoppix:~$ su ‑
root@Microknoppix:~#fdisk /dev/sda

Command (m for help):
Older versions of fdisk may give you a warning about disks with more than 1024 cylinders. If your BIOS is very old and does not support booting from beyond cylinder 1024, this may apply to you, but most systems today will not be affected by this limit and modern versions of fdisk no longer display the warning. You may also find your version has a -c option to turn off DOS compatibility mode. this is generally recommended and will also suppress some warnings.
Type m to display a list of available one-letter commands as shown in Listing 6.
Listing 6. Help in fdisk
Command (m for help): m
Command action
   a   toggle a bootable flag
   b   edit bsd disklabel
   c   toggle the dos compatibility flag
   d   delete a partition
   l   list known partition types
   m   print this menu
   n   add a new partition
   o   create a new empty DOS partition table
   p   print the partition table
   q   quit without saving changes
   s   create a new empty Sun disklabel
   t   change a partition's system id
   u   change display/entry units
   v   verify the partition table
   w   write table to disk and exit
   x   extra functionality (experts only)

Command (m for help):
Use the p command to display the existing partition on this disk. Listing 7 shows the output.
Listing 7. Displaying the existing partition table
Command (m for help): p

Disk /dev/sda: 640.1 GB, 640135028736 bytes
255 heads, 63 sectors/track, 77825 cylinders, total 1250263728 sectors
Units = sectors of 1  512 = 512 bytes
Sector size (logical/physical): 512 bytes / 512 bytes
I/O size (minimum/optimal): 512 bytes / 512 bytes
Disk identifier: 0x00064a1a

   Device Boot      Start         End      Blocks   Id  System
/dev/sda1              63     2040254     1020096   83  Linux
/dev/sda2         2040255    22523129    10241437+  82  Linux swap / Solaris
/dev/sda4        22523191  1250258624   613867717    5  Extended
/dev/sda5        22523193   167397299    72437053+  83  Linux
/dev/sda6       167397363   310761359    71681998+  83  Linux
/dev/sda7      310761423   455442749    72340663+  83  Linux
/dev/sda8       455442813   600092009    72324598+  83  Linux
/dev/sda9       600092073   744436034    72171981   83  Linux
/dev/sda10      744436098   918439935    87001919   83  Linux
/dev/sda11      918441984  1079044095    80301056   83  Linux
/dev/sda12     1079053983  1250258624    85602321   83  Linux

Command (m for help):
This particular disk is a 640GB disk with two primary partitions, /dev/sda1 and /dev/sda2, and an extended partition /dev/sda4 which contains 8 logical partitions. There is one Linux swap partition.
Adding a partition using fdisk
Let's now use part of the very small amount of free space at the end of the disk to add a primary partition which we will eventually format as FAT32.
Start by using the n command to create a new partition; see Listing 8.
Listing 8. Creating our first partition
Command (m for help): n
Partition type:
   p   primary (2 primary, 1 extended, 1 free)
   l   logical (numbered from 5)
Select (default p): p
Selected partition 3
First sector (22523130‑1250263727, default 22523130): 1250258625
Last sector, +sectors or +size{K,M,G} (1250258625‑1250263727, default 1250263727):
Using default value 1250263727

Command (m for help): p

Disk /dev/sda: 640.1 GB, 640135028736 bytes
255 heads, 63 sectors/track, 77825 cylinders, total 1250263728 sectors
Units = sectors of 1  512 = 512 bytes
Sector size (logical/physical): 512 bytes / 512 bytes
I/O size (minimum/optimal): 512 bytes / 512 bytes
Disk identifier: 0x00064a1a

   Device Boot      Start         End      Blocks   Id  System
/dev/sda1              63     2040254     1020096   83  Linux
/dev/sda2         2040255    22523129    10241437+  82  Linux swap / Solaris
/dev/sda3      1250258625  1250263727        2551+  83  Linux
/dev/sda4        22523191  1250258624   613867717    5  Extended
/dev/sda5        22523193   167397299    72437053+  83  Linux
/dev/sda6       167397363   310761359    71681998+  83  Linux
/dev/sda7      310761423   455442749    72340663+  83  Linux
/dev/sda8       455442813   600092009    72324598+  83  Linux
/dev/sda9       600092073   744436034    72171981   83  Linux
/dev/sda10      744436098   918439935    87001919   83  Linux
/dev/sda11      918441984  1079044095    80301056   83  Linux
/dev/sda12     1079053983  1250258624    85602321   83  Linux

Partition table entries are not in disk order

Command (m for help):
A primary partition must be numbered 1 through 4, so once we selected p as the partition type, our only choice for partition number was 3 as the disk already has 1,2 and 4 in use. We specified 1250258625 as the starting sector as it is one sector beyond the last sector in use for /dev/sda12. We took the default for the ending sector as the last sector on the disk. The new /dev/sda3 partition has 2551 1K blocks, so it is indeed tiny.
It is a good idea to assign partition numbers sequentially; some tools complain if this is not done and fdisk warns us that our partition table entries are no longer in disk order.
Notice also that our new partition was assigned a type of 83, for a Linux data partition. Think of this as an indicator to the operating system of the intended use of the partition. The eventual use should match this, but at this point we don't even have the partition formatted, let alone have any data on it. We'll change the partition type in a moment.
You may have noticed that when we entered the n subcommand to create a new partition, the only choices were 'l' for logical and 'p' for primary. You will only see options for the possible types of partitions that you could create. You would see 'e' for extended if the drive did not already have an extended partition. Also note that our extended partition (/dev/sda4) is type 5.
Changing partition type using fdisk
Before we leave fdisk, we will change the partition type for our new partition. We do this using the t subcommand to set the partition type. We set /dev/sda3 to type b (W95 FAT32). If you want to see the full list of supported types, enter L as you see in Listing 9.
Listing 9. Changing partition types
Command (m for help):  t
Partition number (1‑12):  3
Hex code (type L to list codes):  b
Changed system type of partition 3 to b (W95 FAT32)

Command (m for help):
Saving our partition table
So far, we have just been doing an in-memory edit of a partition table. We could use the q command to quit without saving changes. If something is not how you want it, you can use the d command to delete one or more partitions so you can redefine them. If you are happy with your setup, use the v command to verify your setup, and then the w command to write the new partition table and at which point fdisk exits. See Listing 10. If you run fdisk -l again, you will see that Linux now knows about the new partitions. Unlike in some operating systems, it is not always necessary to reboot to see the changes. A reboot may be required if, for example, /dev/hda3 became /dev/hda2 because the original /dev/hda2 was deleted. If a reboot is needed, fdisk should tell you to do so.
Listing 10. Saving the partition table
Command (m for help): v
Remaining 12367 unallocated 512‑byte sectors

Command (m for help): w
The partition table has been altered!

Calling ioctl() to re‑read partition table.

WARNING: If you have created or modified any DOS 6.x
partitions, please see the fdisk manual page for additional
information.
Syncing disks.
More on fdisk
Neither LILO nor GRUB uses the bootable flag. If either of these is installed in the MBR, then it can boot any partition, whether primary or logical.
You can also use fdisk to fix the partition order in the partition table if you need to. This will usually change the partition numbers, so you may have other work to do to restore your system to a working system. To make this change, use the x subcommand to switch to expert mode and then the f subcommand to fix the partition order, as shown in Listing 11. If you just want to see what the new partition order would be without changing it, you can use the q subcommand to quit as we have done in this example, rather than writing the updated partition table to disk.
Listing 11. Fixing the partition table order
root@Microknoppix:~#fdisk /dev/sda

Command (m for help): p

Disk /dev/sda: 640.1 GB, 640135028736 bytes
255 heads, 63 sectors/track, 77825 cylinders, total 1250263728 sectors
Units = sectors of 1  512 = 512 bytes
Sector size (logical/physical): 512 bytes / 512 bytes
I/O size (minimum/optimal): 512 bytes / 512 bytes
Disk identifier: 0x00064a1a

   Device Boot      Start         End      Blocks   Id  System
/dev/sda1              63     2040254     1020096   83  Linux
/dev/sda2         2040255    22523129    10241437+  82  Linux swap / Solaris
/dev/sda3      1250258625  1250263727        2551+   b  W95 FAT32
/dev/sda4        22523191  1250258624   613867717    5  Extended
/dev/sda5        22523193   167397299    72437053+  83  Linux
/dev/sda6       167397363   310761359    71681998+  83  Linux
/dev/sda7      310761423   455442749    72340663+  83  Linux
/dev/sda8       455442813   600092009    72324598+  83  Linux
/dev/sda9       600092073   744436034    72171981   83  Linux
/dev/sda10      744436098   918439935    87001919   83  Linux
/dev/sda11      918441984  1079044095    80301056   83  Linux
/dev/sda12     1079053983  1250258624    85602321   83  Linux

Partition table entries are not in disk order

Command (m for help): x

Expert command (m for help): m
Command action
   b   move beginning of data in a partition
   c   change number of cylinders
   d   print the raw data in the partition table
   e   list extended partitions
   f   fix partition order
   g   create an IRIX (SGI) partition table
   h   change number of heads
   i   change the disk identifier
   m   print this menu
   p   print the partition table
   q   quit without saving changes
   r   return to main menu
   s   change number of sectors/track
   v   verify the partition table
   w   write table to disk and exit

Expert command (m for help): f
Done.

Expert command (m for help): p

Disk /dev/sda: 255 heads, 63 sectors, 77825 cylinders

Nr AF  Hd Sec  Cyl  Hd Sec  Cyl     Start      Size ID
 1 00   1   1    0 254  63  126         63    2040192 83
 2 00   0   1  127 254  63 1023    2040255   20482875 82
 3 00 254  63 1023 254  63 1023   22523191 1227735434 05
 4 00   0   1    1  80  63    1 1250258625       5103 0b
 5 00 254  63 1023 254  63 1023          2  144874107 83
 6 00 254  63 1023 254  63 1023         63  143363997 83
 7 80 254  63 1023 254  63 1023         63  144681327 83
 8 00 254  63 1023 254  63 1023         63  144649197 83
 9 00 254  63 1023 254  63 1023         63  144343962 83
10 00 254  63 1023 254  63 1023         63  174003838 83
11 00 254  63 1023 254  63 1023       2048  160602112 83
12 00 254  63 1023 254  63 1023         63  171204642 83

Expert command (m for help): q
You can see from the menu of expert commands that many are unlikely to ever be used and you should only use them if you know what you are doing. Note also that the printout of the partition has a different format in expert mode.
Partitioning an GPT disk using gdisk
We will now look at adding partitions to GPT formatted disks using the gdisk command. We will add a 4GB swap partition and a 40GB data partition. The examples in this section use a CentOS 6 system.
Warning: If you use gdisk on an MBR formatted disk, it will offer to convert the disk to GPT format. This might destroy data on your disk, so make sure you have good backups before you try this.
Gdisk-partition- 1 shows gdisk starting using the MBR disk we used above (/dev/sda), and then using a GPT formatted disk (/dev/sdc). We will use /dev/sdc for our two new partitions.
Starting gdisk in interactive mode
root@attic4‑cent ~gdisk /dev/sda
GPT fdisk (gdisk) version 0.8.10

Partition table scan:
  MBR: MBR only
  BSD: not present
  APM: not present
  GPT: not present


*
Found invalid GPT and valid MBR; converting MBR to GPT format
in memory. THIS OPERATION IS POTENTIALLY DESTRUCTIVE! Exit by
typing 'q' if you don't want to convert your MBR partitions
to GPT format!
*


Warning! Secondary partition table overlaps the last partition by
33 blocks!
You will need to delete this partition or resize it in another utility.

Command (? for help): q

root@attic4‑cent ~gdisk /dev/sdc
GPT fdisk (gdisk) version 0.8.10

Partition table scan:
  MBR: protective
  BSD: not present
  APM: not present
  GPT: present

Found valid GPT with protective MBR; using GPT.

Command (? for help):
As with fdisk, you can get help. Use the ? subcommand as shown in .
Listing 13. Getting help with starting gdisk
Command (? for help): ?
b    back up GPT data to a file
c    change a partition's name
d    delete a partition
i    show detailed information on a partition
l    list known partition types
n    add a new partition
o    create a new empty GUID partition table (GPT)
p    print the partition table
q    quit without saving changes
r    recovery and transformation options (experts only)
s    sort partitions
t    change a partition's type code
v    verify disk
w    write table to disk and exit
x    extra functionality (experts only)
?    print this menu

Command (? for help):
shows how to add our two partitions. Initially, they will both default to Linux data partitions (type 8300). Note the use of +4G and +40G to specify the last sectors of the partitions.
Listing 14. Adding partitions using gdisk
Command (? for help): n
Partition number (2‑128, default 2):
First sector (34‑1953525134, default = 949415936) or {+‑}size{KMGTP}:
Last sector (949415936‑1953525134, default = 1953525134) or {+‑}size{KMGTP}: +4G
Current type is 'Linux filesystem'
Hex code or GUID (L to show codes, Enter = 8300):
Changed type of partition to 'Linux filesystem'

Command (? for help): n
Partition number (3‑128, default 3):
First sector (34‑1953525134, default = 957804544) or {+‑}size{KMGTP}:
Last sector (957804544‑1953525134, default = 1953525134) or {+‑}size{KMGTP}: +40G
Current type is 'Linux filesystem'
Hex code or GUID (L to show codes, Enter = 8300):
Changed type of partition to 'Linux filesystem'

Command (? for help):
Now we will change the partition type for /dev/sdc2 to Linux swap. shows the available types and how to change /dev/sdc2. We also show the resulting partition table, including the first partition that was already on the disk.
Listing 15. Changing a partition type using gdisk
Command (? for help): l
0700 Microsoft basic data  0c01 Microsoft reserved    2700 Windows RE
3000 ONIE boot             3001 ONIE config           4100 PowerPC PReP boot
4200 Windows LDM data      4201 Windows LDM metadata  7501 IBM GPFS
7f00 ChromeOS kernel       7f01 ChromeOS root         7f02 ChromeOS reserved
8200 Linux swap            8300 Linux filesystem      8301 Linux reserved
8302 Linux /home           8400 Intel Rapid Start     8e00 Linux LVM
a500 FreeBSD disklabel     a501 FreeBSD boot          a502 FreeBSD swap
a503 FreeBSD UFS           a504 FreeBSD ZFS           a505 FreeBSD Vinum/RAID
a580 Midnight BSD data     a581 Midnight BSD boot     a582 Midnight BSD swap
a583 Midnight BSD UFS      a584 Midnight BSD ZFS      a585 Midnight BSD Vinum
a800 Apple UFS             a901 NetBSD swap           a902 NetBSD FFS
a903 NetBSD LFS            a904 NetBSD concatenated   a905 NetBSD encrypted
a906 NetBSD RAID           ab00 Apple boot            af00 Apple HFS/HFS+
af01 Apple RAID            af02 Apple RAID offline    af03 Apple label
af04 AppleTV recovery      af05 Apple Core Storage    be00 Solaris boot
bf00 Solaris root          bf01 Solaris /usr & Mac Z  bf02 Solaris swap
bf03 Solaris backup        bf04 Solaris /var          bf05 Solaris /home
bf06 Solaris alternate se  bf07 Solaris Reserved 1    bf08 Solaris Reserved 2
bf09 Solaris Reserved 3    bf0a Solaris Reserved 4    bf0b Solaris Reserved 5
c001 HP‑UX data            c002 HP‑UX service         ea00 Freedesktop $BOOT
eb00 Haiku BFS             ed00 Sony system partitio  ed01 Lenovo system partit
Press the <Enter> key to see more codes:
ef00 EFI System            ef01 MBR partition scheme  ef02 BIOS boot partition
fb00 VMWare VMFS           fb01 VMWare reserved       fc00 VMWare kcore crash p
fd00 Linux RAID

Command (? for help): t
Partition number (1‑3): 2
Current type is 'Linux filesystem'
Hex code or GUID (L to show codes, Enter = 8300): 8200
Changed type of partition to 'Linux swap'

Command (? for help): p
Disk /dev/sdc: 1953525168 sectors, 931.5 GiB
Logical sector size: 512 bytes
Disk identifier (GUID): E5D8C34A‑33BF‑49EA‑8800‑AE195E292F1D
Partition table holds up to 128 entries
First usable sector is 34, last usable sector is 1953525134
Partitions will be aligned on 2048‑sector boundaries
Total free space is 911836525 sectors (434.8 GiB)

Number  Start (sector)    End (sector)  Size       Code  Name
   1            2048       949415935   452.7 GiB   0700
   2       949415936       957804543   4.0 GiB     8200  Linux swap
   3       957804544      1041690623   40.0 GiB    8300  Linux filesystem

Command (? for help): i
Notice that /dev/sdc1 has a type of 0700 which is Microsoft basic data. The partition is actually formatted as a Linux ext4 filesystem. Some partition types, such as Microsoft basic data, matter to some operating systems. Others, as in this case, are merely hints to an operating system.
Our final task is to verify the partition table and write it. We show this in .
Listing 16. Verifying and writing a partition table using gdisk
Command (? for help): v

No problems found. 911836525 free sectors (434.8 GiB) available in 2
segments, the largest of which is 911834511 (434.8 GiB) in size.

Command (? for help): w

Final checks complete. About to write GPT data. THIS WILL OVERWRITE EXISTING
PARTITIONS!!

Do you want to proceed? (Y/N): y
OK; writing new GUID partition table (GPT) to /dev/sdc.
Warning: The kernel is still using the old partition table.
The new table will be used at the next reboot.
The operation has completed successfully.
The final warning about needing to reboot is because we had /dev/sdc1 mounted. As we said earlier, it's generally better to repartition a disk when it has no mounted filesystems.
Partitioning using parted
By now, you will not be surprised to learn that you can also use parted in interactive mode. You can use it for either MBR or GPT formatted disks. One big difference between parted and either fdisk or gdisk, is that parted executes its subcommands immediately and updates the partition table as you go.
shows how to start parted to update /dev/sdc. You can get a list of commands and help on individual commands. We illustrate individual help for the mklabel subcommand. Commands can be abbreviated to the minimum unique abbreviation, so we could have used h mklabelhmklabel instead of help mklabelhelpmklabel. We also print the partition table and you can confirm that /dev/sdc1 is the only partition that is formatted and indeed it is formatted as ext4.
Listing 17. Starting parted to update /dev/sdc
root@attic4‑cent ~parted /dev/sdc
GNU Parted 2.1
Using /dev/sdc
Welcome to GNU Parted! Type 'help' to view a list of commands.
(parted) help
  align‑check TYPE N                        check partition N for TYPE(min|opt)
        alignment
  check NUMBER                             do a simple check on the file system
  cp [FROM‑DEVICE] FROM‑NUMBER TO‑NUMBER   copy file system to another partition
  help [COMMAND]                           print general help, or help on
        COMMAND
  mklabel,mktable LABEL‑TYPE               create a new disklabel (partition
        table)
  mkfs NUMBER FS‑TYPE                      make a FS‑TYPE file system on
        partition NUMBER
  mkpart PART‑TYPE [FS‑TYPE] START END     make a partition
  mkpartfs PART‑TYPE FS‑TYPE START END     make a partition with a file system
  move NUMBER START END                    move partition NUMBER
  name NUMBER NAME                         name partition NUMBER as NAME
  print [devices|free|list,all|NUMBER]     display the partition table,
        available devices, free space, all found partitions, or a particular
        partition
  quit                                     exit program
  rescue START END                         rescue a lost partition near START
        and END
  resize NUMBER START END                  resize partition NUMBER and its file
        system
  rm NUMBER                                delete partition NUMBER
  select DEVICE                            choose the device to edit
  set NUMBER FLAG STATE                    change the FLAG on partition NUMBER
  toggle [NUMBER [FLAG]]                   toggle the state of FLAG on partition
        NUMBER
  unit UNIT                                set the default unit to UNIT
  version                                  display the version number and
        copyright information of GNU Parted
(parted) help mklabel
  mklabel,mktable LABEL‑TYPE               create a new disklabel (partition
        table)

    LABEL‑TYPE is one of: aix, amiga, bsd, dvh, gpt, mac, msdos, pc98, sun,
        loop
(parted) p
Model: ATA WDC WD1003FZEX‑0 (scsi)
Disk /dev/sdc: 1000GB
Sector size (logical/physical): 512B/4096B
Partition Table : gpt

Number  Start   End    Size    File system  Name              Flags
 1      1049kB  486GB  486GB   ext4
 2      486GB   490GB  4295MB               Linux swap
 3      490GB   533GB  42.9GB               Linux filesystem

(parted)
Note that parted uses decimal powers rather than binary powers for MB, GB, etc, so the 40GB partition that was added by gdisk now appears as 42.9GB using parted.
We will now add two more Linux filesystem partitions using the mkpart subcommand. You could use the mkpartfs command to both make a partition and format it, but parted recommends using the more robust partition formatting tools that we will meet shortly, so we'll just use mkpart as shown in .
Listing 18. Using mkpart to add two Linux filesystem partitions
(parted) mkpart
Partition name?  []? "Linux filesystem"
File system type?  [ext2]? xfs
Start? 533GB
End? 573GB
Partition name?  []? "Linux filesystem"
File system type?  [ext2]?
Start? 573GB
End? 613GB
(parted) p
Model: ATA WDC WD1003FZEX‑0 (scsi)
Disk /dev/sdc: 1000GB
Sector size (logical/physical): 512B/4096B
Partition Table : gpt

Number  Start   End    Size    File system  Name              Flags
 1      1049kB  486GB  486GB   ext4
 2      486GB   490GB  4295MB               Linux swap
 3      490GB   533GB  42.9GB               Linux filesystem
 4      533GB   573GB  39.7GB               Linux filesystem
 5      573GB   613GB  40.0GB               Linux filesystem

(parted)
You may have noticed that parted asked us about the filesystem type but not the partition type code. We specified xfs for one and defaulted to ext2 for the second. In theory, parted uses the intended filesystem type to determine the correct partition type. uses gdisk to show the types that parted assigned to our new partitions.
Listing 19. Using gdisk to show the partition types created by parted
root@attic4‑cent ~gdisk ‑l /dev/sdc
GPT fdisk (gdisk) version 0.8.10

Partition table scan:
  MBR: protective
  BSD: not present
  APM: not present
  GPT: present

Found valid GPT with protective MBR; using GPT.
Disk /dev/sdc: 1953525168 sectors, 931.5 GiB
Logical sector size: 512 bytes
Disk identifier (GUID): E5D8C34A‑33BF‑49EA‑8800‑AE195E292F1D
Partition table holds up to 128 entries
First usable sector is 34, last usable sector is 1953525134
Partitions will be aligned on 2048‑sector boundaries
Total free space is 756262253 sectors (360.6 GiB)

Number  Start (sector)    End (sector)  Size       Code  Name
   1            2048       949415935   452.7 GiB   0700
   2       949415936       957804543   4.0 GiB     8200  Linux swap
   3       957804544      1041690623   40.0 GiB    8300  Linux filesystem
   4      1041690624      1119139839   36.9 GiB    0700  Linux filesystem
   5      1119139840      1197264895   37.3 GiB    0700  Linux filesystem
Probably /dev/sdc1 was created using parted or perhaps gparted.
You have now seen several ways to add partitions to a Linux workstation. We will show you a few other tools to add to your toolbox later in this tutorial. Filesystem considerations that might influence the choices you might make are covered in the tutorial, "Learn Linux, 101: Find and place system files."
Filesystem types
Linux supports several different filesystems. Each has strengths and weaknesses and its own set of performance characteristics. One important attribute of a filesystem is journaling, which allows for much faster recovery after a system crash. Generally, a journaling filesystem is preferred over a non-journaling one when you have a choice. You may also want to consider whether your chosen filesystem supports Security Enhanced Linux (or SELinux). Two newer file systems, ZFS and btrfs, use a technique called Copy on Write to improve data integrity and address large storage needs. Following is a brief summary of the types you need to know about for the LPI exam. See resources on the right for additional background information.
The ext2 filesystem
The ext2 filesystem (also known as the second extended filesystem) was developed to address shortcomings in the Minix filesystem used in early versions of Linux. It has been used extensively on Linux for many years. There is no journaling in ext2, and it has largely been replaced by ext3 and more recently ext4.
The ext3 filesystem
The ext3 filesystem adds journaling capability to a standard ext2 filesystem and is therefore an evolutionary growth of a very stable filesystem. It offers reasonable performance under most conditions and is still being improved. Because it adds journaling on top of the proven ext2 filesystem, it is possible to convert an existing ext2 filesystem to ext3 and even convert back again if required.
The ext4 filesystem started as extensions to ext3 to address the demands of ever larger file systems by increasing storage limits and improving performance. To preserve the stability of ext3, it was decided in June 2006 to fork the extensions into a new filesystem, ext4. The ext4 filesystem, was released in December 2008 and included in the 2.6.28 kernel. Some of the changes from ext3 are:
- File systems up to 1 exabyte with files up to 16 terabytes
- The use of extents to replace block mapping as a means of improving performance
- Journal checksums to improve reliability
- Faster file system checking because unallocated blocks can be skipped during checks.
- Delayed allocation and multiblock allocators to improve performance and reduce file fragmentation.
- Timestamp changes that provide finer granularity, a new creation date (which will require eventual updates to many other libraries and utilities to become fully useful). A further timestamp change addresses the year 2038 problem which is caused by storing timestamps as signed 32-bit integers.
The XFS filesystem
XFS is a filesystem with journaling. It comes with robust features and is optimized for scalability. XFS aggressively caches in-transit data in RAM, so an uninterruptible power supply is recommended if you use XFS.
The swap filesystem
Swap space must be formatted for use as swap space, but it is not generally considered a filesystem.
The vfat filesystem
This filesystem (also known as FAT32) is not journaled and lacks many features required for a full Linux filesystem implementation. It is useful for exchanging data between Windows and Linux systems as it can be read by both Windows and Linux. Do not use this filesystem for Linux, except for sharing data between Windows and Linux. If you unzip or untar a Linux archive on a vfat disk, you will lose permissions, such as execute permission, and you will lose any symbolic links that may have been stored in the archive.
The ReiserFS filesystem
ReiserFS is a B-tree-based filesystem that has very good overall performance, particularly for large numbers of small files. ReiserFS also scales well and has journaling. It is no longer in active development, does not support SELinux and has largely been superseded by Reiser4 whose future is unclear.
The btrfs filesystem
The btrfs (B-Tree file system) was initially developed by Oracle and is available under the GPL license (see resources on the right). It is a new copy-on-write filesystem for Linux aimed at implementing advanced features while focusing on fault tolerance, repair, and easy administration. The Btrfs filesystem code has been in the mainline kernel since the 2.6.29 release in 2009. In particular, it is designed to handle large files efficiently and handle filesystems spread across multiple devices. Some of the design goals include:
- Large file size (up to 2^64 byte)
- Checksums on data and metadata
- Integrated support for multiple devices
- SSD awareness
- Efficient Incremental Backup
- Data integrity
- Copy on write does not overwrite data, so hardware failures do not leave data in inconsistent states
Like most new filesystems, it takes a long time for the system to gain enough stability for users to commit important data to it, so it is not yet the mainline filesystem for most Linux distributions.
The ext3 filesystem is mature and was used as the default filesystem on many distributions. The ext4 filesystem is now replacing it as the default filesystem on several distributions, starting with distributions like Red Hat enterprise Linux 6. Fedora 17 and Ubuntu 12.10. The ReiserFS filesystem was used for many years as the default on some distributions, including SUSE, but is not widely used today.
Creating filesystems
Linux uses the mkfs command to create filesystems and mkswapcommand to make swap space. The mkfs command is actually a front end to several filesystem-specific commands such as mkfs.ext3 for ext3, mkfs.ext4 for ext4 and mkfs.btrfs for btrfs.
What filesystem support is already installed on your system? Use the ls /sbin/mk`ls/sbin/mk` command to find out. An example is shown in Listing 20.
Listing 20. Filesystem creation commands
[[ian@attic4‑cent ~]$ ls /sbin/mk*
/sbin/mkdosfs     /sbin/mkfs.cramfs   /sbin/mkfs.msdos        /sbin/mksquashfs
/sbin/mkdumprd    /sbin/mkfs.ext2     /sbin/mkfs.vfat         /sbin/mkswap
/sbin/mke2fs      /sbin/mkfs.ext3     /sbin/mkfs.xfs
/sbin/mkfs        /sbin/mkfs.ext4     /sbin/mkhomedir_helper
/sbin/mkfs.btrfs  /sbin/mkfs.ext4dev  /sbin/mkinitrd
You will notice various forms of some commands. For example, you will usually find that the files mke2fs, mkfs.ext2, and mkfs.ext3 are all the same file, while mkfs.msdos and mkfs.vfat are usually symbolic links to mkdosfs. Filesystems that may be needed to boot the system will usually use hard links to provide the different names for the same file. Filesystems that cannot be used for the / filesystem in Linux, such as vfat or msdos, may use symbolic links instead. The tutorial "Learn Linux, 101: Create and change hard and symbolic links" will help you learn about these different kinds of links.
There are a few common options for all mkfs commands. Options that are specific to the type of filesystem being created are passed to the appropriate creation command, based on the type of filesystem specified in the -type option. Our examples use mkfs -typemkfs-type, but you may use the other forms directly with equal effect. For example, you may use mkfs -type ext2mkfs-typeext2, mk2fs, or mkfs.ext2. For the manual pages for a specific filesystem, use the appropriate mkfs command as the name, for example, man mkfs.ext3manmkfs.ext3. Many of the values displayed in the output examples below can be controlled by options to mkfs.
Now that we have created all our partitions, we will reboot the CentOS 6 system and format the filesystems using that rather than the somewhat slower live Knoppix DVD. Of course, you could continue to use a live system if you wished. Remember that you need root authority to create filesystems.
Creating an ext3 filesystem
Let's format the /dev/sdc3 partition as ext3 using the mkfs command as shown in Listing 21.
Listing 21. Creating an ext3 filesystem
root@attic4‑cent ~mkfs ‑t ext3 /dev/sdc3
mke2fs 1.41.12 (17‑May‑2010)
Filesystem label=
OS type: Linux
Block size=4096 (log=2)
Fragment size=4096 (log=2)
Stride=1 blocks, Stripe width=0 blocks
2621440 inodes, 10485760 blocks
524288 blocks (5.00%) reserved for the super user
First data block=0
Maximum filesystem blocks=4294967296
320 block groups
32768 blocks per group, 32768 fragments per group
8192 inodes per group
Superblock backups stored on blocks:
    32768, 98304, 163840, 229376, 294912, 819200, 884736, 1605632, 2654208,
    4096000, 7962624

Writing inode tables: done
Creating journal (32768 blocks): done
Writing superblocks and filesystem accounting information: done

This filesystem will be automatically checked every 32 mounts or
180 days, whichever comes first.  Use tune2fs ‑c or ‑i to override.
Note that a journal is created with ext3. If you wish to add a journal to an existing ext2 system, use the tune2fs command with the -j option.
A useful option for ext2, ext3, and ext4 filesystems is the -L option with a name, which assigns a label to the partition. This can be used instead of the device name when mounting filesystems; it provides some level of insulation against changes that may need to be reflected in various control files. To display or set a label for an existing ext2, ext3, or ext3 filesystem, use the e2label command. Labels are limited to a maximum size of 16 characters.
A more recent development is to use a universally unique identifier, or UUID, rather than a label. A UUID is a 128-bit identifier usually displayed as 32 hexadecimal digits in groups of 8, separated by four hyphens. Most Linux filesystems generate a UUID automatically when the filesystem is formatted. Use the blkid command (which does not need root authority) as shown in Listing 22 to see the UUID for the partition we just formatted. UUIDs are more likely to be unique than labels and are especially useful for hot-plugged devices such as USB drives.
Listing 22. Displaying a UUID using blkid
[ian@attic4‑cent ~]$ blkid /dev/sdc3
/dev/sdc3: UUID="05efd400‑c689‑4205‑a53a‑e8b009eb5a55" SEC_TYPE="ext2" TYPE="ext3"
Creating an ext4 filesystem
Now let's create an ext4 filesystem on our new partition, /dev/sdc4. With the -L option of mkfs, label the partition and also show the GUID using the blkid command as we did for the ext3 partition above. Ext 4-part illustrates this.
Creating an ext4 partition
root@attic4‑cent ~mkfs ‑t ext4 ‑L IAN‑GPT‑EXT4 /dev/sdc4
mke2fs 1.41.12 (17‑May‑2010)
Filesystem label=IAN‑GPT‑EXT4
OS type: Linux
Block size=4096 (log=2)
Fragment size=4096 (log=2)
Stride=1 blocks, Stripe width=0 blocks
2424832 inodes, 9681152 blocks
484057 blocks (5.00%) reserved for the super user
First data block=0
Maximum filesystem blocks=4294967296
296 block groups
32768 blocks per group, 32768 fragments per group
8192 inodes per group
Superblock backups stored on blocks:
    32768, 98304, 163840, 229376, 294912, 819200, 884736, 1605632, 2654208,
    4096000, 7962624

Writing inode tables: done
Creating journal (32768 blocks): done
Writing superblocks and filesystem accounting information: done

This filesystem will be automatically checked every 23 mounts or
180 days, whichever comes first.  Use tune2fs ‑c or ‑i to override.
root@attic4‑cent ~blkid /dev/sdc4
/dev/sdc4: LABEL="IAN‑GPT‑EXT4" UUID="f69e0b28‑beda‑4255‑ad5a‑4d73672ac9e4" TYPE="ext4"
Notice that the first line of the mkfs output confirms that the work for creating both ext3 and ext4 filesystems is being done by mke2fs.
To see all the parameters that you can specify when creating an ext4 partition, consult the man pages for mkfs.ext4.
Creating an XFS filesystem
Let's now format /dev/sdc3 the partition we just formatted as ext3 using the XFS filesystem. If you are using SELinux (Security Enhanced Linux) with XFS, you should specify larger inodes than the default of 256 using the -i parameter. The recommended value is 512. This is because the default size of 256 bytes is not large enough for the SELinux XATTR and it would have to be stored in a separate node. Notice that the XFS formatter notifies you if it finds a recognized filesystem already on the partition. Note also that the UUID was reassigned by the XFS format.
Listing 26. Creating an XFS filesystem
root@attic4‑cent ~mkfs ‑t xfs ‑i size=512 /dev/sdc3
mkfs.xfs: /dev/sdc3 appears to contain an existing filesystem (ext3).
mkfs.xfs: Use the ‑f option to force overwrite.
root@attic4‑cent ~mkfs ‑t xfs ‑i size=512 ‑f /dev/sdc3
meta‑data=/dev/sdc3              isize=512    agcount=16, agsize=655360 blks
         =                       sectsz=4096  attr=2, projid32bit=0
data     =                       bsize=4096   blocks=10485760, imaxpct=25
         =                       sunit=0      swidth=0 blks
naming   =version 2              bsize=4096   ascii‑ci=0
log      =internal log           bsize=4096   blocks=5120, version=2
         =                       sectsz=4096  sunit=1 blks, lazy‑count=1
realtime =none                   extsz=4096   blocks=0, rtextents=0
root@attic4‑cent ~blkid /dev/sdc3
/dev/sdc3: UUID="16df203e‑7ee8‑4604‑b65f‑1a490e9a2f8c" TYPE="xfs"
You can label an XFS system using the -L option with a name. Or you can use the xfs_admin command with the -L option to add a label to an existing XFS filesystem. Use the -l option of xfs_admin to display a label. Unlike ext2, ext3, and ReiserFS, XFS labels have a maximum length of 12 characters.
Listing 27. Creating a vfat filesystem
root@attic4‑cent ~mkfs ‑t vfat /dev/sda3
mkfs.vfat 3.0.9 (31 Jan 2010)
root@attic4‑cent ~blkid /dev/sda3
/dev/sda3: SEC_TYPE="msdos" UUID="8856‑9AA8" TYPE="vfat"
UUIDs for vfat filesystems are shorter than normal UUIDs and therefore somewhat less likely to be unique. If you want a label instead, use the dosfslabel command. Labels for DOS partitions are limited to 11 characters in length.
For our last filesystem, we'll format out GPT partition, /dev/sdc5, using the btrfs filesystem as shown in .
Listing 26. Creating a btrfs filesystem
root@attic4‑cent ~mkfs ‑t btrfs /dev/sdc5

WARNING! ‑ Btrfs Btrfs v0.20‑rc1 IS EXPERIMENTAL
WARNING! ‑ see https://btrfs.wiki.kernel.org/index.php/Main_Page before using

fs created label (null) on /dev/sdc5
    nodesize 4096 leafsize 4096 sectorsize 4096 size 37.25GB
Btrfs Btrfs v0.20‑rc1
By now, you know to consult the man pages for mkfs.btrfs to find out more about the available options.
Creating swap space
Now let's create some swap space on the /dev/sdc2 partition using the mkswap command as shown in Listing 28.
Listing 28. Creating swap space
root@attic4‑cent ~mkswap /dev/sdc2
Setting up swapspace version 1, size = 4194300 KiB
no label, UUID=34ec5a36‑08a4‑458f‑bb6e‑a62800716211
Note that recent versions of mkswap show you the generated UUID.
Unlike regular filesystems, swap partitions aren't mounted. Instead, they are enabled using the swapon command. Your Linux system's startup scripts will usually take care of automatically enabling your swap partitions.
Other tools and filesystems
The following tools and filesystems are not part of the LPI objectives for this exam. This very brief overview touches on some of the tools and filesystems that you may encounter.
Partitioning tools
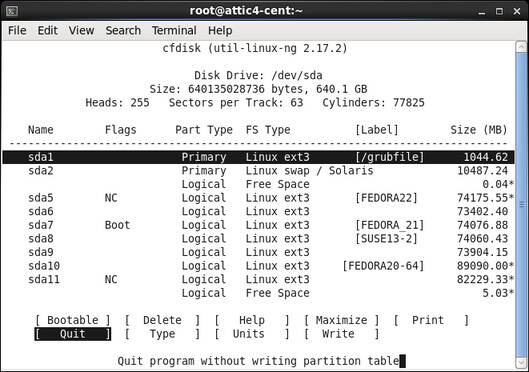
Many Linux distributions include the cfdisk or sfdisk commands and their GPT analogs cgdisk and sgdisk. The cfdisk command provides a more graphical interface than fdisk, using the ncurses library functions as shown in Figure 1. The sfdisk command is intended for programmer use and can be scripted. Use it only if you know what you are doing.
Figure 1. Using cfdisk
The gparted tool is another graphical partitioning tool, designed for the GNOME desktop. It uses the GTK+GUI library, and is shown in Figure 2. (See resources on the right)
You may have to install gparted as it may not be part of your default install.
Figure 2. Using gparted

Many distributions allow you to partition your disk, and sometimes shrink an existing Windows NTFS or FAT32 partition, as part of the installation process. Consult the installation documentation for your distribution.
Logical volume manager
The logical volume manager (or LVM) for Linux allows you to combine multiple physical storage devices into a single volume group. For example, you might add a partition to an existing volume group, rather than having to carve out contiguous space large enough for your desired filesystem. The tutorial "Learn Linux 101: Hard disk layout" has more information and an example of creating filesystems with LVM. Note that btrfs also supports multiple volumes.
RAID
RAID (Redundant Array of Independent Disks) is a technology for providing a reliable data storage using low-cost disks that are much less expensive than the disks found on high-end systems. There are several different types of RAID, and RAID may be implemented in hardware or software. Linux supports both hardware and software RAID.
More filesystems
You will probably encounter filesystems besides those discussed above.
IBM's Journaled File System (JFS), currently used in IBM enterprise servers, is designed for high-throughput server environments. It is available for Linux and is included in several distributions. There is a new enhanced journaled file system (JFS2) designed to accommodate a 64-bit kernel and larger files. It was introduced in IBM's AIX 5.1 operating system. The original JFS is sometimes now called JFS1. To create JFS filesystems, use the mkfs.jfs command. You may need to install the jfsutils package to get JFS support.
There are other filesystems too, such as the cramfs filesystem often used on embedded devices.
This completes your introduction to creating partitions and filesystems.