Tutorial
Using Express.js for Node applications
Build a responsive web UI for REST servicesIn this tutorial, I introduce you to Express.js. This learning path wouldn't be complete without introducing at least one web framework, and I've chosen Express.js because it's one of the most popular web frameworks in the Node ecosystem. It's also the basis for others like Loopback and krakenjs.
Express is minimal, fast, and has tons of contributions built on top of it. You are likely to encounter this framework as a professional Node developer, so you should be familiar with it.
Inside Express
At minimum, an Express application consists of the following:
- Middleware: The code used to process the HTTP request-and-response objects.
- Routing: Matching a URL path to a function for handling.
- View processing: Rendering an HTML page based on a page template and request data.
- Data validation and sanitization: Comparing request data to validation rules and ensuring the data does not contain exploitative data.
This tutorial introduces you to these modules. If you need more functionality, contributions extend that minimal core.
About the tutorial
I've converted the Shopping List application from "Create your first Node.js application" to use Express and added a GUI so that you can use a browser to interact with it. You'll find the code in the GitHub repo for this tutorial.
I recommend you read through the material first and pull up the code examples in your editor. Once you've got an overview, fire up the example application from a terminal window or command prompt:
- Navigate to the
Unit-11directory in your local copy of the GitHub repo. - Run
npm installto install the necessary packages from the npm registry. - Load the data into the SQLite3 database:
npm run load-db. - Start the application:
npm start. - Point your browser to
http://localhost:3000.
Now you can begin working through the material, using the source code and the running application as a reference. As you play with the application, see if you can match the screens in the UI with the modules, pages, and other source artifacts, so you can learn how they work.
The Shopping List application
In this tutorial, you'll work with an enhanced version of the Shopping List application from "Create your first Node.js application." When converting the previous version of the application, I first ran express-generator to create a basic project structure, then created new directories on top of that. The following listing shows the final directory structure of the Shopping List project.
Ix:~/src/projects/IBM-Developer/Node.js/Course/Unit-11 sperry$ tree -d .
.
├── bin
├── config
├── controllers
├── models
├── node_modules
├── public
│   ├── images
│   ├── javascripts
│   └── stylesheets
├── routes
├── scripts
├── test
├── utils
└── views

14 directories
I suggest taking a moment to look through the directories and familiarize yourself with the code. Doing this will help you move more easily through the rest of the tutorial.
In the next sections, we'll explore the core modules of an Express application.
Module 1: Express middleware
An Express middleware function sits between the HTTP server and the application's business logic and has access to HTTP request-and-response objects for processing. Middleware functions are installed via the use() function.
Express applications use middleware to perform many functions related to handling web requests. Normally, a single middleware function does a single task, then sends the request to the next middleware function for further handling.
Some middleware functions are provided by the Express core, such as for parsing the request body or handling static resources. Other middleware functions are provided by contribs, such as for cookie parsing and HTTP error handling. There are also Node API packages for things like path processing.
Some middleware, like routing, you provide yourself using the Express Router, which I'll introduce in the next section.
Note: The root directory for all source code in this tutorial is Node.js/Course/Unit-11/. All file locations and paths are relative to that.
Express application configuration
The entry point for an Express application is ./bin/www.js, whose main job is to create the HTTP server. To create the server, ./bin/www.js uses the Express configuration contained in the main module, which is called app.js or server.js.
The configuration in ./app.js is pretty simple. I've broken it into sections to make it easier to describe.
Based on the config, the Express server first calls the require() modules, which the app module needs. The require() modules include local modules that handle routing:
// require
const path = require('path');
const express = require('express');
const cookieParser = require('cookie-parser');
const createError = require('http-errors');
// local modules
const indexRouter = require('./routes/index');
const listsRouter = require('./routes/lists');
const restRouter = require('./routes/rest');
Next, it creates the Express application:
// Create Express application
const app = express();
Then, it calls app.use() to install the insert-request middleware functions:
// middleware
app.use(express.json());
app.use(express.urlencoded({ extended: false }));
app.use(express.static(path.join(__dirname, 'public')));
app.use(cookieParser());
This block of code uses the following middleware:
Request body parsing:
- JSON objects in the request body (
express.json()) - URL-encoded parameters in the request body (
express.urlencoded())
- JSON objects in the request body (
- Access to static resources like images and Cascading Style Sheets (CSS) (
express.static()) - Cookie parsing (cookie-parser)
The Express server sets up path routes via app.use(), whose arguments are (1) the path and (2) the module that handles it:
// Path routing
app.use(indexRouter);
app.use('/lists', listsRouter);
app.use('/rest', restRouter);
Note: No path argument implies the middleware is applied to all paths (/).
It configures the view engine via calls to app.set:
// View engine
app.set('views', path.join(__dirname, 'views'));
app.set('view engine', 'pug');
Finally, it installs error-handling middleware:
// Error handling
app.use(function(req, res, next) {
  // catch 404 and forward to error handler
  next(createError(404));
});
app.use(function(err, req, res, next) {
  res.locals.message = err.message;
  res.locals.error = req.app.get('env') === 'development' ? err : {};
  res.status(err.status || 500);
  res.render('error');
});

module.exports = app;
Note: Error-handling middleware uses the http-errors module.
The following listing shows the app module in its entirety.
01 // require
02 const path = require('path');
03 const express = require('express');
04 const cookieParser = require('cookie-parser');
05 const createError = require('http-errors');
06
07 // local modules
08 const indexRouter = require('./routes/index');
09 const listsRouter = require('./routes/lists');
10 const restRouter = require('./routes/rest');
11
12 // Create Express application
13 const app = express();
14
15 // Install Middleware
16 app.use(express.json());
17 app.use(express.urlencoded({ extended: false }));
18 app.use(express.static(path.join(__dirname, 'public')));
19 app.use(cookieParser());
20
21 // Path routing
22 app.use(indexRouter);
23 app.use('/lists', listsRouter);
24 app.use('/rest', restRouter);
25
26 // View engine
27 app.set('views', path.join(__dirname, 'views'));
28 app.set('view engine', 'pug');
29
30 // Error handling
31 app.use(function(req, res, next) {
32   // catch 404 and forward to error handler
33   next(createError(404));
34 });
35 app.use(function(err, req, res, next) {
36   res.locals.message = err.message;
37   res.locals.error = req.app.get('env') === 'development' ? err : {};
38   res.status(err.status || 500);
39   res.render('error');
40 });
41
42 module.exports = app;
Executing the middleware chain
The order of calls to app.use() is important because the middleware forms a "chain" that is executed in the order you call app.use(). Middleware will either handle the request and re-route it to some other URL/path/etc., or it will pass the request along to the next link in the chain, via a call to the Express next() function.
There's good reason the error-handling code is at the bottom of the chain: if a request has reached the error-handling middleware, it means that no other middleware has handled that request, or an exception was thrown along the way. At that point, the error handler receives it.
Module 2: Express routing
A route is a mapping between the path portion of a URL and an endpoint in your application, such as a page or business logic in a REST function.
Routing is the process of mapping an HTTP request specified by a method like
GETorPOST, along with a URL path, to a callback function to handle the request.
"Create your first Node.js application" introduced the routing functionality for the Shopping List application, and you completed that functionality as an exercise. The routing used to map an HTTP method/path combination to a REST service was fairly primitive, not to mention tedious. In this tutorial, you learn how much easier Express routing is.
Routes
In a typical Express application, routes are located in a ./routes folder immediately subordinate to the project root. The Shopping List application contains three route definition modules in the routes directory:
index.jsdefines the "default" route.rest.jsholds route definitions for REST services provided by the Shopping List application.lists.jsholds route definitions for view-related routes served by the Shopping List application.
We'll start with the REST service routes, which are summarized in the following table.
| URL path | HTTP method | Route handler (rest-controller.js) |
|---|---|---|
/rest/lists |
GET | fetchAll() |
/rest/lists |
POST | create() |
/rest/lists/:listId |
GET | read() |
/rest/lists/:listId |
PUT | update() |
/rest/lists/:listId/items |
POST | addItems() |
/rest/lists/:listId/items |
GET | fetchAllItems() |
/rest/lists/:listId/items/:itemId |
PUT | updateItem() |
/rest/lists/:listId/items/:itemId |
DELETE | removeItem() |
/rest/items |
GET | itemSearch() |
Routing code is easy to write in Express. After require(express), you call the express.Router() function to create the router. On the router, you call functions that match the HTTP method you need to handle, such as router.get() for a GET request, router.post() for POST, and so forth.
Routes delegate to controller functions
Routing functions take the following arguments:
- The route path is the path portion of the request URL, which can be a string pattern or regular expression.
- The route handler is the controller function that handles the route.
The routing for every path in the Shopping List application is done in two phases. The first phase involves the topmost part of the path.
Recall from previous listing for the app.js file that the topmost part of the route (that is, /rest) was specified in app.js:
const express = require('express');
.
.
// local modules
.
const restRouter = require('./routes/rest');
.
// Path routing
.
.
app.use('/rest', restRouter);
.
Typically, a router's module name matches the part of the path it is used to route. In this case /rest is the path, and so rest.js is the module name.
All routes whose URL paths match /rest are forwarded to the rest router for further routing. The router then examines the remaining part of the path to determine its final destination.
This example shows how routers can be combined to modularize routing. The Shopping List application is simple, and the paths are not that complicated, so a pair of routers does nicely. Complex applications typically have longer URLs and more complex routing, so being able to stack routers is very handy.
Whenever the /rest path is matched, the restRouter (in the rest module) is invoked to handle mapping the remainder of the path.
Routing lists
Now let's look at the /lists routes in the Shopping List application's rest.js. (Note that we're looking at the lists routing in this section; we'll study the lists.js module shortly.)
01 const express = require('express');
02
03 // We have no control over stuff like this, so tell eslint to chill
04 const router = express.Router();//eslint-disable-line new-cap
05
06 // The rest controller that handles the requests
07 const restController = require('../controllers/rest-controller');
08
09 // REST service - fetch all shopping lists
10 router.get('/lists', restController.fetchAll);
11 // REST service - create new shopping list
12 router.post('/lists', restController.create);
13 // REST service - fetch shopping list by ID
14 router.get('/lists/:listId', restController.read);
15 // REST service - update the specified list
16 router.put('/lists/:listId', restController.update);
17 // REST service - add an item to the specified shopping list
18 router.post('/lists/:listId/items', restController.addItem);
19 // REST service - fetch all items for the specified shopping list
20 router.get('/lists/:listId/items', restController.fetchAllItems);
21 // REST service - update the specified item for the specified list
22 router.put('/lists/:listId/items/:itemId', restController.updateItem);
23 // REST service - remove the specified item from the specified list
24 router.delete('/lists/:listId/items/:itemId', restController.removeItem);
25 // REST service - search for items
26 router.get('/items', restController.itemSearch);
27
28 module.exports = router;
Note that in the rest router you don't have to map the /rest part of the path again; you only need to specify the part of the path after /rest.
Request matching
The router attempts to find a "greedy" match between the path portion of the request URL and the paths in its routes. It will execute the callback function for every matching route.
Consider the following URL:
http://localhost:3000/rest/lists
The path portion of this URL by itself is ambiguous, matching both of the /rest/lists routes above (lines 10 and 12, respectively). Express looks at the HTTP method specified in the request to determine which route matches.
If the GET method is specified, then restController.fetchAll() will be called (line 10). If POST is specified, then the restController.create function will be invoked (line 12).
In a case where the request looks like this:
- HTTP Method:
POST - URL:
http://localhost:3000/rest/lists
the Express server will match the following route:
router.post('/lists', restController.create);
Controller functions implement REST services
In a typical Express application, routes are located in a ./controllers folder immediately subordinate to the project root.
The controller module for the rest router, called rest-controller, has a function for each route.
All middleware route functions have a signature that look similar to the create() function below:
function create(req, res, next) {
    let requestBody = req.body;

    listsDao.create(requestBody.description).then((result) => {
        utils.writeServerJsonResponse(res, result.data, result.statusCode);
    }).catch((err) => {
        next(err);
    });
}
The parameters are:
req: An ExpressRequestobject, which represents the HTTP request.res: An ExpressResponseobject, which represents the HTTP response.next: An Express function used to pass along the request to the next middleware in the chain.
Let's walk through the create() function.
First, we retrieve the request body as a JSON object (thanks to the express.json() middleware). As part of the POST request, the caller sends the description attribute of the shopping list to be created in the request body. The express.json() parses it and makes it available in the req.body.description property.
Next, we call listsDao.create and pass the description of the new shopping list. If that succeeds, we call utils.writeServerJsonResponse() (the same function from "Create your first Node.js application") to send a JSON object response and status code 200 to the caller.
If an error occurs, then we simply pass it to the next middleware in the chain. If we don't pass the request it will never complete, and will eventually hang.
Module 3: Express views
The view is the application interface, or what a user sees when they open your app. So far, the Shopping List application has been a collection of REST services; useful, but not very exciting to a user. So, I created a GUI (graphical user interface), which we'll explore in this section.
Express has a pluggable view template processing architecture, which means it uses a template engine, along with templates, to render views. Users interact with these views.
Express supports several template engines. Some of the most popular include:
- Pug (formerly Jade)
- EJS
- React
- Handlebars
The default template engine is Pug, which we'll explore in this tutorial.
Creating a template
A Pug application typically defines one or more default layout pages, which your other pages will extend.
The layout page for the Shopping List application is called layout.pug and is located in the views directory:
doctype html
html(lang='en')
  head
    title= title
    meta(charset='utf-8')
    meta(name='viewport', content='width=device-width, initial-scale=1')
    link(rel="stylesheet", href='https://maxcdn.bootstrapcdn.com/bootstrap/4.1.3/css/bootstrap.min.css')
    script(src='https://maxcdn.bootstrapcdn.com/bootstrap/4.1.3/js/bootstrap.min.js')
    link(rel='stylesheet', href='/stylesheets/style.css')
  body
    div(class='container-fluid')
      div(class='row')
        div(class='col-sm-2')
          block sidebar
            ul(class='sidebar-nav')
              li
                //- Stateless navigation goes here
                a(href='/lists') Home
        div(class='col-sm-10')
          //- Replace individual page content in the block below
          block content
          //- The page footer
          block foot
            //- Render errors in the footer
            if errors
              p
              h3 You have errors:
              ul
                for error in errors
                  li.list-group-item-danger= error.msg
This template provides a responsive GUI and uses Bootstrap, too!
View routes
Each view in the Shopping List application has a route associated with it, as summarized below.
| URL path | HTTP method | Route handler (lists-controller.js) |
|---|---|---|
/lists |
GET | fetchAll() |
/lists/create |
GET | create() |
/lists/:listId |
GET | read() |
/lists/:listId/update |
GET | update() |
/lists/:listId/itemSearch |
GET | itemSearch() |
/lists |
POST | createList() |
/lists/:listId |
POST | updateList() |
/lists/:listId/itemSearch |
POST | addItemsSearch() |
/lists/:listId/addItems |
POST | addListItems() |
/lists/:listId/items/delete |
POST | removeItems() |
Routes and controller functions
Once again, routes delegate to controller functions. Recall that the topmost part of the route (that is, /lists) was specified in app.js:
const express = require('express');
.
.
// local modules
.
const listsRouter = require('./routes/lists');
.
// Path routing
.
.
app.use('/lists', listsRouter);
.
For better code readability, you should give your router module a name that matches the part of the path it is used to route. In this case, /lists is the path, and so lists.js is the module name.
All routes whose URL path matches /lists will be forwarded to the lists router. The router will examine the remaining part of the path to determine each route's final destination.
Whenever the /lists path is matched, the listsRouter (in the lists module) is invoked to map the remainder of the path. The following listing shows the /lists routes in lists.js.
01 const express = require('express');
02
03 // We have no control over stuff like this, so tell eslint to chill
04 /* eslint new-cap: 0 */
05 const router = express.Router();
06
07 const listsController = require('../controllers/lists-controller');
08
09 // Pages
10 // Page to display all shopping lists
11 router.get('/', listsController.fetchAll);
12 // Page to create new shopping list
13 router.get('/create', listsController.create);
14 // Page to fetch shopping list by id
15 router.get('/:listId', listsController.read);
16 // Page to update shopping list
17 router.get('/:listId/update', listsController.update);
18 // Page to search for items
19 router.get('/:listId/itemSearch', listsController.itemSearch);
20
21 // REST Calls
22 // Call REST service to create new shopping list
23 router.post('/', listsController.createList);
24 // Call REST service to update shopping list
25 router.post('/:listId', listsController.updateList);
26 // Call REST service to search for Items
27 router.post('/:listId/itemSearch', listsController.addItemsSearch);
28 // Call REST service to add an Item to a shopping list
29 router.post('/:listId/addItems', listsController.addListItems);
30 // Call REST service to remove items (DELETE does not work for HTML forms)
31 router.post('/:listId/items/delete', listsController.removeItems);
32
33 module.exports = router;
Note that you don't have to map the /lists part of the path again; you only need to specify the part of the path after /lists.
Request matching URLs
Recall that the router will attempt to find a greedy match between the path portion of the request URL and the paths in its routes, and will execute the callback function for every matching route. As an example, consider the following URL:
http://localhost:3000/lists/create
The path portion of this URL will match both of the /lists routes above (lines 11 and 13, respectively), but the controller function depends on the HTTP method specified in the request. If the GET method is specified, then listsController.fetchAll() will be called. If POST, then the listsController.create function will be invoked.
In a case where the request looks like this:
- HTTP Method:
GET - URL:
http://localhost:3000/create
The Express server will match the following route:
router.get('/create', listsController.create);
Rendering the GUI
When we create a shopping list with a REST service, the caller prepares the data and sends it, and the list is created. When we add a GUI, we need two additional steps:
- Render the GUI, which the user uses to input data.
- Validate the data and forward it to the REST service.
You'll learn about data validation in the next section. For now, let's look at how pages are rendered.
Step 1: Page rendering with controller functions
The controller module for the lists router, called lists-controller, has a function for each route. Below is the listsController.create() function.
function renderCreatePage(req, res, next) {
    // Render the page to create a new shopping list
    res.render('lists-create', { title: 'Create Shopping List' });
}
This function calls the render() function on the Express res response object. It passes the name of the page template, along with a JSON object that contains the data for the page.
Note: In a typical Express application, views are located in a ./views folder immediately subordinate to the project root.
The Pug template containing the page source is called lists-create.pug.
extends layout

block content
  h1= title

  p Enter required fields and click the Save link to create your new shopping list.

  form(method='POST' action='/lists')
    div.form-group
      label(for='description') Description*:
      input(type='text', placeholder='Description' name='description')
    div.form-group

    button.btn.btn-primary(type='submit') Create
Considering what the page does, you may wonder how this template can be so slim. Notice the first line:
extends layout
This template extends the one you saw in an earlier listing, called layout.pug. The lists-create.pug template provides capabilities that extend that base layout.
Now look at the Pug syntax. Each HTML tag has a Pug attribute that mimics it. The page is pretty simple: It contains an h1 for the page title and some instructions in a paragraph tag, followed by a form to allow the user to enter a description of the new shopping list to be created.
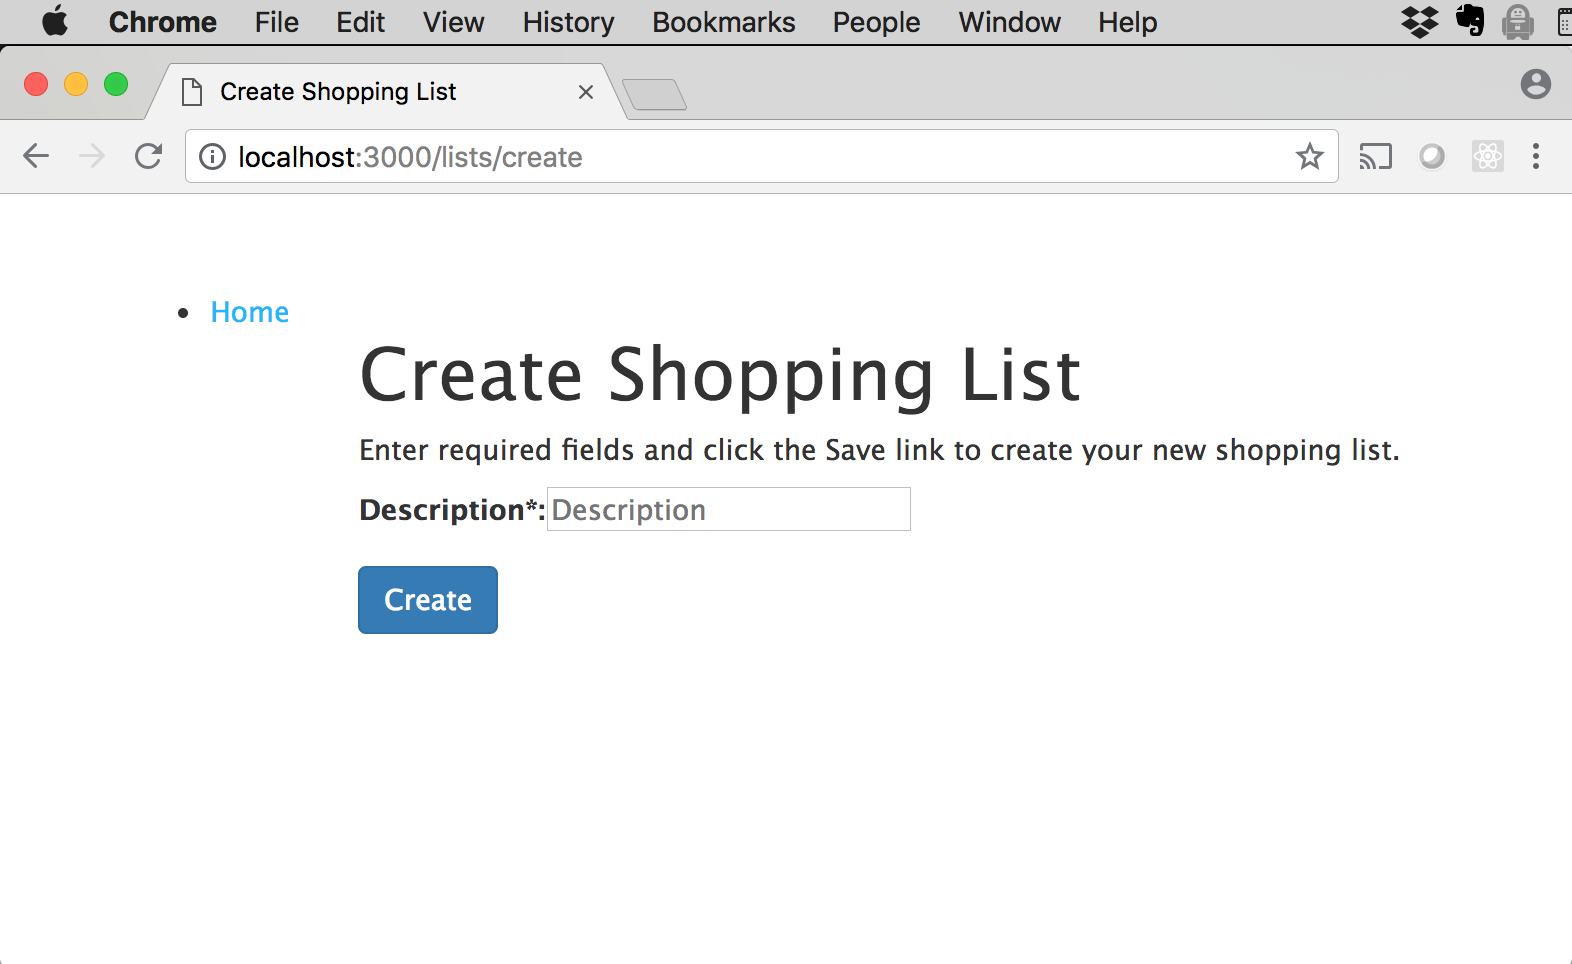
Here's the page displayed in Chrome:
When the user enters a shopping list description and clicks Create, the form data containing the description will be posted to /lists (which expands to http://localhost:3000/lists). Recall the route created to handle this URL (from the previous listing, line 24):
// Call REST service to create new shopping list
router.post('/', listsController.createList);
Step 2: Function calls on controller function chains
Once the user has entered a list description, the shopping list can be created. Creating the list requires a series of function calls, which do the following:
- Validate and sanitize the data.
- Handle any validation errors.
- Invoke the REST service to create the shopping list.
We'll need more than a single function to perform all of these actions. The createList function is actually a function chain, meaning an array of function calls.
01 const createList = [
02     // Validate input(s)
03     body('description', 'Description cannot be empty').isLength({ min: 1 }),
04     // Sanitize fields.
05     sanitizeBody('description').trim().escape(),
06     // Check validation results
07     (req, res, next) => {
08         const errors = validationResult(req);
09         if (!errors.isEmpty()) {
10             let errorsArray = errors.array();
11             logger.debug(`Found ${errorsArray.length} errors with the request`);
12             res.render('lists-create', { title: 'Create Shopping List', data: '', errors: errorsArray });
13         } else {
14             logger.debug('Request is error free. Moving on...', 'createList()');
15             next();
16         }
17     },
18     // All is well (if we got this far). Send the request!
19     (req, res, next) => {
20         let requestBody = JSON.stringify(req.body);
21         request('POST', '/rest/lists', requestBody, (err, data) => {
22             if (err) {
23                 next(err);
24             } else {
25                 // Redirect to main /lists page
26                 res.redirect('/lists');
27             }
28         });
29     }
30 ];
The data is validated and sanitized in lines 3 and 5, then the validation results are computed in their own req/res/next callback (lines 7 to 17).
If the request is deemed valid, the /rest/lists REST service is invoked to create the list (lines 20 to 21). If an error occurs (line 22), the request is sent to the next middleware for handling (line 23). If the request is successful, the browser redirects to the /lists route (line 26), which takes the user to the main page.
Module 4: Data validation and sanitization (express-validator)
Data validation is a fairly tricky problem to solve, especially in the context of a web request. Fortunately, express-validator plugs into Express and solves the problem for us.
To validate and sanitize the request body, you require the body express-validator, and then tell body which fields you want to validate and how. Below is the relevant source from lists-controllers.js:
const { body, validationResult } = require('express-validator/check');
('express-validator/filter');
const { sanitizeBody } = require('express-validator/filter');

.
.
    body('description', 'Description cannot be empty').isLength({ min: 1 }),
.
.
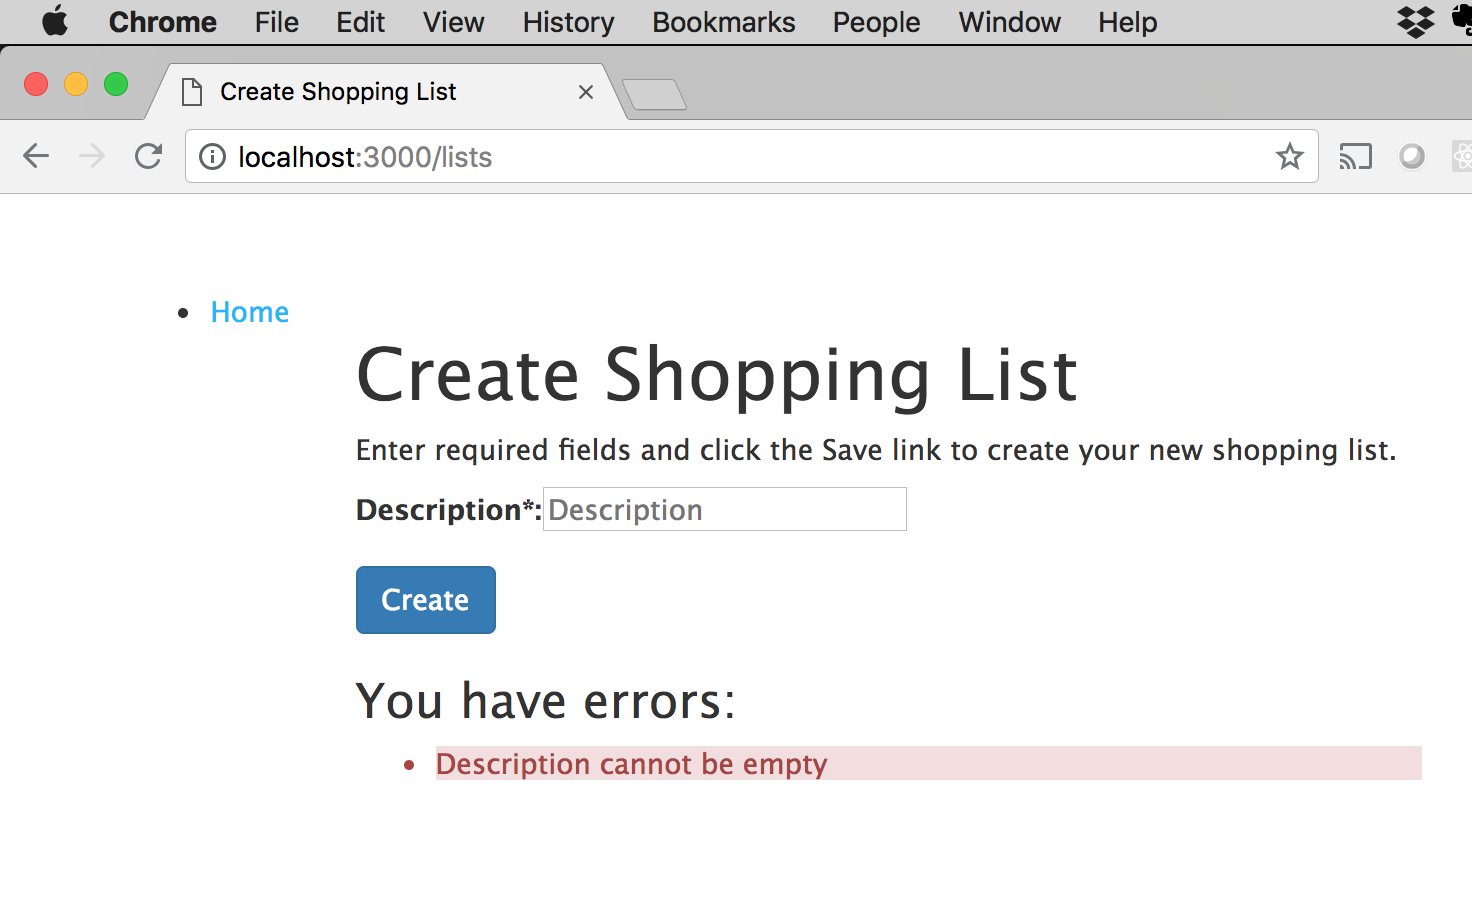
The validator's first task is data validation. It uses the above rule to validate the description attribute in the JSON request, using the isLength() validator to ensure the description is at least one character long. This rule ensures that if the user does not enter a description, they will see the error message Description cannot be empty.
Next up is data sanitization, which is important because the user can enter anything they want in the description field. A malicious user could attempt to use this field to exploit your application, for example by entering JavaScript code or SQL into the field. You can avoid this by sanitizing the input, removing any potentially harmful characters:
sanitizeBody('description').trim().escape(),
In this case, you want to trim any whitespace and escape all potentially harmful characters.
Returning errors to the caller
There's one more step to data validation, which is reporting errors to the user. Once again, express-validator comes to the rescue.
There are two steps to reporting an error with express-validator:
- A call to
validationResult(). - Rendering the page containing errors to the user, along with a message.
Looking back to the previous listing, line 8, notice the call to validationResult(req), passing in the request object. From this call, express-validator returns a validation result. The object is converted to an array (line 10), and the original page is re-rendered, passing the errors object in the JSON data (line 12).
If this validation error occurred, the user would see the following message:
Run the Shopping List application
You've seen how Express handles routes and renders pages for the Shopping List application. Now's your chance to run the application and see it the way a user would.
To run the application, make sure you have the code setup correctly, then open a terminal window or command prompt. Navigate to the directory where the code resides. (Revisit "Install Node.js, npm, and VS Code" if you need a refresher on setting up the application code.)
Run npm install to install all the packages you'll need.
Next, load the data into the database by running npm run load-db (this command takes a few minutes, so be patient).
Then, run npm start to start the application.
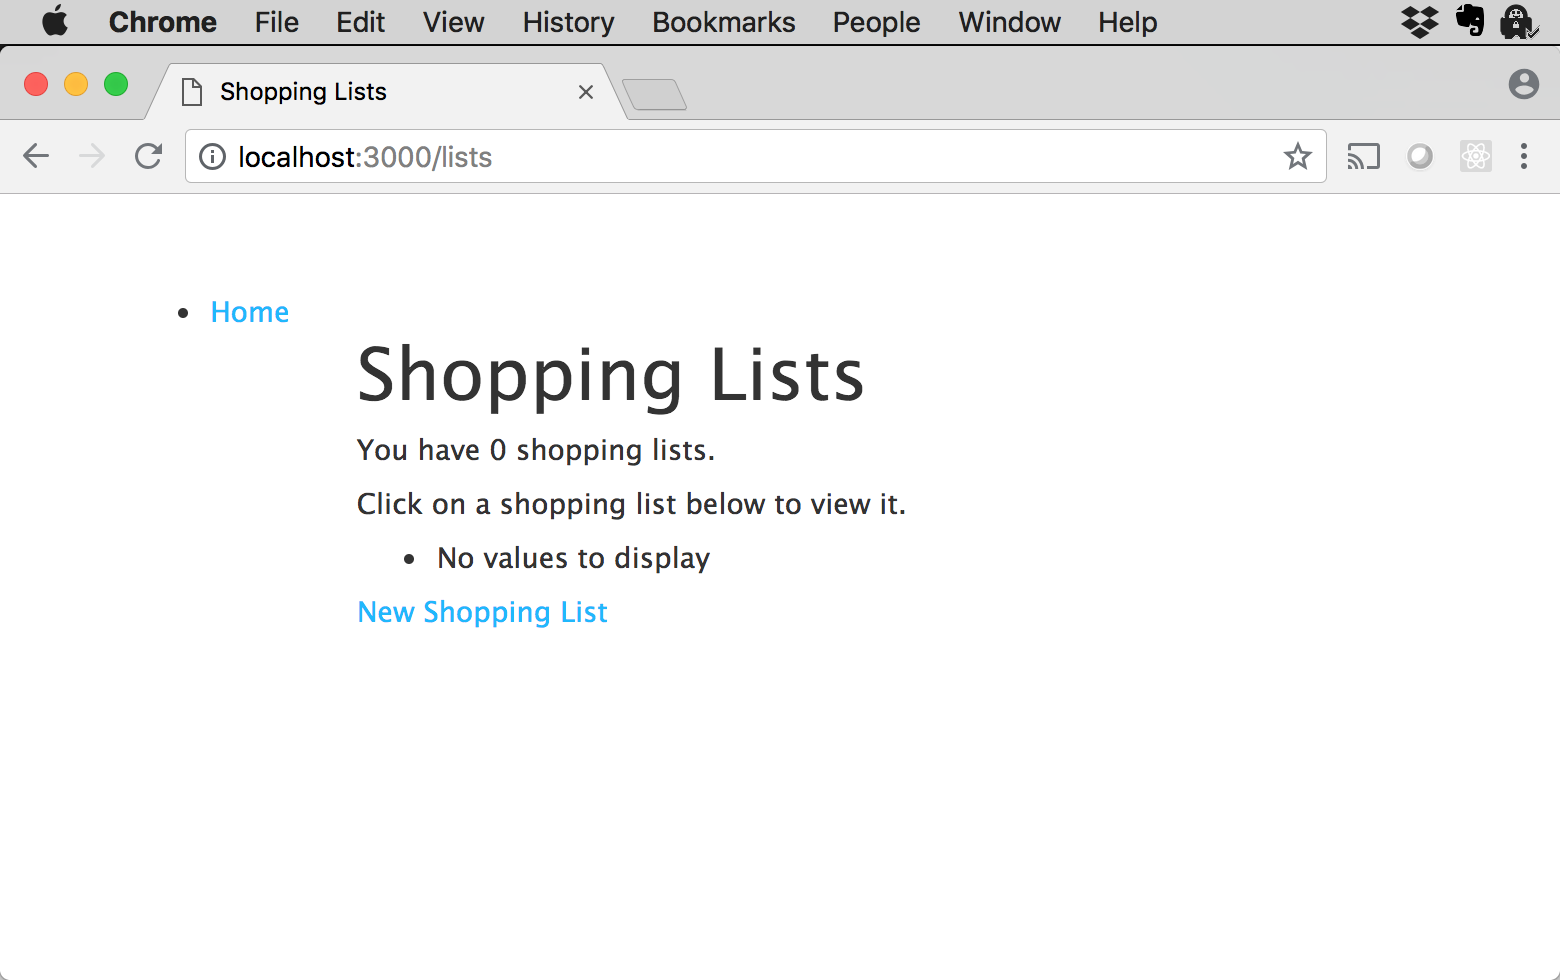
Now, point your browser to http://localhost:3000, where you'll see the main screen:
Create a new shopping list called "My Shopping List." Enter the description and click the Create button:

Doing this will return you to the main screen:
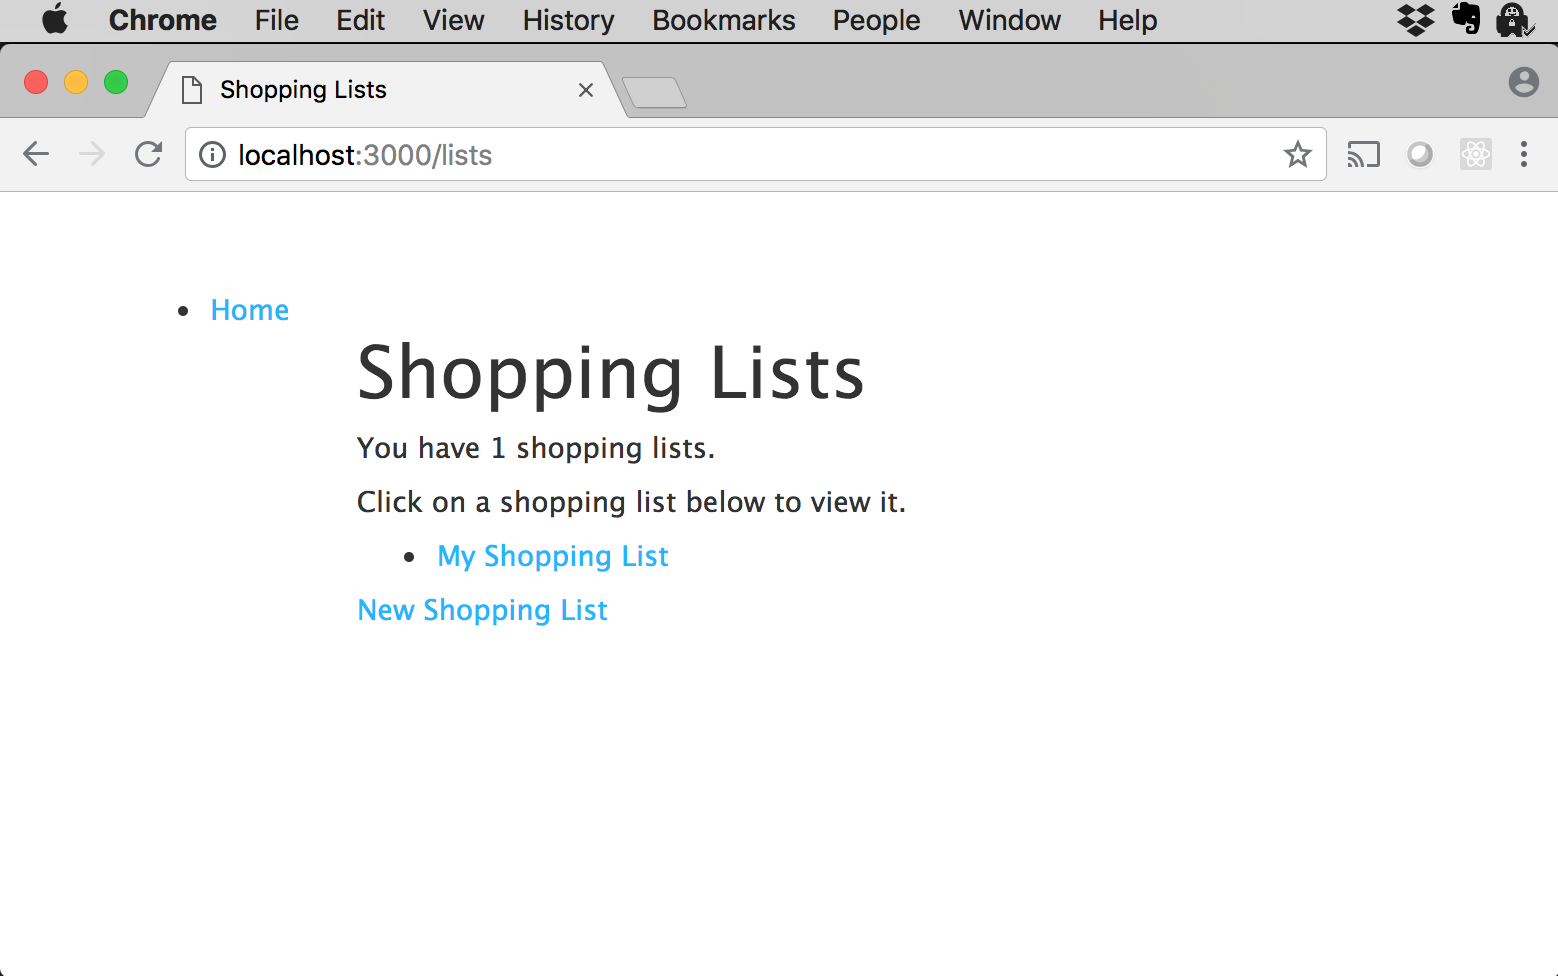
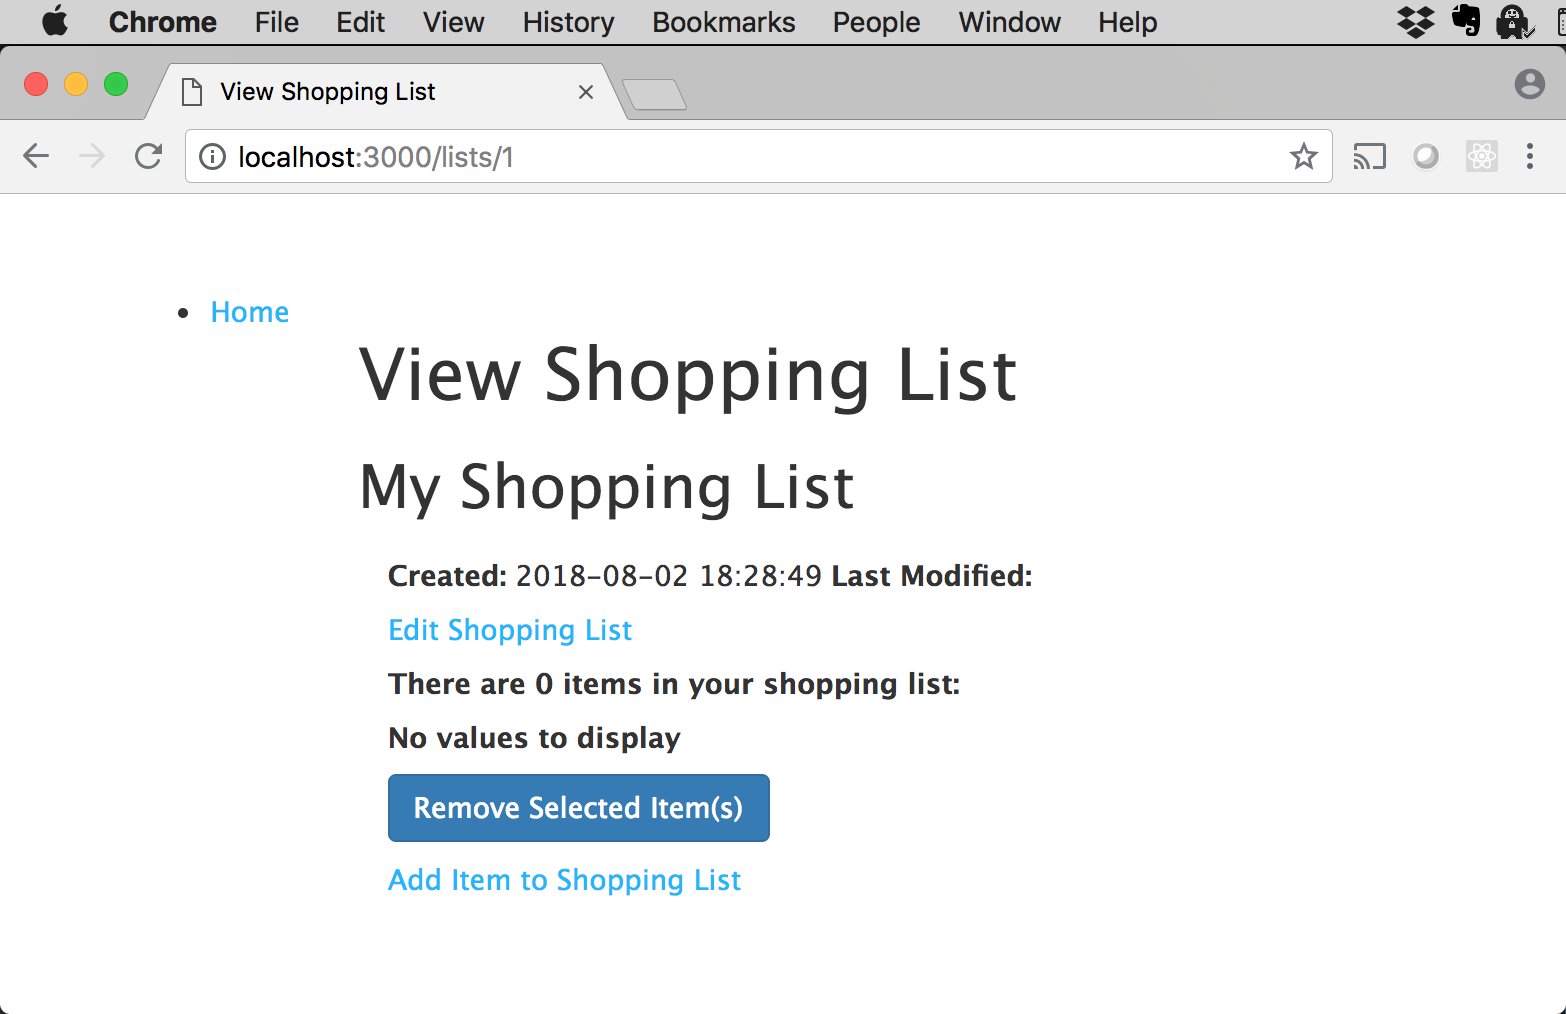
Click on "My Shopping List" to view your new list:
To add items, click on the Add Item to Shopping List link. In this example, I did a search for "Red Delicious":
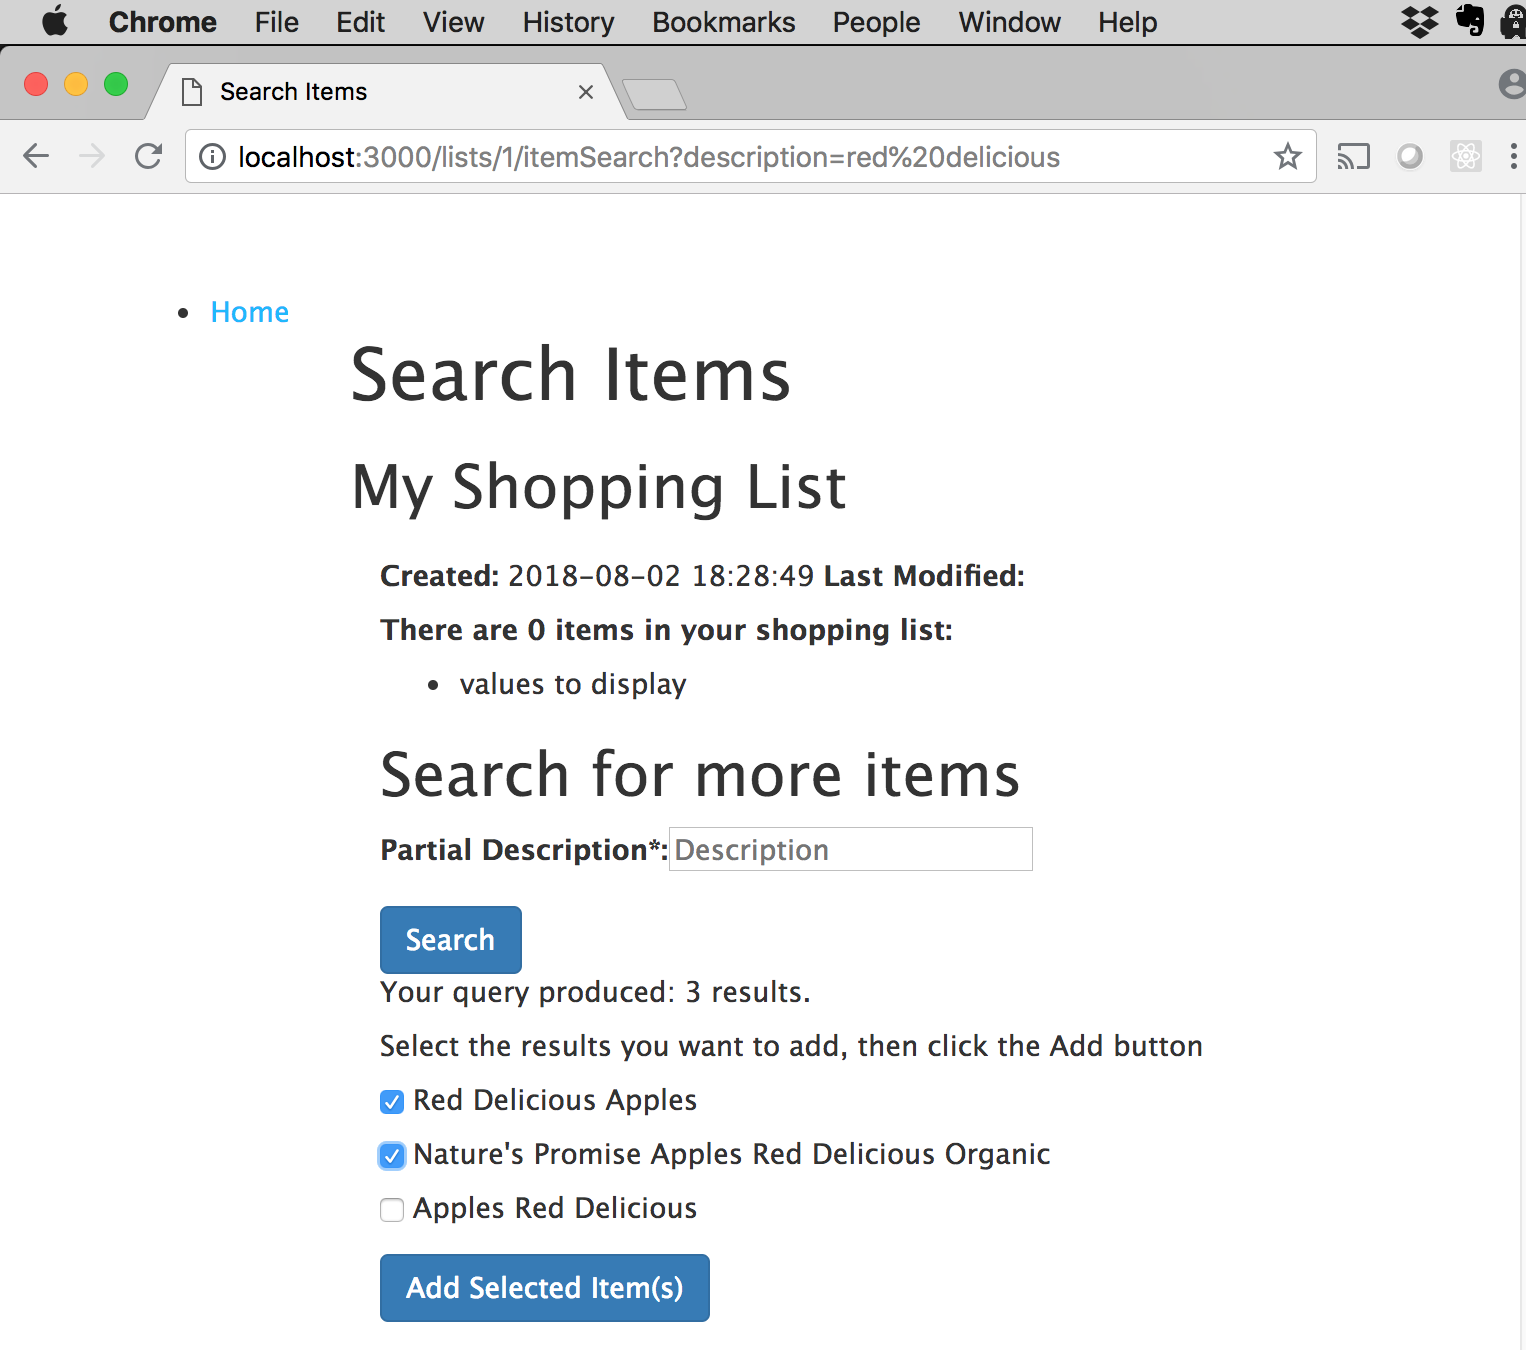
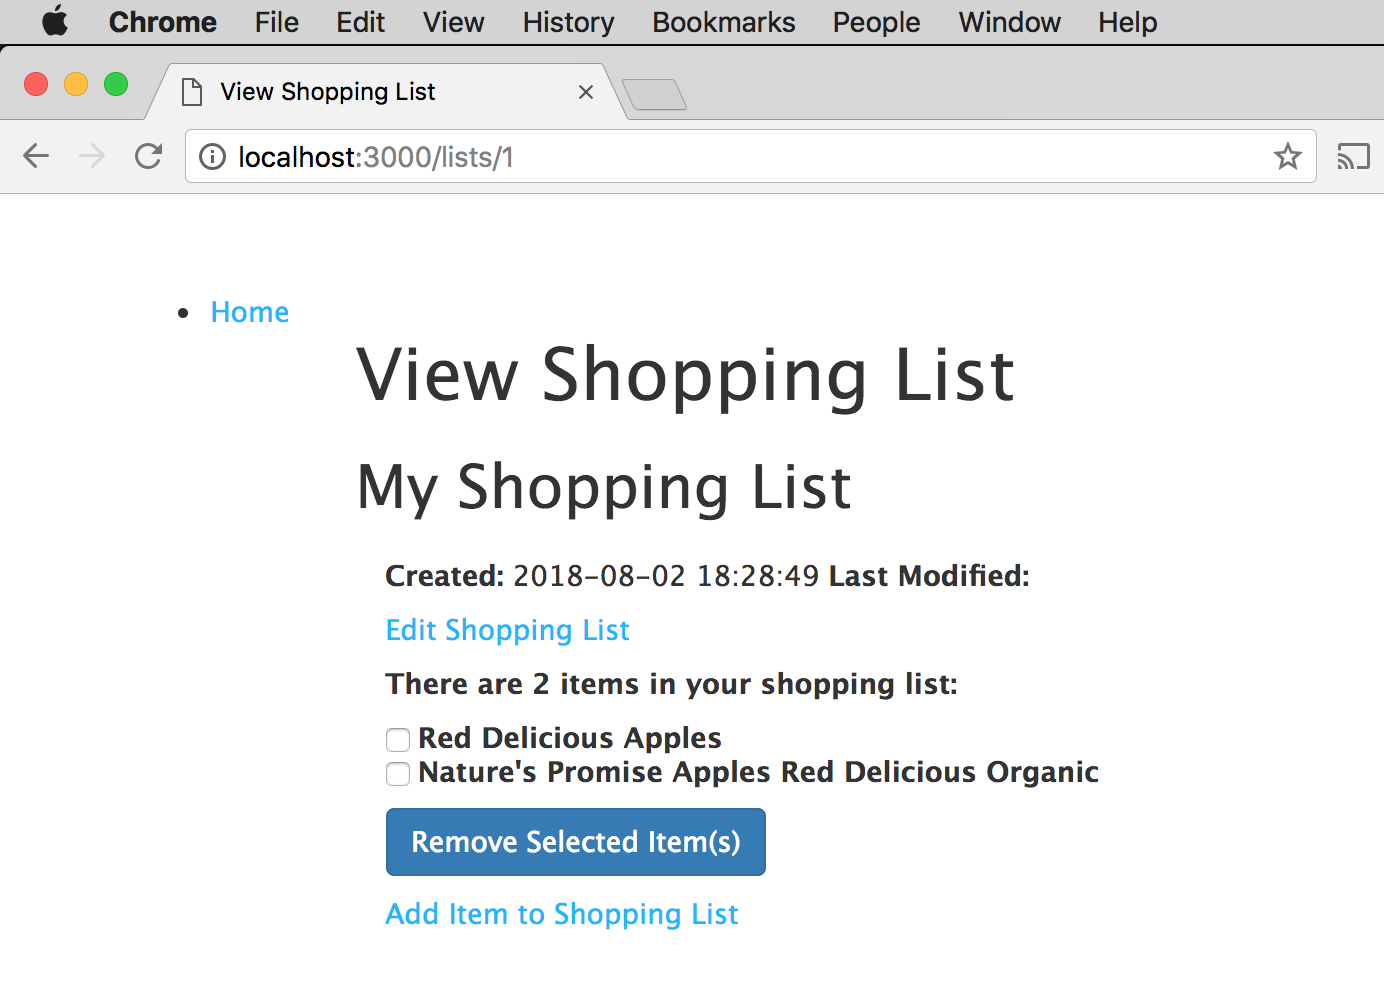
Select a couple of items, click the Add Selected Item(s) button, and they're on your list!
Conclusion
In this tutorial, you learned about Express middleware, routing, and processing view templates with Pug. You also got started with data validation and sanitization using express-validator.
Make sure to get the source code for the Shopping List application, run it, and play around with it. There's no substitute for running code to learn how code runs (feel free to quote me on that). You can also watch the video to see the Shopping List UI in action.
Video
In this video, I show you those improvements which involve using Express.js for a web framework, which includes routing, and Pug for the user interface.