Tutorial
Get started with the IBM MQ messaging REST API
Produce and consume IBM MQ messages with Rust, Golang, or Node.js using the IBM MQ messaging REST APIThe IBM MQ messaging REST API lets you produce and consume messages from a queue with minimal client configuration. It is not as feature-rich as MQI or JMS, but it is quick to set up and straightforward to use.
The following diagram illustrates how the REST client interacts with the REST server and the queue manager.

The IBM MQ REST API application runs in a Liberty Server called mqweb, which exposes HTTP endpoints for communication between the client and queue manager. The REST client connects to Liberty over port 9443. Depending on whether the queue manager is local or remote, it connects in bindings mode or in client mode over TCP/IP. Client applications use HTTP POST to produce messages and DELETE to destructively consume them.
The messaging REST API is different from the administrative REST API, which is used to administer IBM MQ objects, such as queue managers, queues, and Managed File Transfer components.
In this tutorial, you learn how to use the messaging REST API in your applications so that they can interact with the queue manager to produce or consume messages.
This tutorial uses the latest version of the API, IBM MQ REST API V3. This version adds the ability to specify user-defined message properties and to include message priority. The ibm-mq-md-priority and ibm-mq-usr-request headers are only available with REST API V3. Another difference between the previous versions and V3 is that the ibm-mq-md-correlationId request header has a different format in REST API V3. The header can be an application-specific ID or an encoded string with the format: prefix:<correlationId>.
Part 1. Validating the availability of the IBM MQ REST service endpoint
cURL commands are a simple way to interact with a REST endpoint and can be used as a test to check your queue manager's REST configuration. These commands can include the three basic HTTP methods used by IBM MQ messaging REST API to allow applications to interact with MQ:
- POST is used to produce messages on to a specified queue hosted on a queue manager. For REST API V3, if your POST request contains user-defined messages, or application-specific correlation ID, the message is formatted as a JMS TextMessage.
- GET is used to browse messages on a specified queue hosted on a queue manager
- DELETE is used to destructively consume messages from a specified queue hosted on a queue manager
For more information about cURL, see What is the cURL command? on IBM Developer.
Prerequisites
curl, which is a command-line tool and library for transferring data with URLs.
Steps
Step 1. Set up your queue manager
The following instructions assume you are using MQ in a local container based on the IBM MQ Advanced for Developers image
Use the Ready, Set, Connect tutorials to set up your queue manager and get your container running. Then, skip to Step 3.
Step 2. Configure the mqweb server
If you are using a container that is based on the MQ Advanced for Developers container image you can skip this step.
If you are using a VM, a bare metal installation, or a customized container image, you will likely need additional configuration.
Go to Getting started with the messaging REST API topic in the IBM MQ docs to set up the MQ REST API. If you also need to set up the IBM MQ Console, check out the Getting started with the IBM MQ Console topic too.
If you're using the MQ Operator on OpenShift, see Configuring IBM MQ Console with a basic registry using the MQ Operator.
If you're using the container with Helm, see Supplying custom web console configuration in the ibm-mq Helm chart docs.
Step 3. Put a message on the queue using cURL
You can try out the MQ messaging REST API by using cURL to put messages on a queue.
Make sure that you have curl installed:
curl -V
You should see output similar to this:

If you get an error saying "command not found" or "curl not recognized", curl might not be installed on your machine. Visit the curl download page to install curl.
The MQ messaging REST API expects the following basic details in the POST request that will put a message on a queue:
-k. This option allows you to connect to a server that has a self-signed certificate, not a CA issued one.-i. This option includes the response headers in the output (optional).request URLshould be specified in the following format:https://host:port/ibmmq/rest/v3/messaging/qmgr/your_qm_name/queue/your_queue_name/message.
Issue the cURL POST command that will put a message to a queue. The following cURL command uses the default configuration for the MQ advanced for developer image, edit the command if your configurations differ.
curl -i -k https://localhost:9443/ibmmq/rest/v3/messaging/qmgr/QM1/queue/DEV.QUEUE.1/message -X POST -u app:passw0rd -H "ibm-mq-rest-csrf-token: blank" -H "Content-Type: text/plain;charset=utf-8" -d "Hello World"
-X. This option specifies the request method.-u. This option is the name and password of the user that you added in the mqwebuser.xml file.-H. This option is the two header values, for the cross-site request forgery token and the content type for the message.-d. This option is the data or the message payload.
You should see output like this:
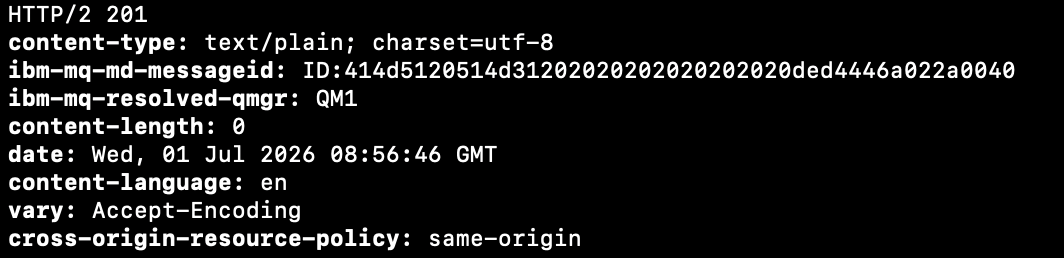
If your output looks like the one here, you have successfully used cURL to produce a message onto the queue. To consume the message from the queue, use a similar command in the next step.
Step 4. Using the IBM MQ REST API to consume a message from the queue
The MQ messaging REST API expects the following basic details in the DELETE request that will destructively consume a message from a queue:
-k. This option allows you to connect to a server that has a self-signed certificate, not a CA issued one.-i. This option includes the response headers in the output (optional).request URLshould be in the following format:https://host:port/ibmmq/rest/v3/messaging/qmgr/your_qm_name/queue/your_queue_name/message.
Issue the cURL DELETE command that will destructively consume a message from a queue. The following cURL command uses the default configuration for the MQ advanced for developer image, edit the command if your configurations differ.
curl -i -k https://localhost:9443/ibmmq/rest/v3/messaging/qmgr/QM1/queue/DEV.QUEUE.1/message -X DELETE -u app:passw0rd -H "ibm-mq-rest-csrf-token: blank"
-X. This option specifies the request method.-u. This option is the name and password of the user that you added in themqwebuser.xmlfile.-H. This option is the two header values, for the cross-site request forgery token and the content type for the message.
You should see output like this:
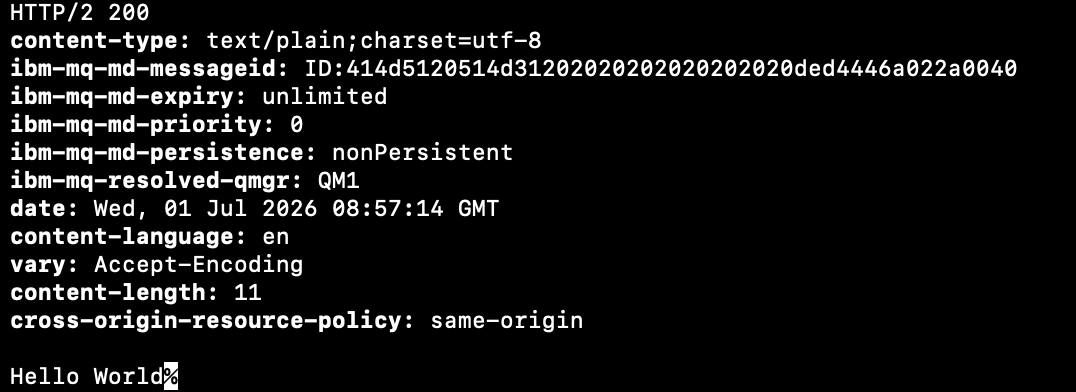
If your output looks like the one here, you have successfully used cURL to consume your message from the queue.
Step 5. (Optional) Use the Swagger UI to interact with the MQ messaging REST APIs
The mqweb server provides an option for switching on the API Discovery feature.
To use the swagger documentation, you will need to configure the mqweb.xml file:
If you are using a container, based on the MQ Advanced for Developers image, you cannot edit this file directly in the running container. Instead, you will need to copy the mqweb.xml file to a local host directory:
podman cp QM1:/opt/mqm/web/mq/etc/mqweb.xml path/to/local/directory
Open the .xml file in an editor and add the following line inside the featureManager tags:
<featureManager>
<feature>apiDiscovery-1.0</feature>
</featureManager>
Then, copy the edited mqweb.xml back to its original directory:
podman cp path/to/local/directory/mqweb.xml QM1:/opt/mqm/web/mq/etc/
You can now use the Swagger documentation by pointing your browser to: https://host:port/ibm/api/explorer, such as:
https://localhost:9443/ibm/api/explorer
Then, use the Swagger UI to interact with the REST APIs. You can produce and consume messages from the "messaging REST API" and see the queue depth change in the MQ Console for the queue DEV.QUEUE.1.
Or, you can point your browser to: https://host:port/ibm/api/docs. Then, retrieve a Swagger 2 document that describes the whole REST API, for example:
https://localhost:9443/ibm/api/docs
Part 2. Examples that use the IBM MQ REST API in Rust, Golang, and Node.js
cURL is a simple and useful tool to check the IBM MQ REST endpoint availability. To build a more sophisticated application with a richer framework, use one of the following examples that use the REST API:
- Rust example
- Go example
- Node.js examples
Prerequisites for the examples
Rust example that uses the MQ messaging REST API
The Rust example is in the mq-dev-patterns repository, which contains all the current samples for IBM MQ. By cloning it, you will have access to several other samples in different languages. This tutorial focuses on the /Rust-REST/ section of this repository.
At a command prompt, issue this command to clone the repo:
git clone https://github.com/ibm-messaging/mq-dev-patterns.git
Navigate to the mq-dev-patterns directory, and then to the Rust-REST directory. You will run the Rust sample programs from this directory.
If you want to connect to a pre-existing IBM MQ queue manager using this Rust sample, you must first update the envrest.json file to specify the APP_USER, APP_PASSWORD, HOST, and PORT values. If you are using a queue manager on IBM Cloud, follow the instructions in the IBM MQ on Cloud docs.
You are now ready to send an IBM MQ message by using the IBM MQ REST API with this Rust sample.
To check whether your queue manager is successfully handling messages, run this command:
On macOS or Linux:
./RUNME.sh
On Windows:
bash RUNME.sh
This script file consecutively runs the sender and receiver samples found inside the cloned repository.
The output from running this script file looks like this:
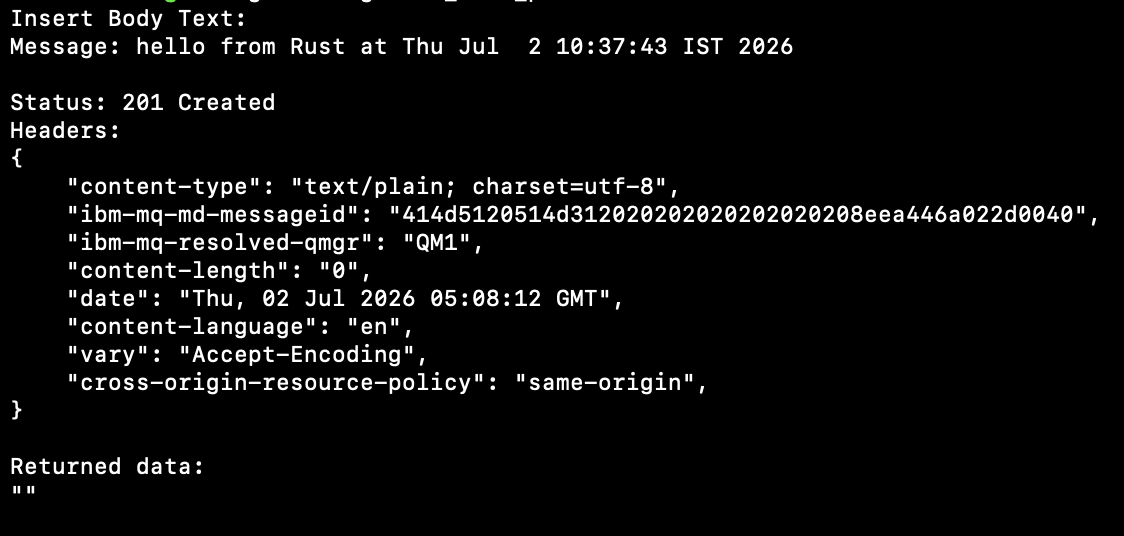
And this:
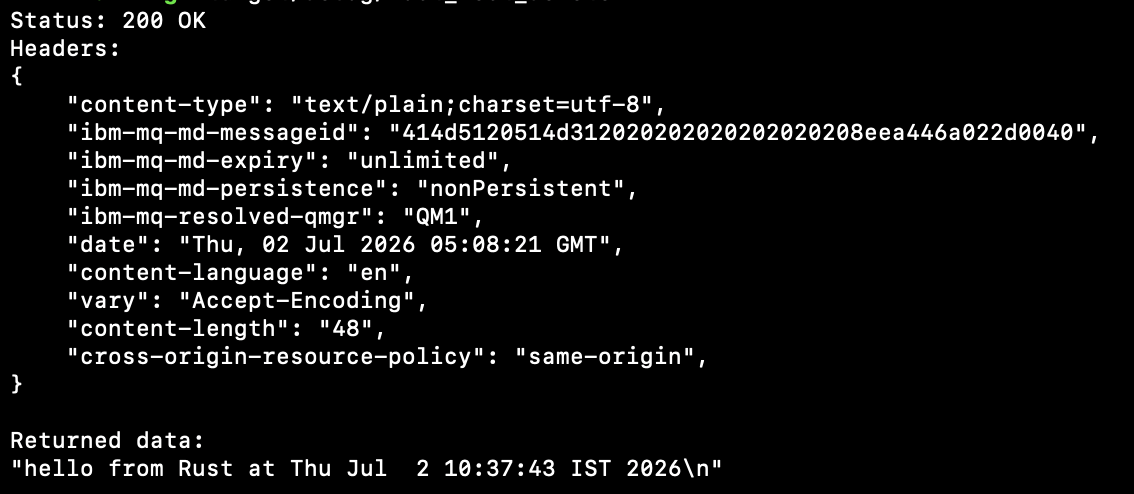
After a successful run of both the POST and GET programs, an HTTP status code of 201 is displayed for the POST sample and 200 for the DELETE sample, based on the outcome of the request.
Go example that uses the MQ messaging REST API
This example is available in the mq-dev-samples repository. Navigate to the gettingStarted folder to find the messaging REST sample, which includes the Go example.
The queue manager that the application, in this example, looks to communicate with is running in IBM Cloud. The default SSL HTTP port for queue managers running in IBM Cloud is 9443. A user can specify a different port, but if no port is available, the default port will be used.
In this application, put and get calls are wrapped in Go functions. The request URL for the queue manager, qmURL, is constructed to include the host, port, the default path for the messaging REST API, queue manager name, and queue name.
The request is then created, the message type is set, and the same additional parameters used in the cURL calls are added: the CSRF token, the content type, and user and password for authentication.
The sender and receiver samples that are part of this application pass the correct MQ parameters to this method, and the REST call is constructed and sent.

Node.js examples that use the HTTPS or Promise modules
For more examples using Node.js, visit the GitHub repository. One example uses a basic HTTPS module to exchange messages. Another example shows you how to use JavaScript promises so that the REST calls are in the correct sequence.
Summary and next steps
Congratulations! You have successfully produced and consumed messages by using the IBM MQ messaging REST API.
To learn more about the API, visit the REST APIs overview and the IBM MQ documentation. You can also visit the IBM MQ Showcase App on GitHub, which uses the REST API, and explore how the API is integrated.