Tutorial
Develop MQ JMS applications with Spring Boot
Use the MQ Spring JMS Starter or a ready-to-use SpringBoot MVC project to access an IBM MQ server from a Spring Boot applicationIBM MQ enables applications to communicate and share data reliably by decoupling one application from another across frameworks, languages, platforms, and clouds. This tutorial shows you how to use the MQ Spring JMS Starter to connect a Spring Boot application to IBM MQ using either a minimal setup or a full MVC pattern with a web interface.
Learning objectives
This tutorial provides a guide to using MQ Spring JMS to connect to an IBM MQ server from a Spring Boot application. It comprises two examples that demonstrate different scenarios:
- The simplest scenario: This example offers a step-by-step walkthrough on setting up a basic Spring Boot application using Spring Initializr. It covers connecting the application to MQ and exchanging messages through a REST endpoint.
- A more complex example: In this advanced example, we explore how to leverage the MVC (Model View Controller) design pattern within a Spring Boot application. It not only illustrates the integration of MQ for message exchange but also demonstrates the process of interacting with MQ through a web interface.
These examples use a local MQ instance running in a Docker container. You could also use an MQ server in IBM Cloud. The applications include REST endpoints or a web-based interface through which messages can be sent and retrieved from MQ.
By following these examples, you perform the following steps:
- Clone a Spring Boot application from the mq-dev-patterns repo
- Launch an MQ Server
- Add the MQ server config (credentials and URL) to your application
- Add the MQ Spring to your application
- Send a message to a queue
- Retrieve a message from a queue
- Build an MVC app and invoke the REST endpoint and display the results from MQ.
Prerequisites
- Maven and Java installed on your computer. It is assumed that you can build and run a Maven based Spring Initializr project.
- Docker installed on your computer. It is assumed that you are able to start/stop containers and are generally familiar with Docker.
Option 1: Develop a basic Spring Boot application with Spring Initializr
Develop the Spring Boot application, connect it to MQ, and exchange messages through a REST endpoint.
Step 1.1: Create a Spring Boot application using Spring Initializr
On the Spring Initializr page, generate a Maven Project with language Java, and the Web dependency. For this example, we use group com.example and artifact mq-spring. Download the project and unzip it.
Step 1.2: Launch a local MQ Server using Docker
If IBM MQ for Developers is not yet running, complete these steps.
The IBM MQ for Developers container provides a quick and simple way to launch a local MQ Server via Docker. You can launch one using the following command (specifying it all on one line):
docker run --env LICENSE=accept --env MQ_QMGR_NAME=QM1 \
           --publish 1414:1414 \
           --publish 9443:9443 \
           --detach \
           icr.io/ibm-messaging/mq
Check that the server is running using Docker.
Step 1.3: Add the MQ server config (credentials and URL) to your application
The default configuration for the local MQ Server includes a user of admin with a password of passw0rd. This can be passed to the application via the normal Spring application.properties file.
Edit the Spring Boot project and add the server information to the src/main/resources/application.properties file with the following property names and values:
ibm.mq.queueManager=QM1
ibm.mq.channel=DEV.ADMIN.SVRCONN
ibm.mq.connName=localhost(1414)
ibm.mq.user=admin
ibm.mq.password=passw0rd
Important: It is not recommended to store credentials in your application. We do so here only for the sake of simplicity in this tutorial. The MQ Spring Boot Starter can utilize other property sources such as environment variables.
Step 1.4: Add the MQ Spring Starter to your application
For this example, we'll create a simple REST application with an endpoint that sends a message via the MQ Server and a second endpoint that retrieves and returns sent messages.
Edit the unzipped Spring Boot project to make the following changes:
Add the following dependencies to the
pom.xmldependencies section:<dependency> <groupId>com.fasterxml.jackson.core</groupId> <artifactId>jackson-databind</artifactId> </dependency> <dependency> <groupId>com.ibm.mq</groupId> <artifactId>mq-jms-spring-boot-starter</artifactId> <version>4.1.0</version> </dependency>Add the following dependencies to the
pom.xmldependencies section:Add annotations to the Spring Boot application class that was created by the Spring Initializr -
com/example/mqpring/MqspringApplication.java. (Note that the Java package and class names are derived from the Group and Artifact values entered on the Initializr.)@RestControllerto enable REST endpoints.@EnableJmsto allow discovery of methods annotated@JmsListenerAdd an
@Autowiredannotation for theJmsTemplateobject. The IBM MQ Spring Boot Starter creates theJmsTemplatewith the properties configured via theapplication.properties:@SpringBootApplication @RestController @EnableJms public class MqspringApplication { @Autowired private JmsTemplate jmsTemplate; public static void main(String[] args) { SpringApplication.run(MqspringApplication.class, args); } }Depending on your development environment, you may also need to manually add import statements to the Java class:
import org.springframework.beans.factory.annotation.Autowired;
import org.springframework.boot.SpringApplication;
import org.springframework.boot.autoconfigure.SpringBootApplication;
import org.springframework.jms.JmsException;
import org.springframework.jms.annotation.EnableJms;
import org.springframework.jms.core.JmsTemplate;
import org.springframework.web.bind.annotation.GetMapping;
import org.springframework.web.bind.annotation.RestController;
Without these, the compilation will fail with "Unknown symbol" errors.
Step 1.5: Add a REST endpoint that sends a message via MQ
Add a REST endpoint to the RestController with the @GetMapping annotation with a path of send. Use the JmsTemplate convertAndSend method to send a message Hello World! to the queue DEV.QUEUE.1. Add exception handling as required.
@GetMapping("send")
String send(){
    try{
        jmsTemplate.convertAndSend("DEV.QUEUE.1", "Hello World!");
        return "OK";
    }catch(JmsException ex){
        ex.printStackTrace();
        return "FAIL";
    }
}
Important: The queue DEV.QUEUE.1 is created by the IBM MQ for Developers container. The method is kept brief for this tutorial, a real application would likely have better exception handling and can use typed objects as message payloads. See the Spring guide for Messaging with JMS for more information.
Step 1.6: Add a REST endpoint that retrieves messages via MQ
Add a REST endpoint with the @GetMapping annotation with a path of recv. Use the JmsTemplate receiveAndConvert method to receive a message from the queue DEV.QUEUE.1. Add exception handling as required.
@GetMapping("recv")
String recv(){
    try{
        return jmsTemplate.receiveAndConvert("DEV.QUEUE.1").toString();
    }catch(JmsException ex){
        ex.printStackTrace();
        return "FAIL";
    }
}
Important: The JmsTemplate receive methods are blocking. (You can try this by invoking the recv endpoint before invoking send and it will not return until send is invoked, unblocking the receive call.) For a non-blocking alternative, consider using a @JmsListener.
Step 1.7: Build the app and invoke the REST endpoints and display the results
Build and run your app with the following command:
mvn package spring-boot:run
Now you can invoke the REST endpoint for send, http://localhost:8080/send. You should see the OK reply from your endpoint confirming that the message has been sent.
Having sent a message, you can invoke the REST endpoint for receive, http://localhost:8080/recv. You should see the reply from the endpoint with the content of the message "Hello World!"
Option 2: Develop an MVC Spring Boot application
Use the MVC (Model View Controller) design pattern within the Spring Boot application, integrate MQ for message exchange, interact with MQ through a web interface.
Step 2.1: Clone the Spring Boot application from the mq-dev-patterns repo
This tutorial is based on an example from the IBM MQ sample patterns repository. The corresponding code for this tutorial can be accessed in the SpringBoot-MVC folder.
To clone the mq-dev-pattern repository, open a new terminal and type:
git clone https://github.com/ibm-messaging/mq-dev-patterns
Change directories to the cloned repository, and then to the SpringBoot-MVC directory where the sample resides.
Step 2.2: Launch a local MQ Server using Docker
If IBM MQ for Developers is not yet running, complete these steps.
The IBM MQ for Developers container provides a quick and simple way to launch a local MQ Server via Docker. You can launch one using the following command (specifying it all on one line):
docker run --env LICENSE=accept --env MQ_QMGR_NAME=QM1 \
           --publish 1414:1414 \
           --publish 9443:9443 \
           --detach \
           icr.io/ibm-messaging/mq
Check that the server is running using Docker.
Step 2.3: Add the MQ server config to your application
The default configuration for the local MQ Server includes a user of admin with a password of passw0rd. This can be passed to the application via the normal Spring application.properties file.
Edit the cloned Spring Boot project and add the server information to the src/main/resources/application.properties file with the following property names and values:
ibm.mq.queueManager=QM1
ibm.mq.channel=DEV.ADMIN.SVRCONN
ibm.mq.connName=localhost(1414)
ibm.mq.user=admin
ibm.mq.password=passw0rd
Important: It is not recommended to store credentials in your application. We do so here only for the sake of simplicity in this tutorial. The MQ Spring Boot Starter can utilize other property sources such as environment variables.
In this application.properties file, you can also define the default MQ queue where messages will be sent and received.
Step 2.4: Run the MQ Spring Boot application
From the demo directory, type the following commands to build and deploy the application:
mvn clean install
mvn package spring-boot:run
After deployment is complete, you can access the Spring Boot application by opening it in your browser: http://localhost:8080. The page you will be using to experience MQ on Spring Boot will look like this:
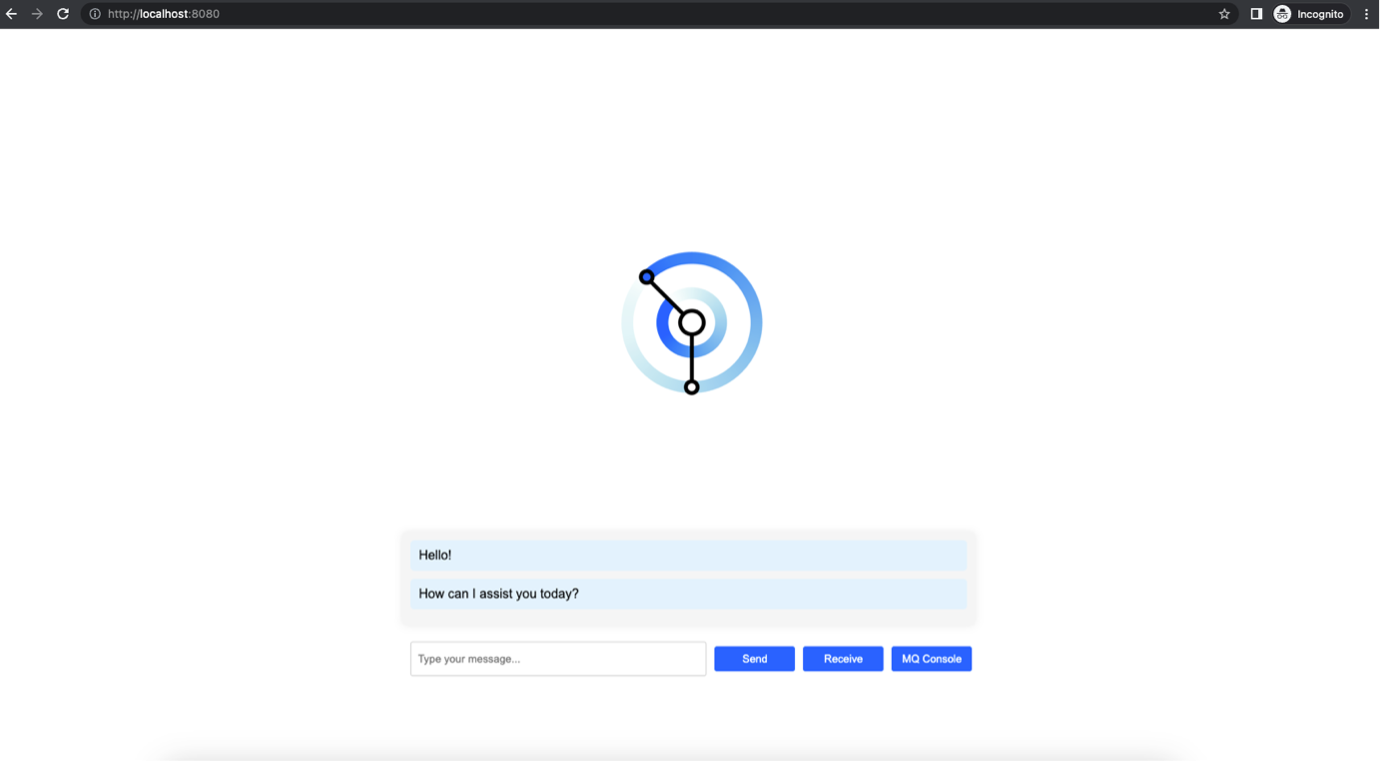
Step 2.5: Send and receive messages to and from MQ
By typing your message in the text field, and pressing on the Send button, you can put that message into the queue you specified above in the application.properties file. In the same way, by clicking the Receive button, you can get the last messages on the queue. The MQ Console is a handy way to access the IBM MQ queue manager to observe where messages are located.
The three buttons (Send, Receive, and MQ Console) call these three REST endpoints that the Spring Boot server is listening to:
sendto put a new message into the queuerecvto get a message from the queueaddressto get the URL to access the MQ Console
These three endpoints are part of a controller, DemoController.java that communicates with the MessageService.java class that is responsible for handling and performing the communication with MQ.
@RestController
public class DemoController {
    private final MessageService messageService;
    @Value("${ibm.mq.connName}")
    private String connName;
    @Autowired
    public DemoController(MessageService messageService) {
        this.messageService = messageService;
    }
    @GetMapping("send")
    public String send(@RequestParam("msg") String msg) {
        return messageService.send(msg);
    }
    @GetMapping("recv")
    public String recv() {
        return messageService.recv();
    }
    @GetMapping("address")
    public String address() {
        try {
            String address_ = connName.split("\\(")[0];;
            return "{ \"message\" : \""+ address_ +"\",  \"message\" : \""+ address_ +"\" }";
        } catch(Exception e) {
            return "{ \"message\" : \"Please ensure that your application.properties file is set up correctly.\" }";
        }
    }
}
The @Autowired decorator in Java is used for automatic dependency injection. When applied to a field, constructor, or a setter method, it allows the Spring framework to automatically resolve and inject the dependencies required by a class. In this example, the @Autowired decorator is used in the constructor of the DemoController class:
@Autowired
    public DemoController(MessageService messageService) {
        this.messageService = messageService;
    }
Here, @Autowired is used to inject an instance of the MessageService class into the DemoController. It tells the Spring framework to locate a bean of type MessageService and pass it as an argument to the constructor when creating an instance of DemoController. By using @Autowired, you don't have to manually instantiate or provide the MessageService object in the DemoController class. Spring takes care of resolving and injecting the dependency based on the configuration and annotations.
In modern versions of Spring, @Autowired is optional when there is only one constructor defined in a class. Spring automatically injects the dependencies without requiring the @Autowired annotation. However, explicitly using @Autowired can still be beneficial for code readability and clarity.
Summary
The IBM MQ Spring Starter makes it easy to send and receive messages from an MQ Service using Spring's JmsTemplate API, with Spring auto configuration.
In this tutorial, you learned how to develop MQ JMS applications with Spring Boot. You can follow one of two sets of steps:
- A simpler set of steps that provide a minimal code base where you initiated sending and receiving messages from an MQ service using Spring's
JmsTemplateAPI, leveraging Spring's auto-configuration feature. - A more advanced set of steps that explored how to structure Spring Boot projects using the MVC design pattern, offering valuable insights into building robust messaging applications with Spring Boot and IBM MQ.