Article
Implementing data privacy rights with mobile apps and databases
Earn users’ trust by giving your mobile app users the control of their data security and privacyMost of us outside the European Union's GDPR regulations feel that our personal data is not in our control, especially in the world of mobile apps! As a mobile app developer or owner, you still want to collect PII (personally identifiable information), but why risk trouble with government agencies when it’s a simple addition to protect users’ data. With great data collection power, comes great responsibility!
My Android app, Appvestr®, which you can find on Google Play, demonstrates some of these mobile security best practices. In this article, I’ll show you how you can easily present the following data privacy options to your users:
- Opt in
- Withdraw permission
- Data Subject Requests (DSR)
I implemented each of these data privacy options with IBM Cloud using basic Cloudant database elements and a serverless monitoring agent.
I’m not going to focus on Android UI code, but rather I’ll show the UI and focus on the pieces of the experience that interact with the common database service. This is an opinionated approach to this solution and clearly, UI and implementations will vary, but the scope of this article is simply focusing on one database implementation to support the above three user experiences for data privacy.
Data design
To implement these data privacy capabilities, I decided on a running log of time-stamped verbs to have an audit trail of all the user actions taken. For the corporate developer who is governed by regulations, this log allows you to keep a running history of the user actions in case any data forensics need to be applied to any user or sets of users.
| User Action | Consent Type Field Contents |
|---|---|
| Opt in | consent |
| Withdraw permission | withdraw |
| Data Subject Requests (DSR) | request |
For each record captured, I simply chose three different fields:
| Database Fields | consenttype | Date | |
|---|---|---|---|
| Sample Data: | noname@youremail.net | Consent | 2026/03/23 |
Initially I chose to implement this in a Cloudant noSQL database, as the service tier is free for simple usage, and the Android mobile libraries were readily available. Capacity is limited in the “Lite” Plan to 20 reads per second, 10 writes per second, but you do get 1Gb of storage included, and hence it was an easy choice for development and early production releases.
Today, I use the Standard plan, which doesn’t throttle capacity and hence I can address the “P” (Performance) in the standard FURPS set of requirements.
Enterprise data design
For enterprises that wish to enhance performance further, a Cloudant Dedicated (single tenant) is available.
In addition to Cloudant, IBM Cloud has other non-relational databases including MongoDB and Elasticsearch. IBM Cloud also has High Availability (HA) relational database services in each Multi-Zone Region (MZR) that also provide automated backup orchestration, autoscaling, such as PostgreSQL and Db2. IBM Cloud contains over a dozen different enterprise database options (check out the catalog of choices for yourself).
To create the Cloudant database, I used a simple csv-import Python importer, which also creates the indices using the sample record data elements outlined above. Once established, I created the following Java method to post the JSON “document” to the database with the aforementioned data fields of email, consent type, and date:
void saveUserPrivacy(String email, String consenttype) {
        DocumentResult response = null;

        IamAuthenticator authenticator = new IamAuthenticator.Builder()
                .apikey(appSecret)
                .build();
        dbService = new Cloudant(Cloudant.DEFAULT_SERVICE_NAME, authenticator);
        dbService.setServiceUrl(appURL);
        Document privacyDocument = new Document();
        String currentDate = new SimpleDateFormat("yyyy-MM-dd:HH:mm:ss", Locale.getDefault()).format(new Date());
        // if I don't provide an id - Cloudant gens one -  prefer to use custom id....
        privacyDocument.setId(email+"!"+consenttype+"!"+currentDate);
        privacyDocument.put("email", email);
        privacyDocument.put("consenttype", consenttype);
        privacyDocument.put("date", currentDate);
        PostDocumentOptions documentOptions =
                new PostDocumentOptions.Builder()
                        .db(dbUserPrivacy)
                        .document(privacyDocument)
                        .build();
        Log.i(CLASS_NAME, "Adding " + privacyDocument);

        // try {
        response = dbService.postDocument(documentOptions).execute().getResult();
        // } catch (Exception e) {
        if (response.isOk())
            Log.i(CLASS_NAME, "Saved user privacy preference. " + response.getId());
        else
            Log.e(CLASS_NAME, "Could not save user privacy preference. " + response.getError());
    }
Opt in
Users must be presented with this option unchecked as the default so as not to have users unwittingly bypass this important checkpoint. This must be a conscious decision by the user, and per Play Store guidelines, you must also publish your policies on a publicly available location.
Developers must decide in our apps if this completely disqualifies the user data as personal information (PI), and if it is fundamental to the app's operation, then exit the app. If the user declines to have PI collected and used, your app might have to use a data obfuscation approach to user identification.
For my mobile app, I chose to limit entry into the app unless the user opts in. As shown below, I enable the “Proceed” button only if the checkbox is checked, indicating an “Opt In” condition for the user:
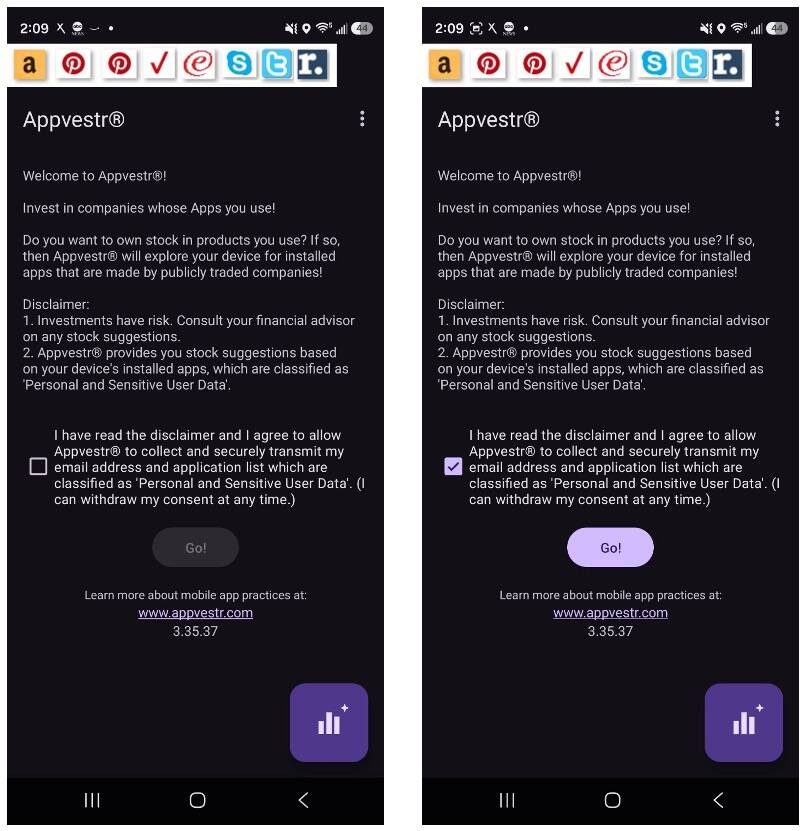
To complete the “Opt In” scenario, I simply use the aforementioned “Consent Type Field Contents” which requires only a simple method call: saveUserPrivacy(email, "consent");.
Withdraw permission
Let me assert a key reminder: Users have the right, after opting in, to withdraw permission. Therefore, all the PI data for that user must then be removed, because even if you're no longer collecting it, it is stored somewhere, which falls under "processed" data.
So, technically, you’ll also need to remove all the data backups too, but in some EU countries, organizations don’t have to delete backups to remain in compliance.
I’ll repeat some key definitions from my earlier article on data privacy roles: controllers and processors:
- "Controllers" control the why and how of data processing activity. That is, controllers set the rules, and you must explicitly show those rules in your app. This transparency allows users to decide to opt in or out based on how you'll use the data, now or in the future.
- "Processors" process personal information (PI) in the way that is determined by the controller. If you plan on providing data to a processor, the processor must inherit the controller's rules and actions.
Developers need their users to be able to oversee their data, so as a “Data Controller”, we must offer a “Withdrawal request” to remove the ability for us and our “Data Processors” to handle that user data because the Processor inherits our policy.
I implemented the UI in both an Android Settings Activity and an AlertDialog to present choices to confirm the Withdraw permission request:
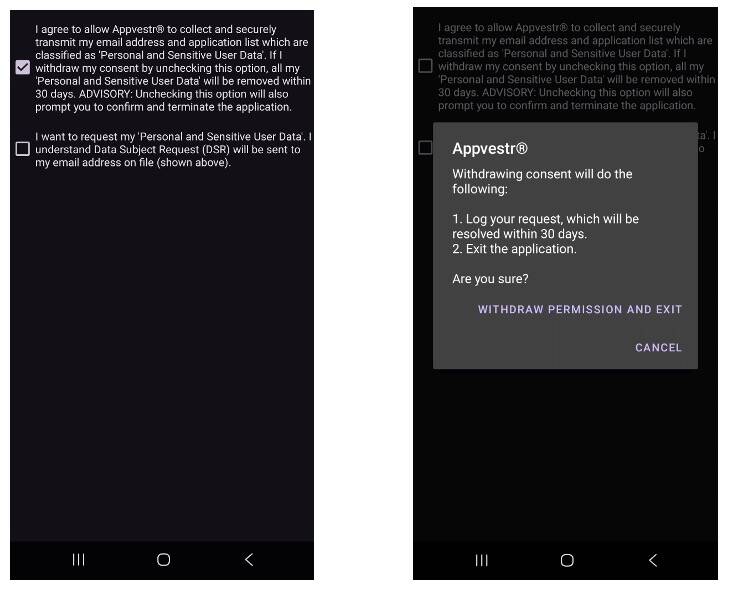
As with the Consent, we can simply log a withdrawal request with this call: saveUserPrivacy(email, "withdraw");.
Data Subject Request (DSR)
Users also have the right to ask for their data. As mobile developers, we must build this into our mobile app security.
I implemented the UI in both an Android Settings Activity and an AlertDialog to present choices to confirm the Data Subject Request:
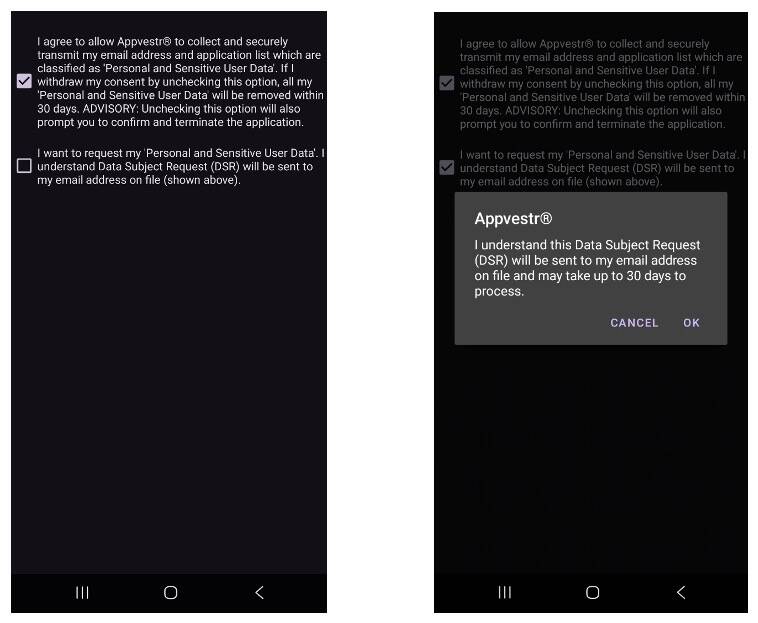
As with the Consent and Withdraw requests, we can simply log a DSR with this call:
saveUserPrivacy(email, "request");.
Notifications of withdrawals and DSRs
Now that we’ve implemented all the compliance data logging in Cloudant, how can we easily monitor the database to notify us of any changes?
Following IBM’s lead into Kubernetes, the OpenWhisk-based IBM Cloud Functions individual service was deprecated in lieu of IBM Cloud Code Engine’s implementation of KNative to simplify building and running serverless workloads on Kubernetes. If you’re not aware, the entire IBM Cloud console was built using Kubernetes. In the quest to gain more developer trust, IBM has been the first company to rollout the latest development tips of Kubernetes for well over five years continuously, beating the other open source contributors including Google.
IBM Cloud Code Engine not only offers a serverless computing option, but extends that low-cost model and simplicity into an overall approach to create modern, source-centric, containerized, and serverless apps and jobs. The IBM Cloud Code Engine platform is designed to address the needs of developers who just want their code to run. Code Engine abstracts the operational burden of building, deploying, and managing workloads in Kubernetes so that developers can focus on what matters most to them: the source code!
Three additional benefits on both cost, security, and simplicity:
- The number of running instances of an app are automatically scaled up or down (to zero) based on incoming requests and your configuration settings.
- Code Engine provides immediate DDoS protection for your application.
- Code Engine is a fully managed service and takes care of all the cluster management, including provisioning, configuring, scaling, and managing servers so you do not need to worry about the underlying infrastructure.
IBM Cloud Code Engine supports applications, (batch) jobs, functions, and fleets. This table in the Code Engine docs is a good comparison to guide your decisions on the kind of application design you need.
A continuous “batch job” of monitoring is a wonderful use case for serverless computing and IBM Cloud Code Engine.
Create a serverless project
An earlier version of this article used IBM Cloud Functions and while this IBM Cloud docs page does a good job showing how to migrate your “legacy” functions to CodeEngine, I ended up selecting and contributing to one of the already-built samples for IBM Cloud Code Engine: the cloudant-change-listener.
I highly recommend reading "Getting started with IBM Cloud CodeEngine" as this will explain some concepts important to this article. Our first step to use this sample code is to create an IBM Cloud CodeEngine serverless project, which bears no cost until you actually build and deploy the project.
Log in to your IBM Cloud account, and upgrade it to a Pay-As-You-Go account. IBM Cloud Code Engine provides 100000 vCPU seconds per month at no charge, so you should be ok if you follow along here.
Click Start Creating to create your serverless project. As you read in the Getting Started reference above, serverless projects can contain an application, a job, a function, or a fleet as shown in the IBM Cloud console. For this cloudant-change-listener, the two core components are a job and a function, so let’s get started creating!
Create the job
Unlike the Getting Started referenced earlier which uses existing images, we’re going to leverage the sample source code. We’ll create the job by providing a name, selecting the option to build an image from source code, and providing a link to the code repo, https://github.com/IBM/CodeEngine.
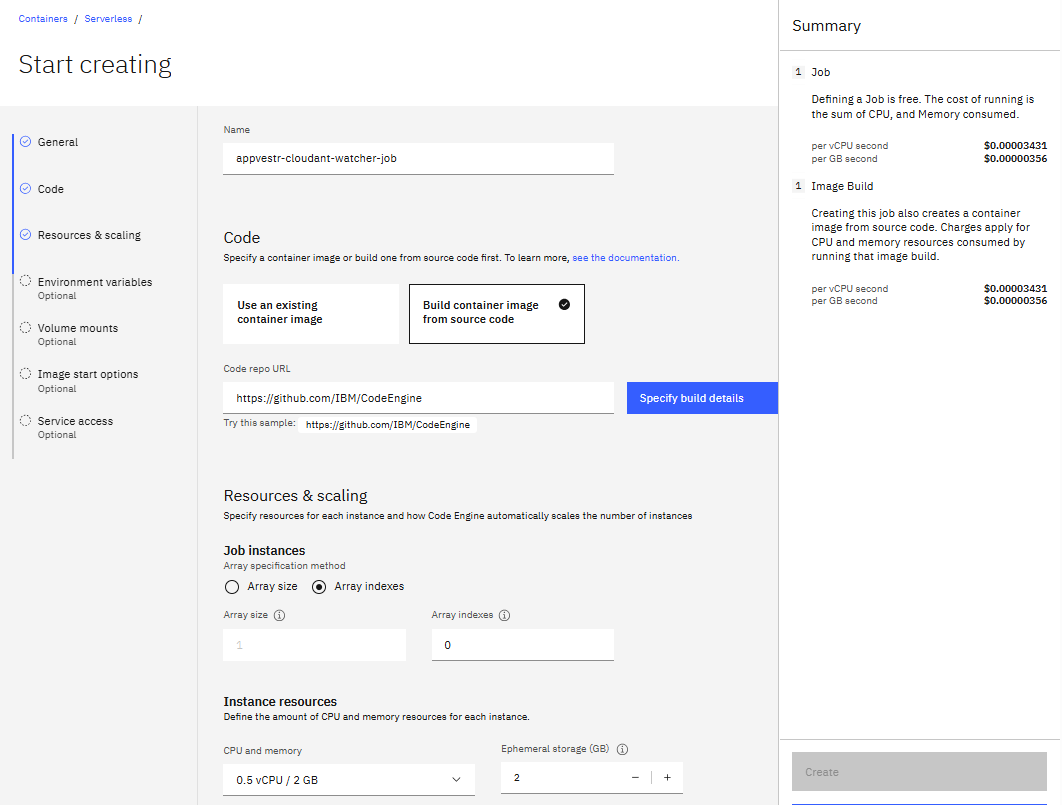
When we specify build details, we need to be sure to include the context directory in the sample code, cloudant-change-listener, to ensure we’re working with the correct job sample code.
For resources and scaling, this particular sample code runs jobs as daemons, so you’ll need to select the proper settings to ensure your job continuously runs.
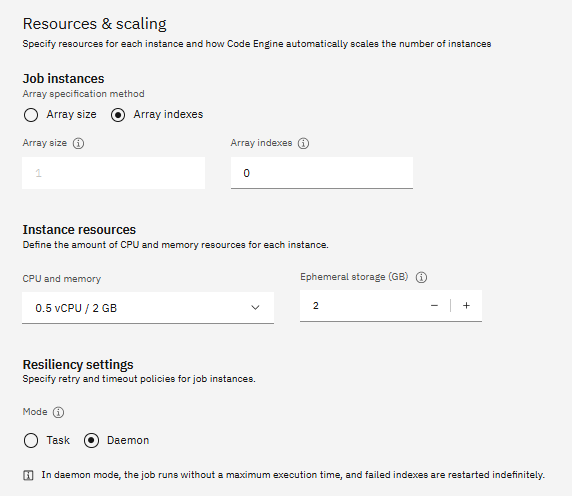
The cloudant-change-listener does require several environment variables, but you define environment variables in the job, after reviewing the sample code.
Creating the function
As serverless containers are developer-centric, of course, you can access many of these same actions via CLI. To demonstrate that here, we’ll build the function using the CLI instead of solely relying on the GUI console. For this project, I used vs.code and the IBMCloud CLI in the Terminal in Visual Studio Code. Once I forked the source, and changed into the cloudant-change-listener directory, I can login to IBM Cloud and target the right region, namespace, and project:
ibmcloud target -r us-east
ibmcloud target -g Default
ibmcloud ce project select -n appvestr-cloudant-watcher
The cloudant-change-listener sample does include a function’s sample code as well as an overview diagram explaining the architecture. Functions are also just part of the CodeEngine project, and if you didn’t have code in a repo, you can use the GUI inline editor to work with your function code.
Functions publish an internal or external URL that allows the independent operation, but in this case, the aforementioned Job will invoke the function by launching the function from the URL that you specify in the sample’s environment variables.
Before we build and deploy the function code, let’s look how simple functions can be and in my case, I simply want to get an email notification that someone has updated their user privacy settings. For this, I do use the nodemailer, but in under 60 lines of Node.js code, I can (inclusive of logging), send an email notification:
let nodemailer;
nodemailer = require('nodemailer');

async function main(params) {
    console.info(">>> Function started. Event ID: ", params.id || "No ID provided");

    if (process.env.SMTP_SKIP === 'true') {
        console.info('>>> SMTP_SKIP is set; skipping real SMTP operations (local run).');
        console.info('>>> Would send mail to:', process.env.SMTP_USER || '(no SMTP_USER)');
        return {
            status: 'success',
            messageId: 'skipped-local'
        };
    }

    // 1. Setup Transporter
    const transporter = nodemailer.createTransport({
        host: "<<your SMTP server target>>",
        port: 587, // Changed to 587 for better cloud compatibility
        secure: false,
        auth: {
            user: process.env.SMTP_USER,
            pass: process.env.SMTP_PASSWORD,
        },
    });

    try {
        // 2. Verify Connection
        console.info(">>> Verifying SMTP connection...");
        await transporter.verify();
        console.info(">>> SMTP Connection Successful!");

        // 3. Prepare Email
        const mailOptions = {
            from: '"Appvestr® Alerter" <'+ process.env.SMTP_USER +'>',
            to: process.env.SMTP_USER,
            subject: "Appvestr® User Privacy Change Detected",
            text: `A change occurred in Cloudant. ID: ${params.id}`,
            html: `<b>User Privacy Change Detected</b><br><pre>${params.id}<br>${params.seq}</pre>`,
        };

        // 4. Send Mail
        console.info(">>> Sending email...");
        const info = await transporter.sendMail(mailOptions);

        console.info(">>> Email sent successfully! Message ID:", info.messageId);
        return {
            status: "success",
            messageId: info.messageId
        };

    } catch (error) {
        console.error(">>> ERROR encountered:", error.message);
        return {
            status: "error",
            error: error.message
        };
    }
}

exports.main = main;
Now, let’s build that code via the CLI:
ibmcloud ce function update --name appvestr-cloudant-watcher-function-notify -build-source .
The output from this build will reference a “run name” where the built image resides, and we’ll use that in the next step to complete the build step:
ibmcloud ce buildrun logs --name <<run name provided in the output from the above command>>
Another benefit of having this function as an indepent component of this solution is that you can easily modify the function, rebuild and deploy without having to affect the job as the job is simply looking for that callable URL published by the function.
Submit the job
Once the build is available for the job, then you can Submit the job:
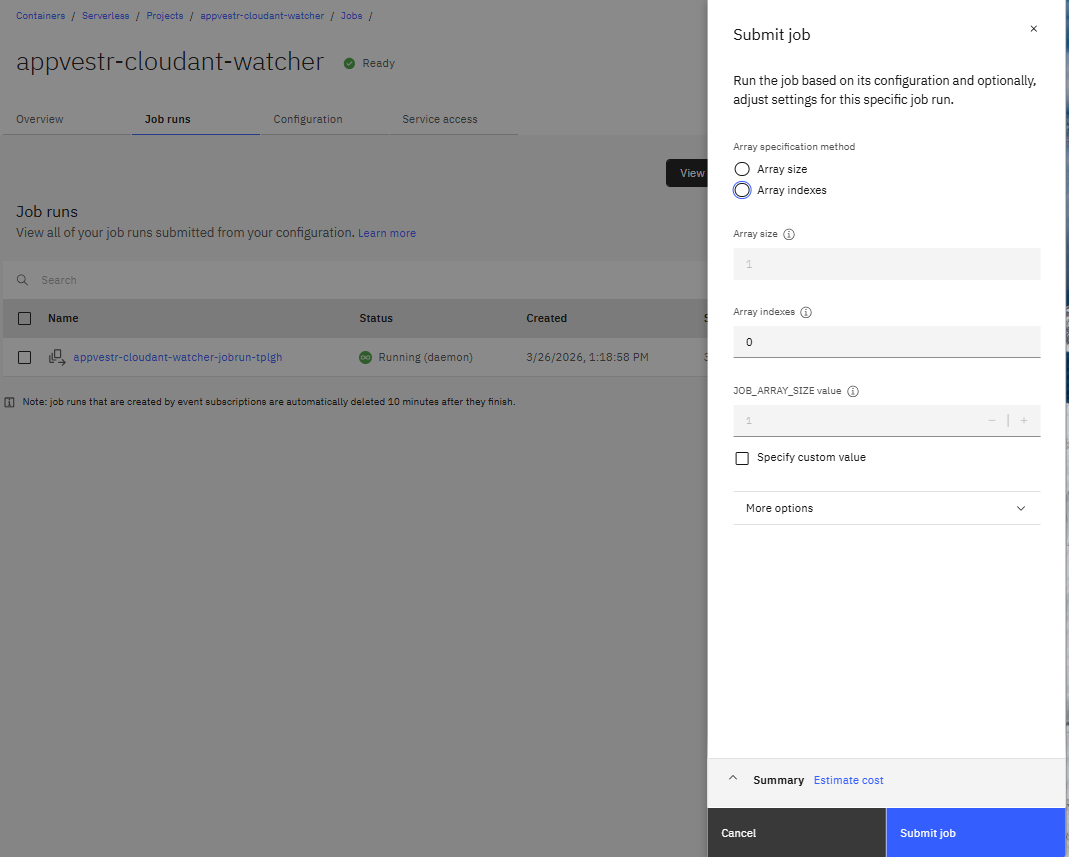
In the background, I already have one that has been running, so I won’t recreate it here. Once the job runs, then as changes occur in the specified database from the environment variables for the job, the function gets targeted for execution and the email sent. To stop monitoring, simply just delete the job run.
Summary
While regulations in certain countries aren't always there to protect consumers, developers can do the right thing now and build trust in their user base by easily implementing a simple set of data privacy rights using some basic Cloudant database elements and a serverless monitoring agent using IBM Cloud CodeEngine.
In this article, I demonstrated a simple and low-cost approach to log and monitor user's privacy rights in a mobile application. Mobile applications have gained in popularity to simplify tasks that were previously on more complex web or other front-end systems. Clearly, user privacy issues exist in any system that collects your data, and this article's approach can be applied to any number of systems because the Cloudant database is accessible through several different languages and applications.
Acknowledgments
I'd like to thank IBMers Enrico Regge, Steffen Rost, and Torsten Teich not only for their collective contributions to the CodeEngine samples including cloudant-change-listener, but also for their support in diagnosing some CodeEngine issues, improving logging, and a deeper-level understanding of this cost-saving mechanism for running apps, jobs, and serverless compute functions.