Tutorial
IBM MQ on ARM64: Install and run MQ on ARM devices
Install and run IBM MQ 10 on ARM64 hardware, including cloud instances and Raspberry Pi.IBM MQ supports a wide range of platforms. To make it easier for developers to get started, IBM MQ provides developer builds for Windows and Linux, a Mac client, an MQ on Cloud managed service, and an IBM MQ container image.
IBM MQ has a developer edition that runs on ARM64 (64-bit ARM), which is one of the fastest-growing architectures in both cloud and edge computing. ARM64 is increasingly popular in cloud environments because it delivers high cost-efficiency and energy-optimized compute. IBM MQ runs on ARM64 cloud instances such as AWS Graviton, as well as on smaller devices like the Raspberry Pi.
The Raspberry Pi is a practical example: even on low-powered edge hardware, IBM MQ can demonstrate reliable message delivery with automatic failover between devices.
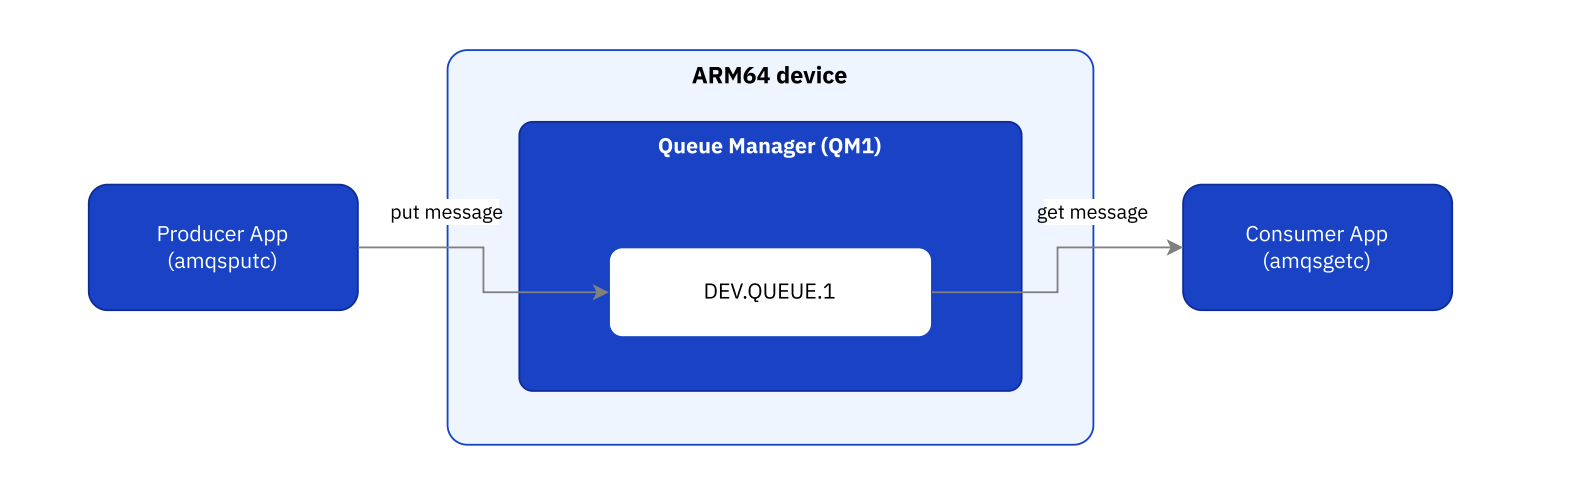
The IBM MQ Advanced for Developers package for Ubuntu Linux ARM64 includes most of the features of IBM MQ that are available on large enterprise systems, including multi-instance queue managers, queue manager clustering, and fully functional TLS authentication, all running on your ARM64 devices.
Important: This package is a developer edition of IBM MQ and is not suitable for production use. This is also an experimental offering that is provided as is with no formal IBM support. Some MQ features may not be available on ARM64. For a full list of limitations, see /opt/mqm/RPi_README.txt after installation.
In this tutorial, you install IBM MQ 10 on an ARM64 device, create and configure a queue manager, activate the MQ Console, and send your first messages. By the end, you have a fully running MQ queue manager on ARM64 and can put and get messages from a local queue.
Prerequisites
Before you begin, make sure you have the following:
ARM64 hardware. Any of the following should work:
- Any ARM64 Linux cloud instance, such as AWS Graviton, Google Cloud ARM64 VMs (Tau T2A, C4A), or Microsoft Azure ARM64 VMs
- A Raspberry Pi 4 or Raspberry Pi Zero 2W (64-bit). Earlier Pi models (Pi Zero, Pi 2, Pi 3) use a 32-bit ARM architecture and are not supported by this build.
Operating system
- Ubuntu 22.04 LTS or later (ARM64).
- Raspberry Pi OS (64-bit) is also supported.
Step 1. Create users and groups
Before installing MQ, open a terminal on your ARM64 device and create a group called mqclient and a user called app. These are used later to configure MQ objects and test message sending.
sudo addgroup mqclient
sudo adduser app
sudo adduser app mqclient
groups app
When prompted, set a password for the app user. You can leave all other fields blank by pressing Enter. The output confirms that app belongs to the mqclient group:
app : app mqclient
Step 2. Download IBM MQ 10 for ARM64
Download the IBM MQ 10 Advanced for Developers package for Ubuntu Linux ARM64.
Extract the downloaded archive:
tar -zxvf 10.0.0.0-IBM-MQ-Advanced-for-Developers-UbuntuLinuxARM64.tar.gz
The command extracts the product to a folder called MQServer.
Step 3. Install IBM MQ
Important: Do not run these steps from the root user's home directory (/root/). The _apt user that runs the package installation process does not have read access to /root/, which causes sudo apt update to fail with a permission error. If you extracted the archive in the /root/ directory, move it first:
mv ~/MQServer /tmp/MQServer && cd /tmp/MQServer
Navigate into the MQServer folder and accept the license. Then install the packages:
cd MQServer
sudo ./mqlicense.sh -text_only
Read the license and press 1 to accept.
Next, add the folder to the apt cache so that apt can resolve package dependencies automatically:
echo "deb [trusted=yes] file:$(pwd) ./" | sudo tee /etc/apt/sources.list.d/ibmmq-install.list
sudo apt update
Now, install all MQ packages in one command:
sudo apt install "ibmmq-*" -y
The command installs all required packages, including the server, client, web console, Java, and samples.
Step 4. Set up your MQ environment
After installation is complete, set MQ as the primary installation and configure your environment:
sudo /opt/mqm/bin/setmqinst -i -p /opt/mqm
source /opt/mqm/bin/setmqenv -s
Add your user account to the mqm group to get MQ admin privileges:
sudo adduser $(whoami) mqm
Important: After adding your user to the mqm group, you must start a new terminal session for the group membership to take effect. If you continue in the same terminal, you get the error AMQ7077E: You are not authorized to perform the requested operation.
Open a new terminal session and set up the MQ environment again:
source /opt/mqm/bin/setmqenv -s
Verify the installation:
dspmqver
You see output like the following example, confirming MQ 10 is installed in 64-bit mode on the ARM64 platform:
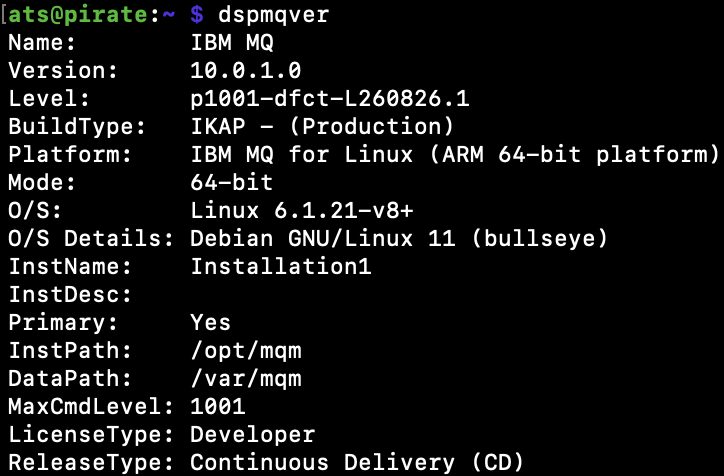
The version number shown in your output might differ if you downloaded a newer fix pack. The Platform should show IBM MQ for Linux (ARM 64-bit platform) and the Mode should show 64-bit.
Step 5. Create and configure a queue manager
Create a queue manager called QM1:
crtmqm QM1
Start it:
strmqm QM1
Verify it is running:
dspmq
You see:
QMNAME(QM1) STATUS(Running)
Configure the queue manager with developer objects (queues, channels, topics, and a listener) using the IBM MQ dev samples configuration script:
wget -O mq-dev-config.mqsc https://raw.githubusercontent.com/ibm-messaging/mq-dev-samples/master/gettingStarted/mqsc/mq-dev-config.mqsc
runmqsc QM1 < mq-dev-config.mqsc
This creates the following objects:
DEV.QUEUE.1,DEV.QUEUE.2,DEV.QUEUE.3— local queues for developmentDEV.DEAD.LETTER.QUEUE— dead letter queue for undeliverable messagesDEV.BASE.TOPIC— a topic for pub/sub messagingDEV.APP.SVRCONN— a server connection channel for applicationsDEV.ADMIN.SVRCONN— a server connection channel for adminsDEV.LISTENER.TCP— a TCP listener on port 1414
Finally, grant the mqclient group permission to connect and use the DEV queues:
setmqaut -m QM1 -t qmgr -g mqclient +connect +inq
setmqaut -m QM1 -n DEV.** -t queue -g mqclient +put +get +browse +inq
Step 6. Put and get your first messages
Set the environment variables needed to connect to the queue manager:
export MQSERVER='DEV.APP.SVRCONN/TCP/localhost(1414)'
export MQSAMP_USER_ID='app'
cd /opt/mqm/samp/bin
Put a message onto DEV.QUEUE.1:
./amqsputc DEV.QUEUE.1 QM1
Enter the password for the app user when prompted. Then, type a message, for example Hello MQ, and press Enter. Press Enter twice to finish putting messages.
Get the message back from the queue:
./amqsgetc DEV.QUEUE.1 QM1
Enter the app password again. Your message is returned:
message <Hello MQ>
The program waits 15 seconds for new messages then exits automatically.
Step 7. Activate the MQ Console
The MQ Console is a browser-based tool for managing your queue manager. You can create queues, browse messages, manage channels, and more.
First, create a user called mqadmin and add them to the mqm group. When prompted, set a password to use when signing into the console. You can leave all other fields blank by pressing Enter.
sudo adduser mqadmin
sudo adduser mqadmin mqm
groups mqadmin
Next, copy the local OS authentication configuration file to the MQ web server directory:
cp /opt/mqm/web/mq/samp/configuration/local_os_registry.xml /var/mqm/web/installations/Installation1/servers/mqweb
cd /var/mqm/web/installations/Installation1/servers/mqweb
Rename the existing config file and replace it with the local OS registry file:
mv mqwebuser.xml mqwebuser.xml.old
mv local_os_registry.xml mqwebuser.xml
The mqwebuser.xml file is installed as read-only. Make it writable before editing, then restore the permissions afterwards:
sudo chmod 644 mqwebuser.xml
sudo nano mqwebuser.xml
Find and uncomment these two lines by removing the <!-- and --> around them:
<variable name="httpsPort" value="9443"/>
<variable name="httpHost" value="*"/>
Save the file by pressing Ctrl+O, then exit nano by pressing Ctrl+X.
sudo chmod 444 mqwebuser.xml
The file should now look like this:
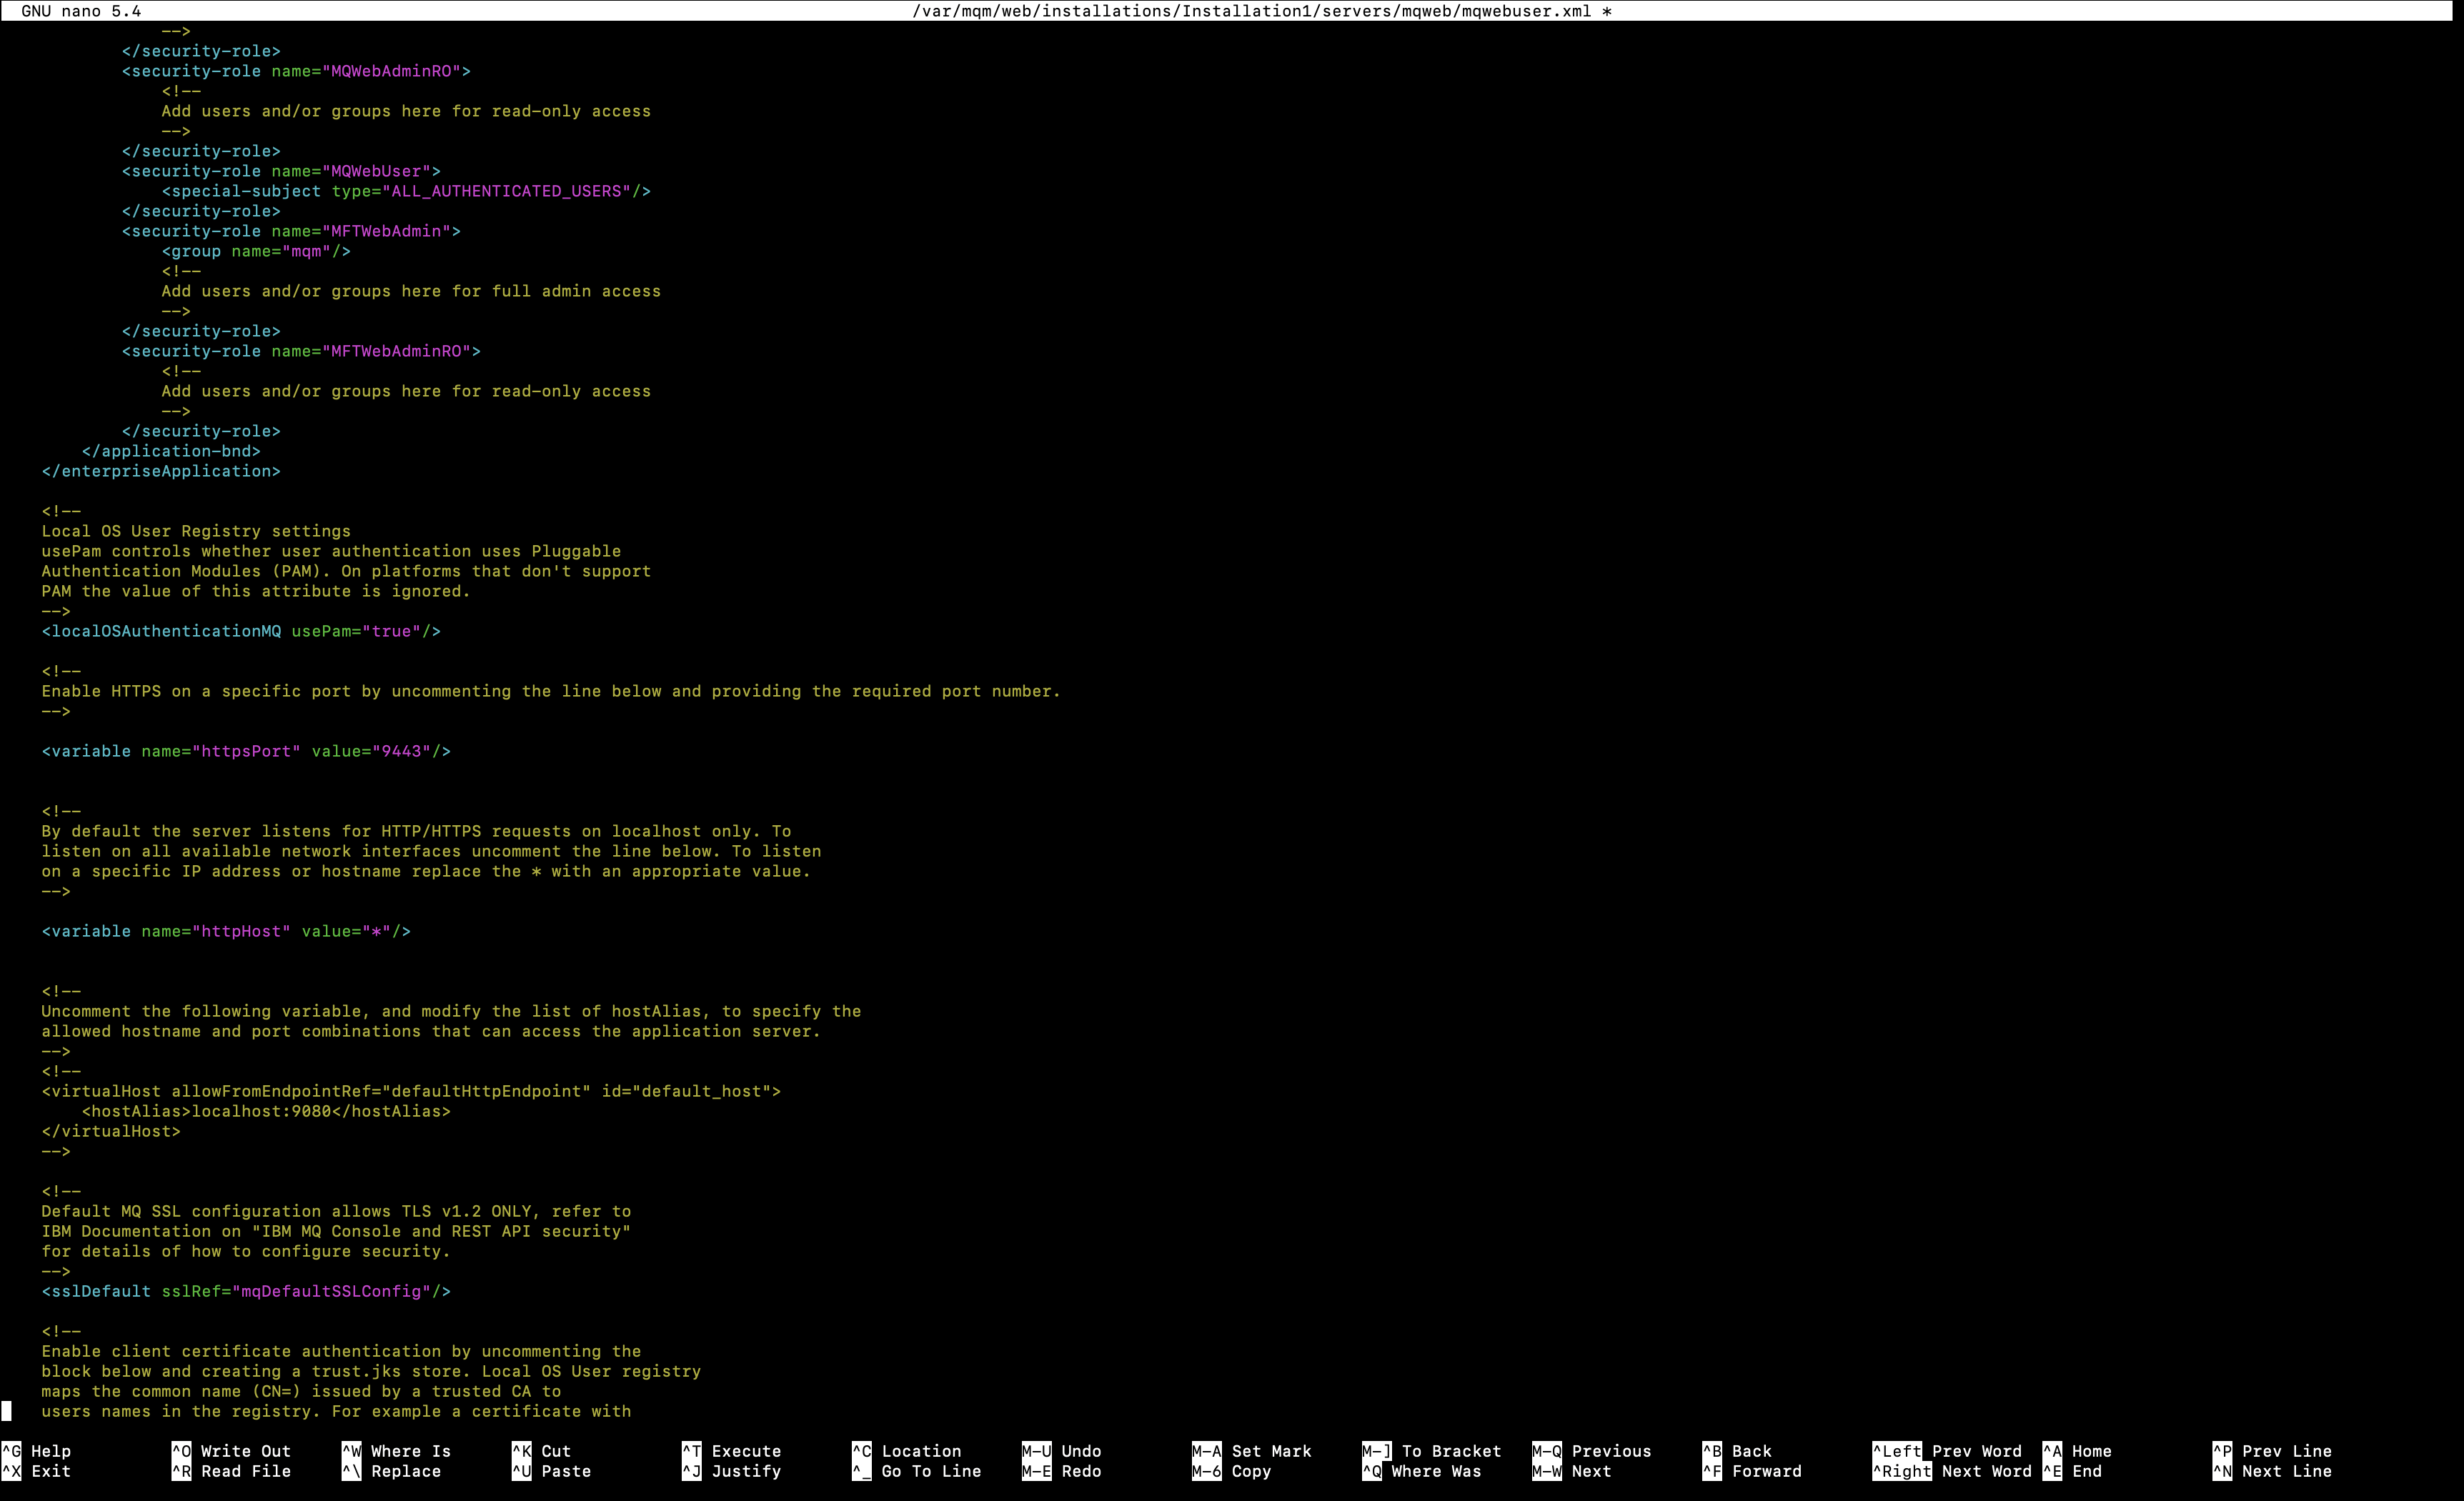
Uncommenting httpsPort enables the console on port 9443. Uncommenting httpHost allows connections from other devices on your network so that you can access the console from your laptop or phone.
Now, start the MQ web server. In MQ 10, strmqweb cannot be run as root — switch to the mqadmin user first:
su - mqadmin
source /opt/mqm/bin/setmqenv -s
strmqweb
dspmqweb
You see:
MQWB1124I: Server 'mqweb' is running.
URLS:
  https://[your-hostname]:9443/ibmmq/rest/
  https://[your-hostname]:9443/ibmmq/console/
Step 8. Access the MQ Console
Open a browser and navigate to:
https://[ip-address-of-your-device]:9443/ibmmq/console
You might see a certificate warning. This warning is expected as MQ uses a self-signed certificate by default. It is safe to proceed.
Sign in with username mqadmin and the password that you set earlier.
After you sign in, you see the MQ Console home screen:
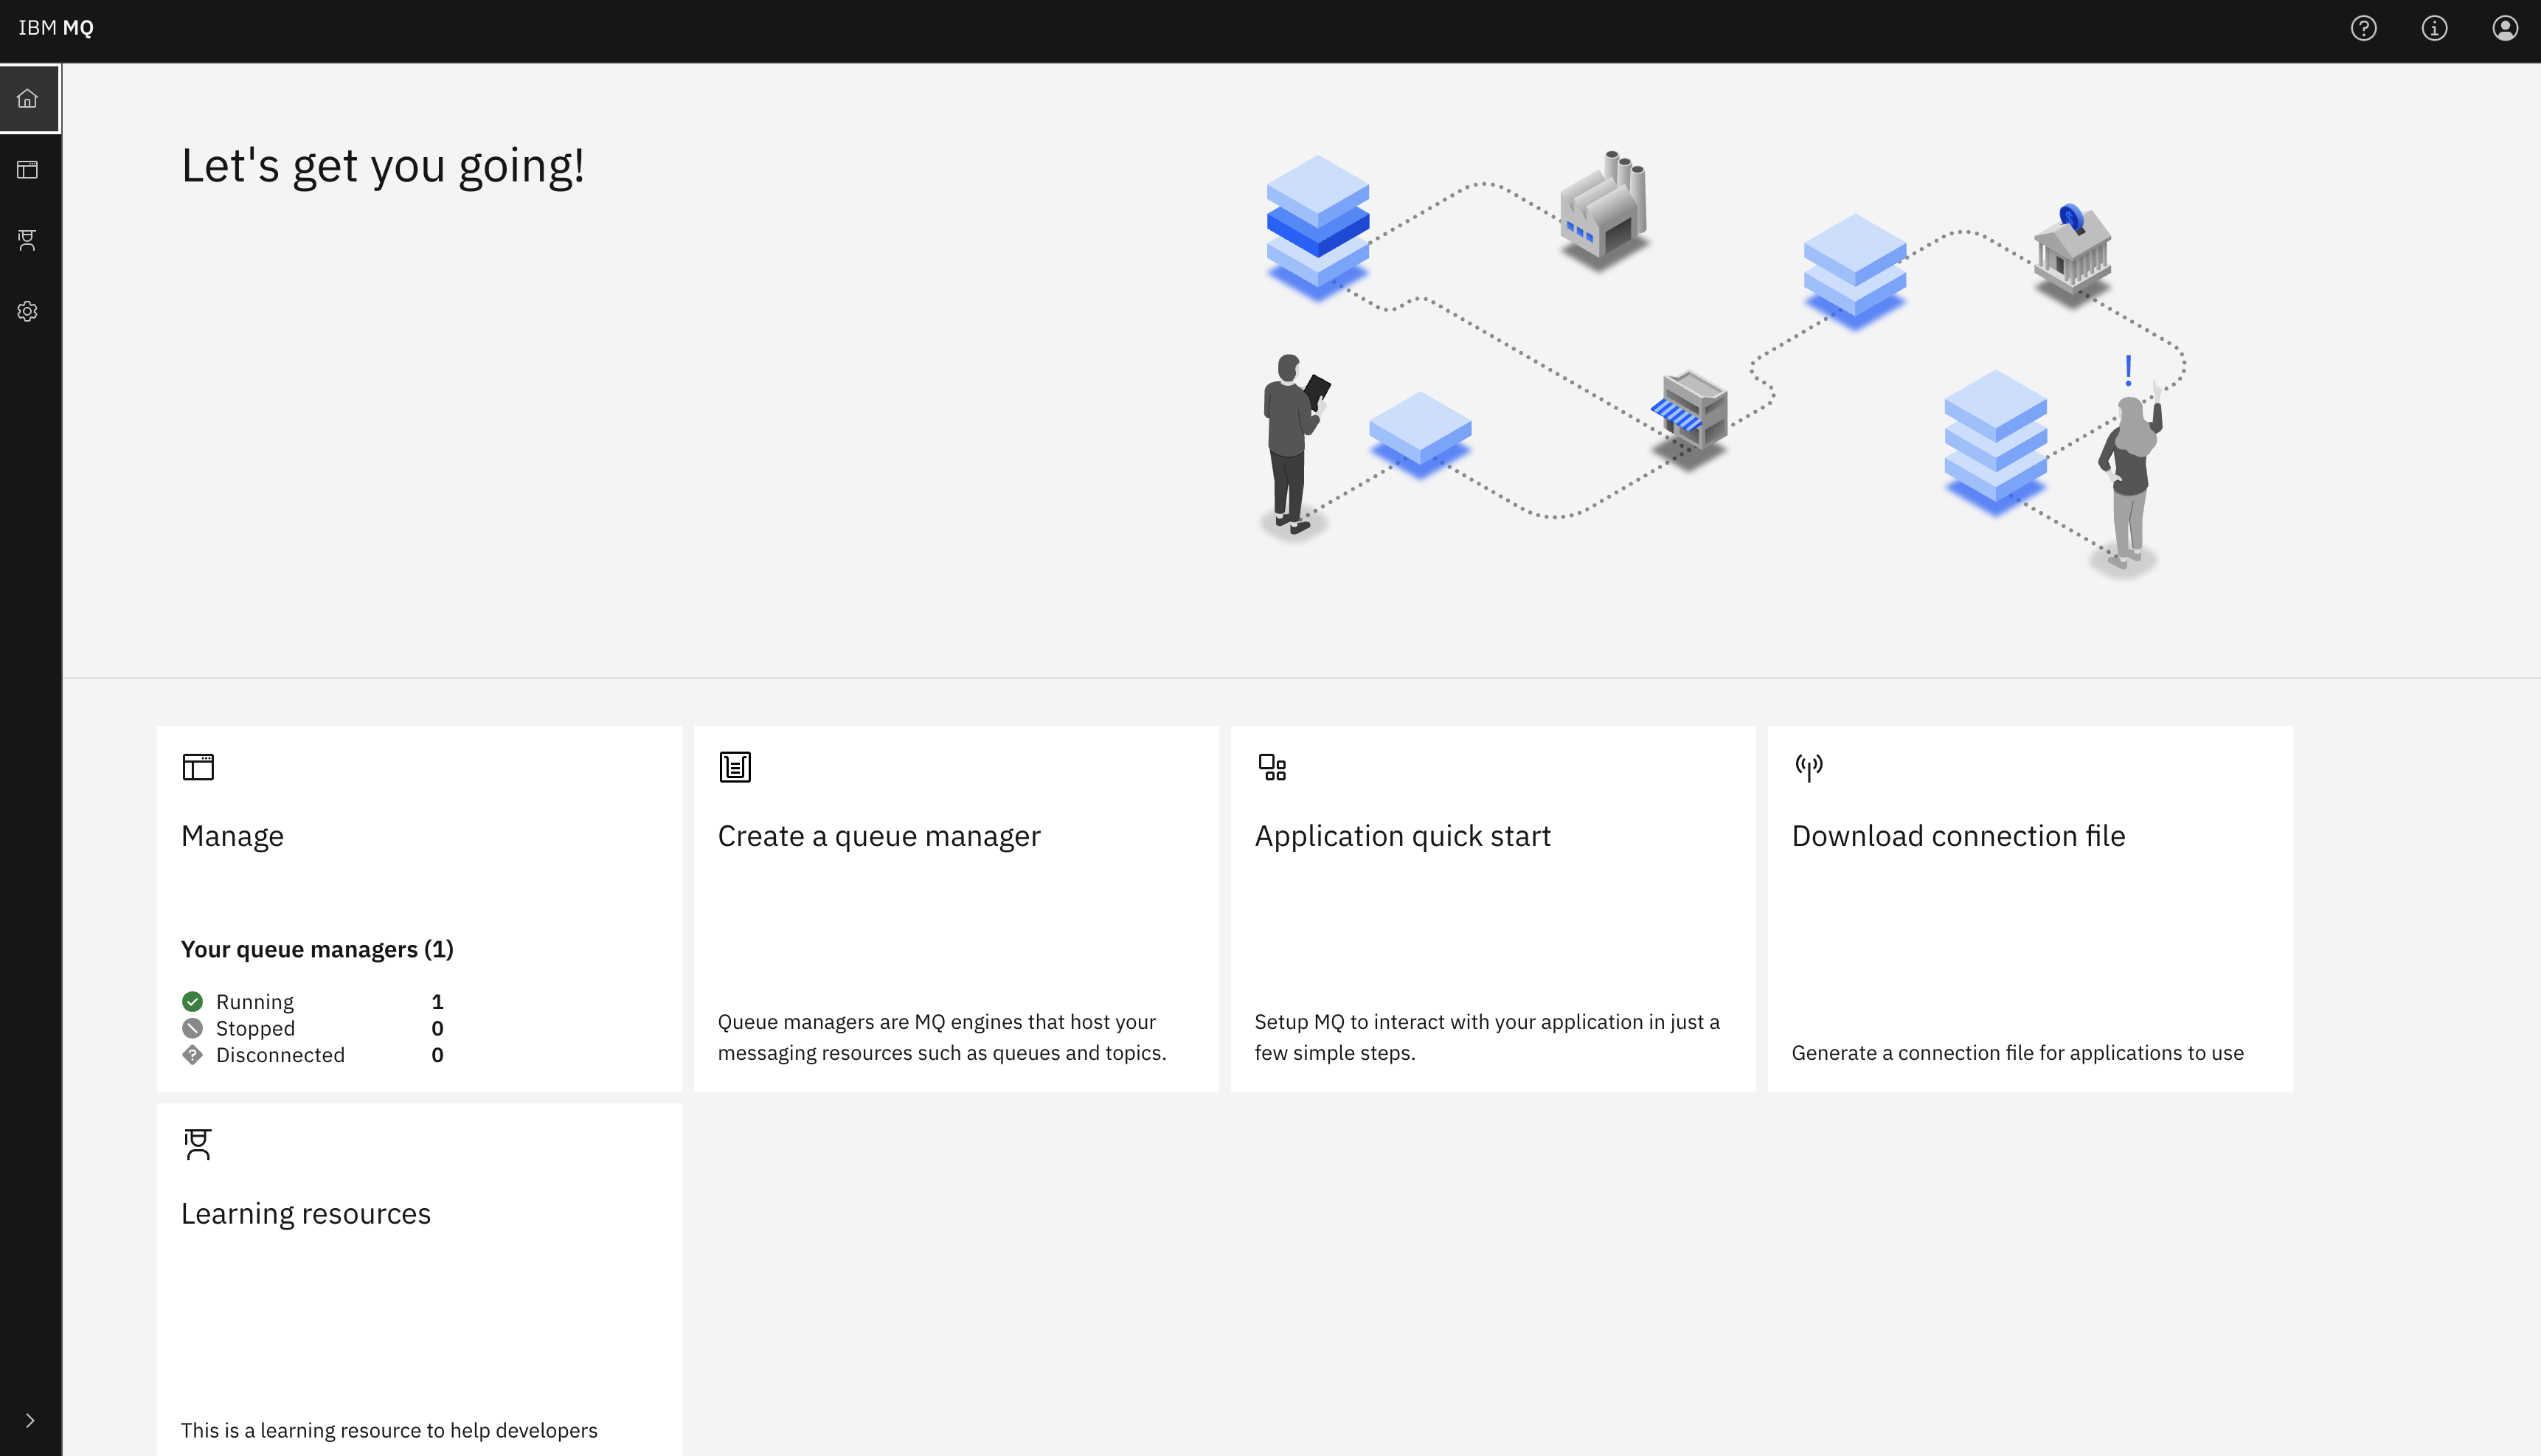
Click Manage to view your queue managers:
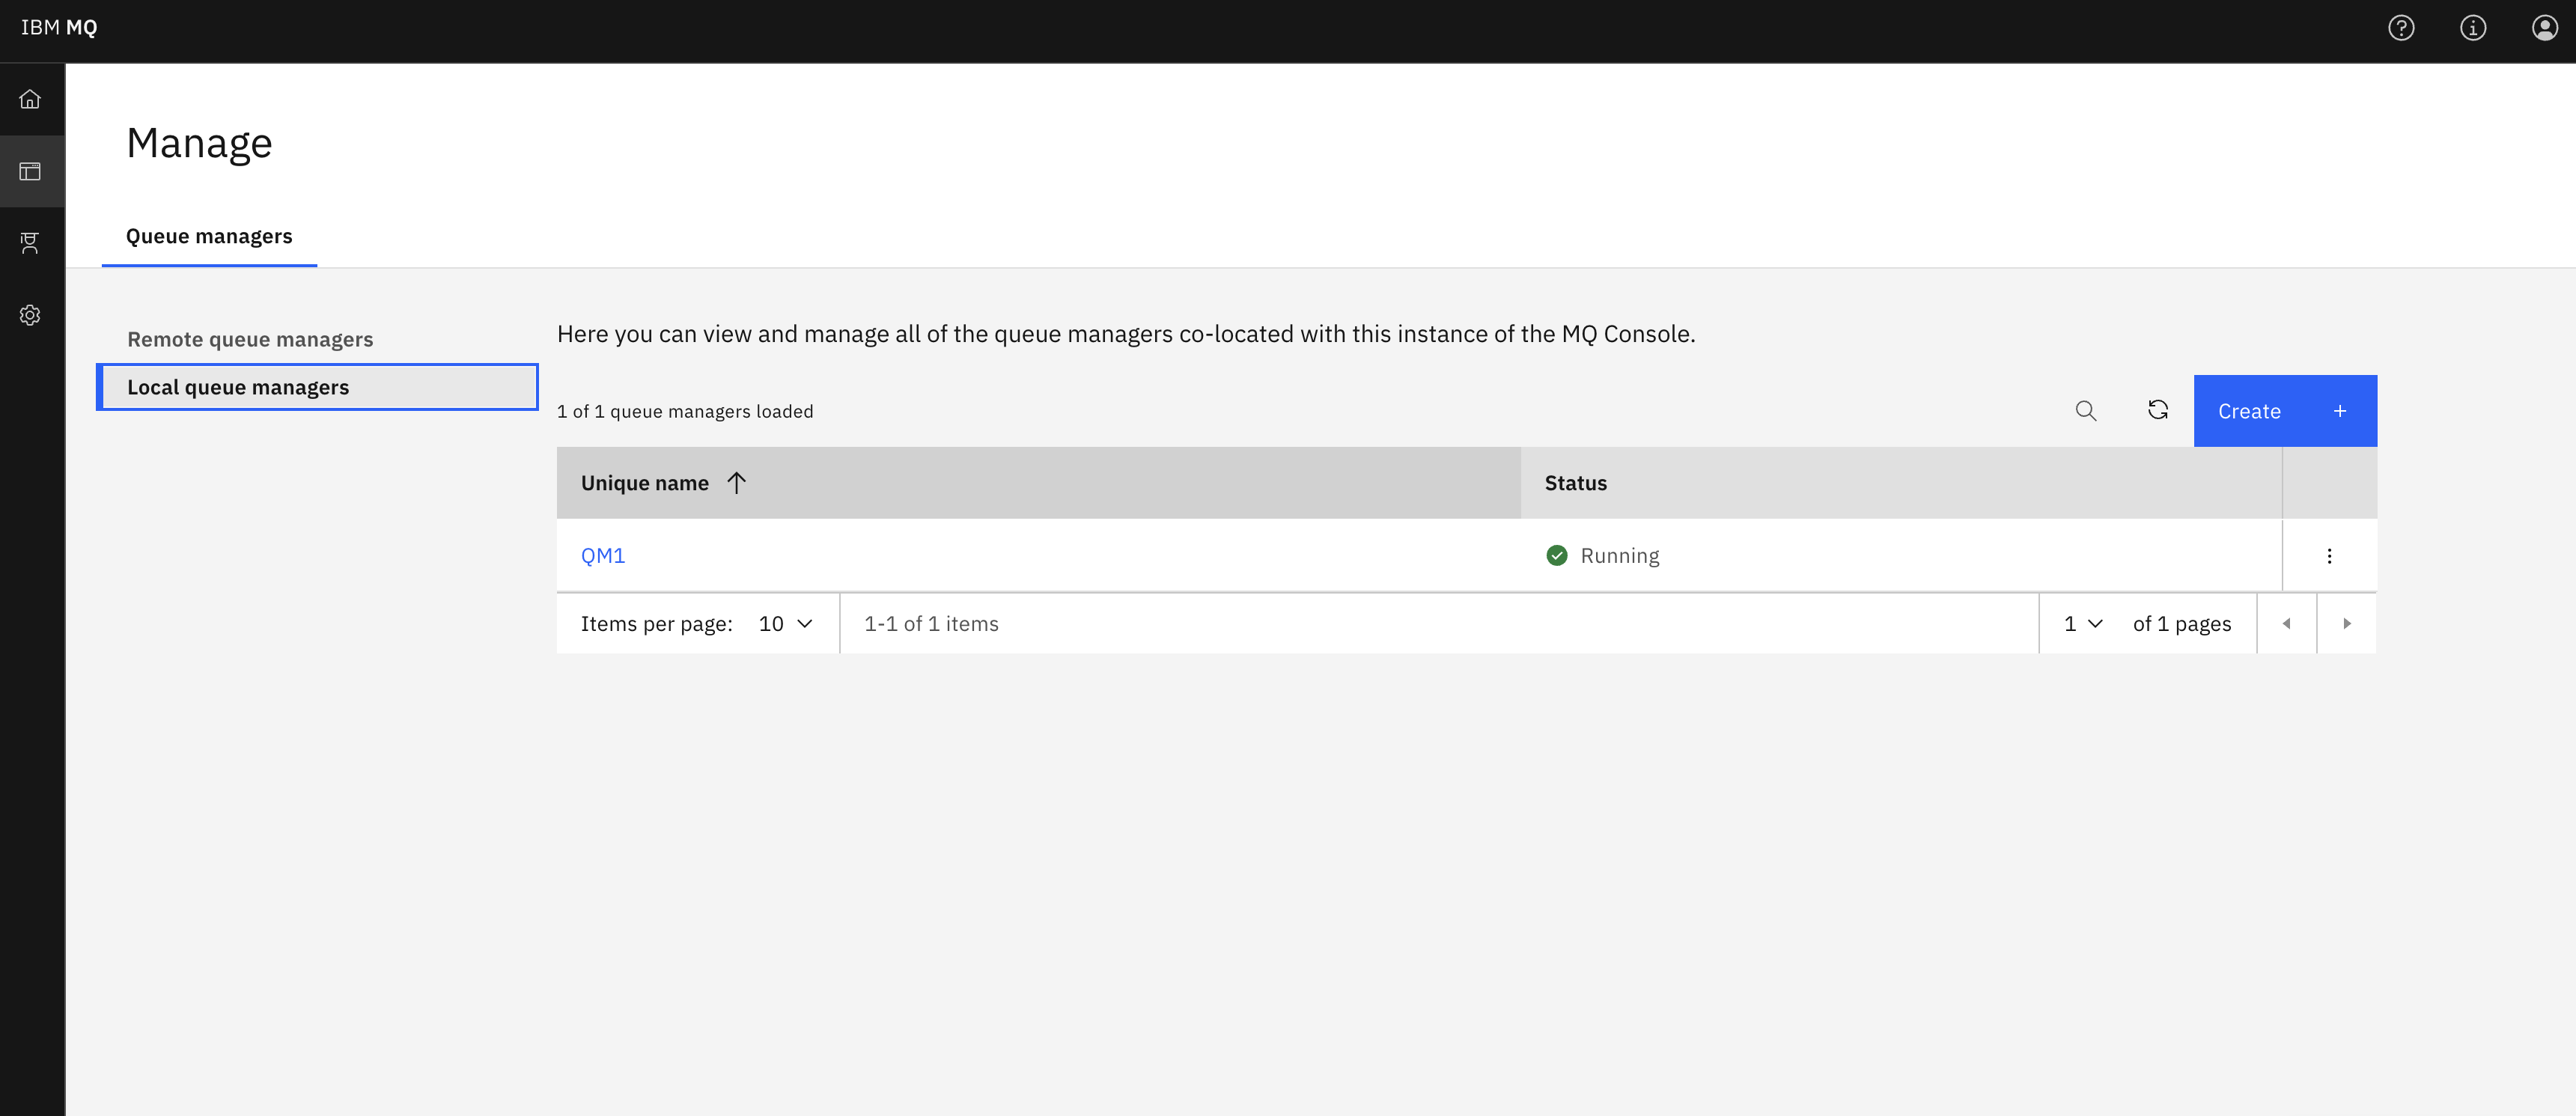
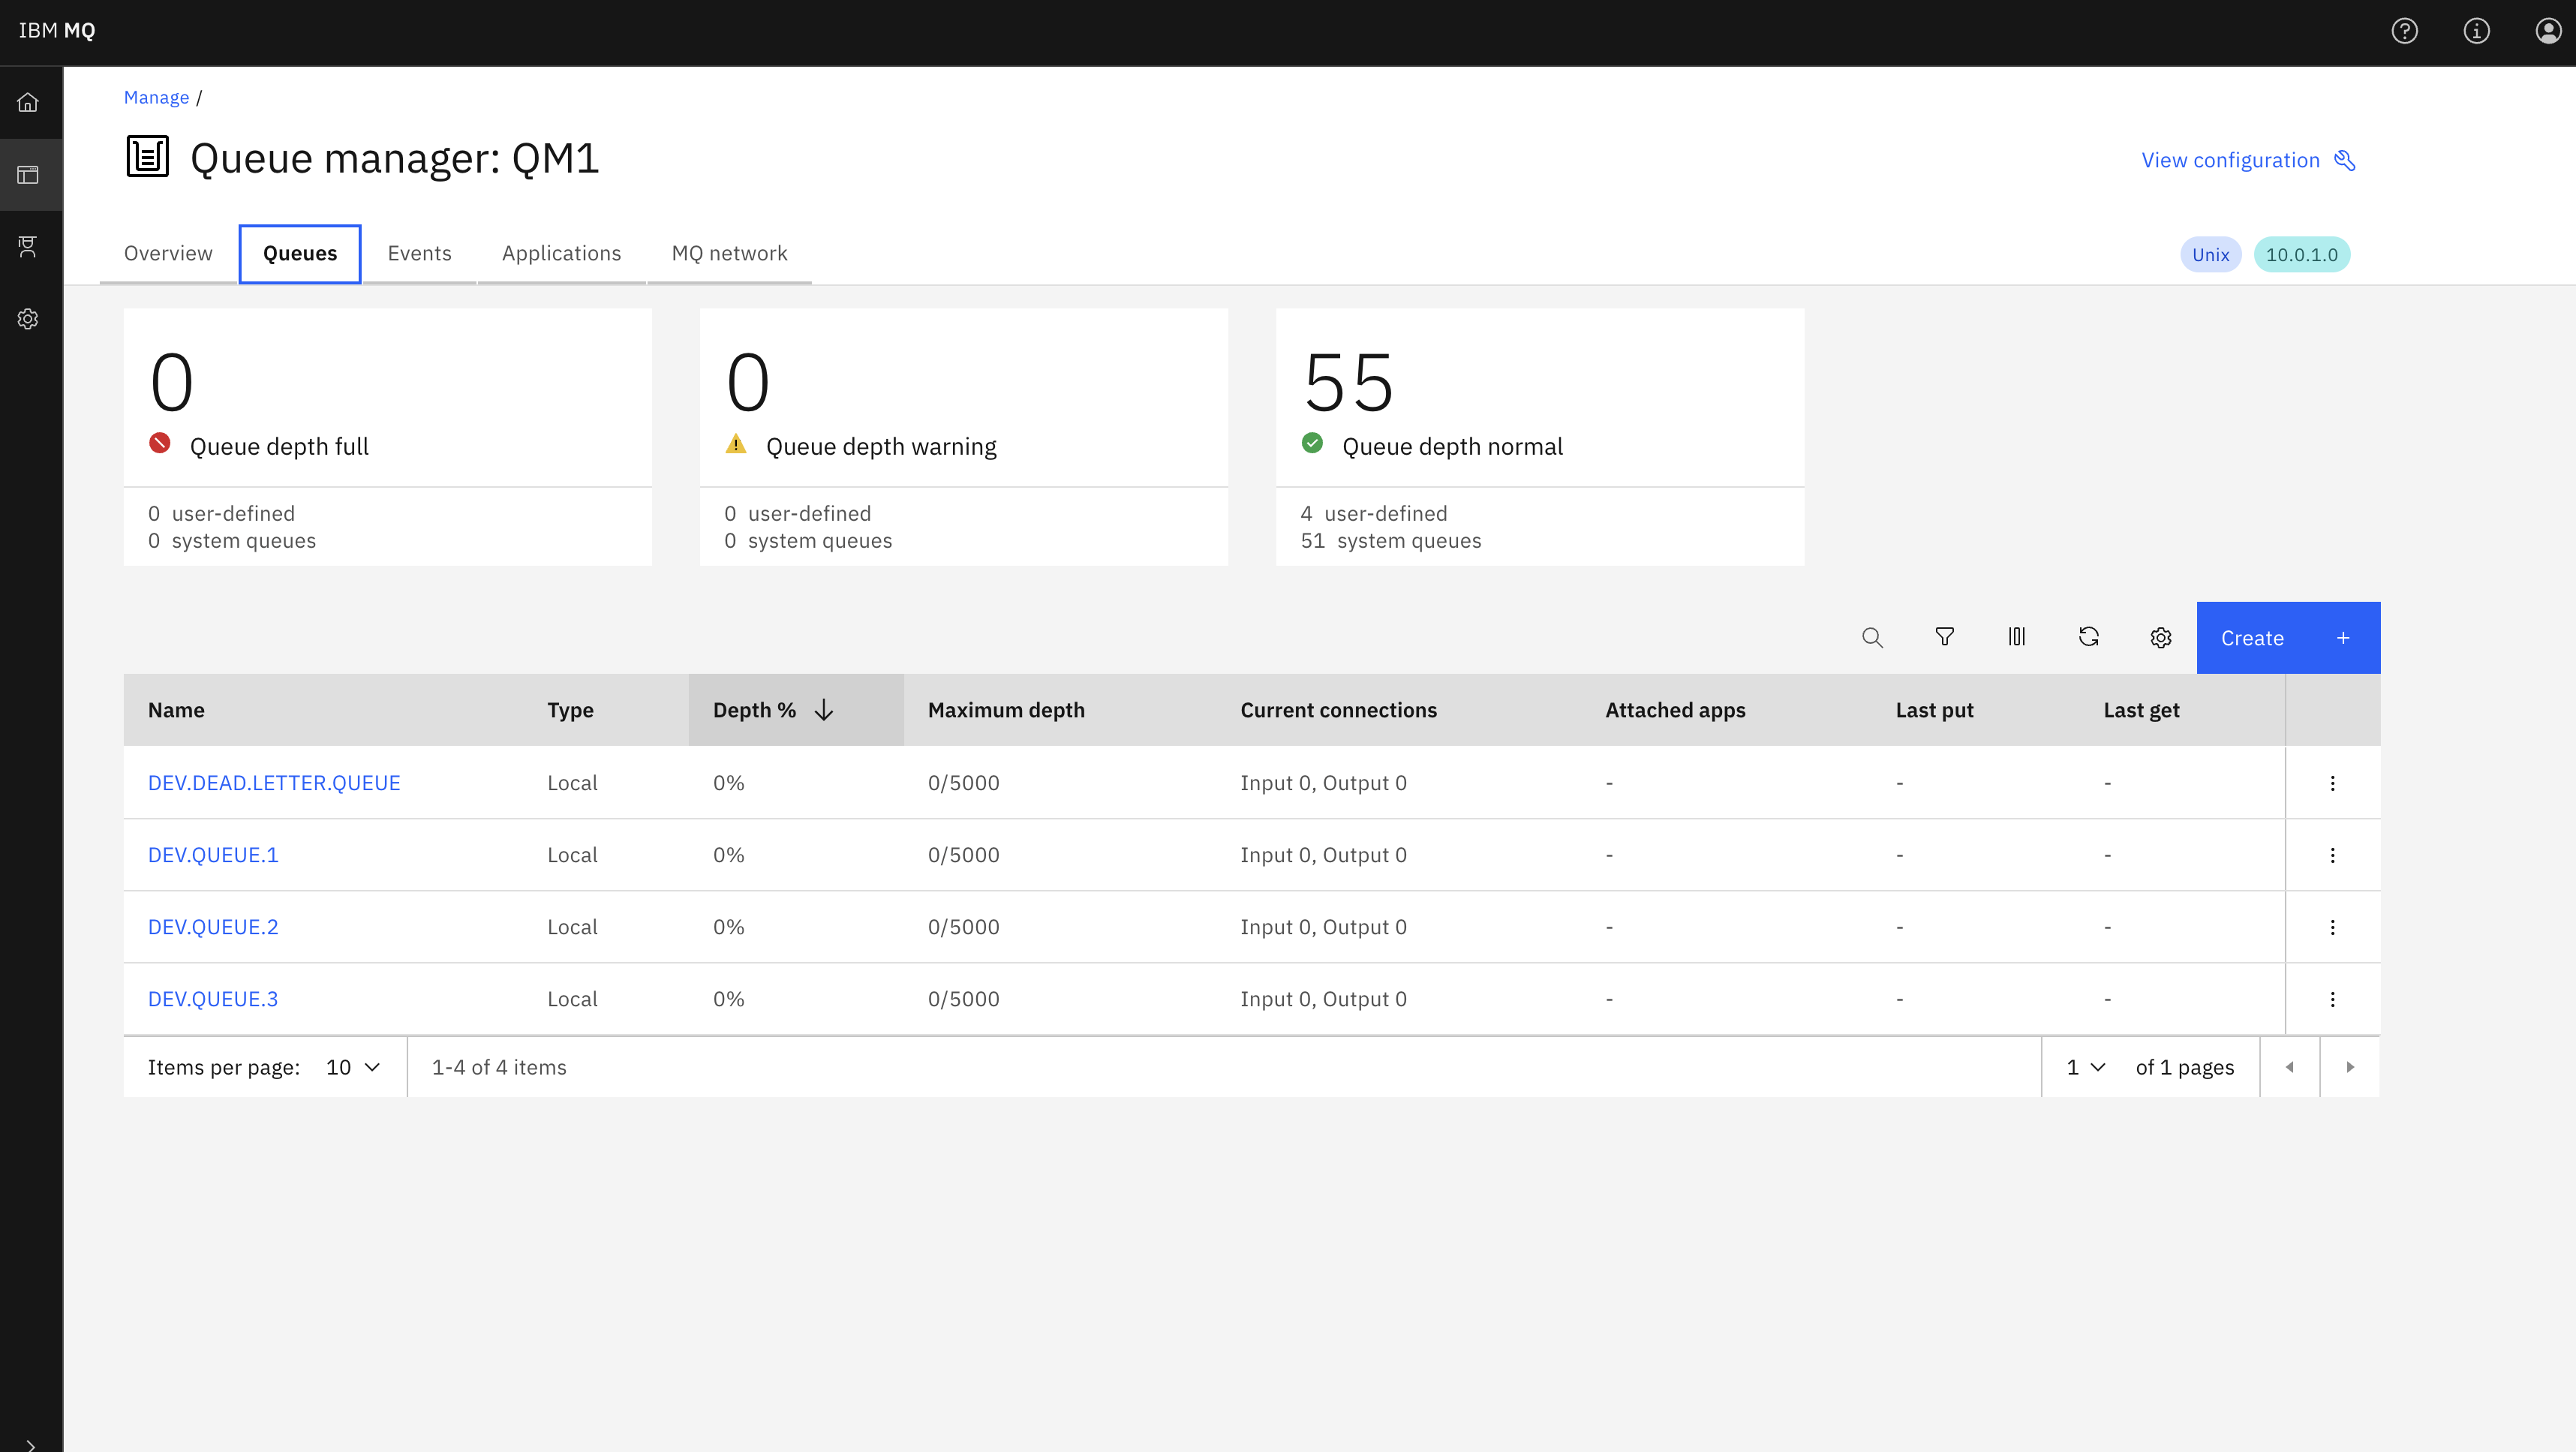
Select QM1 to see the queue manager overview. The overview shows CPU, memory, and storage usage, along with active queues, connected applications, and messages in the last minute. Click the Queues tab to see your development queues: DEV.QUEUE.1, DEV.QUEUE.2, DEV.QUEUE.3, and DEV.DEAD.LETTER.QUEUE. From here, you can create new queues, browse messages, and manage queue properties:
Summary
In this tutorial, you installed IBM MQ 10 Advanced for Developers on an ARM64 device, created and configured a queue manager, sent and received your first messages, and activated the MQ Console to manage your setup from a browser.
Next steps
Now that MQ is running on your ARM64 device, you can start building messaging applications:
- Follow the IBM MQ JMS tutorial to create a simple Java application.
- Explore sample code in multiple languages on GitHub.
- Take the IBM MQ Developer Essentials learning path to earn a badge.
If you come across any issues, raise them on the mq-raspberry-pi-developers GitHub repository.