Tutorial
Deploying Vault securely in a confidential environment
Build and run IBM Vault Self-Managed for Z and LinuxONE on IBM Confidential Computing Platform with HSM-based auto-unsealIBM Vault Self-Managed for IBM Z and LinuxONE (previously known as Hashicorp Vault for s390x) manages secrets like encryption keys, API tokens, certificates, passwords and database credentials. But this also makes it a key target for bad actors to get hold of the proverbial "keys to the kingdom".
IBM Confidential Computing (previously known as IBM Cloud Hyper Protect Services) leverages IBM Secure Execution (IBM SEL) to protect data-in-use, aka when data is in the clear in the server memory, with a hardware based Trusted Execution Environments (TEE) on IBM Z and LinuxONE.
Vault protects all the secrets it manages, with a protected / wrapped Master Key. Until the Master Key is unwrapped, Vault remains in the "sealed" state, which means Vault will not respond to any requests. The Vault-admin can manually "unseal" Vault by using the "unseal-keys". To automate the unseal process, Vault can be integrated with a Hardware Security Module (HSM), which acts as a trusted entity to auto-unseal. Integration with IBM HSM enables hardware acceleration of cryptographic functions required by the Vault-PKI engine. With IBM Crypto Express 8s and above, Vault can also support PQC algorithms like ML-KEM / ML-DSA.
A regular deployment of Vault does not provide data-in-use protection, so there is a possibility of sensitive data being exposed through insider threats or memory dumps.
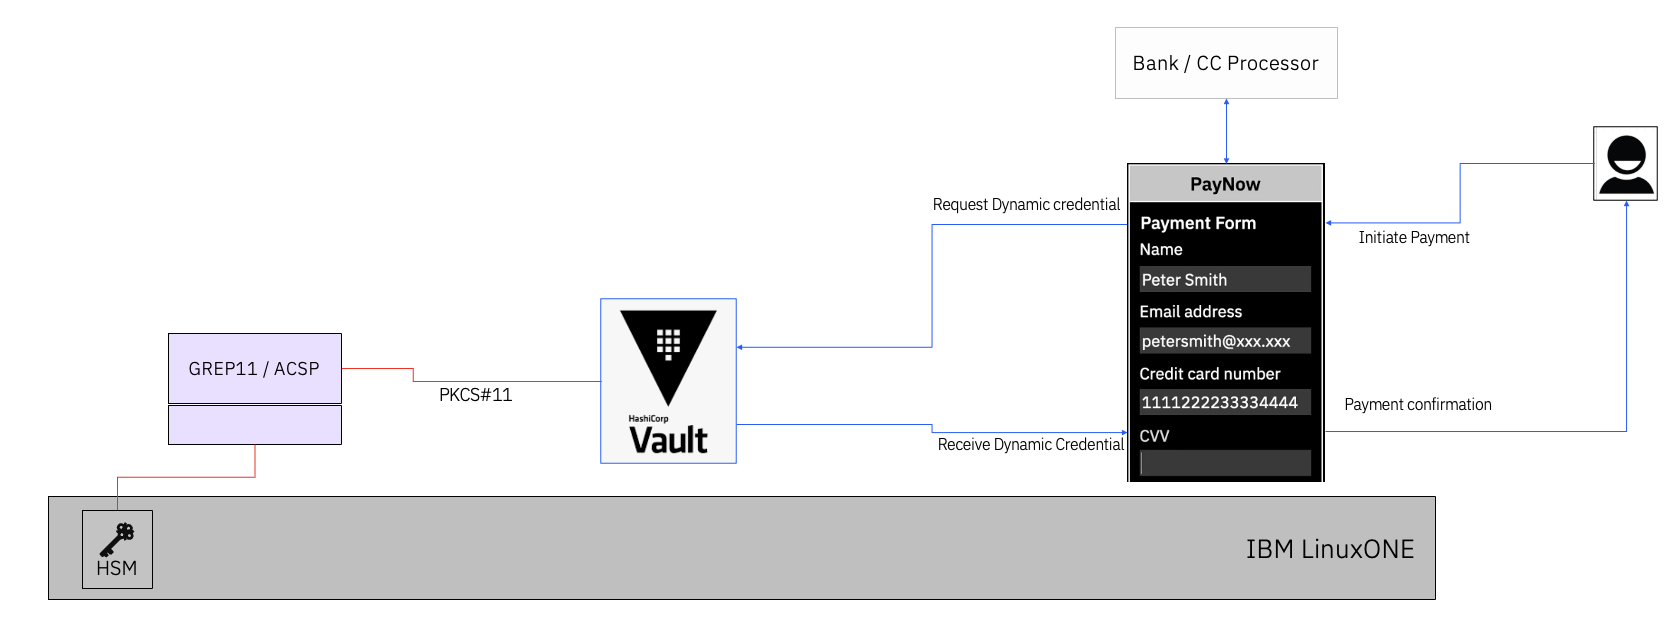
When Vault runs inside a Confidential Computing environment, it is protected from memory inspection—even by someone with super-user access, as shown below:
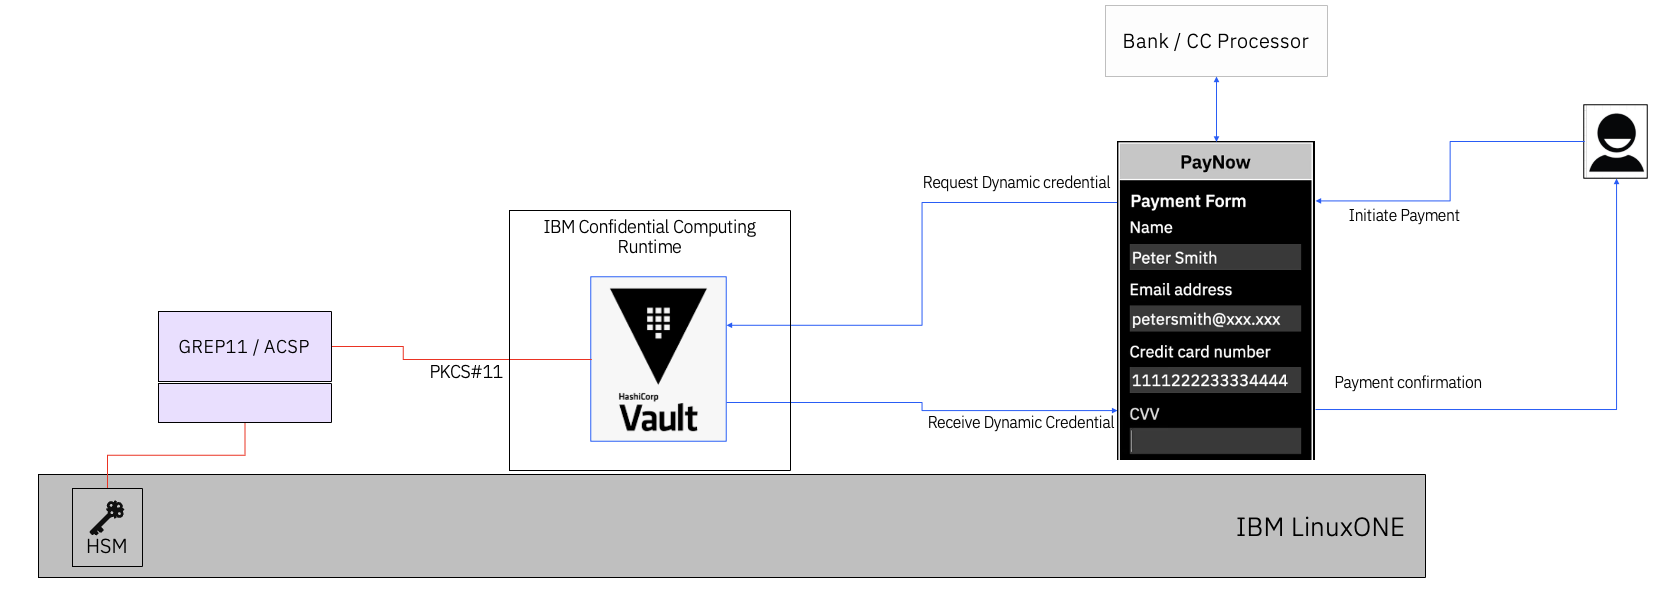
Besides protecting memory, IBM Confidential Computing Runtime (CCRT) ensures the containerized workload is built on an immutable contract, which can be encrypted to keep it confidential.
This tutorial is divided into three parts:
Build a Vault container image that accepts configuration through BASE64-encoded environment variables.
Set up Vault to run on IBM Confidential Computing Platform.
Integrate Vault with an external HSM for the sealing and unsealing process.
Prerequisites
- Basic knowledge of IBM Confidential Computing - setup steps like logging and contract definition are out of scope.
- Basic knowledge of Vault.
- Basic knowledge of Podman to build a Vault Container Image using
Containerfile. - Access to a zLinux VM on IBM Z or LinuxONE to build images.
- Access to IBM Confidential Computing Runtime (CCRT) image
- Access to a container registry - this tutorial uses IBM Container Registry (ICR) -
us.icr.io. - Access to IBM Vault Self Managed on IBM Z and LinuxONE binaries, which can be downloaded from Passport Advantage Online - PID 5900BP2. Update the
Containerfilebased on the method you choose. - Vault Enterprise License
- Access to a PKCS#11 endpoint for HSM access.
Part 1. Build a containerized Vault image that accepts BASE64-encoded environment variables
IBM Confidential Computing Platform requires containerized workloads. In this step, you build a Vault image that reads configuration files created from Base64-encoded environment variables. This makes it easy to reuse the image and contract without rebuilding the image every time the config changes.
Build and push the image:
a. Log in to your zLinux VM. Create and move into an empty directory. This will be your working folder.
b. Copy vault_script.sh into this directory. This script generates Vault config files from BASE64 env vars and starts Vault.
c. Copy Containerfile into the same directory. It creates a
/vault/datadirectory for RAFT, downloads the latest Vault binary for s390x, and copiesvault_script.shinto the image.d. Build the image using:
podman build . --tag {registry}/{image-name}:{version}Replace
{registry},{image-name}, and{version}with your values. (See sample output).e. Push the image using:
podman push {registry}/{image-name}:{version}Get the image URL with SHA-256 digest:
You’ll need the image’s SHA-256 digest for IBM Confidential Computing Runtime (CCRT). Check the registry for the image’s digest. It will look like this:
{registry}/{image-name}@sha256:{sha256sum}Example for IBM Cloud Container Registry (ICR):
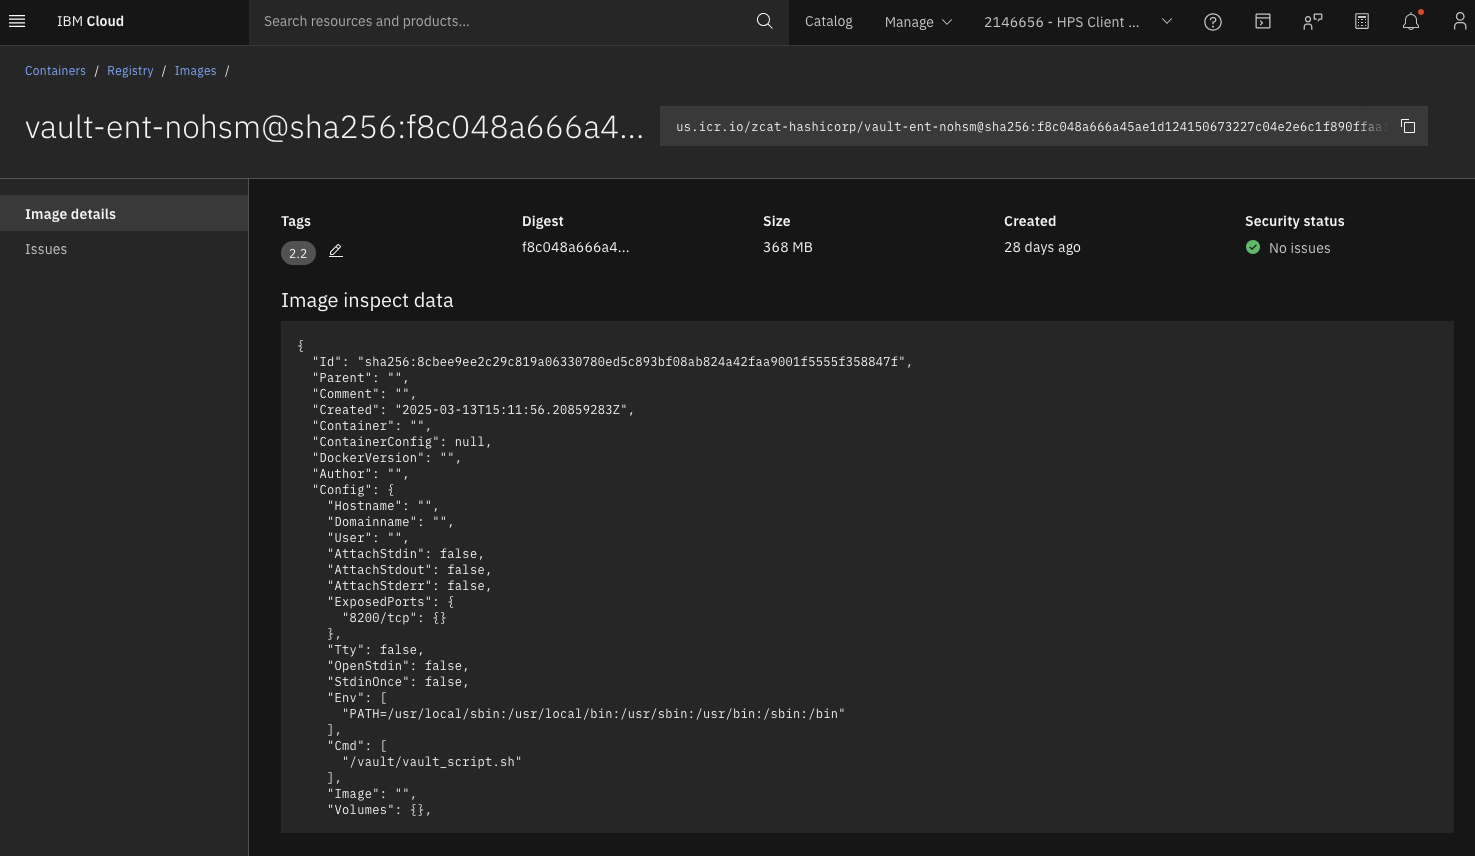
Get the ENV variables:
a. Copy the Vault config file vault-conf.hcl into your working directory. This file sets up Vault to enable the UI, listen on
http://0.0.0.0:8200, use the license file/vault/license.hclic, and useraftfor storage at/vault/data.Note: In a real deployment, especially in production, you should use TLS/HTTPS with signed certificates. This tutorial does not cover that setup.
b. Convert it to Base64:
base64 -iw0 vault-conf.hclYou’ll get output like this:
dWkgICAgICAgICAgICA9IHRydWUKY2x1c3Rlcl9hZGRyICA9ICJodHRwOi8vMTI3LjAuMC4xOjgyMDEiCmFwaV9hZGRyICAgICAgPSAiaHR0cDovLzAuMC4wLjA6ODIwMCIKZGlzYWJsZV9tbG9jayA9IHRydWUKbGljZW5zZV9wYXRoICA9ICIvdmF1bHQvbGljZW5zZS5oY2xpYyIKCnN0b3JhZ2UgInJhZnQiIHsKICAgIHBhdGggPSAiL3ZhdWx0L2RhdGEiCiAgICB2YXVsdF9ub2RlX25hbWUgPSAidmF1bHRfMSIgICAgICAgICAgICAjc2V0dGluZyB1cCBhIHVuaXF1ZSBub2RlX2lkIGZvciBlYWNoIHZhdWx0IG5vZGUKfQoKbGlzdGVuZXIgInRjcCIgewogIGFkZHJlc3MgICAgICAgPSAiMC4wLjAuMDo4MjAwIgogIHRsc19kaXNhYmxlICAgPSAxCn0KThis Base64 string will be used as the
confenvironment variable in your CCRT contract.c. Repeat the same process for your Vault license file. It will become the
licenseenvironment variable.(Optional) Test the vault image outside of IBM Confidential Computing.
a. Create or copy a vault.yaml file. This will be your
podman playfile, containing the Base64 values for your Vault config and license.b. Start the pod:
podman play kube vault.yamlCheck the sample output.
c. Check if Vault is running:
   export VAULT_ADDR=http://127.0.0.1:8200/
   ./vault status
Check the sample output.
d. View logs with:
podman logs {pod ID or container ID}Check the sample output.
Part 2. Configure Vault to run in IBM Confidential Computing Runtime
This section defines only the workload section of the contract (assuming you already have a working environment section).
Define the workload and start CCRT:
Create a workload.yaml file as follows:
 type: workload
 play:
   templates:
     - apiVersion: v1
       kind: Pod
       metadata:
         name: zcatvault
       spec:
         securityContext:
           privileged: false
         containers:
         - name: {Prefix}vault
           image: {registry}/{image-name}@sha256:{sha256sum-chars}
           securityContext:
             privileged: false
           volumeMounts:
           - name: vault-data
             mountPath: /vault/data
           env:
           - name: conf
             value: dWkgICAgICAgICAgICA9IHRydWUKY2x1c3Rlcl9hZGRyICA9ICJodHRwOi8vMTI3LjAuMC4xOjgyMDEiCmFwaV9hZGRyICAgICAgPSAiaHR0cDovLzAuMC4wLjA6ODIwMCIKZGlzYWJsZV9tbG9jayA9IHRydWUKbGljZW5zZV9wYXRoICA9ICIvdmF1bHQvbGljZW5zZS5oY2xpYyIKCnN0b3JhZ2UgInJhZnQiIHsKICAgIHBhdGggPSAiL3ZhdWx0L2RhdGEiCiAgICB2YXVsdF9ub2RlX25hbWUgPSAidmF1bHRfMSIgICAgICAgICAgICAjc2V0dGluZyB1cCBhIHVuaXF1ZSBub2RlX2lkIGZvciBlYWNoIHZhdWx0IG5vZGUKfQoKbGlzdGVuZXIgInRjcCIgewogIGFkZHJlc3MgICAgICAgPSAiMC4wLjAuMDo4MjAwIgogIHRsc19kaXNhYmxlICAgPSAxCn0K
           - name: license
             value: **omitted**
           ports:
           - containerPort: 8200
             hostPort: 8200
         volumes:
         - name: vault-data
           hostPath:
             path: /mnt/data
             type: DirectoryOrCreate
         restartPolicy: Never
 volumes:
   test:
     mount: "/mnt/data"
     seed: "testing"
 auths:
   {registry}:
     password: {Registry-Password}
     username: {Registry-User}
Important updates
Before starting, update the following in your contract:
{Prefix}— any prefix you want (for example,zcat){registry}— your container registry (for example,us.icr.io){image-name}— your image path and name (for example,zcat-hashicorp/vault-ent-nohsm){sha256sum-chars}— the SHA-256 checksum of your image (for example,f8c048a666a45ae1d124150673227c04e2e6c1f890ffaafe62724bd3f58a0367)- Registry login credentials under the
auths:section - Base64-encoded value of
vault-conf.hclfor theconfvariable Base64-encoded Vault license for the
licensevariableOnce updated, start your CCRT environment. See sample on-prem output. Then, Vault should launch successfully. See sample logging output.
Test Vault in CCRT:
a. Set the Vault address (replace with your CCRT IP if different) and check the Vault status:
 export VAULT_ADDR=http://192.168.122.22:8200/
 ./vault status
You should see output similar to Vault CCRT sample output.
b. To unseal Vault, run the following command:
./vault operator unsealYou should see output similar to Vault CCRT unseal sample output, and logs similar to Vault CCRT unseal log sample output.
Part 3. Configure Vault to use external HSM for seal/unseal
To use GREP11 with Vault for sealing and unsealing, you’ll need a running GREP11 container with a database backend. To connect, gather the following:
- Hostname, IP, or URL
- Port (default: 9876)
- CA certificate:
grep11-ca.pem - Client certificate:
grep11-client.pem(signed by the above CA) - Client key:
grep11-client.key
Note: If you don’t have access to an on-premise GREP11 container, you can use IBM UKO Crypto Connect ACSP (CC-ACSP). In that case, follow documentation for CC-ACSP-Client Installation.
Build Vault image with HSM and PKCS#11 support.
a. Log in to your zLinux VM, create a new empty directory, and switch into it. This will be your working directory.
b. Add the new vault_script.sh to this directory. This script will generate config files from base64-encoded environment variables (for Vault and the PKCS#11 library) and start Vault.
c. Add the new Containerfile to the same directory. It is similar to the previous steps, but it also downloads the latest Vault HSM binary, downloads version 2.6.8 of the PKCS#11 library for s390x (update the link if a newer version is available), and copies the new vault_script.sh to the image (make sure the script is in the same directory).
d. Build the image using:
podman build . --tag {registry}/{image-name}:{version}Replace placeholders with your actual registry, image name, and version.
e. Push the image to your registry:
podman push {registry}/{image-name}:{version}Save the full image URL with its SHA256 digest, you'll need it later in your CCRT contract.
Configuration files
a. The grep11client.yaml (for PKCS#11 Library) configures the PKCS#11 library to connect to your GREP11 container:
iamcredentialtemplate: &defaultiamcredential enabled: false endpoint: "https://iam.cloud.ibm.com" sessionauthtemplate: &defaultsessionauth enabled: false tokenspaceIDPassword: "12345678" tokens: 0: grep11connection: address: "{GREP11-Addr}" port: "9876" tls: enabled: true mutual: true cacert: "/etc/ep11client/certs/grep11-ca.pem" certfile: "/etc/ep11client/certs/grep11-client.pem" keyfile: "/etc/ep11client/certs/grep11-client.key" storage: # filestore: # enabled: true # storagepath: <GREP11-KeyStore> remotestore: enabled: true # localpostgres: # enabled: false # connectionstring: users: 0: # SO User name: "SO user" 1: # User name: "Normal user" tokenspaceID: "21DCABAA-BEC7-442A-8089-5BD9582CB7EB" 2: # Anonymous user name: "Anonymous" tokenspaceID: "B77CB96E-1D40-4530-8AA4-F96DDBEECD04" logging: loglevel: "trace" logpath: "/etc/ep11client/pkcs11.log"Notes:
- Replace
{GREP11-Addr}with your GREP11 IP or hostname. - If you're not using port
9876, update it. - The
tokenspaceIDPasswordmust be an 8-digit number, and it must match thepinin Vault’s config (below). Each deployment should use different
tokenspaceIDUUIDs.b. The vault-conf.hcl (Vault with HSM) is the Vault configuration using PKCS#11:
ui = true cluster_addr = "http://127.0.0.1:8201/" api_addr = "http://0.0.0.0:8200/" disable_mlock = true license_path = "/vault/license.hclic" storage "raft" { path = "/vault/data" vault_node_name = "vault_1" #setting up a unique node_id for each vault node } listener "tcp" { address = "0.0.0.0:8200" tls_disable = 1 } seal "pkcs11" { key_label = "vault-hsm-key" lib = "/usr/local/lib/pkcs11-grep11-s390x.so.2.6.8" slot = "0" mechanism = 0x1085 pin = "12345678" generate_key = "true" # token_label = "vaultpoc" hmac_key_label = "vault-hsm-hmac-key" }Note: Make sure the
pinmatches thetokenspaceIDPasswordingrep11client.yaml.
- Replace
To define the Workload section of contract for IBM Confidential Computing Runtime (CCRT), create the workload.yaml file with the following content:
type: workload play: templates: - apiVersion: v1 kind: Pod metadata: name: zcatvault spec: securityContext: privileged: false containers: - name: {Prefix}vault image: {registry}/{image-name}@sha256:{sha256sum-chars} securityContext: privileged: false volumeMounts: - name: vault-data mountPath: /vault/data env: - name: grep11 value: {BASE64 of grep11client.yaml} - name: ca value: {BASE64 of grep11-ca.pem} - name: client value: {BASE64 of grep11-client.pem} - name: key value: {BASE64 of grep11-client.key} - name: conf value: {BASE64 of vault-conf.hcl} - name: license value: {BASE64 of license} ports: - containerPort: 8200 hostPort: 8200 volumes: - name: vault-data hostPath: path: /mnt/data type: DirectoryOrCreate restartPolicy: Never volumes: test: mount: "/mnt/data" seed: "testing" auths: {registry}: password: {Registry-Password} username: {Registry-User}Note: Make sure to update the following:
{Prefix}– any prefix you like to use{registry}– your container registry{image-name}– image name and path{sha256sum-chars}– SHA256 digest of your image- Registry credentials in the
auths:section Base64-encoded values for:
grep11client.yaml→grep11grep11-ca.pem→cagrep11-client.pem→clientgrep11-client.key→keyvault-conf.hcl→conf- Vault license →
license
Start your CCRT environment (sample on-prem output). The logs should show Vault started successfully (sample logging output).
a. Check Vault status.
./vault statusExpected output:
 Key                      Value
 ---                      -----
 Seal Type                pkcs11
 Recovery Seal Type       n/a
 Initialized              false
 Sealed                   true
 Total Recovery Shares    0
 Threshold                0
 Unseal Progress          0/0
 Unseal Nonce             n/a
 Version                  1.19.1+ent.hsm
 Build Date               2025-03-06T18:16:09Z
 Storage Type             raft
 Removed From Cluster     false
 HA Enabled               true
You should see
Seal Typeaspkcs11.b. Initialize Vault.
./vault operator initThis will generate multiple recovery keys and a root token:
 Recovery Key 1: qw3cFT+FZhmJWlO84wbLQuWAcsX/FRH96Xfiy0FYdunD
 Recovery Key 2: 2eMCBGXFo60rRoGOw1/Tny2CyIB7ktSLTbhlqvfxcxMG
 Recovery Key 3: s1Cn2LSFy6Ix8cw7yZyPtrTBssxz+TGlFWha3qQXlDDW
 Recovery Key 4: rbEfBMVq5DboCNni4ykbmB94yUUlgCPGKBuYluiHuMJ1
 Recovery Key 5: ngtmQaV6Kr82nmjJdYYPmnCdDbTmu7MgaNWECj88HAjA

 Initial Root Token: hvs.PniWzjqonUqK3q6wQkfUdTKB

 Success! Vault is initialized
These values will differ each time. You can find more logging details.
c. Log in and test Vault operations.
Log in to Vault (as per the above sample):
./vault login token=hvs.PniWzjqonUqK3q6wQkfUdTKBSuccess! You are now authenticated. The token information displayed below is already stored in the token helper. You do NOT need to run "vault login" again. Future Vault requests will automatically use this token. Key Value --- ----- token hvs.PniWzjqonUqK3q6wQkfUdTKB token_accessor gL7k67gSck0PbFEEsIgIANwy token_duration ∞ token_renewable false token_policies ["root"] identity_policies [] policies ["root"]You should see a success message confirming you're authenticated.
Now you can test basic operations such as
vault operator seal,vault operator unseal, andvault status.Sample outputs for these commands are available at Vault HSM seal-unseal output.
d. Auto-unseal on restart.
Vault with HSM should auto-unseal after a restart.
To test, seal Vault if it’s not already sealed, restart the CCRT environment. Once it’s back up, run:
./vault statusKey Value --- ----- Seal Type pkcs11 Recovery Seal Type shamir Initialized true Sealed false Total Recovery Shares 5 Threshold 3 Version 1.19.1+ent.hsm Build Date 2025-03-06T18:16:09Z Storage Type raft Cluster Name vault-cluster-c8c01c44 Cluster ID bcdf2373-95e7-3170-10d6-c45a5997b082 Removed From Cluster false HA Enabled true HA Cluster https://127.0.0.1:8201/ HA Mode active Active Since 2025-03-20T13:33:07.34429041Z Raft Committed Index 179579 Raft Applied Index 179579 Last WAL 68842You should see
SealedisfalseandSeal Typeispkcs11, confirming it auto-unsealed.Full logs of the restart and status are available at Vault HSM restart unseal output.
Conclusion
You have completed this 3-part tutorial. You learned how to:
- Build a containerized IBM Vault Self-Managed for Z and LinuxONE image to run on IBM Confidential Computing Platform.
- Connect Vault to an HSM using PKCS#11.
- Use environment variables to pass config data securely into your workload.
You're now set up to run Vault securely in a confidential environment.