Tutorial
Deploy customizable speech-to-text functions on Red Hat OpenShift
Walk through the steps of installing a customizable Watson Speech to Text Library for Embed service on Red Hat OpenShiftArchive date: 2024-05-29
This content is no longer being updated or maintained. The content is provided “as is.” Given the rapid evolution of technology, some content, steps, or illustrations may have changed.The IBM Speech to Text Library for Embed transcribes written text from spoken audio in a number of languages. The service uses machine learning to combine knowledge of grammar, language structure, and the composition of audio and voice signals to accurately transcribe the human voice.
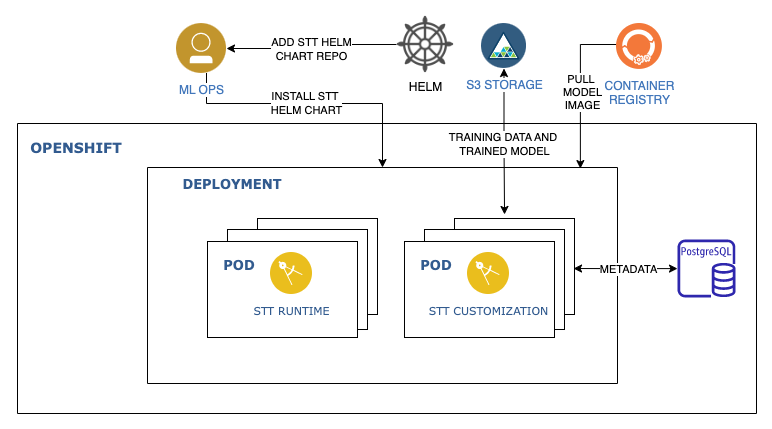
The Speech to Text Service can be deployed either with or without customization. A customizable deployment lets users update the service to understand how to transcribe words. While a noncustomizable deployment requires only a single container image and can be deployed easily with a container runtime like Docker or Podman, a customizable deployment requires multiple images and a PostgreSQL database. It is recommended to use the Helm chart to install on a Red Hat OpenShift cluster.
This tutorial walks you through the steps to install a customizable Speech to Text service in Red Hat OpenShift. The tutorial uses this Helm Chart to deploy the service.
Reference architecture
Prerequisites
To run this tutorial, you must:
- Install Helm 3.
- Ensure that you have an entitlement key. You might need to create one. This key is required to access the images used in this tutorial.
Set an environment variable.
export IBM_ENTITLEMENT_KEY=<Set the entitlement key>Have S3-compatible storage. This tutorial includes instructions on setting this up in IBM Cloud. For other cloud platforms, use the instructions from the cloud provider.
- Have a PostgreSQL database, which is required to manage metadata that is related to customization.
- Have a Red Hat OpenShift Cluster on which you deploy the service.
S3-compatible storage
For customization, you need an S3-compatible storage service that supports HMAC (access key and secret key) credentials. Watson Speech requires a bucket that it can read and write to. The bucket is populated with stock models at installation and also stores customization artifacts, including training data and trained models.
Steps
Step 1. Create an S3 bucket on IBM Cloud
The following steps explain how to obtain IBM Cloud S3 bucket HMAC credentials and endpoint. If you are using a different cloud, then use the instructions that are given by the cloud provider to set it up.
- Log in to IBM Cloud.
- From the IBM Cloud dashboard, click the Cloud Object Storage service instance that you want to work with.
- To get the Bucket name, click Buckets in the left pane, and select your preferred bucket name and make a note of it.
- To get the endpoint URLs, click Endpoint in the left pane, and select your preferred location or region.
- Copy your preferred public
endpoint(for example, s3.us-east.cloud-object-storage.appdomain.cloud), and use it as the value for theEndpoint URLfield (orendpointUrlparameter). - Copy your preferred location or
region(for example, us-east), and use it as the value for theRegionfield (orregionparameter).
- Copy your preferred public
- To view the service credentials, click Service credentials in the left pane, and then click View credentials. (If you want to define new credentials, click New credential, click Advanced options, then select Include HMAC Credential.)
- Copy the
cos_hmac_keys/secret_access_keyvalue, and use it as the value for theSecret access keyfield (orsecretAccessKey parameter). - Copy the
cos_hmac_keys/access_key_idvalue, and use it as the value for theAccess key IDfield (oraccessKeyId parameter).
Step 2. Set S3 information in environment variables
Set the S3 crededentials and information in the following environment variables. These variables are used when deploying the Speech to Text Service Helm chart.
export S3_BUCKET_NAME=<Bucket name you found in step 3 >
export S3_REGION=<Region can be found in step 4.1 when you select your bucket>
export S3_ENPOINT_URL=<Endpoint URL you found in step 4>
export S3_SECRET_KEY=<secretAccessKey you found in step 6>
export S3_ACCESS_KEY=<accessKeyId you found in step 7>
The commands that you use to set the variables should look similar to the following example.
export S3_BUCKET_NAME=speech-embed
export S3_REGION=us-east
export S3_ENPOINT_URL=https://s3.us-east.cloud-object-storage.appdomain.cloud
export S3_SECRET_KEY=12a3bcd4567890ef123g4567890hij12k1m3n4567o8901p2
export S3_ACCESS_KEY=1a2dfbc3d45678901ef2g3h45678i90jkl
Step 3. Set PostgreSQL information in environment variables
A PostgreSQL database is required to manage metadata that is related to customization. The customization container uses TLS to Postgres, but always sets up the connection with a NonValidatingFactory, which does not do certificate validation.
Set the database connection information in the following environment variables. These variables are used when deploying the Speech to Text Service Helm Chart.
export POSTGRES_HOST=<Postgresql hostname>
export POSTGRES_USER=<Postgresql username>
export POSTGRES_PASSWORD=<Postgresql password>
Step 4. Install Speech to Text Helm Chart
Clone the Helm Chart GitHub repository.
git clone https://github.com/IBM/ibm-watson-embed-charts.git
cd ibm-watson-embed-charts/charts
The containers deployed by this chart come from the IBM Entitled Registry. You must create a Secret with credentials to pull from this registry. The default name is ibm-entitlement-key, but this can be changed by updating the value of imagePullSecrets.
The following code shows an example command to create the pull secret.
 oc create secret docker-registry ibm-entitlement-key \
  --docker-server=cp.icr.io \
  --docker-username=cp \
  --docker-password=$IBM_ENTITLEMENT_KEY \
  --docker-email=<your-email>
By default, the en-US_Multimedia and en-US_Telephony models are enabled, with defaultModel set to en-US_Multimedia.
Helm charts have configurable values that can be set at installation. To configure the values (for example, enable additional models), refer to the base values.yaml file. Values can be changed by using the --set parameter or using YAML files specified with -f/--values. In the following example, I set values using the --set parameter.
helm install stt-release ./ibm-watson-stt-embed \
--set license=true \
--set nameOverride=stt \
--set models.enUSTelephony.enabled=false \
--set postgres.host=${POSTGRES_HOST} \
--set postgres.user=${POSTGRES_USER} \
--set postgres.password=${POSTGRES_PASSWORD} \
--set objectStorage.endpoint=${S3_ENPOINT_URL} \
--set objectStorage.region=${S3_REGION} \
--set objectStorage.bucket=${S3_BUCKET_NAME} \
--set objectStorage.accessKey=${S3_ACCESS_KEY} \
--set objectStorage.secretKey=${S3_SECRET_KEY}
Step 5. Verify the chart
For chart verification, see the instructions (from the NOTES.txt file within the chart) after the Helm installation completes. The instructions also can be viewed by running the following command.
helm status stt-release
For basic usage of customization, see the documentation.
You can also look at the complete API reference for the Watson Speech to Text Service.
Step 6. Test the service
In one terminal, create a proxy through the service.
oc proxyDownload an example audio file as
example.flac.curl --url https://github.com/watson-developer-cloud/doc-tutorial-downloads/raw/master/speech-to-text/0001.flac \ -sLo example.flacSend a
recognizerequest using the downloaded file.curl --url "http://localhost:8001/api/v1/namespaces/stt-demo/services/https:stt-release-runtime:https/proxy/speech-to-text/api/v1/recognize?model=en-US_Multimedia" \ --header "Content-Type: audio/flac" \ --data-binary @example.flac
Summary
In this tutorial, you learned how to install a customizable Speech to Text Service in Red Hat OpenShift.