Tutorial
Java constructs for real-world applications, Part 1
Advanced Java language features for complex programming scenariosThe Java language is mature and sophisticated enough to help you accomplish nearly any programming task. This tutorial introduces you to features of the Java language that you need to handle complex programming scenarios, including:
- Exception handling
- Inheritance and abstraction
- Interfaces
- Nested classes
Prerequisites
The content of this tutorial is geared toward programmers new to the Java language who are unfamiliar with its more-sophisticated features. The tutorial assumes that you have:
- A Java development environment (if you do not, see the setup instructions)
- A basic understanding of object-oriented programming principles on the Java platform
- Worked through "Learn how to create and run Java objects" to begin the programming project that you continue developing in this tutorial
You can find the code examples in this tutorial in my GitHub repository. The code in the src tree is where you'll find the examples from the tutorial.
Next steps with objects
"Learn how to create and run Java objects" left off with a Person class that was reasonably useful, but not as useful as it could be. Here, you begin learning about techniques to enhance a class such as Person, starting with the following techniques:
- Overloading methods
- Overriding methods
- Comparing one object with another
- Using class variables and class methods
You'll start enhancing Person by overloading one of its methods.
Overloading methods
When you create two methods with the same name but with different argument lists (that is, different numbers or types of parameters), you have an overloaded method. At runtime, the JRE decides which variation of your overloaded method to call, based on the arguments that were passed to it.
Suppose that Person needs a couple of methods to print an audit of its current state. I call both of those methods printAudit(). Paste the overloaded method in Listing 1 into the Eclipse editor view in the Person class.
public void printAudit(StringBuilder buffer) {
   buffer.append("Name=");
   buffer.append(getName());
   buffer.append(",");
   buffer.append("Age=");
   buffer.append(getAge());
   buffer.append(",");
   buffer.append("Height=");
   buffer.append(getHeight());
   buffer.append(",");
   buffer.append("Weight=");
   buffer.append(getWeight());
   buffer.append(",");
   buffer.append("EyeColor=");
   buffer.append(getEyeColor());
   buffer.append(",");
   buffer.append("Gender=");
   buffer.append(getGender());
}

public void printAudit(Logger l) {
   StringBuilder sb = new StringBuilder();
   printAudit(sb);
   l.info(sb.toString());
}
You have two overloaded versions of printAudit(), and one even uses the other. By providing two versions, you give the caller a choice of how to format an audit of the class. Depending on the parameters that are passed, the Java runtime calls the correct method.
Remember two important rules when you use overloaded methods:
- You can't overload a method just by changing its return type.
- You can't have two same-named methods with the same parameter list.
If you violate these rules, the compiler gives you an error.
Overriding methods
When a subclass provides its own implementation of a method that's defined on one of its parent classes, that's called method overriding. To see how method overriding is useful, you need to do some work on an Employee class. Watch the following video to see how to set up the Employee class and perform method overriding in that class. After you watch, I'll recap those steps while giving you a closer look at the code. The code is available in GitHub for reference.

Employee: A subclass of Person
Recall when you learned about basic object-oriented programming principles that an Employee class might be a subclass (or child) of Person that has additional attributes such as taxpayer identification number, employee number, hire date, and salary.
To declare the Employee class, right-click the com.jstevenperry.intro package in Eclipse. Click New > Class... to open the New Java Class dialog box, shown in the following figure.
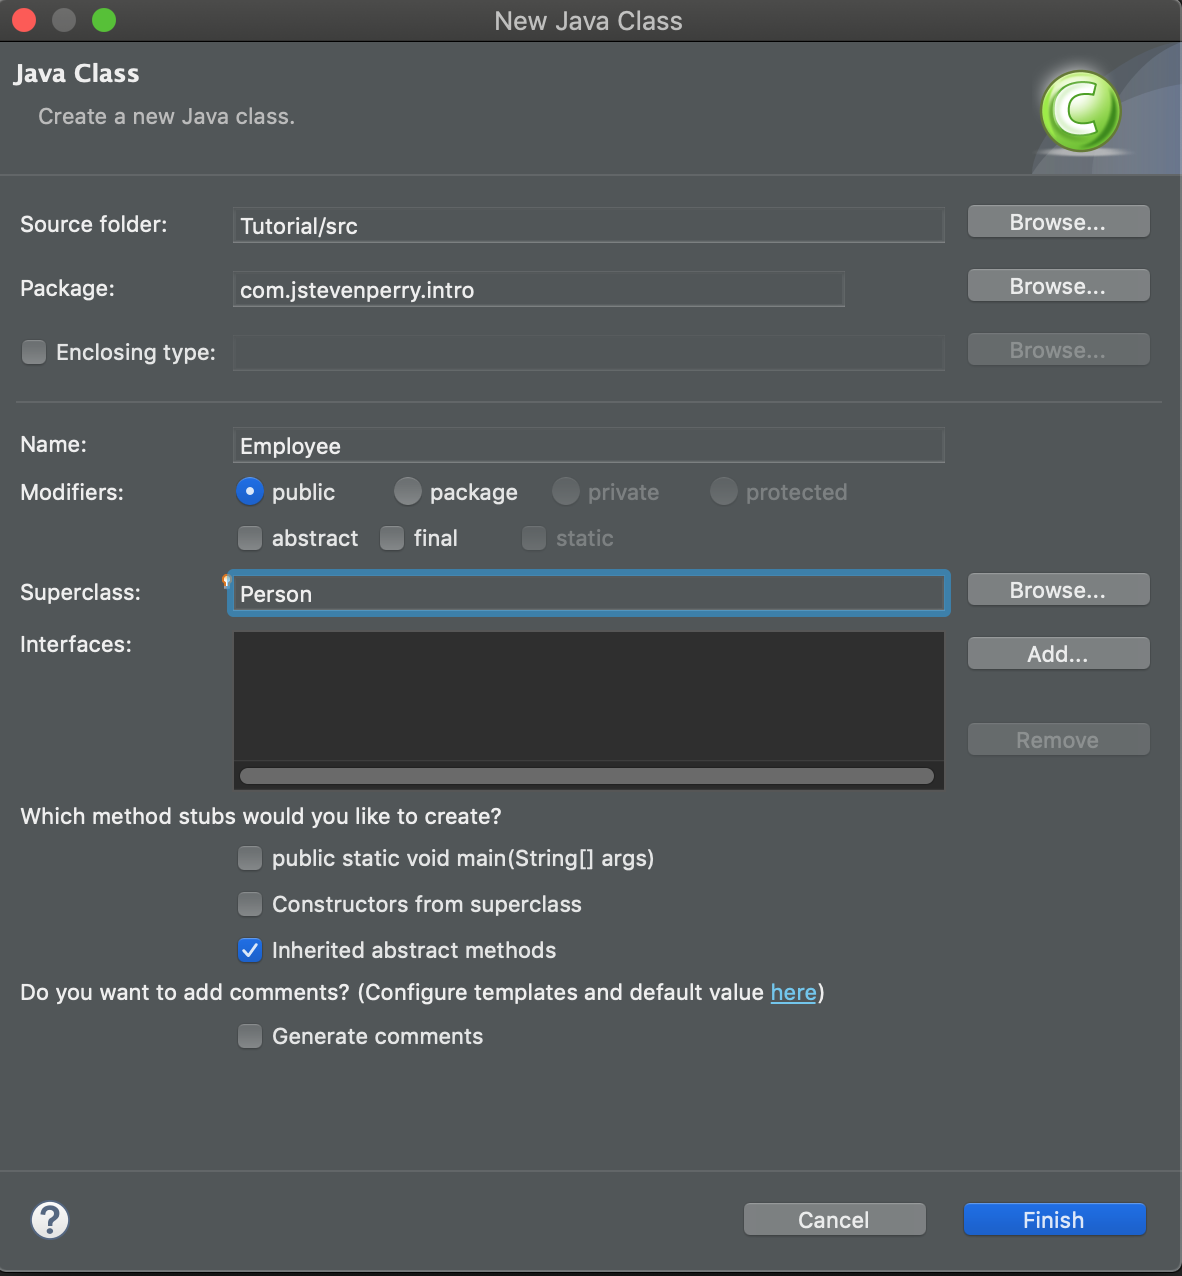
Enter Employee as the name of the class and Person as its superclass. Click Finish, and you can see the Employee class code in an edit window.
Hover your mouse cursor over the Employee class name in the editor window and notice that Eclipse complains that the Employee class has an error with this message: Implicit super constructor Person() is undefined for default constructor. Must define an explicit constructor.
To fix the error, go into the Person class and add the following constructor just before the constructor you added earlier in the tutorial:
public Person() {

}
This constructor is the default constructor and is automatically generated for you by the compiler unless the class's superclass has a custom constructor (as Person does) and does not explicitly implement the default constructor (as Person does not). The default constructor is often called the no-argument constructor, because it takes no arguments.
Note: Every class needs at least one constructor.
Since Person has a custom constructor, the compiler does not generate the default constructor, and when you created the Employee subclass of Person, Eclipse complained (rightly so) that Employee does not have a constructor.
You fixed that error by explicitly adding the default (no-argument) constructor to Person, which Employee inherits, and the compiler is happy.
I'll talk more about constructors and inheritance later in the tutorial.
With the Employee class edit window having the focus, go to Source > Generate Constructors from Superclass.... In the Generate Constructors from Superclass dialog box (see the following figure), select both constructors and click Generate.
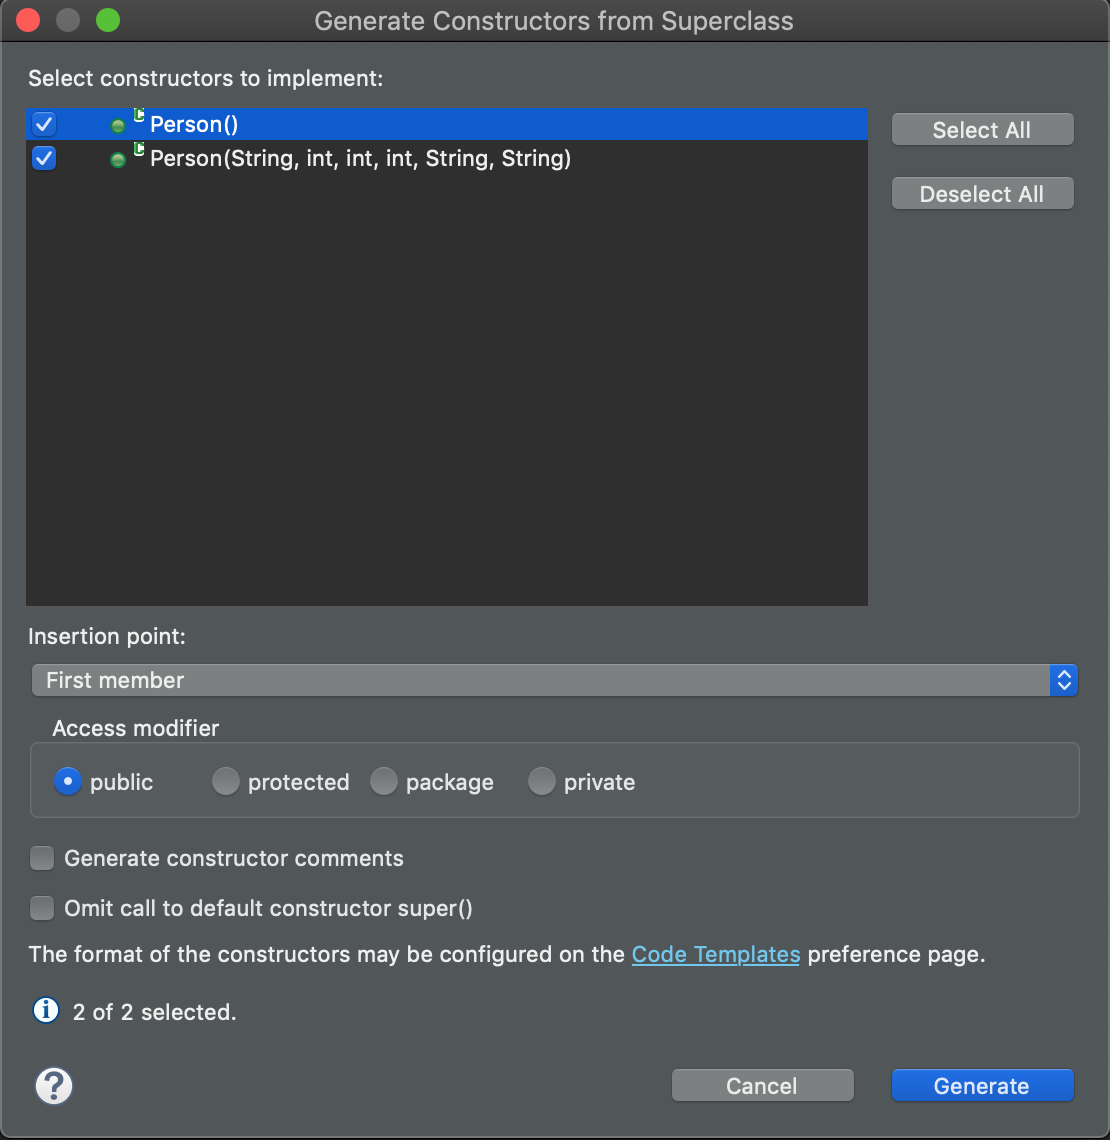
Eclipse generates the constructors for you. You now have an Employee class like this:
package com.jstevenperry.intro;

public class Employee extends Person {

  public Employee() {
    super();
    // TODO Auto-generated constructor stub
  }

  public Employee(String name, int age, int height, int weight, String eyeColor, String gender) {
    super(name, age, height, weight, eyeColor, gender);
    // TODO Auto-generated constructor stub
  }

}
Employee as a child of Person
Employee inherits the attributes and behavior of its parent, Person. Add the following attributes of Employee's own, as shown in lines 7-9 of the following listing:
taxpayerIdNumberof typeStringemployeeNumberof typeStringsalaryof typeBigDecimal(don't forget to add theimport java.math.BigDecimalstatement)
package com.jstevenperry.intro;

import java.math.BigDecimal;

public class Employee extends Person {

  private String taxpayerIdNumber;
  private String employeeNumber;
  private BigDecimal salary;

  public Employee() {
    super();
  }

  public Employee(String name, int age, int height, int weight, String eyeColor, String gender) {
    super(name, age, height, weight, eyeColor, gender);
    // TODO Auto-generated constructor stub
  }

  public String getTaxpayerIdNumber() {
    return taxpayerIdNumber;
  }

  public void setTaxpayerIdNumber(String taxpayerIdNumber) {
    this.taxpayerIdNumber = taxpayerIdNumber;
  }

  // Other getter/setters...
}
Don't forget to generate getters and setters for the new attributes. I recommend using Eclipse's code generator for this, as you did for Person's attributes in the "Learn how to create and run Java objects" tutorial in the "Your first Java class" section.
Overriding the printAudit() method
Two or more methods of the same name, but different signatures, are called overloaded methods. When you create a new version of a method in a subclass that is defined in a superclass, it's called method overriding.
Now you'll override the printAudit() method that you used to format the current state of a Person instance. Employee inherits that behavior from Person. If you instantiate Employee, set its attributes, and call either of the overloads of printAudit(), the call succeeds. However, the audit that's produced doesn't fully represent an Employee. The printAudit() method can't format the attributes specific to an Employee, because Person (where printAudit is declared) doesn't know about them.
The solution is to override the overload of printAudit() that takes a StringBuilder as a parameter and add code to print the attributes specific to Employee.
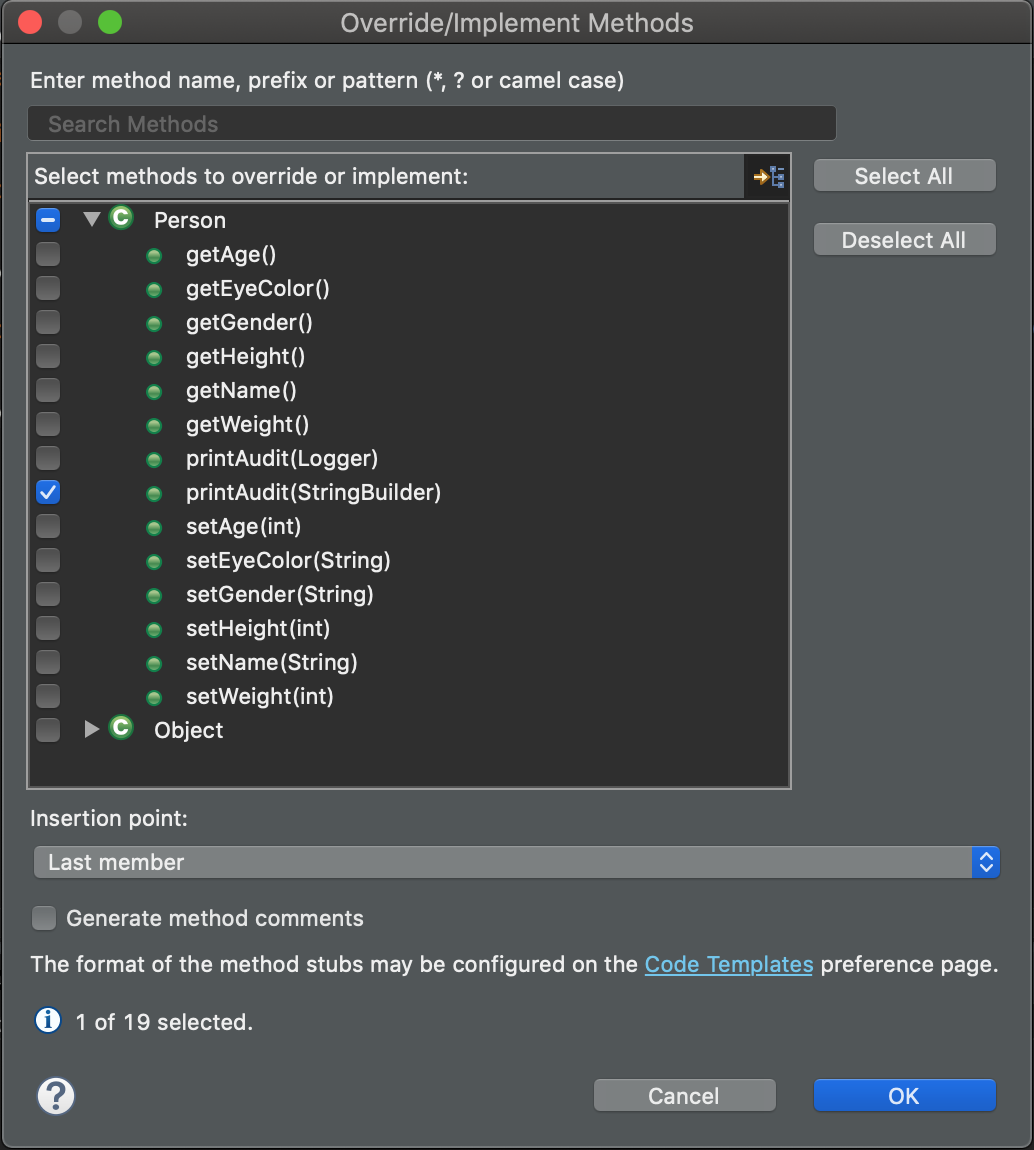
With Employee open in the editor window or selected in the Project Explorer view, go to Source > Override/Implement Methods.... In the Override/Implement Methods dialog box, as shown in the following figure, select the overloaded printAudit() method that takes a StringBuilder parameter and click OK.
Eclipse generates the method stub for you, and then you can fill in the rest, like so:
@Override
public void printAudit(StringBuilder buffer) {
  // Call the superclass version of this method first to get its attribute values
  super.printAudit(buffer);

  // Now format this instance's values
  buffer.append("TaxpayerIdentificationNumber=");
  buffer.append(getTaxpayerIdNumber());
  buffer.append(",");
  buffer.append("EmployeeNumber=");
  buffer.append(getEmployeeNumber());
  buffer.append(",");
  buffer.append("Salary=");
  buffer.append(getSalary().setScale(2).toPlainString());
}
Notice the call to super.printAudit(). What you're doing here is asking the (Person) superclass to exhibit its behavior for printAudit(), and then you augment it with Employee-type printAudit() behavior.
The call to super.printAudit() doesn't need to be first; it just seemed like a good idea to print those attributes first. In fact, you don't need to call super.printAudit() at all. If you don't call it, you must format the attributes from Person yourself in the Employee.printAudit() method, or they won't be included in the audit output.
Comparing objects
The Java language provides two ways to compare objects:
- The
==operator - The
equals()method
Comparing objects with ==
The == syntax compares objects for equality such that a == b returns true only if a and b have the same value. For objects, this will be the case if the two refer to the same object instance. For primitives, if the values are identical.
Suppose you generate a JUnit test for Employee (which you saw how to do in the "Your first Java class" section, in "Learn how to create and run Java objects"). The JUnit test is shown in the following listing.
class EmployeeTest {

  @Test
  void test() {
      int int1 = 1;
      int int2 = 1;
      Logger l = Logger.getLogger(EmployeeTest.class.getName());

      l.info("Q: int1 == int2?           A: " + (int1 == int2));
      Integer integer1 = Integer.valueOf(int1);
      Integer integer2 = Integer.valueOf(int2);
      l.info("Q: Integer1 == Integer2?   A: " + (integer1 == integer2));
      integer1 = Integer.valueOf(int1);
      integer2 = Integer.valueOf(int2);
      l.info("Q: Integer1 == Integer2?   A: " + (integer1 == integer2));
      Employee employee1 = new Employee();
      Employee employee2 = new Employee();
      l.info("Q: Employee1 == Employee2? A: " + (employee1 == employee2));
  }

}
Run the Listing 4 code inside Eclipse (select Employee in the Project Explorer view, then choose Run As > JUnit Test) to generate the following output:
May 09, 2020 10:38:23 AM com.jstevenperry.intro.EmployeeTest test
INFO: Q: int1 == int2?           A: true
May 09, 2020 10:38:23 AM com.jstevenperry.intro.EmployeeTest test
INFO: Q: Integer1 == Integer2?   A: true
May 09, 2020 10:38:23 AM com.jstevenperry.intro.EmployeeTest test
INFO: Q: Integer1 == Integer2?   A: false
May 09, 2020 10:38:23 AM com.jstevenperry.intro.EmployeeTest test
INFO: Q: Employee1 == Employee2? A: false
In the first case, the values of the primitives are the same, so the == operator returns true. In the second case, the Integer objects refer to the same instance, so again == returns true.
In the third case, even though the Integer objects seem to wrap the same value, because the objects are different, == returns false because the objects are different. This potentially confusing behavior may be why creating a Java fundamental object wrapper type like Integer by passing a value to its constructor has been deprecated since Java 9.
Think of == as a test for "same object instance." With that in mind, obviously then in the fourth case, because Employee1 and Employee2 are different objects, == returns false.
Comparing objects with equals()
equals() is a method that every Java language object gets for free, because it's defined as an instance method of java.lang.Object (which every Java object inherits from).
You call equals() like this:
a.equals(b);
This statement invokes the equals() method of object a, passing to it a reference to object b. By default, a Java program would simply check to see if the two objects are the same by using the == syntax. Because equals() is a method, however, it can be overridden. Compare the JUnit test case to the anotherTest(), which uses equals() to compare the two objects.
@Test
public void anotherTest() {
  Logger l = Logger.getLogger(Employee.class.getName());
  Integer integer1 = Integer.valueOf(1);
  Integer integer2 = Integer.valueOf(1);
  l.info("Q: integer1 == integer2 ? A: " + (integer1 == integer2));
  l.info("Q: integer1.equals(integer2) ? A: " + integer1.equals(integer2));
  integer1 = new Integer(integer1);
  integer2 = new Integer(integer2);
  l.info("Q: integer1 == integer2 ? A: " + (integer1 == integer2));
  l.info("Q: integer1.equals(integer2) ? A: " + integer1.equals(integer2));
  Employee employee1 = new Employee();
  Employee employee2 = new Employee();
  l.info("Q: employee1 == employee2 ? A: " + (employee1 == employee2));
  l.info("Q: employee1.equals(employee2) ? A : " + employee1.equals(employee2));
}
Running it produces this output:
May 09, 2020 10:43:36 AM com.jstevenperry.intro.EmployeeTest anotherTest
INFO: Q: integer1 == integer2 ? A: true
May 09, 2020 10:43:36 AM com.jstevenperry.intro.EmployeeTest anotherTest
INFO: Q: integer1.equals(integer2) ? A: true
May 09, 2020 10:43:36 AM com.jstevenperry.intro.EmployeeTest anotherTest
INFO: Q: integer1 == integer2 ? A: false
May 09, 2020 10:43:36 AM com.jstevenperry.intro.EmployeeTest anotherTest
INFO: Q: integer1.equals(integer2) ? A: true
May 09, 2020 10:43:36 AM com.jstevenperry.intro.EmployeeTest anotherTest
INFO: Q: employee1 == employee2 ? A: false
May 09, 2020 10:43:36 AM com.jstevenperry.intro.EmployeeTest anotherTest
INFO: Q: employee1.equals(employee2) ? A : false
A note about comparing integers
In the previous code listing, it should be no surprise that the equals() method of Integer returns true if == returns true. But notice what happens in the second case, where you create separate objects that both wrap the value 1: == returns false because integer1 and integer2 refer to different objects; but equals() returns true.
The writers of the JDK decided that for Integer, the meaning of equals() would be different from the default (which, as you recall, is to compare the object references to see if they refer to the same object). For Integer, equals() returns true in cases in which the underlying (boxed) int value is the same.
For Employee, you didn't override equals(), so the default behavior (of using ==) returns what you'd expect, because employee1 and employee2 refer to different objects.
For any object you write, then, you can define what equals() means as is appropriate for the application you're writing.
Overriding equals()
You can define what equals() means to your application's objects by overriding the default behavior of Object.equals()— and you can do this in Eclipse. With Employee having the focus in the IDE's source window, select Source > Override/Implement Methods to open the dialog box shown in the following figure.
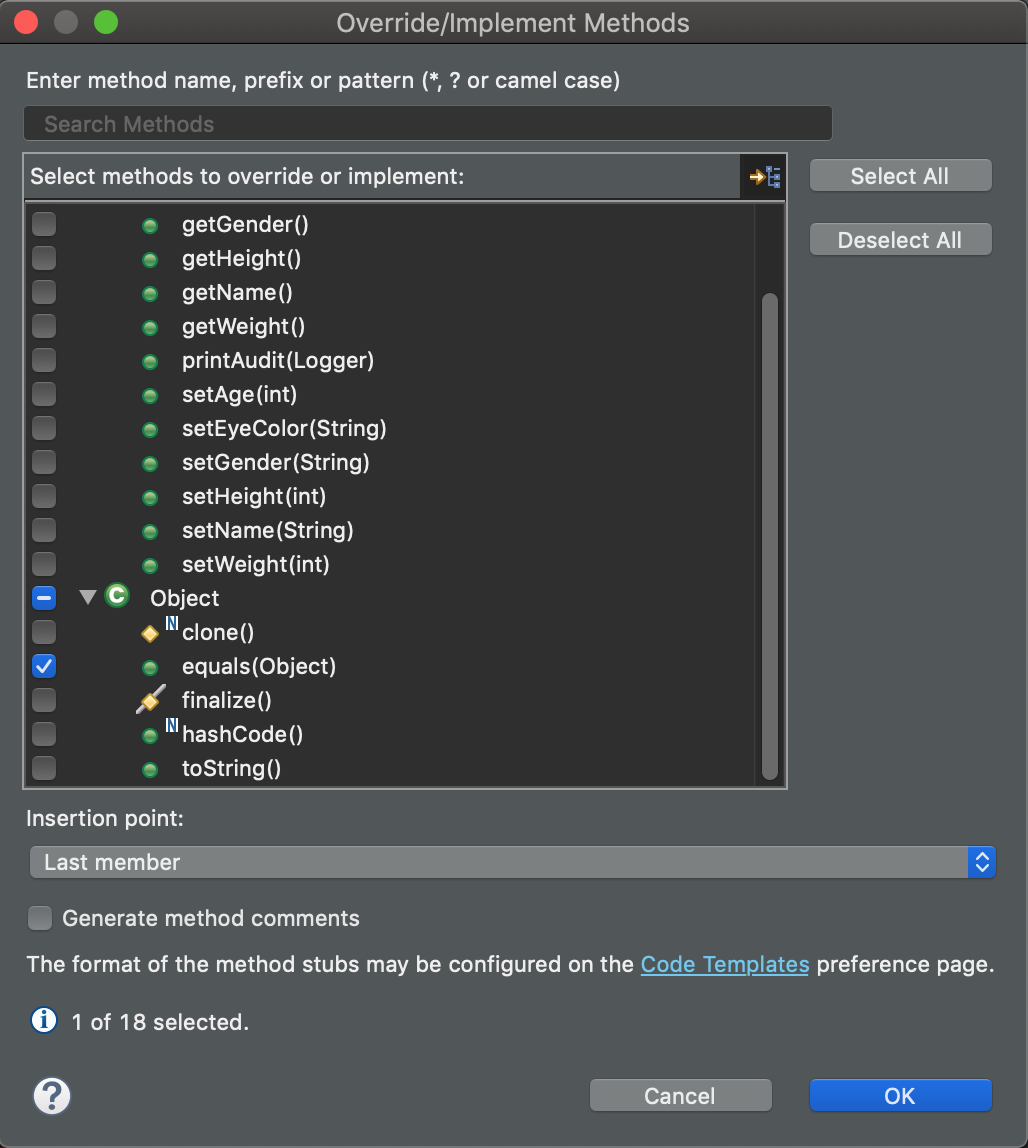
Locate Object in the list of methods to override or implement, select the equals(Object) method, and click OK. Eclipse generates the code and places it in your source file:
  @Override
  public boolean equals(Object obj) {
    // TODO Auto-generated method stub
    return super.equals(obj);
  }
Run the JUnit test again, and notice the output doesn't change. What's going on?
Well, the default behavior of equals() is (essentially) to compare object instances, so just overriding equals() to use Object's overload of equals() isn't what we want, and we need to think about what it means for two Employee objects to be "equal".
In general, it makes sense that the two Employee objects are "equal" if the states (that is, their attribute values) of those objects are the same.
What does an equals() method look like that reflects this new definition of "equals"?
Autogenerating equals()
Eclipse can generate an equals() method for you based on the instance variables (attributes) that you define for a class.
Employee is a subclass of Person, so generate equals() for Person first, then generate equals() for Employee.
In the Eclipse Project Explorer view, right-click Person and choose Generate hashCode() and equals(). In the dialog box that opens, click Select All to include all of the attributes in the hashCode() and equals() methods, and click Generate.

Eclipse generates an equals() method that looks like this:
  @Override
  public boolean equals(Object obj) {
    if (this == obj)
      return true;
    if (!super.equals(obj))
      return false;
    if (getClass() != obj.getClass())
      return false;
    Employee other = (Employee) obj;
    if (employeeNumber == null) {
      if (other.employeeNumber != null)
        return false;
    } else if (!employeeNumber.equals(other.employeeNumber))
      return false;
    if (salary == null) {
      if (other.salary != null)
        return false;
    } else if (!salary.equals(other.salary))
      return false;
    if (taxpayerIdNumber == null) {
      if (other.taxpayerIdNumber != null)
        return false;
    } else if (!taxpayerIdNumber.equals(other.taxpayerIdNumber))
      return false;
    return true;
  }
The equals() method generated by Eclipse looks complicated, but what it does is simple: If the object passed in is the same object as the one in Listing 6, equals() returns true. If the object passed in is null (meaning missing), it returns false.
Next, the method checks to see if the Class objects are the same (meaning that the passed-in object must be a Person object). If they are the same, each attribute value of the object passed in is checked to see if it matches value-for-value with the state of the given Person instance. If the attribute values are null, the equals() checks as many as it can, and if those match, the objects are considered equal.
Exercises
Now, work through a couple of guided exercises to do even more with Person and Employee in Eclipse.
Exercise 1: Generate an equals() for Employee
Follow the steps in "Autogenerating equals()" to generate an equals() for Employee. Once you have your generated equals(), add the following JUnit test case (which I've called yetAnotherTest()) to it:
@Test
public void yetAnotherTest() {
  Logger l = Logger.getLogger(Employee.class.getName());
  Employee employee1 = new Employee();
  employee1.setName("J Smith");
  Employee employee2 = new Employee();
  employee2.setName("J Smith");
  l.info("Q: employee1 == employee2?      A: " + (employee1 == employee2));
  l.info("Q: employee1.equals(employee2)? A: " + employee1.equals(employee2));
}
If you run the code, you should see the following output:
May 09, 2020 11:21:11 AM com.jstevenperry.intro.EmployeeTest yetAnotherTest
INFO: Q: employee1 == employee2?      A: false
May 09, 2020 11:21:12 AM com.jstevenperry.intro.EmployeeTest yetAnotherTest
INFO: Q: employee1.equals(employee2)? A: true
As you would expect, since employee1 and employee2 refer to different objects, == returns false. In the second test, a match on Name alone was enough to convince equals() that the two objects are equal. Try adding more attributes to this example and see what you get.
Exercise 2: Override toString()
Remember the printAudit() method from the beginning of this section? If you thought it was working a little too hard, you were right. Formatting the state of an object into a String is such a common pattern that the designers of the Java language built it into Object itself, in a method called (no surprise) toString(). The default implementation of toString() isn't especially useful, but every object has one. In this exercise, you override toString() to make it a little more useful.
If you suspect that Eclipse can generate a toString() method for you, you're correct. Go back into your Project Explorer and right-click the Person class, then choose Source > Generate toString().... In the dialog box, select all attributes and click OK. Now do the same thing for Employee. The code generated by Eclipse for Employee is shown in the following listing.
  @Override
  public String toString() {
    return "Employee [taxpayerIdNumber=" + taxpayerIdNumber + ", employeeNumber=" + employeeNumber + ", salary="
        + salary + "]";
  }
The code that Eclipse generates for toString doesn't include the superclass's toString() ( Employee's superclass being Person). You can fix that situation quickly, using Eclipse, with this override:
@Override
public String toString() {
  return super.toString() + "Employee [taxpayerIdentificationNumber=" + taxpayerIdentificationNumber +
    ", employeeNumber=" + employeeNumber + ", salary=" + salary + "]";
}
The addition of toString() makes printAudit() much simpler:
@Override
  public void printAudit(StringBuilder buffer) {
  buffer.append(toString());
}
toString() now does the heavy lifting of formatting the object's current state, and you simply stuff what it returns into the StringBuilder and return.
I recommend always implementing toString() in your classes, if only for support purposes. It's virtually inevitable that at some point, you'll want to see what an object's state is while your application is running, and toString() is a great hook for doing that.
Class members
Every object instance has variables and methods, and for each one, the exact behavior is different, because it's based on the state of the object instance. The variables and methods that you have on Person and Employee are instance variables and methods. To use them, you must either instantiate the class you need or have a reference to the instance.
Classes can also have class variables and methods — known as class members. You declare class variables with the static keyword. The differences between class variables and instance variables are:
- Every instance of a class shares a single copy of a class variable.
- You can call class methods on the class itself, without having an instance.
- Class methods can access only class variables.
- Instance methods can access class variables, but class methods can't access instance variables.
When does it make sense to add class variables and methods? The best rule of thumb is to do so rarely, so that you don't overuse them. That said, it's a good idea to use class variables and methods:
- To declare constants that any instance of the class can use (and whose value is fixed at development time)
- On a class with utility methods that don't ever need an instance of the class (such as
Logger.getLogger())
Class variables
To create a class variable, use the static keyword when you declare it:
accessSpecifier static variableName [= initialValue];
Note: The square brackets here indicate that their contents are optional. The brackets are not part of the declaration syntax.
The JRE creates space in memory to store each of a class's instance variables for every instance of that class. In contrast, the JRE creates only a single copy of each class variable, regardless of the number of instances. It does so the first time the class is loaded (that is, the first time it encounters the class in a program). All instances of the class share that single copy of the variable. That makes class variables a good choice for constants that all instances should be able to use.
For example, you declared the Gender attribute of Person to be a String, but you didn't put any constraints on it. Listing 8 shows a common use of class variables.
public class Person {
  //. . .
  public static final String GENDER_MALE = "MALE";
  public static final String GENDER_FEMALE = "FEMALE";
  public static final String GENDER_PREFER_NOT_TO_SAY = "PNTS";

  // . . .
  public static void main(String[] args) {
  Person p = new Person("Joe Q Author", 42, 173, 82, "Brown", GENDER_MALE);
    // . . .
  }
  //. . .
}
Declaring constants
Typically, constants are:
- Named in all uppercase
- Named as multiple words, separated by underscores
- Declared
final(so that their values cannot be modified) - Declared with a
publicaccess specifier (so that they can be accessed by other classes that need to reference their values by name)
In the previous listing, to use the constant for MALE in the Person constructor call, you would simply reference its name. To use a constant outside of the class, you would preface it with the name of the class where it was declared:
String genderValue = Person.GENDER_MALE;
Class methods
If you've been following along since "Explore the Java platform, learn object-oriented programming principles, and create a project," you've already called the static Logger.getLogger() method several times — whenever you retrieved a Logger instance to write output to the console. Notice, though, that to do so you didn't need an instance of Logger. Instead, you referenced the Logger class, which is the syntax for making a class method call. As with class variables, the static keyword identifies Logger (in this example) as a class method. Class methods are also sometimes called static methods for this reason.
Now you can combine what you learned about static variables and methods to create a static method on Employee. You declare a private static final variable to hold a Logger, which all instances share, and which is accessible by calling getLogger() on the Employee class.
public class Employee extends Person {
  private static final Logger logger = Logger.getLogger(Employee.class.getName());

  //. . .
  public static Logger getLogger() {
    return logger;
  }

}
Two important things are happening in Listing 9:
- The
Loggerinstance is declared withprivateaccess, so no class outsideEmployeecan access the reference directly. - The
Loggeris initialized when the class is loaded — because you use the Java initializer syntax to give it a value.
To retrieve the Employee class's Logger object, you make the following call:
Logger employeeLogger = Employee.getLogger();
Exceptions
No program ever works 100 percent of the time, and the designers of the Java language knew this. In this section, learn about the Java platform's built-in mechanisms for handling situations in which your code doesn't work exactly as planned.
Exception-handling basics
An exception is an event that occurs during program execution that disrupts the normal flow of the program's instructions. Exception handling is an essential technique of Java programming. You wrap your code in a try block (which means "try this and let me know if it causes an exception") and use it to catch various types of exceptions.
To get started with exception handling, take a look at the code in the following listing.
@Test
public void yetAnotherTest() {
  Logger l = Logger.getLogger(Employee.class.getName());
//    Employee employee1 = new Employee();
  Employee employee1 = null;
  employee1.setName("J Smith");
  Employee employee2 = new Employee();
  employee2.setName("J Smith");
  l.info("Q: employee1 == employee2?      A: " + (employee1 == employee2));
  l.info("Q: employee1.equals(employee2)? A: " + employee1.equals(employee2));
}
Notice that the Employee reference is set to null.
If you run this code, the test fails immediately with a NullPointerException, telling you that you're trying to reference an object through a null reference (pointer), which is a pretty serious development error. (You probably noticed that Eclipse warns you of the potential error with the message: Null pointer access: The variable employee1 can only be null at this location. Eclipse warns you about many potential development mistakes — yet another advantage of using an IDE for Java development.)
Fortunately, you can use try and catch blocks (along with a little help from finally) to catch the error.
Using try, catch, and finally
The following listing shows the buggy code from the previous one cleaned up with the standard code blocks for exception handling: try, catch, and finally.
@Test
public void yetAnotherTest() {
  Logger l = Logger.getLogger(Employee.class.getName());

  //    Employee employee1 = new Employee();
  try {
    Employee employee1 = null;
    employee1.setName("J Smith");
    Employee employee2 = new Employee();
    employee2.setName("J Smith");
    l.info("Q: employee1 == employee2?      A: " + (employee1 == employee2));
    l.info("Q: employee1.equals(employee2)? A: " + employee1.equals(employee2));
  } catch (Exception e) {
    l.severe("Caught exception: " + e.getMessage());
  } finally {
    // Always executes
  }
}
Together, the try, catch, and finally blocks form a net for catching exceptions. First, the try statement wraps code that might throw an exception. In that case, execution drops immediately to the catch block, or exception handler. When all the trying and catching is done, execution continues to the finally block, whether or not an exception occurred. When you catch an exception, you can try to recover gracefully from it, or you can exit the program (or method).
The program recovers from the error and then prints out the exception's message:
May 09, 2020 11:33:44 AM com.jstevenperry.intro.EmployeeTest yetAnotherTest
SEVERE: Caught exception: null
The exception hierarchy
The Java language incorporates an entire exception hierarchy consisting of many types of exceptions grouped into two major categories:
- Checked exceptions are checked by the compiler (meaning the compiler makes sure that they get handled somewhere in your code). In general, these are direct subclasses of
java.lang.Exception. - Unchecked exceptions (also called runtime exceptions) are not checked by the compiler. These are subclasses of
java.lang.RuntimeException.
When a program causes an exception, you say that it throws the exception. A checked exception is declared to the compiler by any method with the throws keyword in its method signature. Next is a comma-separated list of exceptions that the method could potentially throw during its execution. If your code calls a method that specifies that it throws one or more types of exceptions, you must handle it somehow, or add a throws to your method signature to pass that exception type along.
When an exception occurs, the Java runtime searches for an exception handler somewhere up the stack. If it doesn't find one by the time it reaches the top of the stack, it halts the program abruptly, as you saw.
Multiple catch blocks
You can have multiple catch blocks, but they must be structured in a particular way. If any exceptions are subclasses of other exceptions, the child classes are placed ahead of the parent classes in the order of the catch blocks. The following listing shows an example of different exception types structured in their correct hierarchical sequence.
@Test
public void exceptionTest() {
  Logger l = Logger.getLogger(Employee.class.getName());
  File file = new File("file.txt");
  BufferedReader bufferedReader = null;
  try {
    bufferedReader = new BufferedReader(new FileReader(file));
    String line = bufferedReader.readLine();
    while (line != null) {
      // Read the file
    }
  } catch (FileNotFoundException e) {
    l.severe(e.getMessage());
  } catch (IOException e) {
    l.severe(e.getMessage());
  } catch (Exception e) {
    l.severe(e.getMessage());
  } finally {
    // Close the reader
  }
}
In this example, the FileNotFoundException is a child class of IOException, so it must be placed ahead of the IOException catch block. And IOException is a child class of Exception, so it must be placed ahead of the Exception catch block.
Catch Multiple Exceptions
In the previous section, you saw a try with multiple catch clauses.
That's valid, but in some cases, you implement the same logic in each of the cause blocks.
For these cases, Java has the | pipe operator to concatenate all the exceptions that should fall into the same catch block.
} catch (IOException | NullPointerException ex) {
 logger.error(ex);
 throw new MyBusinessException(ex.getMessage());
}
try-with-resources blocks
The code must declare a variable to hold the bufferedReader reference, and then in the finally must close the BufferedReader.
Alternative, more-compact syntax (available as of JDK 7) automatically closes resources when the try block goes out of scope. The following listing shows this newer syntax.
@Test
public void exceptionTestTryWithResources() {
  Logger l = Logger.getLogger(Employee.class.getName());
  File file = new File("file.txt");
    try (BufferedReader bufferedReader = new BufferedReader(new FileReader(file))) {
      String line = bufferedReader.readLine();
      while (line != null) {
// Read the file
      }
    } catch (Exception e) {
      l.severe(e.getMessage());
    }
}
Essentially, you assign resource variables after try inside parentheses, and when the try block goes out of scope, those resources are automatically closed. The resources must implement the java.lang.AutoCloseable interface; if you try to use this syntax on a resource class that doesn't, Eclipse warns you.
Building Java applications
In this section, you continue building up Person as a Java application. Along the way, you can get a better idea of how an object, or collection of objects, evolves into an application.
The application entry point
All Java applications need an entry point where the Java runtime knows to start executing code. That entry point is the main() method. Domain objects — that is, objects (Person and Employee, for example) that are part of your application's business domain— typically don't have main() methods, but at least one class in every application must.
As you know, Person and its Employee subclass are conceptually part of a human-resources application. Now you'll add a new class to the application to give it an entry point.
Creating a driver class
The purpose of a driver class (as its name implies) is to "drive" an application. Notice that this simple driver for a human-resources application contains a main() method:
package com.jstevenperry.intro;
public class HumanResourcesApplication {
  public static void main(String[] args) {
  }
}
Now, create a driver class in Eclipse using the same procedure you used to create Person and Employee. Name the class HumanResourcesApplication, being sure to select the option to add a main() method to the class. Eclipse will generate the class for you.
Next, add some code to your new main() method so that it looks like this:
package com.jstevenperry.intro;
import java.util.logging.Logger;

public class HumanResourcesApplication {
  private static final Logger log = Logger.getLogger(HumanResourcesApplication.class.getName());
  public static void main(String[] args) {
    Employee e = new Employee();
    e.setName("J Smith");
    e.setEmployeeNumber("0001");
    e.setTaxpayerIdNumber("123‑45‑6789");
    e.setSalary(BigDecimal.valueOf(45000.0));
    e.printAudit(log);
  }
}
Finally, launch the HumanResourcesApplication class and watch it run. You should see this output:
May 10, 2020 9:42:25 PM com.jstevenperry.intro.Person printAudit
INFO: Name=J Smith,Age=0,Height=0,Weight=0,EyeColor=null,Gender=nullTaxpayerIdentificationNumber=123‑45‑6789,EmployeeNumber=0001,Salary=45000.00
That's all there is to creating a simple Java application. In the next section, you begin looking at some of the syntax and libraries that can help you develop more-complex applications.
Inheritance
You've encountered examples of inheritance a few times already in this series. This section explains in more detail how inheritance works — including the inheritance hierarchy, constructors and inheritance, and inheritance abstraction.
How inheritance works
Classes in Java code exist in hierarchies. Classes above a given class in a hierarchy are superclasses of that class. That particular class is a subclass of every class higher up the hierarchy. A subclass inherits from its superclasses. The java.lang.Object class is at the top of the class hierarchy — so every Java class is a subclass of, and inherits from, Object.
For example, suppose you have a Person class that looks like this:
public class Person {

  public static final String STATE_DELIMITER = "~";

  public Person() {
    // Default constructor
  }

  public enum Gender {
    MALE,
    FEMALE,
    PREFER_NOT_TO_SAY
  }

  public Person(String name, int age, int height, int weight, String eyeColor, Gender gender) {
    this.name = name;
    this.age = age;
    this.height = height;
    this.weight = weight;
    this.eyeColor = eyeColor;
    this.gender = gender;
  }


  private String name;
  private int age;
  private int height;
  private int weight;
  private String eyeColor;
  private Gender gender;
The Person class in Listing 14 implicitly inherits from Object. Because inheriting from Object is assumed for every class, you don't need to type extends Object for every class you define. But what does it mean to say that a class inherits from its superclass? It simply means that Person has access to the exposed variables and methods in its superclasses. In this case, Person can see and use Object's public and protected methods and variables.
Defining a class hierarchy
Now suppose you have an Employee class that inherits from Person. Employee's class definition would look something like this:
public class Employee extends Person {

  private String taxpayerIdentificationNumber;
  private String employeeNumber;
  private BigDecimal salary;
  // . . .
}
The Employee inheritance relationship to all of its superclasses (its inheritance graph) implies that Employee has access to all public and protected variables and methods in Person (because Employee directly extends Person), as well as those in Object (because Employee actually extends Object, too, though indirectly). However, because Employee and Person are in the same package, Employee also has access to the package-private (sometimes called friendly) variables and methods in Person.
To go one step deeper into the class hierarchy, you could create a third class that extends Employee:
public class Manager extends Employee {
  // . . .
}
In the Java language, any class can have at most one direct superclass, but a class can have any number of subclasses. That's the most important thing to remember about inheritance hierarchy in the Java language.
Single versus multiple inheritance
Languages like C++ support the concept of multiple inheritance: At any point in the hierarchy, a class can directly inherit from one or more classes. The Java language supports only single inheritance— meaning you can only use the extends keyword with a single class. So the class hierarchy for any Java class always consists of a straight line all the way up to java.lang.Object. However, as you'll learn in the next main section, "Interfaces," the Java language supports implementing multiple interfaces in a single class, giving you a workaround of sorts to single inheritance.
Constructors and inheritance
Constructors aren't full-fledged object-oriented members, so they aren't inherited; instead, you must explicitly implement them in subclasses. Before I go into that topic, I'll review some basic rules about how constructors are defined and invoked.
Constructor basics
Remember that a constructor always has the same name as the class it's used to construct, and it has no return type. For example:
public class Person {
  public Person() {
  }
}
Recall earlier I said that every class has at least one constructor, and if you don't explicitly define a constructor for your class, the compiler generates one for you, called the default constructor. The preceding class definition and this one are identical in how they function:
public class Person {
}
Invoking a superclass constructor
To invoke a superclass constructor other than the default constructor, you must do so explicitly. For example, suppose Person has a constructor that takes just the name of the Person object being created. From Employee's default constructor, you could invoke the Person constructor.
public class Person {
  private String name;
  public Person() {
  }
  public Person(String name) {
    this.name = name;
  }
}

// Meanwhile, in Employee.java
public class Employee extends Person {
  public Employee() {
    super("Elmer J Fudd");
  }
}
You would probably never want to initialize a new Employee object this way, however. Until you get more comfortable with object-oriented concepts, and Java syntax in general, it's a good idea to implement superclass constructors in subclasses only if you are sure you'll need them. The following listing defines a constructor in Employee that looks like the one in Person so that they match up. This approach is much less confusing from a maintenance standpoint.
public class Person {
  private String name;
  public Person(String name) {
    this.name = name;
  }
}
// Meanwhile, in Employee.java
public class Employee extends Person {
  public Employee(String name) {
    super(name);
  }
}
Declaring a constructor
The first thing a constructor does is invoke the default constructor of its immediate superclass, unless you — on the first line of code in the constructor — invoke a different constructor. For example, the following two declarations are functionally identical:
public class Person {
  public Person() {
  }
}
// Meanwhile, in Employee.java
public class Employee extends Person {
  public Employee() {
  }
}
public class Person {
  public Person() {
  }
}
// Meanwhile, in Employee.java
public class Employee extends Person {
  public Employee() {
  super();
  }
}
No-arg constructors
If you provide an alternate constructor, you must explicitly provide the default constructor; otherwise it is unavailable. For example, the following code gives you a compile error:
public class Person {
  private String name;
  public Person(String name) {
    this.name = name;
  }
}
// Meanwhile, in Employee.java
public class Employee extends Person {

  public Employee() {
  }
}
The Person class in this example has no default constructor, because it provides an alternate constructor without explicitly including the default constructor.
How constructors invoke constructors
A constructor can invoke another constructor in the same class via the this keyword, along with an argument list. Like super(), the this() call must be the first line in the constructor, as in this example:
public class Person {
  private String name;
  public Person() {
    this("Some reasonable default?");
  }
  public Person(String name) {
    this.name = name;
  }

}
You see this idiom frequently. One constructor delegates to another, passing in a default value if that constructor is invoked. This technique is also a great way to add a new constructor to a class while minimizing impact on code that already uses an older constructor.
Constructor access levels
Constructors can have any access level you want, and certain rules of visibility apply. Table 1 summarizes the rules of constructor access.
| Constructor access modifier | Description |
|---|---|
| public | Constructor can be invoked by any class. |
| protected | Constructor can be invoked by an class in the same package or any subclass. |
| No modifier (package-private) | Constructor can be invoked by any class in the same package. |
| private | Constructor can be invoked only by the class in which the constructor is defined. |
You might be able to think of use cases in which constructors would be declared protected or even package-private, but how is a private constructor useful? I've used private constructors when I didn't want to allow direct creation of an object through the new keyword when implementing, say, the Factory pattern. In that case, I'd use a static method to create instances of the class, and that method — being included in the class — would be allowed to invoke the private constructor.
Inheritance and abstraction
If a subclass overrides a method from a superclass, the method is essentially hidden because calling it through a reference to the subclass invokes the subclass's version of the method, not the superclass's version. However, the superclass method is still accessible. The subclass can invoke the superclass method by prefacing the name of the method with the super keyword (and unlike with the constructor rules, this can be done from any line in the subclass method, or even in a different method altogether). By default, a Java program calls the subclass method if it's invoked through a reference to the subclass.
This capability also applies to variables, provided the caller has access to the variable (that is, the variable is visible to the code trying to access it). This detail can cause you no end of grief as you gain proficiency in Java programming. Eclipse provides ample warnings — for example, that you're hiding a variable from a superclass, or that a method call won't call what you think it will.
In an OOP context, abstraction refers to generalizing data and behavior to a type higher up the inheritance hierarchy than the current class. When you move variables or methods from a subclass to a superclass, you say you are abstracting those members. The main reason for abstracting is to reuse common code by pushing it as far up the hierarchy as possible. Having common code in one place makes it easier to maintain.
Abstract classes and methods
At times, you want to create classes that only serve as abstractions and do not necessarily ever need to be instantiated. Such classes are called abstract classes. By the same token, sometimes certain methods need to be implemented differently for each subclass that implements the superclass. Such methods are abstract methods. Here are some basic rules for abstract classes and methods:
- Any class can be declared
abstract. - Abstract classes cannot be instantiated.
- An abstract method cannot contain a method body.
- Any class with an abstract method must be declared
abstract.
Using abstraction
Suppose you don't want to allow the Employee class to be instantiated directly. You simply declare it using the abstract keyword, and you're done:
public abstract class Employee extends Person {
  // etc.
}
If you try to run this code, you get a compile error:
public void someMethodSomwhere() {
  Employee p = new Employee();// compile error!!
}
The compiler is complaining that Employee is abstract and can't be instantiated.
The power of abstraction
Suppose that you need a method to examine the state of an Employee object and make sure that it's valid. This need would seem to be common to all Employee objects, but it would have zero potential for reuse because it would behave differently among all potential subclasses. In that case, you declare the validate() method abstract (forcing all subclasses to implement it):
public abstract class Employee extends Person {
  public abstract boolean validate();
}
Every direct subclass of Employee (such as Manager) is now required to implement the validate() method. However, once a subclass implements the validate() method, none of its subclasses need to implement it.
For example, suppose you have an Executive object that extends Manager. This definition would be valid:
public class Executive extends Manager {
  public Executive() {
  }
}
When (not) to abstract: Two rules
As a first rule of thumb, don't abstract in your initial design. Using abstract classes early in the design forces you down a path that could restrict your application. You can always refactor common behavior (which is the entire point of having abstract classes) further up the inheritance graph — and it's almost always better to refactor after you've discovered that you do need to. Eclipse has wonderful support for refactoring.
Second, as powerful as abstract classes are, resist using them. Unless your superclasses contain much common behavior and aren't meaningful on their own, let them remain nonabstract. Deep inheritance graphs can make code maintenance difficult. Consider the trade-off between classes that are too large and maintainable code.
Assignments: Classes
You can assign a reference from one class to a variable of a type belonging to another class, but certain rules apply. Take a look at this example:
Manager m = new Manager();
Employee e = new Employee();
Person p = m; // okay
p = e; // still okay
Employee e2 = e; // yep, okay
e = m; // still okay
e2 = p; // wrong!
The destination variable must be of a supertype of the class belonging to the source reference, or else the compiler gives you an error. Whatever is on the right side of the assignment must be a subclass or the same class as the thing on the left. To put it another way: a subclass is more specific in purpose than its superclass, so think of a subclass as being narrower than its superclass. And a superclass, being more general, is wider than its subclass. The rule is this, you may never make an assignment that will narrow the reference.
Now consider this example:
Manager m = new Manager();
Manager m2 = new Manager();
m = m2; // Not narrower, so okay
Person p = m; // Widens, so okay
Employee e = m; // Also widens
Employee e = p; // Narrows, so not okay!
Although an Employee is a Person, it's most definitely not a Manager, and the compiler enforces this distinction.
Interfaces
In this section, you begin learning about interfaces and start using them in your Java code.
Watch the following video to see what an interface is (0:16), how to define and implement an interface (1:08), and how to use default interface methods (6:45). After you watch, I'll recap the steps while giving you a closer look at the code. The code is available in GitHub for reference.
Interfaces: What are they good for?
As you know from the previous section, abstract methods, by design, specify a contract— through the method name, parameter(s), and return type — but provide no reusable code. Abstract methods — defined on abstract classes — are useful when the way the behavior is implemented is likely to change from the way it's implemented in one subclass of the abstract class to another.
When you see a set of common behaviors in your application (think java.util.List) that can be grouped together and named, but for which two or more implementations exist, you might consider defining that behavior with an interface— and that's why the Java language provides this feature. However, this fairly advanced feature is easily abused, obfuscated, and twisted into the most heinous shapes (as I've witnessed first-hand), so use interfaces with caution.
It might be helpful to think about interfaces this way: They are like abstract classes that contain only abstract methods; they define only the contract but none of the implementation.
Defining an interface
The syntax for defining an interface is straightforward:
public interface InterfaceName {
    returnType methodName(argumentList);
  }
An interface declaration looks like a class declaration, except that you use the interface keyword. You can name the interface anything you want to (subject to language rules), but by convention, interface names look like class names.
Methods defined in an interface have no method body. The implementer of the interface is responsible for providing the method body (as with abstract methods).
You define hierarchies of interfaces, as you do for classes, except that a single class can implement as many interfaces as you want it to. Remember, a class can extend only one class. If one class extends another and implements an interface or interfaces, you list the interfaces after the extended class, like this:
public class Manager extends Employee implements BonusEligible, StockOptionEligible {
  // And so on
}
An interface doesn't need to have any body at all. The following definition, for example, is perfectly acceptable:
public interface BonusEligible {
}
Generally speaking, such interfaces are called marker interfaces, because they mark a class as implementing that interface but offer no behavior (that is, no methods).
Once you know all that, actually defining an interface is easy:
public interface StockOptionEligible {
  void processStockOptions(int numberOfOptions, BigDecimal price);
}
Implementing interfaces
To define an interface on your class, you must implement the interface, which means that you provide a method body that provides the behavior to fulfill the interface's contract. You use the implements keyword to implement an interface:
public class ClassName extends SuperclassName implements InterfaceName {
  // Class Body
}
Suppose you implement the StockOptionEligible interface on the Manager class:
public class Manager extends Employee implements StockOptionEligible, BonusEligible {

  private static Logger log = Logger.getLogger(Manager.class.getName());


  public Manager() {
    super();
  }

  @Override
  public void processStockOptions(int numberOfOptions, BigDecimal price) {
    log.info("I can't believe I got " + numberOfOptions + " options at $" + price.toPlainString() + " each!");
  }
}
When you implement the interface, you provide behavior for the method or methods on the interface. You must implement the methods with signatures that match the ones on the interface, with the addition of the public access modifier. Notice that you don't need to provide an implementation for the BonusEligible marker interface because it has no methods declared on it.
An abstract class can declare that it implements a particular interface, but you're not required to implement all of the methods on that interface. Abstract classes aren't required to provide implementations for all of the methods they claim to implement. However, the first concrete class (that is, the first non-abstract class in the hierarchy) must implement all methods that classes above it in the class hierarchy do not implement.
Note: Subclasses of a concrete class that implements an interface do not need to provide their own implementation of that interface.
Generating interfaces in Eclipse
Eclipse can easily generate the correct method signature for you if you decide that one of your classes should implement an interface. Just change the class signature to implement the interface. Eclipse puts a red squiggly line under the class, flagging it to be in error because the class doesn't provide the methods on the interface. Click the class name, press Ctrl + 1, and Eclipse suggests "quick fixes" for you. Of these, choose Add Unimplemented Methods, and Eclipse generates the methods for you, placing them at the bottom of the source file.
Using interfaces
An interface defines a new reference data type, which you can use to refer to an interface anywhere you would refer to a class. This ability includes when you declare a reference variable, or cast from one type to another:
package com.jstevenperry.intro;
import java.math.BigDecimal;
import org.junit.Test;
public class ManagerTest {
  @Test
  public void testCalculateAndAwardStockOptions() {
    StockOptionEligible soe = new Manager();// perfectly valid
    calculateAndAwardStockOptions(soe);
    calculateAndAwardStockOptions(new Manager());// works too
  }

  private static void calculateAndAwardStockOptions(StockOptionEligible soe) {
    BigDecimal reallyCheapPrice = BigDecimal.valueOf(0.01);
    int numberOfOptions = 10000;
    soe.awardStockOptions(numberOfOptions, reallyCheapPrice);
  }
}
As you can see, it's valid to assign a new Manager instance to a StockOptionEligible reference, and to pass a new Manager instance to a method that expects a StockOptionEligible reference.
Assignments: Interfaces
You can assign a reference from a class that implements an interface to a variable of an interface type, but certain rules apply. From Listing 18, you can see that assigning a Manager instance to a StockOptionEligible variable reference is valid. The reason is that the Manager class implements that interface. However, the following assignment would not be valid:
Manager m = new Manager();
  StockOptionEligible soe = m; //okay
  Employee e = soe; // Wrong!
Because Employee is a supertype of Manager, this code might at first seem okay, but it's not. Why not? Because Manager implements the StockOptionEligible interface, whereas Employee does not.
Assignments such as these follow the rules of assignment that you saw in the "Inheritance" section. And as with classes, you can only assign an interface reference to a variable of the same type or a superinterface type.
Default methods
Recall the BonusEligible interface from earlier. It was a marker interface, and as such had no methods declared on it. Suppose you write an application where Manager implements the BonusEligible interface and release that code, and it is deployed to production. Great!
Now, suppose you receive a new requirement that all implementations of the BonusEligible interface should provide a way to calculate the bonus. This means that the BonusEligible contract will have to change, and the change will be to add a method called getSalary() to retrieve the salary of the implementing object, and another method called calculateBonus() to the interface calculate and return the bonus amount as a BigDecimal value:
public interface BonusEligible {
  BigDecimal getSalary();
  BigDecimal calculateBonus();
}
You learned earlier in the unit that an interface has to be implemented, so if you add a method to the BonusEligible interface, the Java language compiler will require that all implementations (like Manager) must implement the new method in order for the code to compile.
In the simple examples in this unit, that's not a big deal. Just change the implementations, recompile the code, and release the change to production. But in the real world, an interface like BonusEligible could be used by dozens of other classes, and the impact of changing the interface could have tremendous fanout that affects development teams all across your organization.
Fortunately, through default interface methods the Java language provides a mechanism to address the situation where you must change an interface, but in a backward-compatible way.
Add the default keyword to the calculateBonus() method, along with a method body (the default implementation) and no interfaces are required to change. Existing BonusEligible implementations will compile just fine, and they can override the default calulateBonus() method only if the default implementation isn't suitable on a case-by-case basis:
public interface BonusEligible {
  BigDecimal getSalary();

  default BigDecimal calculateBonus() {
    // Default bonus is 10% of salary
    return getSalary().multiply(BigDecimal.valueOf(0.1));
  }
}
Existing BonusEligible implementations like Manager will not be required to change, and by default will receive a bonus of ten percent of their annual salary.
Default methods are a fairly advanced topic involving subtle nuances of using Java interfaces, but I wanted to introduce you to them so you know they exist.
Nested classes
In this section, you learn about nested classes and where and how to use them.
Where to use nested classes
As its name suggests, a nested class (or inner class) is a class defined within another class:
public class EnclosingClass {
  . . .
  public class NestedClass {
  . . .

  }
}
Like member variables and methods, Java classes can also be defined at any scope including public, private, or protected. Nested classes can be useful when you want to handle internal processing within your class in an object-oriented fashion but limit the functionality to the class where you need it.
Typically, you use a nested class when you need a class that's tightly coupled with the class in which it's defined. A nested class has access to the private data within its enclosing class, but this structure carries with it side effects that aren't obvious when you start working with nested classes.
Scope in nested classes
Because a nested class has scope, it's bound by the rules of scope. For example, a member variable can only be accessed through an instance of the class (an object). The same is true of a nested class.
Suppose you have the following relationship between a Manager and a nested class called DirectReports, which is a collection of the Employees that report to that Manager:
public class Manager extends Employee {
  private DirectReports directReports;
  public Manager() {
    this.directReports = new DirectReports();
  }
  . . .
  private class DirectReports {
  . . .
  }
}
Just as each Manager object represents a unique human being, the DirectReports object represents a collection of actual people (employees) who report to a manager. DirectReports differ from one Manager to another. In this case, it makes sense that I would only reference the DirectReports nested class in the context of its enclosing instance of Manager, so I've made it private.
Public nested classes
Because it's private, only Manager can create an instance of DirectReports. But suppose you wanted to give an external entity the ability to create instances of DirectReports. In this case, it seems like you could give the DirectReports class public scope, and then any external code could create DirectReports instances:
public class Manager extends Employee {
  public Manager() {
  }
  . . .
  public class DirectReports {
  . . .
  }
}
//
public static void main(String[] args) {
  Manager.DirectReports dr = new Manager.DirectReports();// This won't work!
}
The code in Listing 19 doesn't work, and you're probably wondering why. The problem (and also its solution) lies with the way DirectReports is defined within Manager, and with the rules of scope.
The rules of scope, revisited
If you had a member variable of Manager, you'd expect the compiler to require you to have a reference to a Manager object before you could reference it, right? Well, the same applies to DirectReports.
To create an instance of a public nested class, you use a special version of the new operator. Combined with a reference to an enclosing instance of an outer class, new gives you a way you to create an instance of the nested class:
public class Manager extends Employee {
  public Manager() {
  }
  . . .
  public class DirectReports {
  . . .
  }
  }
// Meanwhile, in another method somewhere...
public static void main(String[] args) {
  Manager manager = new Manager();
  Manager.DirectReports dr = manager.new DirectReports();
}
Note on line 12 that the syntax calls for a reference to the enclosing instance, plus a dot and the new keyword, followed by the class you want to create.
Static inner classes
At times, you want to create a class that's tightly coupled (conceptually) to a class, but where the rules of scope are somewhat relaxed, not requiring a reference to an enclosing instance. That's where static inner classes come into play. One common example is to implement a Comparator, which is used to compare two instances of the same class, usually for the purpose of ordering (or sorting) the classes:
public class Manager extends Employee {
  . . .
  public static class ManagerComparator implements Comparator<Manager> {
  . . .
  }
  }
// Meanwhile, in another method somewhere...
public static void main(String[] args) {
  Manager.ManagerComparator mc = new Manager.ManagerComparator();
  . . .
}
In this case, you don't need an enclosing instance. Static inner classes act like their regular Java class counterparts, and you should use them only when you need to couple a class tightly with its definition. Clearly, in the case of a utility class like ManagerComparator, creating an external class is unnecessary and potentially clutters up your code base. Defining such classes as static inner classes is the way to go.
Anonymous inner classes
With the Java language, you can implement abstract classes and interfaces pretty much anywhere, even in the middle of a method if necessary, and even without providing a name for the class. This capability is basically a compiler trick, but there are times when anonymous inner classes are handy to have.
The following listing builds off the previous listing adding a default method for handling Employee types that are not StockOptionEligible. The listing starts with a method in HumanResourcesApplication to process the stock options, followed by a JUnit test to drive the method.
// From HumanResourcesApplication.java
  public void handleStockOptions(final Person person, StockOptionProcessingCallback callback) {
    if (person instanceof StockOptionEligible) {
      // Eligible Person, invoke the callback straight up
      callback.process((StockOptionEligible)person);
    } else if (person instanceof Employee) {
      // Not eligible, but still an Employee. Let's create an
      /// anonymous inner class implementation for this
      callback.process(new StockOptionEligible() {
        @Override
        public void processStockOptions(int number, BigDecimal price) {
        // This employee is not eligible
        log.warning("It would be nice to award " + number + " of shares at $" +
          price.setScale(2, RoundingMode.HALF_UP).toPlainString() +
          ", but unfortunately, Employee " + person.getName() +
          " is not eligible for Stock Options!");
        }
      });
    } else {
      callback.process(new StockOptionEligible() {
        @Override
        public void processStockOptions(int number, BigDecimal price) {
        log.severe("Cannot consider awarding " + number + " of shares at $" +
          price.setScale(2, RoundingMode.HALF_UP).toPlainString() +
          ", because " + person.getName() +
          " does not even work here!");
        }
      });
    }
  }
// JUnit test to drive it (in HumanResourcesApplicationTest.java):
  @Test
  public void testHandleStockOptions() {

    HumanResourcesApplication classUnderTest = new HumanResourcesApplication();

    List<Person> people = HumanResourcesApplication.createPeople();

    StockOptionProcessingCallback callback = new StockOptionProcessingCallback() {
      @Override
      public void process(StockOptionEligible stockOptionEligible) {
        BigDecimal reallyCheapPrice = BigDecimal.valueOf(0.01);
        int numberOfOptions = 10000;
        stockOptionEligible.processStockOptions(numberOfOptions, reallyCheapPrice);
      }
    };
    for (Person person : people) {
      classUnderTest.handleStockOptions(person, callback);
    }
  }
Here, I provide implementations of two interfaces that use anonymous inner classes. First are two separate implementations of StockOptionEligible— one for Employees and one for Persons (to obey the interface). Then comes an implementation of StockOptionProcessingCallback that's used to handle processing of stock options for the Manager instances.
It might take time to grasp the concept of anonymous inner classes, but they're super handy. I use them all the time in my Java code. And as you progress as a Java developer, I believe you will too.
Conclusion
In this tutorial, you learned about some of the more advanced constructs of Java programming, although the overall discussion is still introductory in scope. Java programming topics covered in this tutorial included:
- Exception handling
- Inheritance and abstraction
- Interfaces
- Nested classes
What's next
In the next tutorial, continue learning about some additional advanced constructs of Java programming, including:
- Regular expressions
- Generics
- Functional Interfaces
- Streaming
- Enum types
- I/O
- Serialization