Tutorial
Develop a simple reactive messaging application using Vert.x over AMQP
Add a reactive layer to IBM MQ using Vert.x via the Advanced Message Queuing Protocol (AMQP) channelIn this tutorial, you'll create a simple reactive application that receives messages from IBM MQ. You run this application as a standalone Java application. By the end, you'll have a working Vert.x AMQP receiver that listens for messages from an MQ queue manager.
Reactive messaging is an asynchronous communication strategy designed to manage resources as efficiently as possible. Instead of actively checking for any requests, reactive programs execute a task only after a message is available on a queue. This reactive paradigm allows the application to be flexible in its responses and be easily scalable.
This application uses the Vert.x framework to receive messages from a topic on which you publish the messages using the MQ console. Vert.x acts as a bridge between the application and the MQ queue manager, allowing both technologies to interact with each other using Advanced Message Queuing Protocol (AMQP).
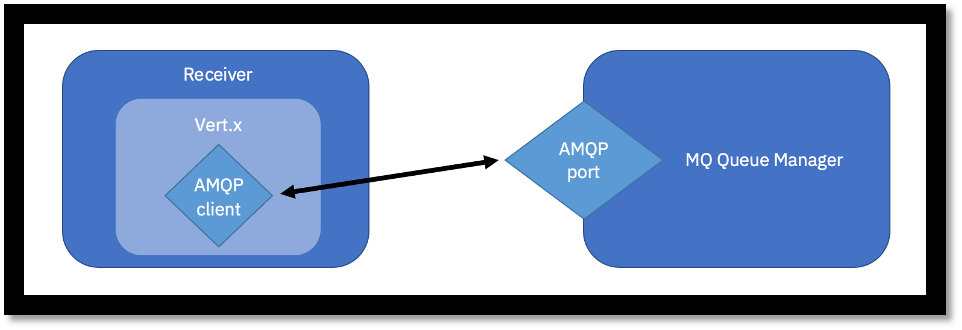
Use Vert.x, a flexible and lightweight framework for reactive applications. The Vert.x framework has an AMQP client that uses publish/subscribe messaging methods. When you create a "receiver" application, Vert.x creates a subscription that waits and listens for incoming messages to display. You use the framework's AMQP client to interact with the MQ queue manager.
Prerequisites
To complete this tutorial, you’ll need to install or set up:
- Git, Maven 3.9 or later, and Java JDK 21 or later
- Docker or Podman
- An AMQP channel enabled instance of IBM MQ. Follow the steps in Set up AMQP with IBM MQ
Steps
Step 1. Clone the repository
Make sure you are in a directory where you want to clone the mq-dev-patterns repository, and then clone it by running this command:
git clone https://github.com/ibm-messaging/mq-dev-patterns.git
After cloning the repository, cd into the project directory:
cd reactive/amqp-vertx
Step 2. Set up the environment variables and dependencies
Before the application can run, you need to set the environment variables.
To allow the reactive application to securely communicate with MQ, set the host, port, username, and password environment variables to configure your Vert.x AMQP client.
The password you need to specify on this environment variable is the one you used when you set up your MQ queue manager.
Copy and paste the following in your terminal to set the environment variables:
On Mac:
export HOST_NAME=localhost
export PORT=5672
export MQ_USER=app
export PASSWORD=passw0rd
On Windows:
set HOST_NAME=localhost
set PORT=5672
set MQ_USER=app
set PASSWORD=passw0rd
If you are a macOS user, modify the default pom.xml file to add an additional dependency.
Add the Vert.x AMQP Client as a dependency in your Java application so that you can use Vert.x to connect to the MQ queue manager.
If you are a macOS user, you need to add the following lines between the lines <dependencies> and </dependencies>. If you are a Windows or Linux user, you do not need to do this step.
If you are on an Intel Mac, add:
<dependency>
    <groupId>io.netty</groupId>
    <artifactId>netty-resolver-dns-native-macos</artifactId>
    <version>4.1.119.Final</version>
    <classifier>osx-x86_64</classifier>
</dependency>
If you are on an Apple Silicon Mac (M1/M2/M3/M4), add:
<dependency>
    <groupId>io.netty</groupId>
    <artifactId>netty-resolver-dns-native-macos</artifactId>
    <version>4.1.119.Final</version>
    <classifier>osx-aarch_64</classifier>
</dependency>
If you are unsure which chip your Mac has, click the Apple menu and select About This Mac. If you see "Apple M1" (or M2/M3/M4), use the osx-aarch_64 classifier. If you see "Intel", use osx-x86_64.
Step 3. Create the Vert.x receiver application
There are three Java files that make up our receiver application. These files are AmqpClientAndConnection.java, Receiver.java, and Runner.java. Runner.java is the main file, and it creates the objects we are going to need.

We are going to use our AmqpClientAndConnection object to initialize the process of creating a connection. Initializing the AmqpClientAndConnection object gets the program to check if the environment variables were provided correctly. If they are not provided correctly, the program exits.
public AmqpClientAndConnection() {
  if (envSettingsProvided()) {
    this.host = System.getenv("HOST_NAME");
    this.port = Integer.valueOf(System.getenv("PORT"));
    this.username = System.getenv("MQ_USER");
    this.password = System.getenv("PASSWORD");

    // Initialise client and connection.
    client = null;
    connection = null;
  } else {
    System.out.println("The environment settings were not provided correctly.");
    System.exit(0);
  }
}
If the environment variable check in AmqpClientAndConnection.java succeeds, our program then checks to see if there is an existing client connection.
if (client == null) {
    System.out.println("There is no existing client. Trying to create one. ");
    createClient();
}
If there is no existing client, we will create our client in the same file using the following lines:
public void createClient() {
    AmqpClientOptions options = new AmqpClientOptions()
    .setHost(host)
    .setPort(port)
    .setUsername(username)
    .setPassword(password);
    // Create a client using its own internal Vert.x instance.
    this.client = AmqpClient.create(options);
    System.out.println("Created a client.");
}
In production environments, you will want to set SSL/TLS protocols most likely as environment variables to provide as an option in the app. For more information about the various AMQP Client options, see the Vert.x docs.
We then create our connection using this client with the following code:
client.connect(ar -> {
    if (ar.failed()) {
        System.out.println("Unable to connect to the broker");
    } else {
        this.connection = ar.result();
        System.out.println("Created a connection.");
    }
});
After the connection has been established, we will use it to create a receiver. This receiver will be created in the Receiver.java file in the same directory. This receiver object will display messages sent to an address named "myreceiver".
public void createReceiver(AmqpClientAndConnection clientAndConnection){
    clientAndConnection.getConnection().createReceiver("myreceiver",
        done -> {
            if (done.failed()) {
                System.out.println("Unable to create receiver");
                clientAndConnection.closeConnection();
            } else {
                this.receiver = done.result();
                receiver.handler(msg -> {
                    System.out.println("Received the message: " + msg.bodyAsString());
                });
            }
        }
    );
    // Wait max of 15 seconds for the connection to be made.
    waitForReceiverToEstablish();
}
If the receiver cannot be created for any reason, the program proceeds to close the connection.
clientAndConnection.closeConnection();
The following snippet displays every message the receiver gets on the terminal:
receiver.handler(msg -> {
    System.out.println("Received the message: " + msg.bodyAsString());
});
Finally, we will include a catch for Ctrl + C from the user to close the existing connection and exit the program cleanly:
Runtime.getRuntime().addShutdownHook(new Thread()
{
    @Override
    public void run()
    {
         clientAndConnection.closeConnection();
    }
});
Step 4. Compile and run the reactive application
Now, compile the Java app using this command:
mvn clean package dependency:copy-dependencies
Before running the app, make sure your local MQ queue manager is up and running. You can check this with the command:
docker ps
or
podman ps
The Java app authenticates with the MQ queue manager using the app username and passw0rd password over AMQP. For this authentication to work, the MQ container must have been started with the MQ_CONNAUTH_USE_HTP=true environment variable. This enables MQ's internal password store, which validates the credentials passed by the Vert.x AMQP client.
If you started your MQ container from the prerequisite tutorial without this flag, stop it and restart it with the flag included:
On Mac:
podman stop <container_name> && podman rm <container_name>

podman run --env LICENSE=accept \
  --env MQ_QMGR_NAME=QM1 \
  --env MQ_APP_PASSWORD=passw0rd \
  --env MQ_ADMIN_PASSWORD=passw0rd \
  --env MQ_CONNAUTH_USE_HTP=true \
  --publish 1414:1414 \
  --publish 9443:9443 \
  --publish 5672:5672 \
  --detach \
  ibm-mqadvanced-server-dev:10.0.0.0-arm64
On Linux:
podman stop <container_name> && podman rm <container_name>

podman run --env LICENSE=accept \
  --env MQ_QMGR_NAME=QM1 \
  --env MQ_APP_PASSWORD=passw0rd \
  --env MQ_ADMIN_PASSWORD=passw0rd \
  --env MQ_CONNAUTH_USE_HTP=true \
  --publish 1414:1414 \
  --publish 9443:9443 \
  --publish 5672:5672 \
  --detach \
  ibm-mqadvanced-server-dev:10.0.0.0-amd64
We can now run the program using this command:
java -cp "target/receiver-example-1.jar:target/dependency/*" vertxtutorial.Runner
If you are on macOS and see the following DNS warning on your terminal, don't worry — add the macOS Netty dependency as described in Step 2 to suppress it:

After running the Receiver app, navigate to the MQ console by typing in the URL https://localhost:9443 and log in.
After logging in, navigate to the Manage QM1 section and check that you can see myreceiver under the Subscriptions tab.
Click the subscription myreceiver.

Click the Create button to create a message.
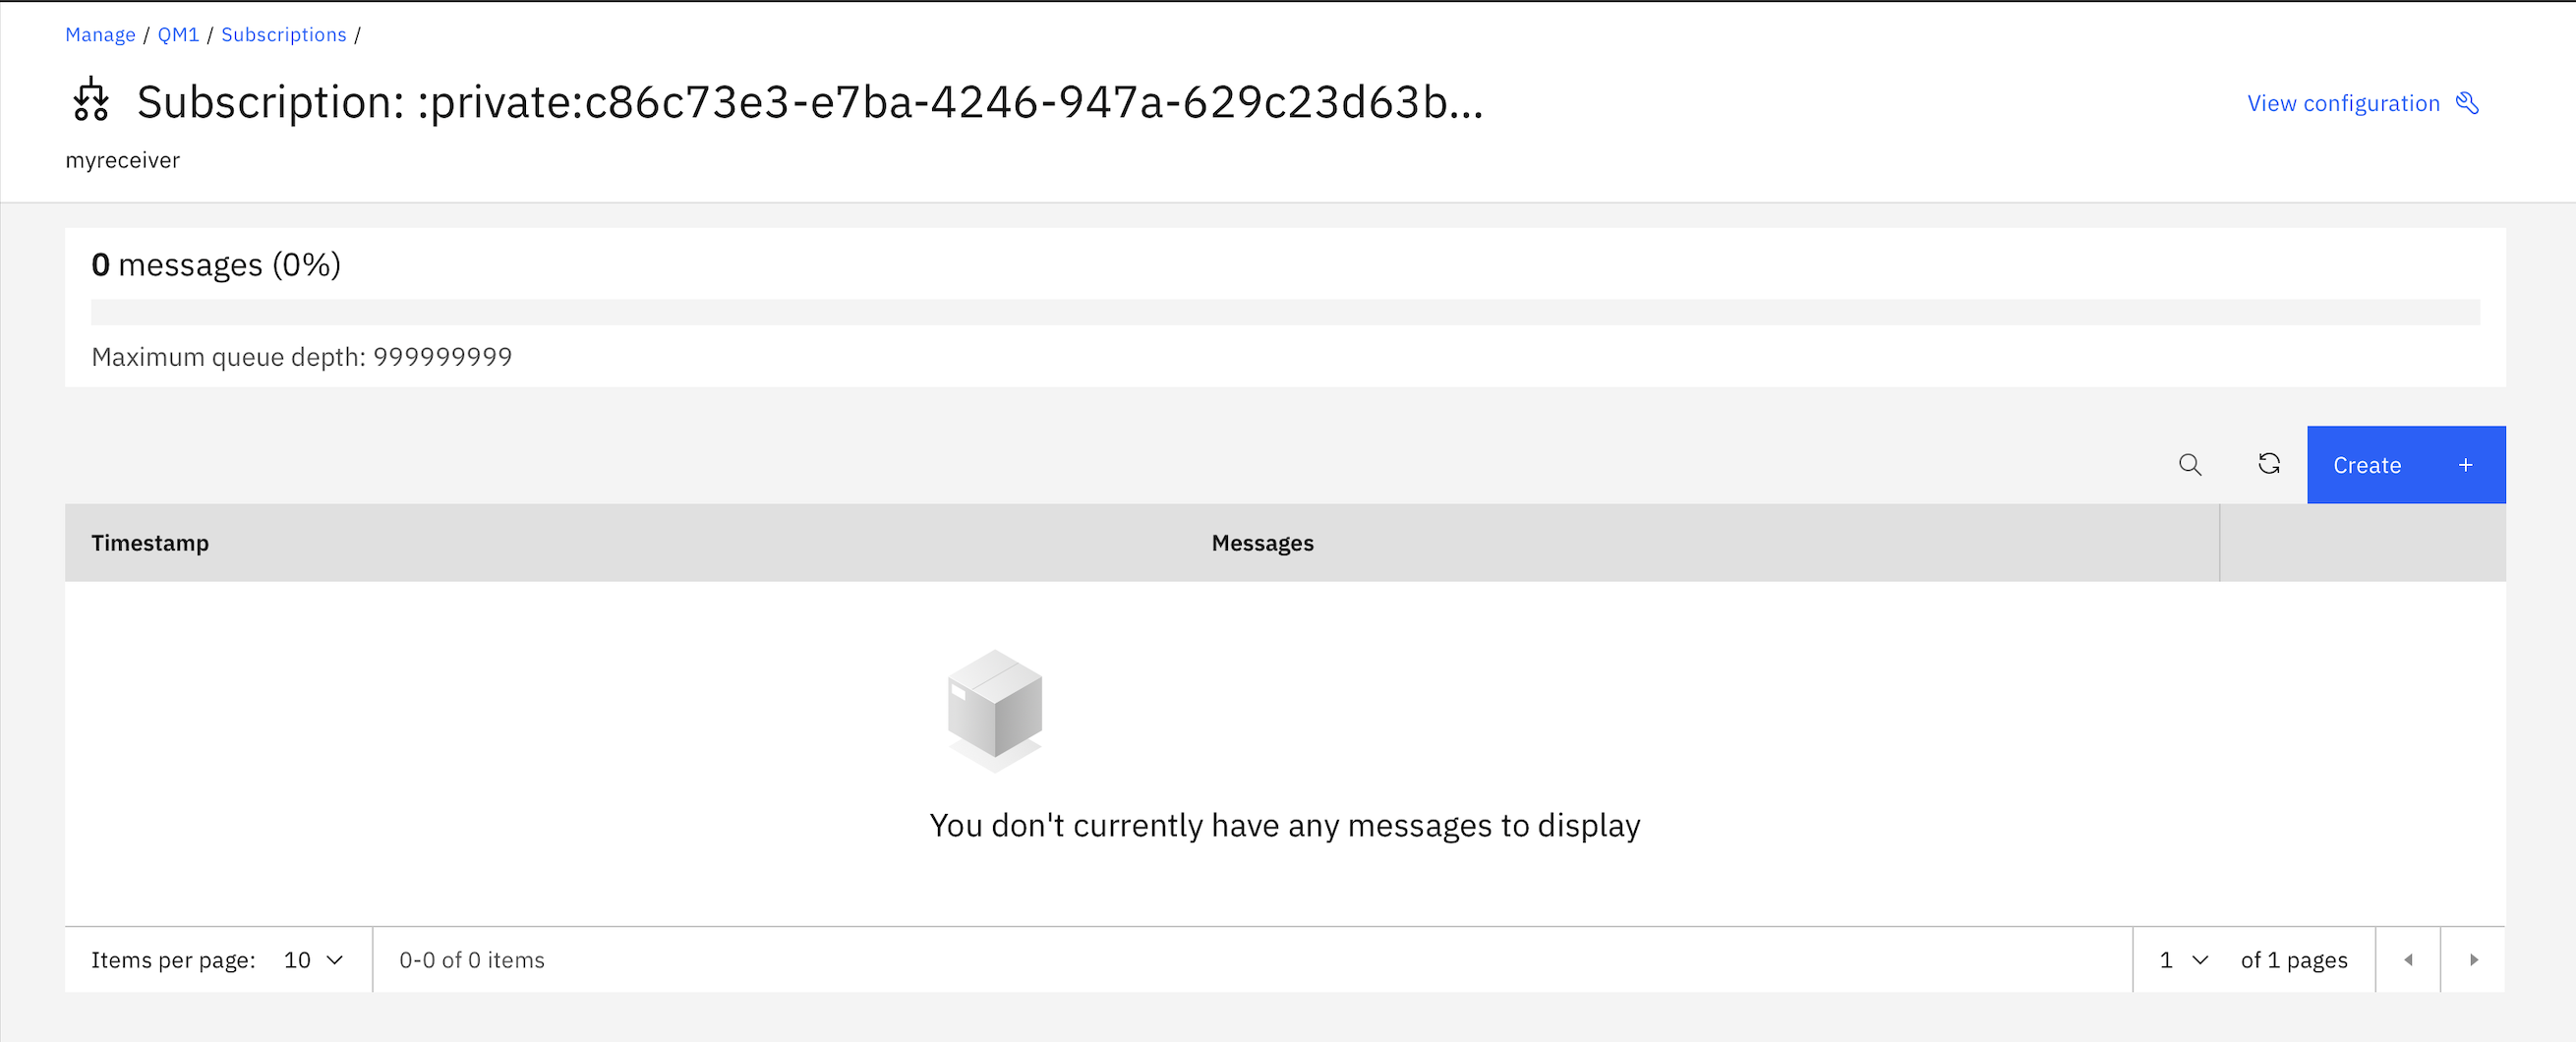
Publish a test message to the receiver.

After putting the message on "myreceiver", look in the terminal where you ran the Receiver app. You should now see the message you created.

Congratulations! You have now successfully created a basic receiver application that displays the message coming from an MQ queue manager using AMQP protocol.
Summary and next steps
In this tutorial, we created a reactive application to receive messages from our MQ queue manager using Vert.x. We created an AMQP client to create a connection to our MQ queue manager. Inside this application, we also created a receiver object using this connection to listen for any messages to display.
You can now explore more about what Vert.x offers to create a reactive application that communicates with an MQ queue manager.