Tutorial
Build scalable bulk data processing with parallel agentic workflows in watsonx Orchestrate
A step-by-step guide to learn how to process thousands of Excel records in seconds using parallel execution, AI agents, and human-in-the-loop validationProcessing large volumes of data from Excel files is a common requirement in enterprise applications. Whether it is onboarding customer records, processing financial transactions, or importing operational datasets, organizations often rely on Excel as a primary data exchange format. However, traditional sequential processing of large Excel files can quickly become inefficient and slow when handling hundreds or thousands of records.
In this tutorial, you will build a scalable bulk upload solution using agentic workflows in watsonx Orchestrate
Using the IBM watsonx Orchestrate ADK, you will design an agentic workflow that:
- Uploads and parses an Excel file
- Extracts individual records
- Distributes records across parallel processing tasks
- Executes business logic concurrently for faster execution
- Aggregates results and returns structured outputs
This approach demonstrates that agentic workflows can enable both AI-driven automation and high-performance data processing.
Architecture
By using watsonx Orchestrate agentic workflows, you can efficiently process large Excel datasets by combining file ingestion, record extraction, and parallel execution.
At a high level, the architecture consists of five major stages: file ingestion, data parsing, task distribution, parallel record processing, and result aggregation.
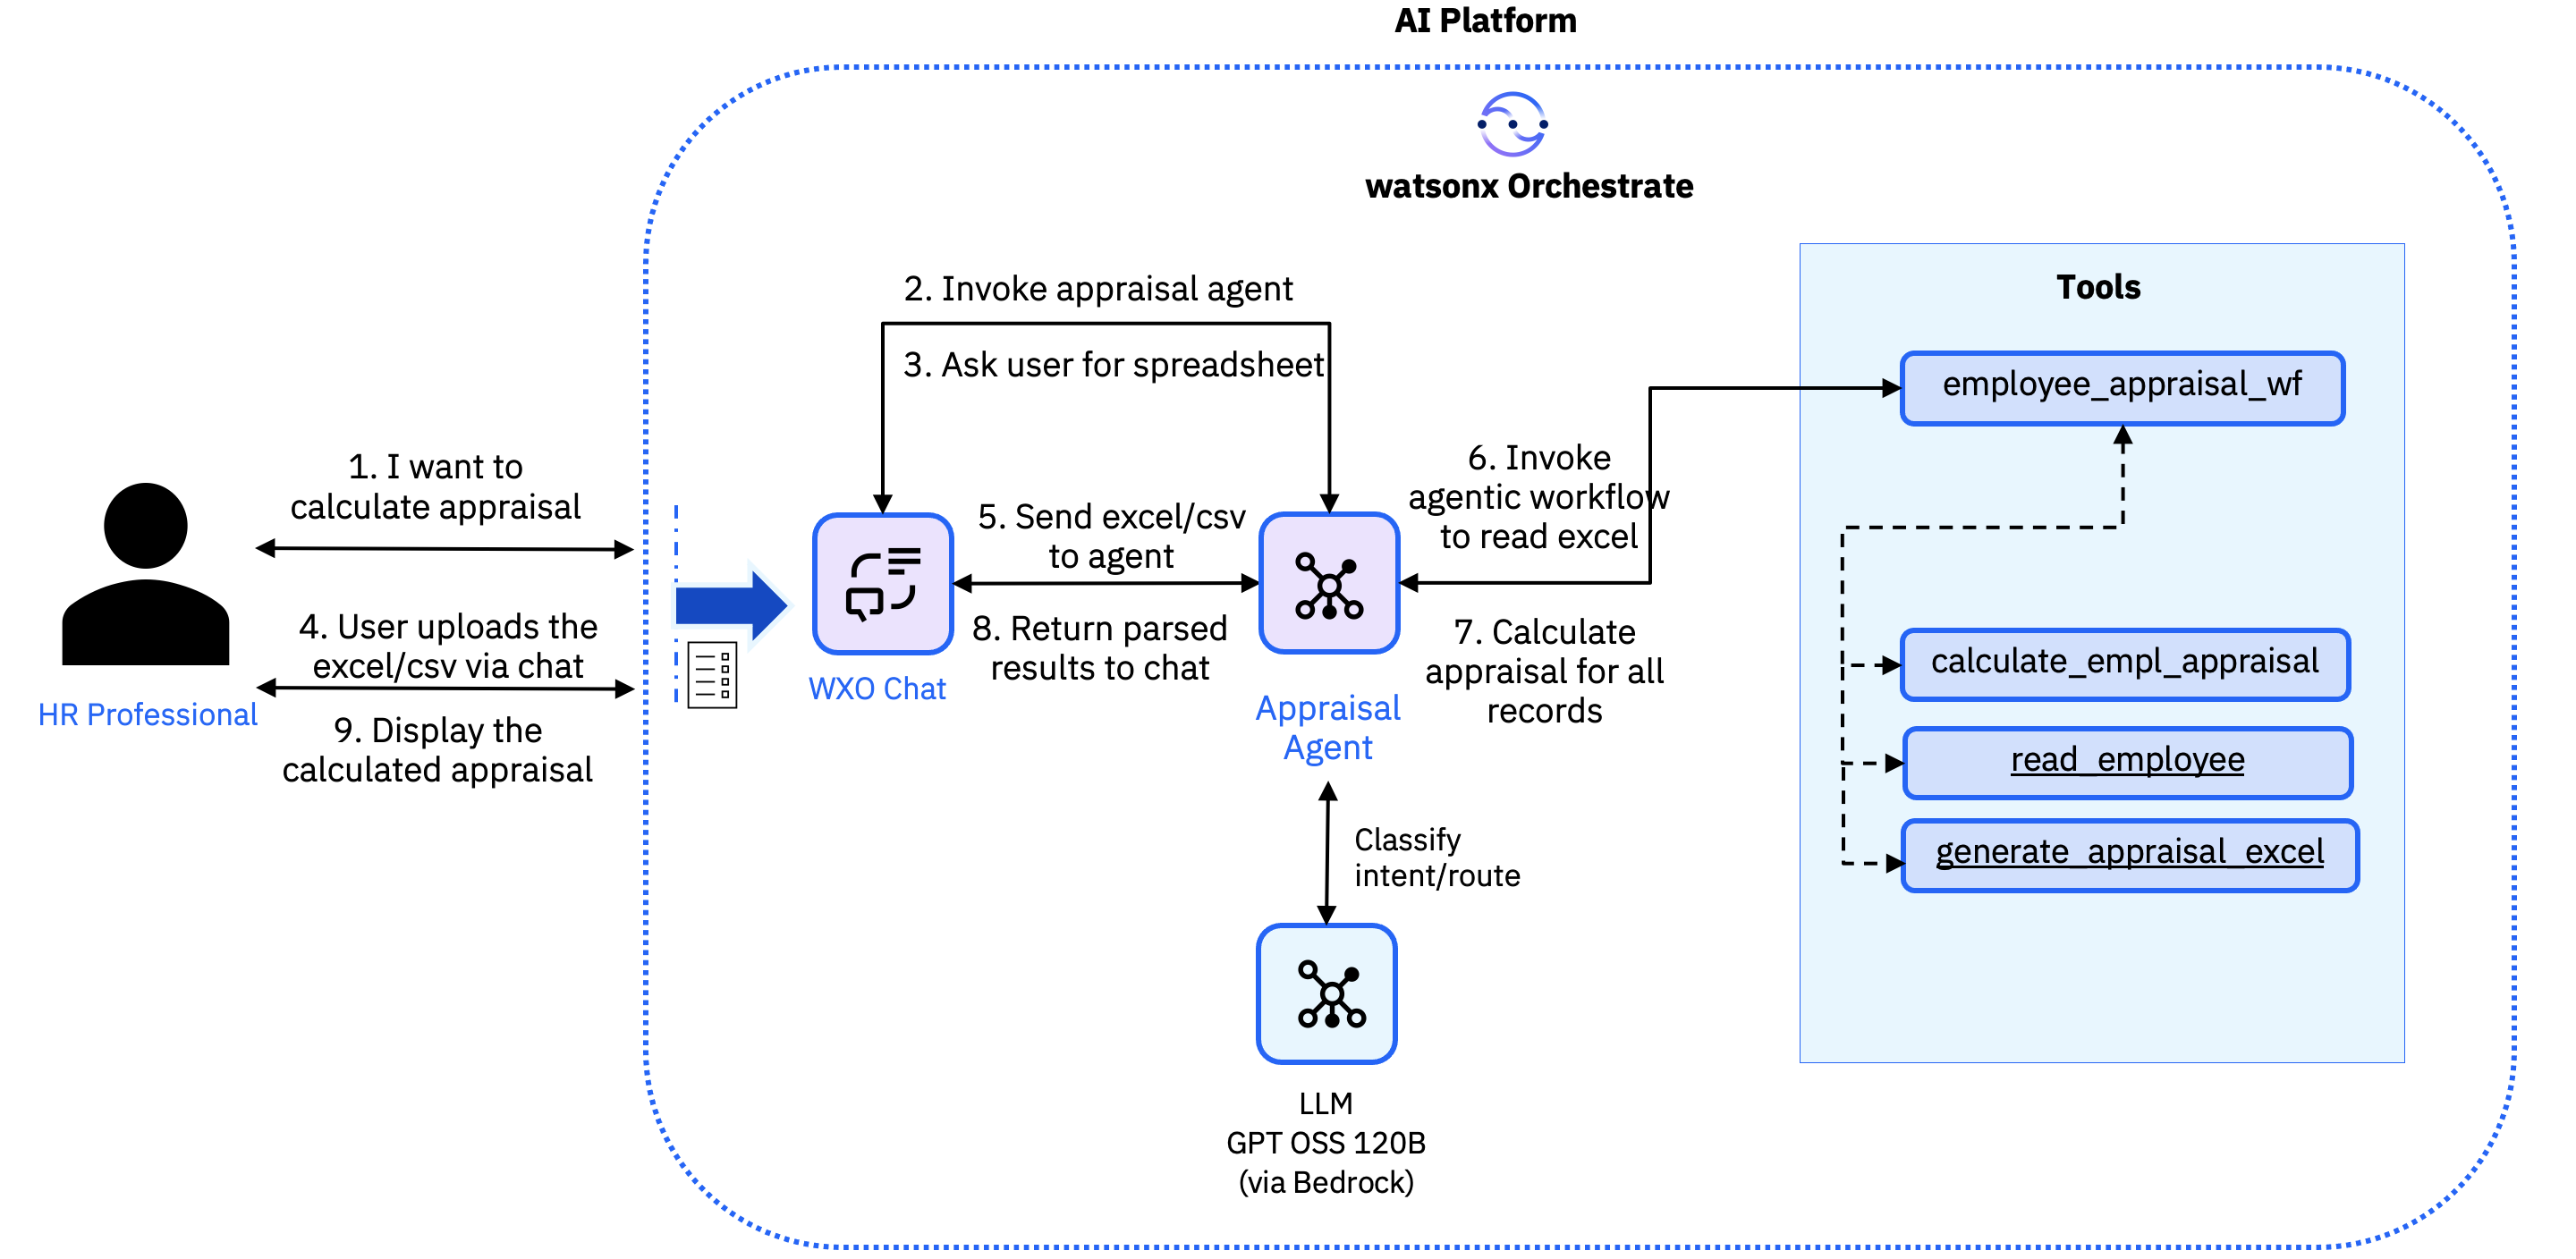
- The user requests an employee appraisal calculation through the agent interface.
- The agent interprets the request and triggers the
employee_appraisal_workflow. - The workflow prompts the user to upload an employee dataset (Excel/CSV).
- The user uploads the spreadsheet file.
- The workflow invokes the
read_employee_datatool to parse and extract structured data. - The parsed data is displayed in an editable table for user validation.
- The user reviews and confirms the data.
- The workflow executes the
calculate_employee_appraisaltool using parallel processing. - The system generates appraisal results as a report that is available for download in Microsoft Excel format.
- The workflow returns the results to the agent.
- The agent presents the results to the user.
Prerequisites
An active watsonx Orchestrate instance. Sign up for a free trial instance on IBM Cloud or AWS:
A running local environment of the watsonx Agent Development Kit (ADK). If you do not have an active ADK instance, review the getting started with ADK tutorial. This tutorial has been tested and validated with ADK version 2.5.0.
Steps
- Configure the watsonx Orchestrate environment.
- Import the tools in to watsonx Orchestrate.
- Import the Employee Appraisal agentic workflow
- Import the Appraisal Agent.
- Validate and test the Appraisal agent.
- Troubleshoot the agentic workflow with the watsonx Orchestrate flow inspector.
Step 1. Configure the watsonx Orchestrate environment
In this step, you configure the watsonx Orchestrate environment by downloading the sample code form our Git repository and then downloading all the dependencies for the project.
Clone the repository and navigate to the project directory.
 git clone https://github.com/IBM/oic-i-agentic-ai-tutorials.git && \
 cd i-oic-parallel-processing-agentic-flows
This repository contains the tools, workflows, and agent configurations required for the tutorial.
Create a Python virtual environment to isolate dependencies, and then activate it (commands vary based on the operating system on which you are running it).
First, create the virtual environment:
python3.11 -m venv .venvTo activate macOS/Linux environments:
source .venv/bin/activateTo activate Windows environments:
.venv\Scripts\activateInstall the required Python packages.
pip install -r requirements.txtLog in to watsonx Orchestrate. In the upper-right corner, click Settings, then click API details. Copy the
WO_INSTANCE_URL.Click Generate API key to create the
WO_API_KEY.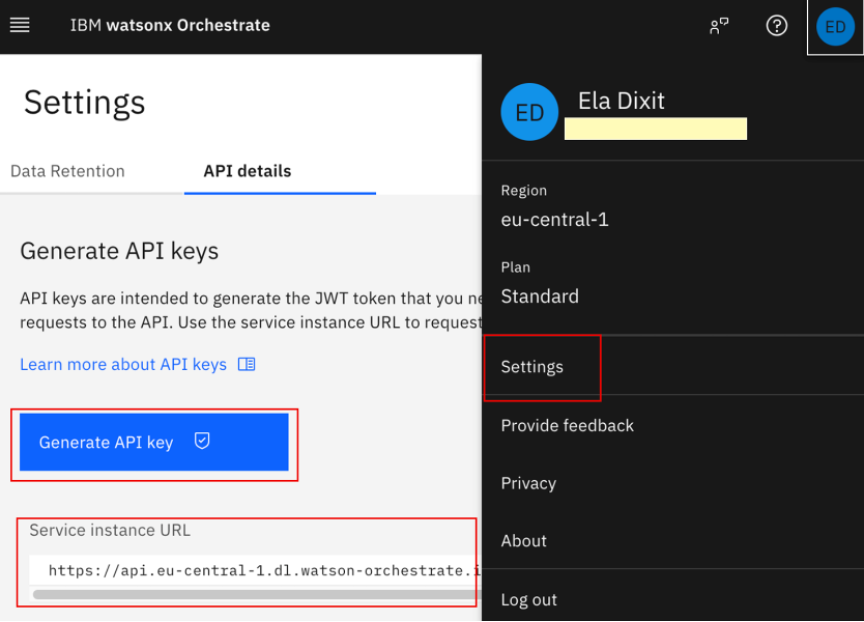
Open a Terminal in the VS Code editor, replace the values in the following command and execute it. This activates your watsonx Orchestrate SaaS environment.
<env-name>- Name of the environment you want to create.<WO_INSTANCE_URL>- Your watsonx Orchestrate instance URL.<WO_API_KEY>- Your watsonx Orchestrate API key.orchestrate env add -n <env-name> -u <WO_INSTANCE_URL> orchestrate env activate <env-name> -a <WO_API_KEY>
Step 2. Import the tools in watsonx Orchestrate
In this step, you import the three tools (namely read_employee_data, calculate_employee_appraisal, and generate_appraisal) that will automate the employee appraisal process. They will be used later in the agentic workflow.
Ensure you are in
oic-i-agentic-ai-tutorials/i-oic-parallel-processing-agentic-flowsdirectory. Then, execute the following command to import the tools.orchestrate tools import -f tools/appraisal_tools.py -k python -r requirements.txtLog in to the watsonx Orchestrate UI to view the imported tools.
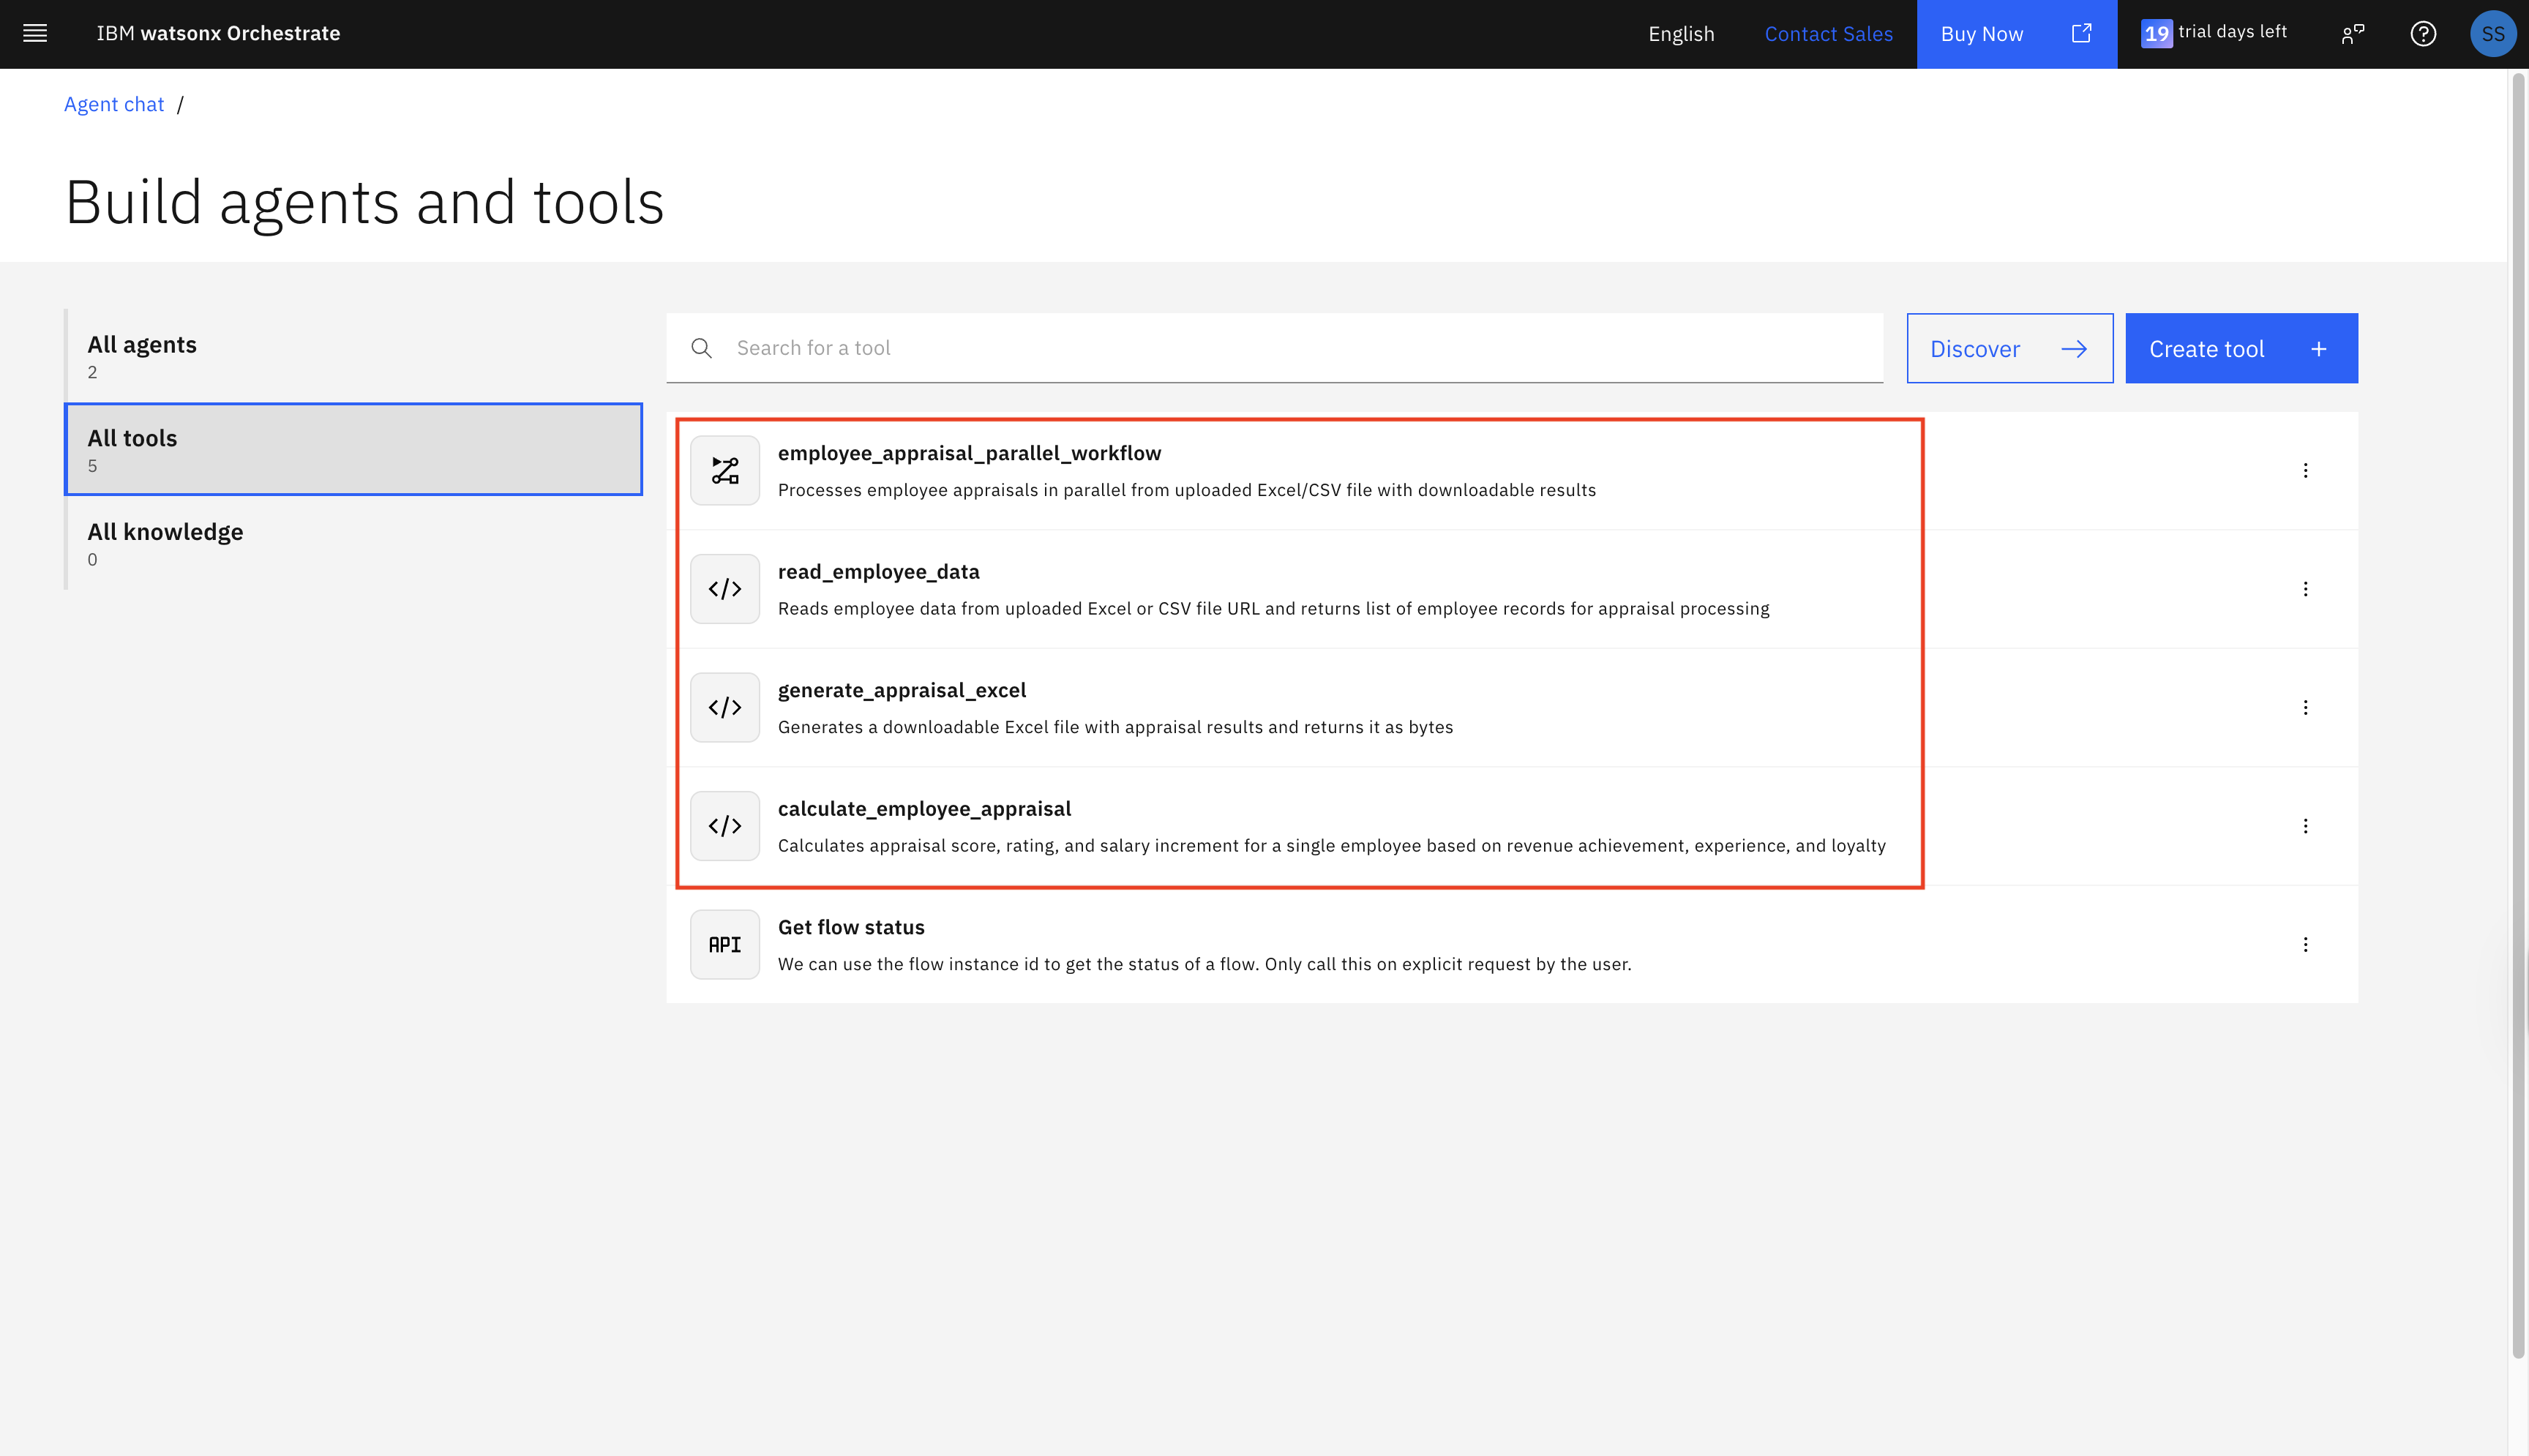
Here is what each of these tool does (you can see the tool definitions in the appraisal_tools.py file):
read_employee_data. This tool reads employee data from the CSV file uploaded by the user in the chat. The tool automatically determines the file format as CSV and then parses the data and finally converts each row into an EmployeeData object. Finally, this tool returns a list of
EmployeeDataobjects that are ready for processing.calculate_employee_appraisal. This tool calculates a comprehensive appraisal for a single employee. It calculates the appraisal based on a revenue score (0-100), an experience bonus (0-15%), and a loyalty bonus (0-15%); it assigns performance ratings (Outstanding, Exceeds Expectations, Meets Expectations, Needs Improvement, Unsatisfactory); it determines salary increment percentages (0-15%) and calculates a new salary and salary increase; it returns an
AppraisalResultobject that contains all calculated appraisal metrics.generate_appraisal_excel. This tool generates a Microsoft Excel file with all appraisal results, which the user can download and reference it later.
Step 3. Import the Employee Appraisal agentic workflow
In this step, you import the employee_appraisal_workflow, which is required to run the employee appraisal process. Workflows are deterministic flows that execute a predefined sequence of steps with consistent and predictable outcomes, which ensures that each stage of the workflow is carried out in a structured, reliable, and repeatable manner.
This workflow implements an agentic appraisal system that allows users to upload employee data, review it, process appraisals in parallel, and download the results as a Microsoft Excel file.
Run the following command to import the workflow. You can choose to modify the code from this Git location
orchestrate tools import -f workflows/employee\_appraisal\_workflow.py -k flow -r requirements.txt
This agentic workflow has six main steps that enable parallel processing in an end-to-end flow.
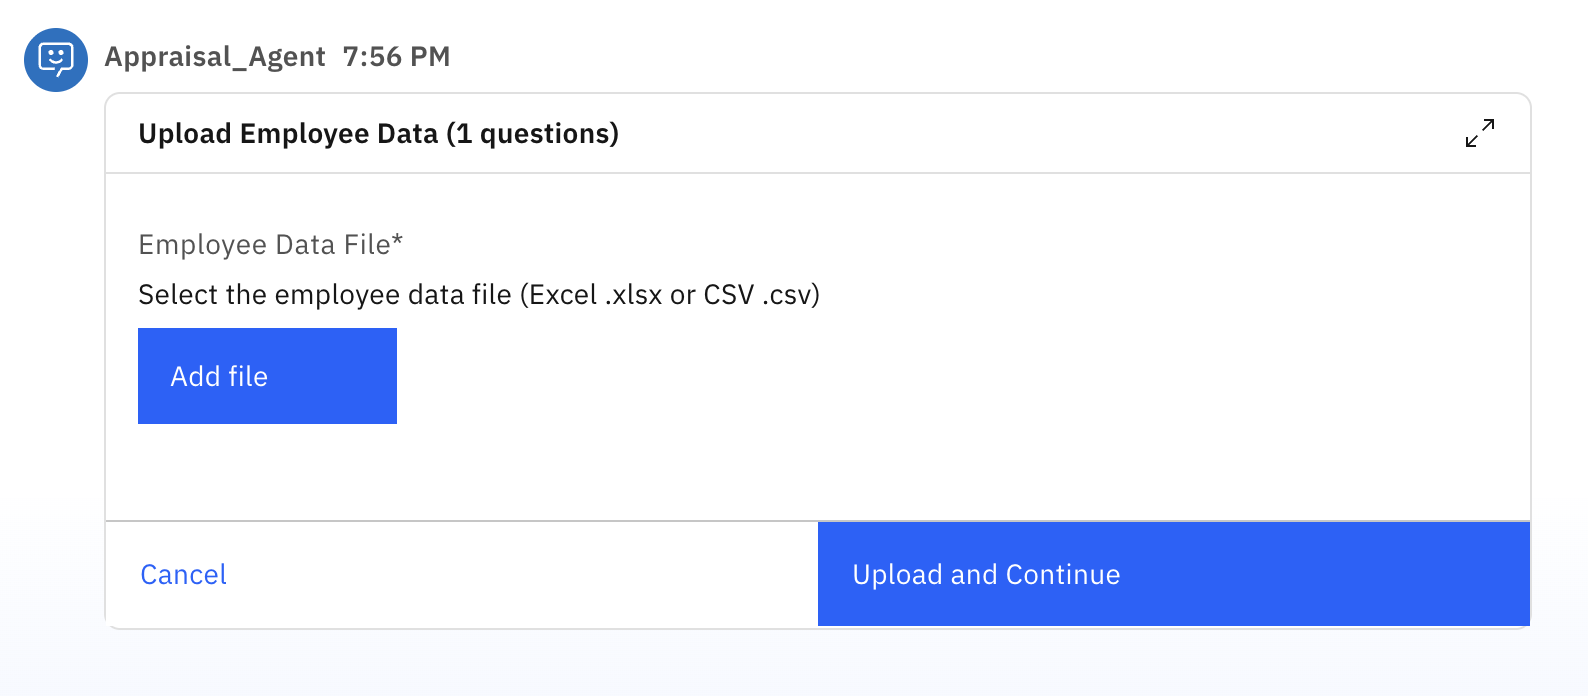
File Upload Form. The workflow starts by showing the user a form with a file upload button. The user selects their employee data file (either Excel or CSV format) and clicks Upload and Continue. The file can be up to 50MB in size. After the file is uploaded, it is stored securely and the workflow moves to the next step.
Read Employee Data. The workflow automatically downloads the uploaded file and reads all the employee information from it and is organized into a structured list that's ready for processing.
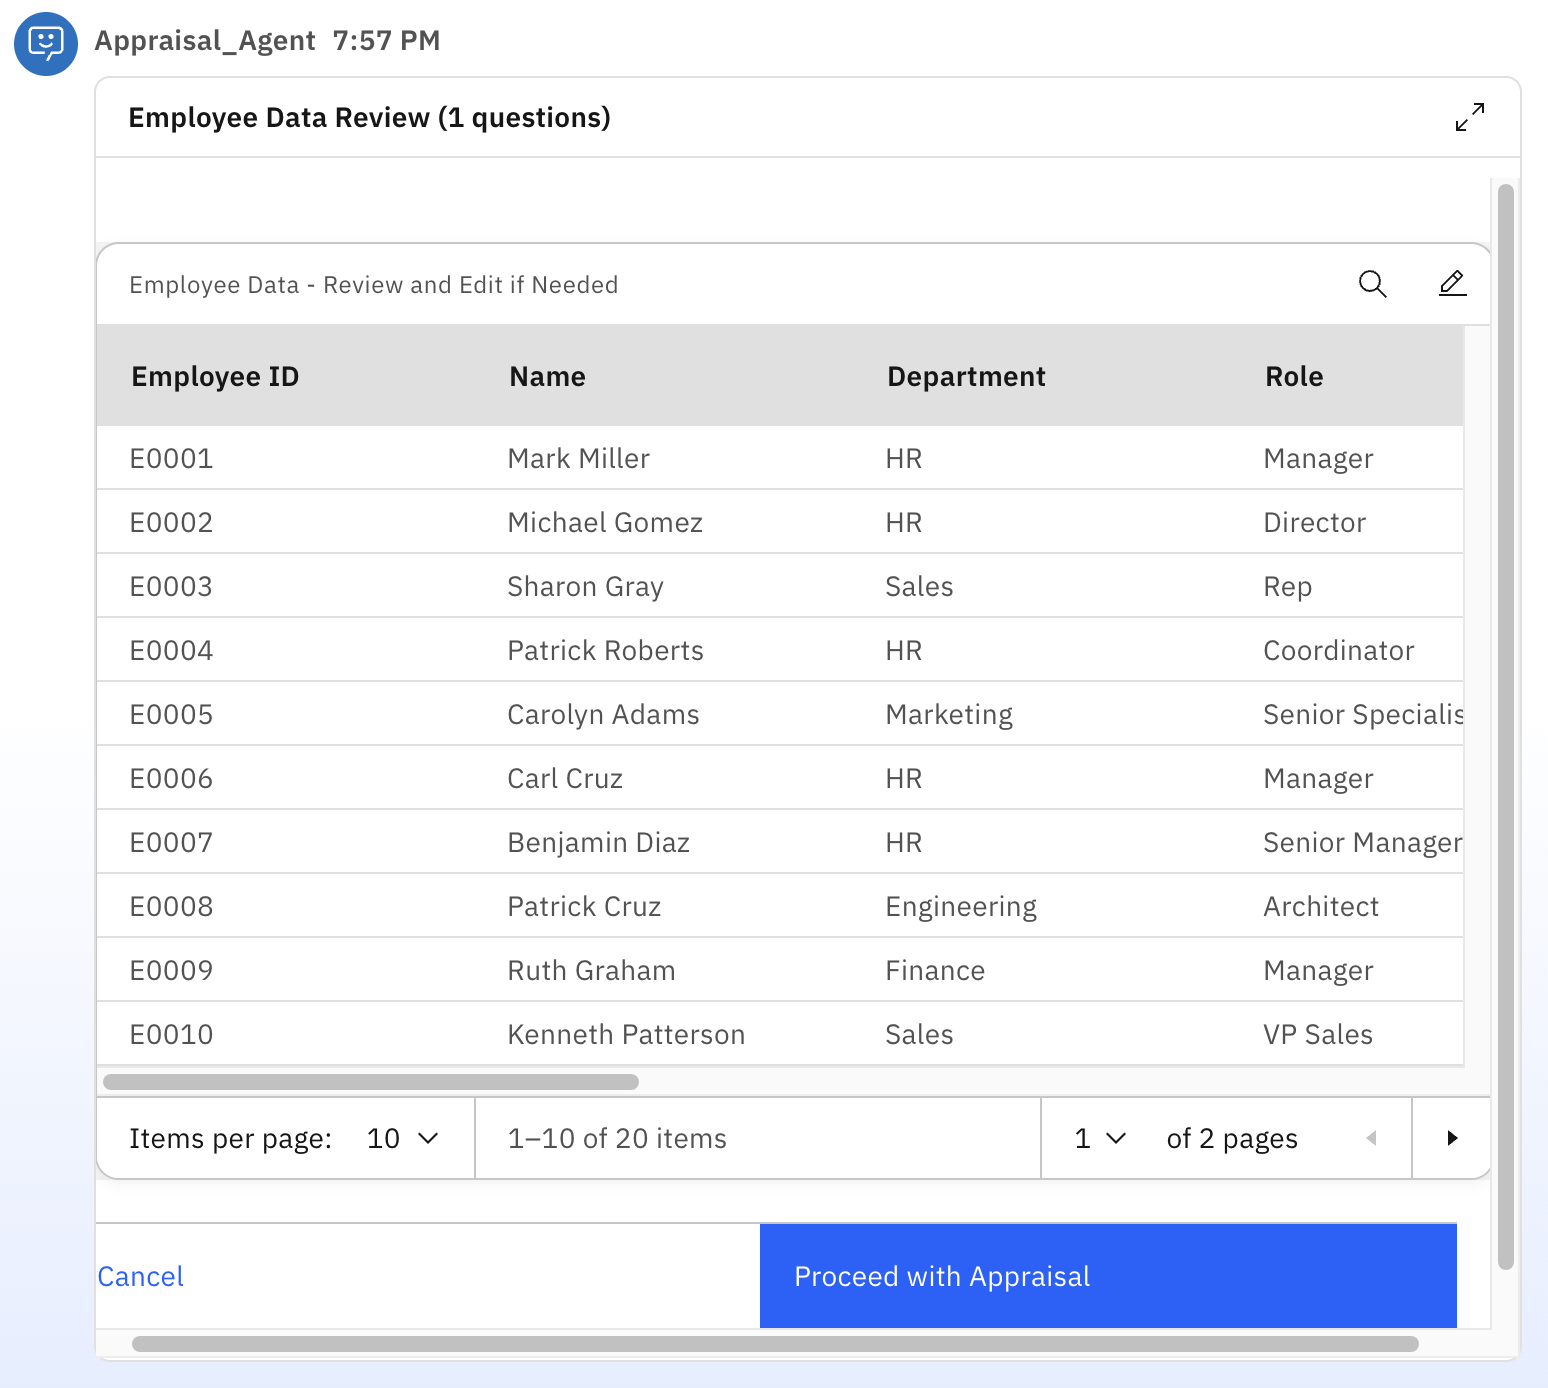
Data Review and Edit. The workflow displays all the employee data in an interactive table. The user can review every employee's information and make corrections if needed and click Proceed with Appraisal to continue.
In the code snippet below, a
Userflow()(which is used to handle interactive user input and data review within a workflow) is implemented with alist_input_fieldto present employee data in an interactive, editable table, along with pagination support for better usability.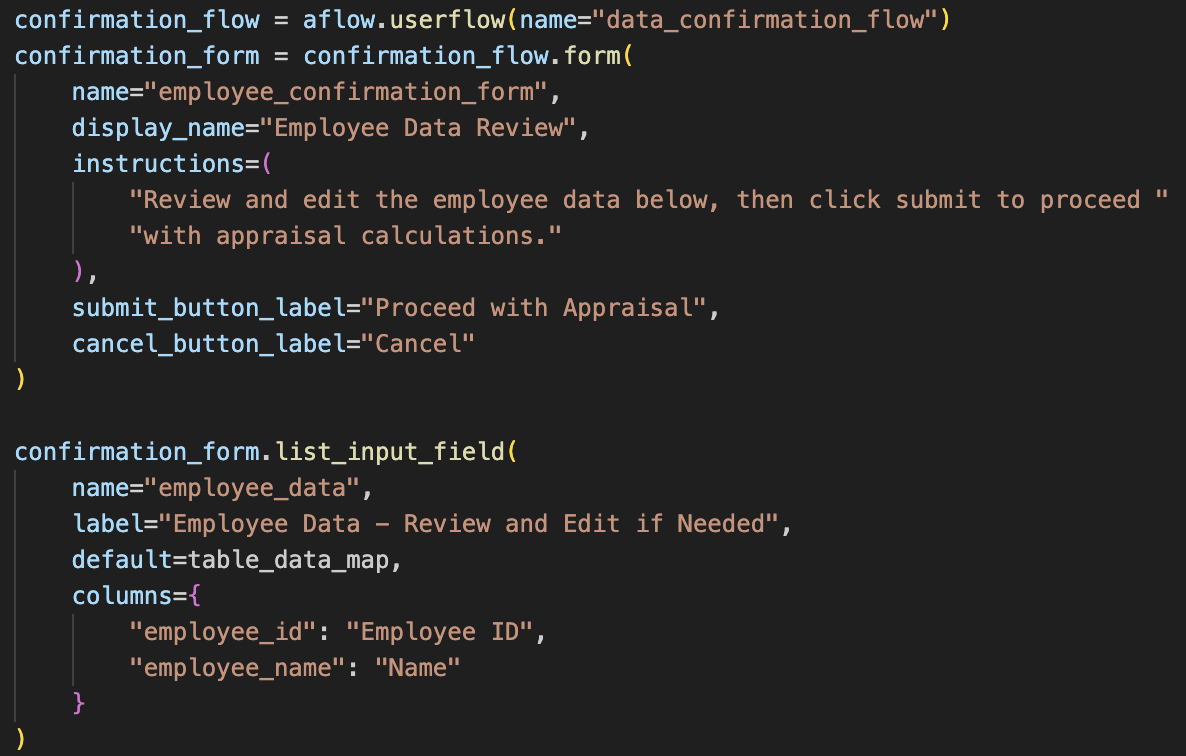
This is how the editable table is displayed in the agent chat interface.
Parallel Processing. This is where the magic happens. The workflow processes each employee on the list and calculates their appraisal score simultaneously, so all employees are processed at the same time rather than one after another. Because this happens in parallel, processing a large data takes only a few seconds rather than several minutes.
The code below defines a for each flow with a parallel execution policy, mapping employee data as input and invoking the
calculate_employee_appraisaltool for each record simultaneously.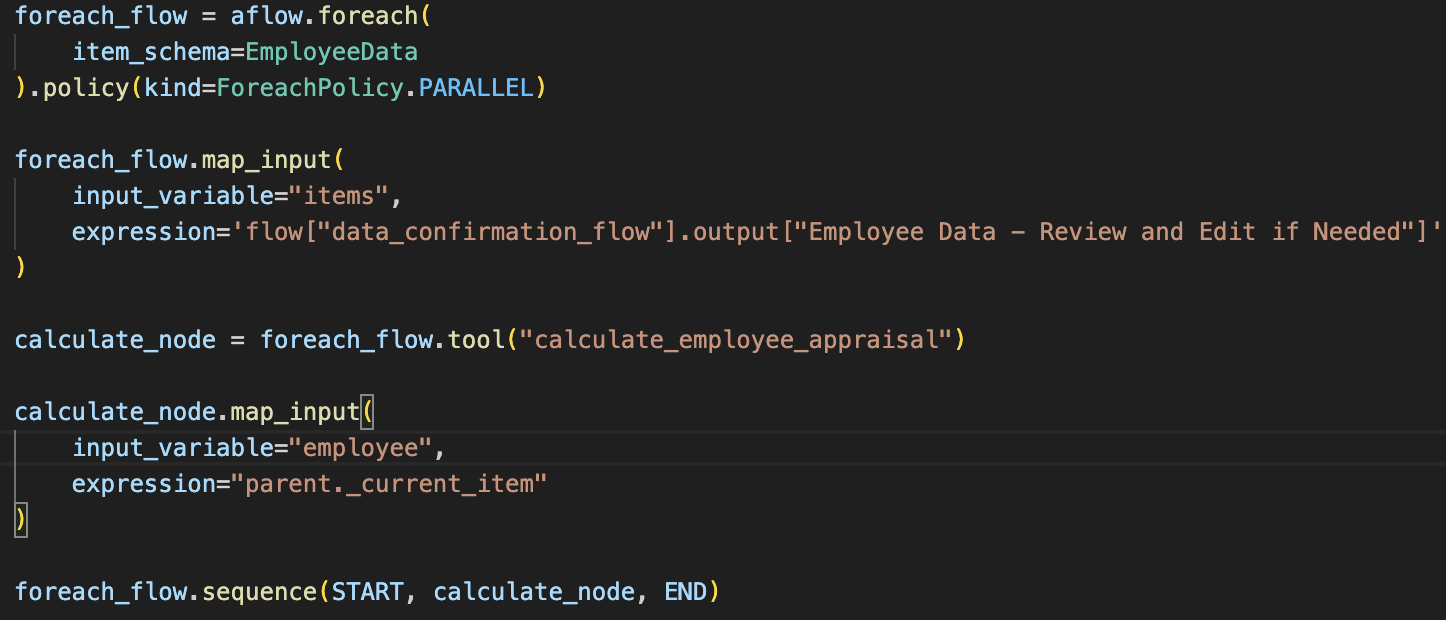
Generate an Excel Report. After all appraisals are calculated, the workflow automatically creates a professional Microsoft Excel spreadsheet containing all the results.
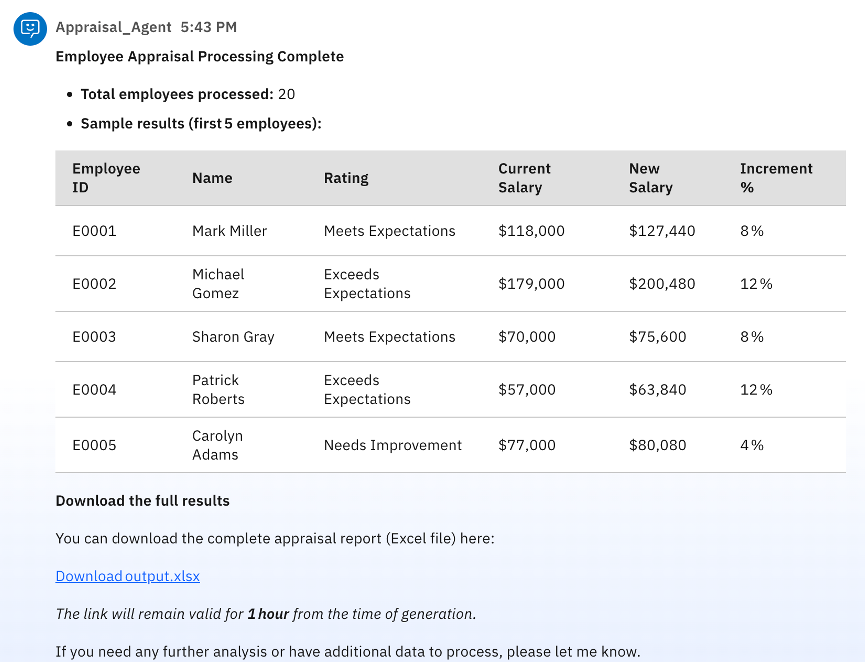
Build a Workflow Sequence. The workflow returns control to the agent, who presents the results to the user with the count of the processed data and a downloadable link of the Microsoft Excel report for future reference.
Step 4. Import the Appraisal agent
Finally, in this step you import the HR Appraisal agent. The agent shows the workflow through an AI-powered interface.
This tutorial demonstrates the default capability in watsonx Orchestrate, but the chat can be embedded in an external UI or the headless agent can be invoked by using an API in a custom UI
Run this command to import the agent in the current SaaS watsonx Orchestrate environment.
orchestrate agents import -f agents/appraisal_agent.yamlLog in to the watsonx Orchestrate UI, and click Manage Agents. Open the
Appraisal_Agentand click Deploy.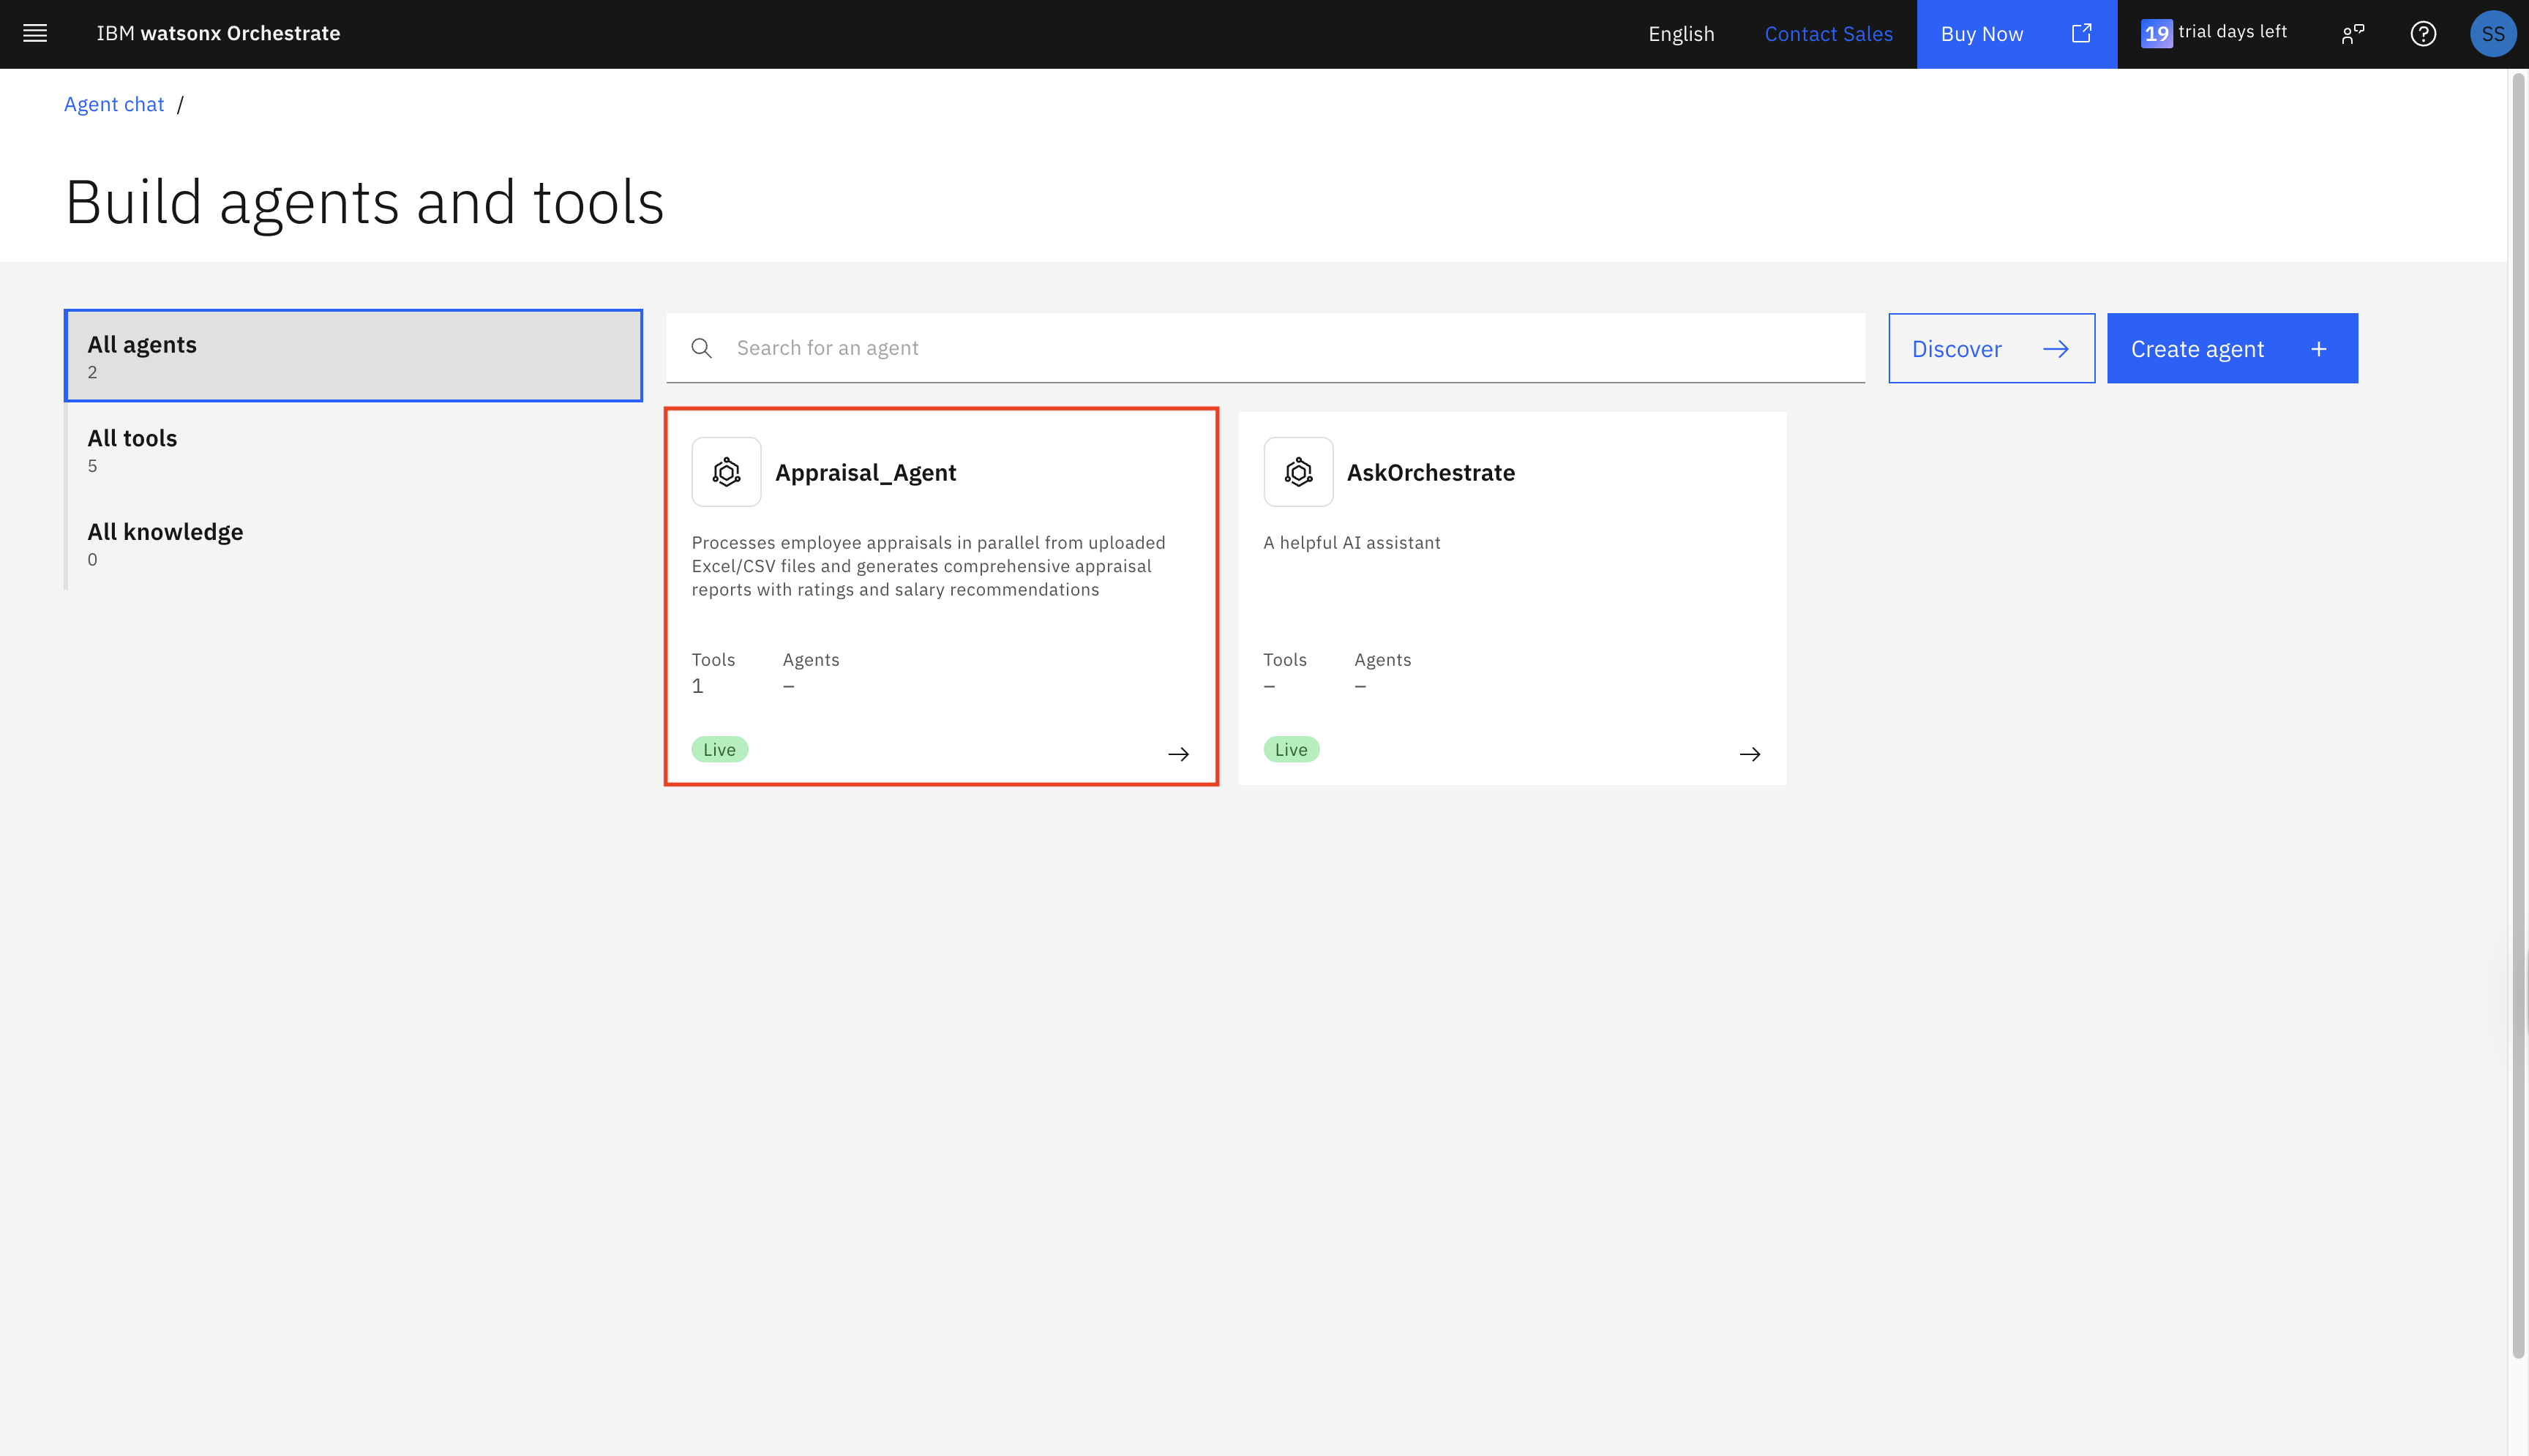
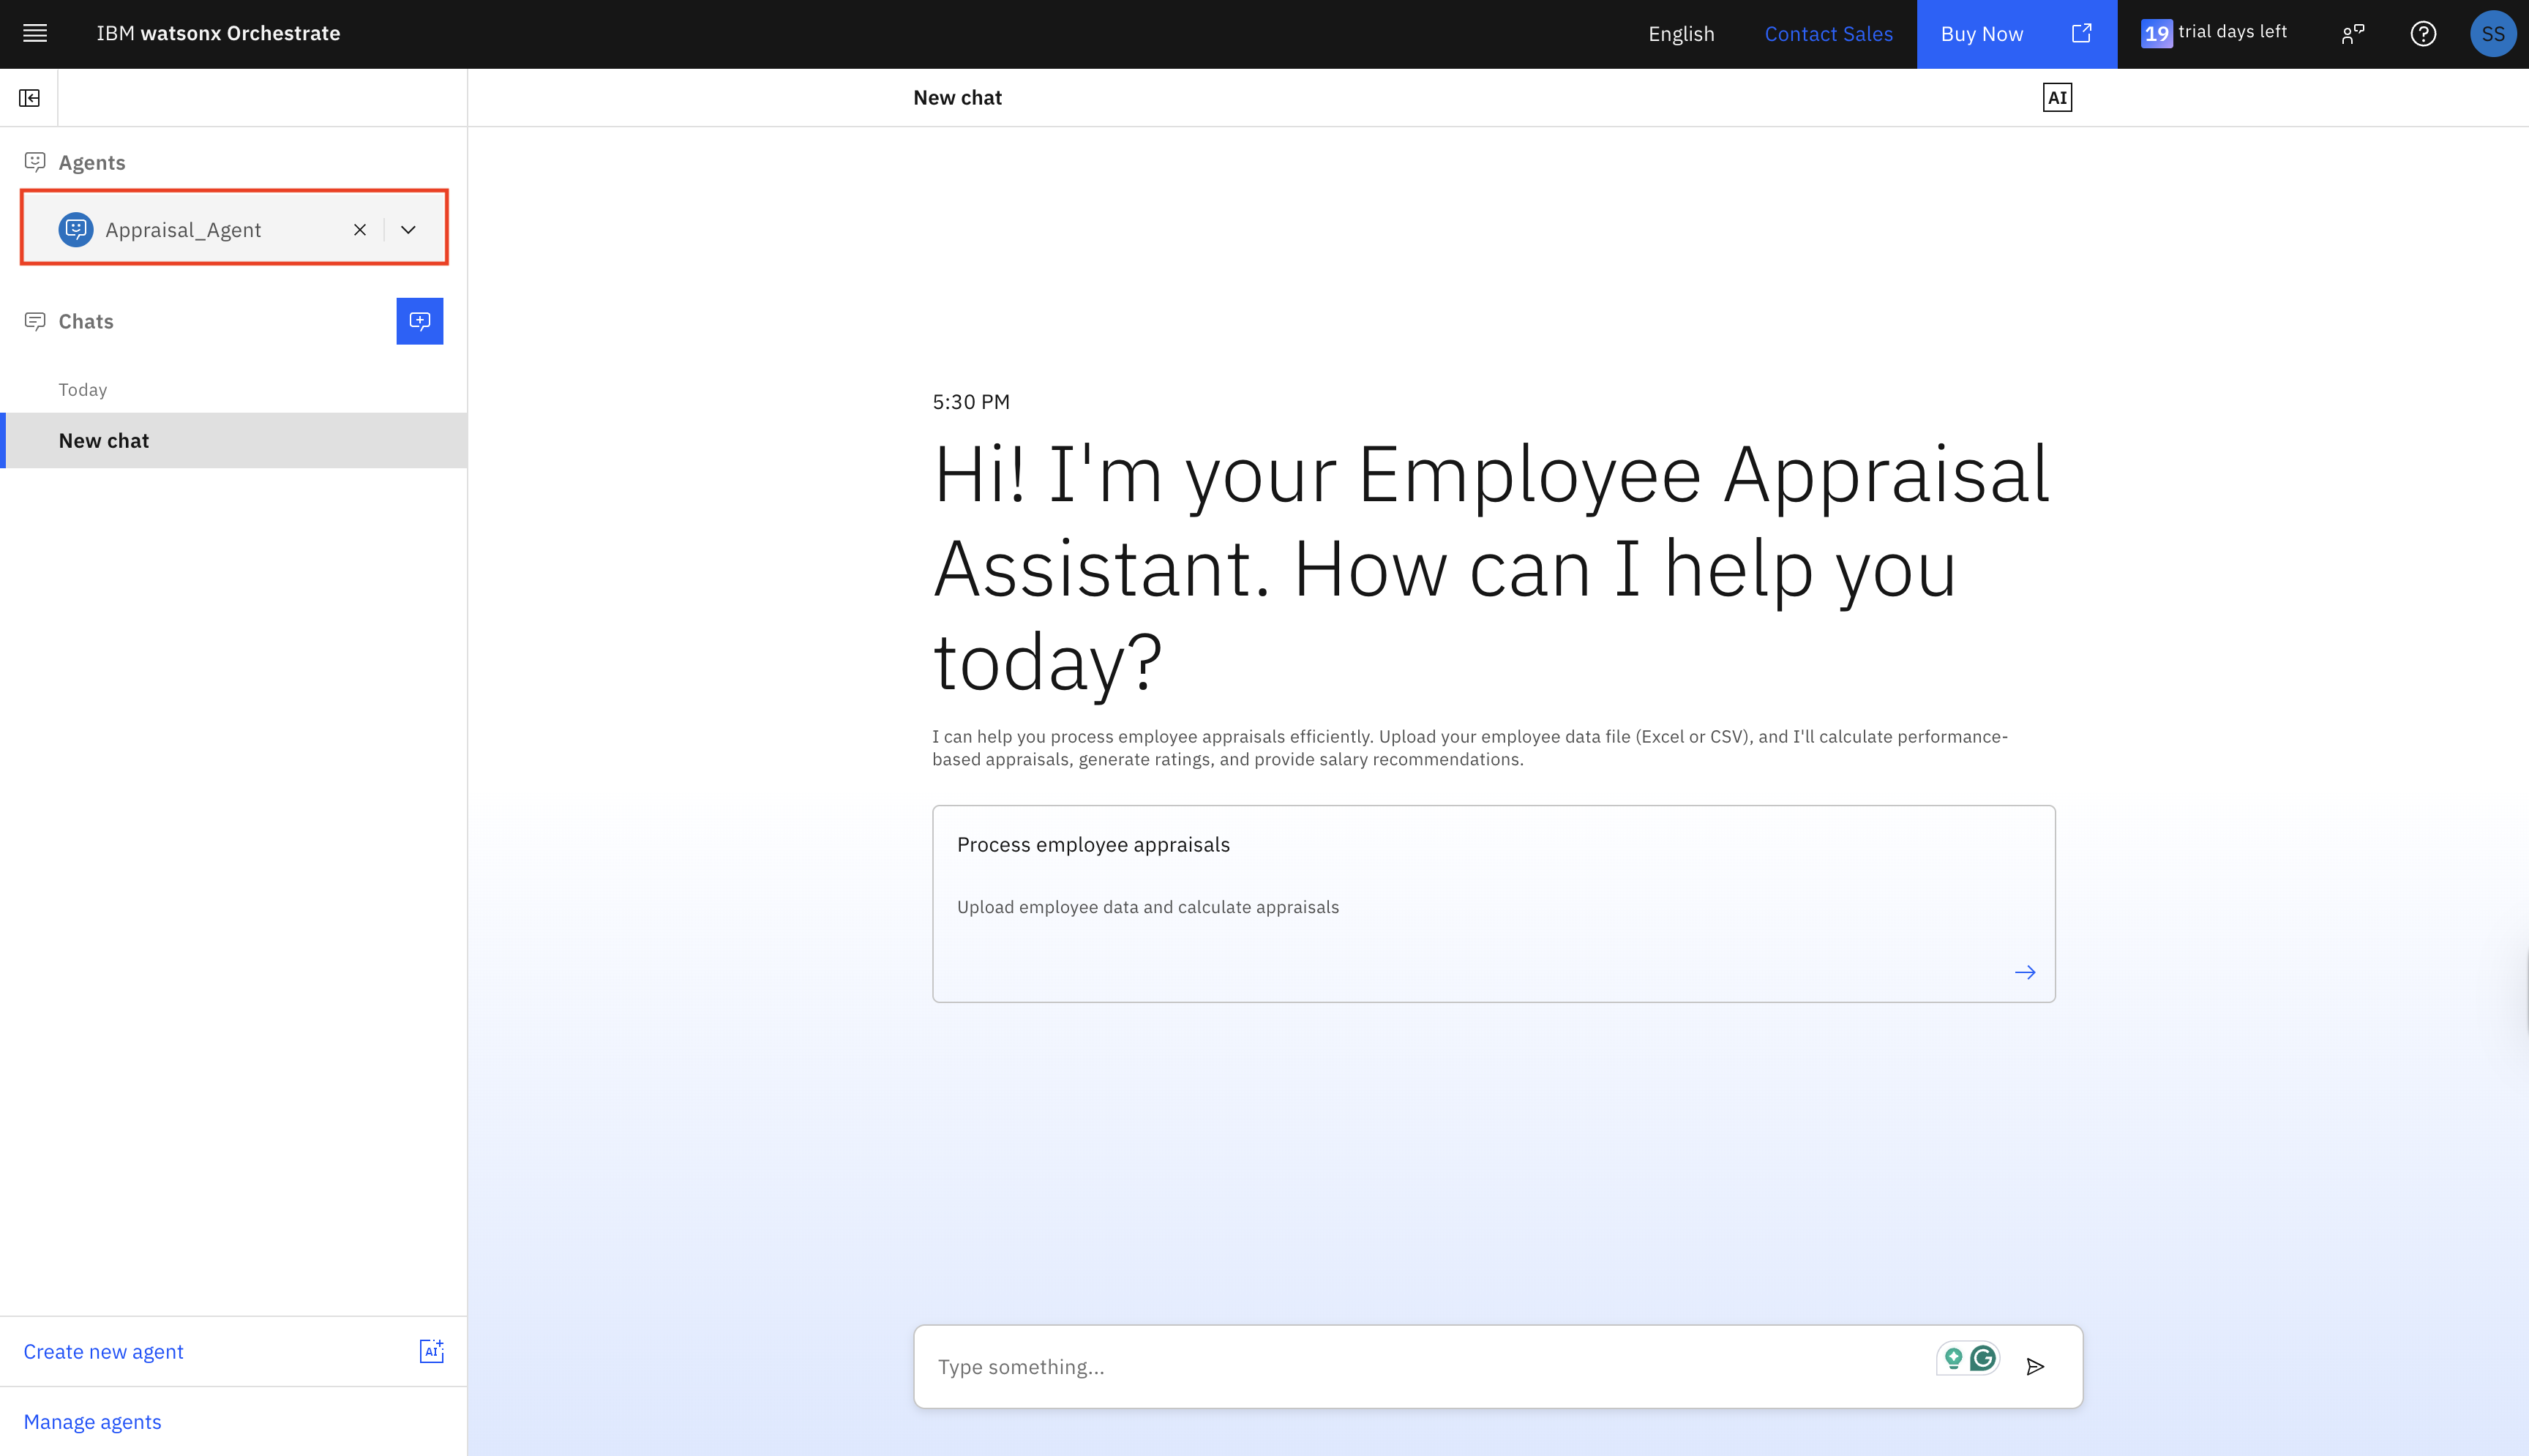
The agent is now visible in the Agents drop-down. The agent is now ready to calculate employee appraisals.
Step 5. Validate and test the Appraisal agent
In this step, you test the agent and the components that you imported in the previous steps.
Enter the prompt “I want to calculate appraisal” or click the starter prompt to test the agent.
After you submit the query, the workflow is triggered and prompts you to upload the employee data file.
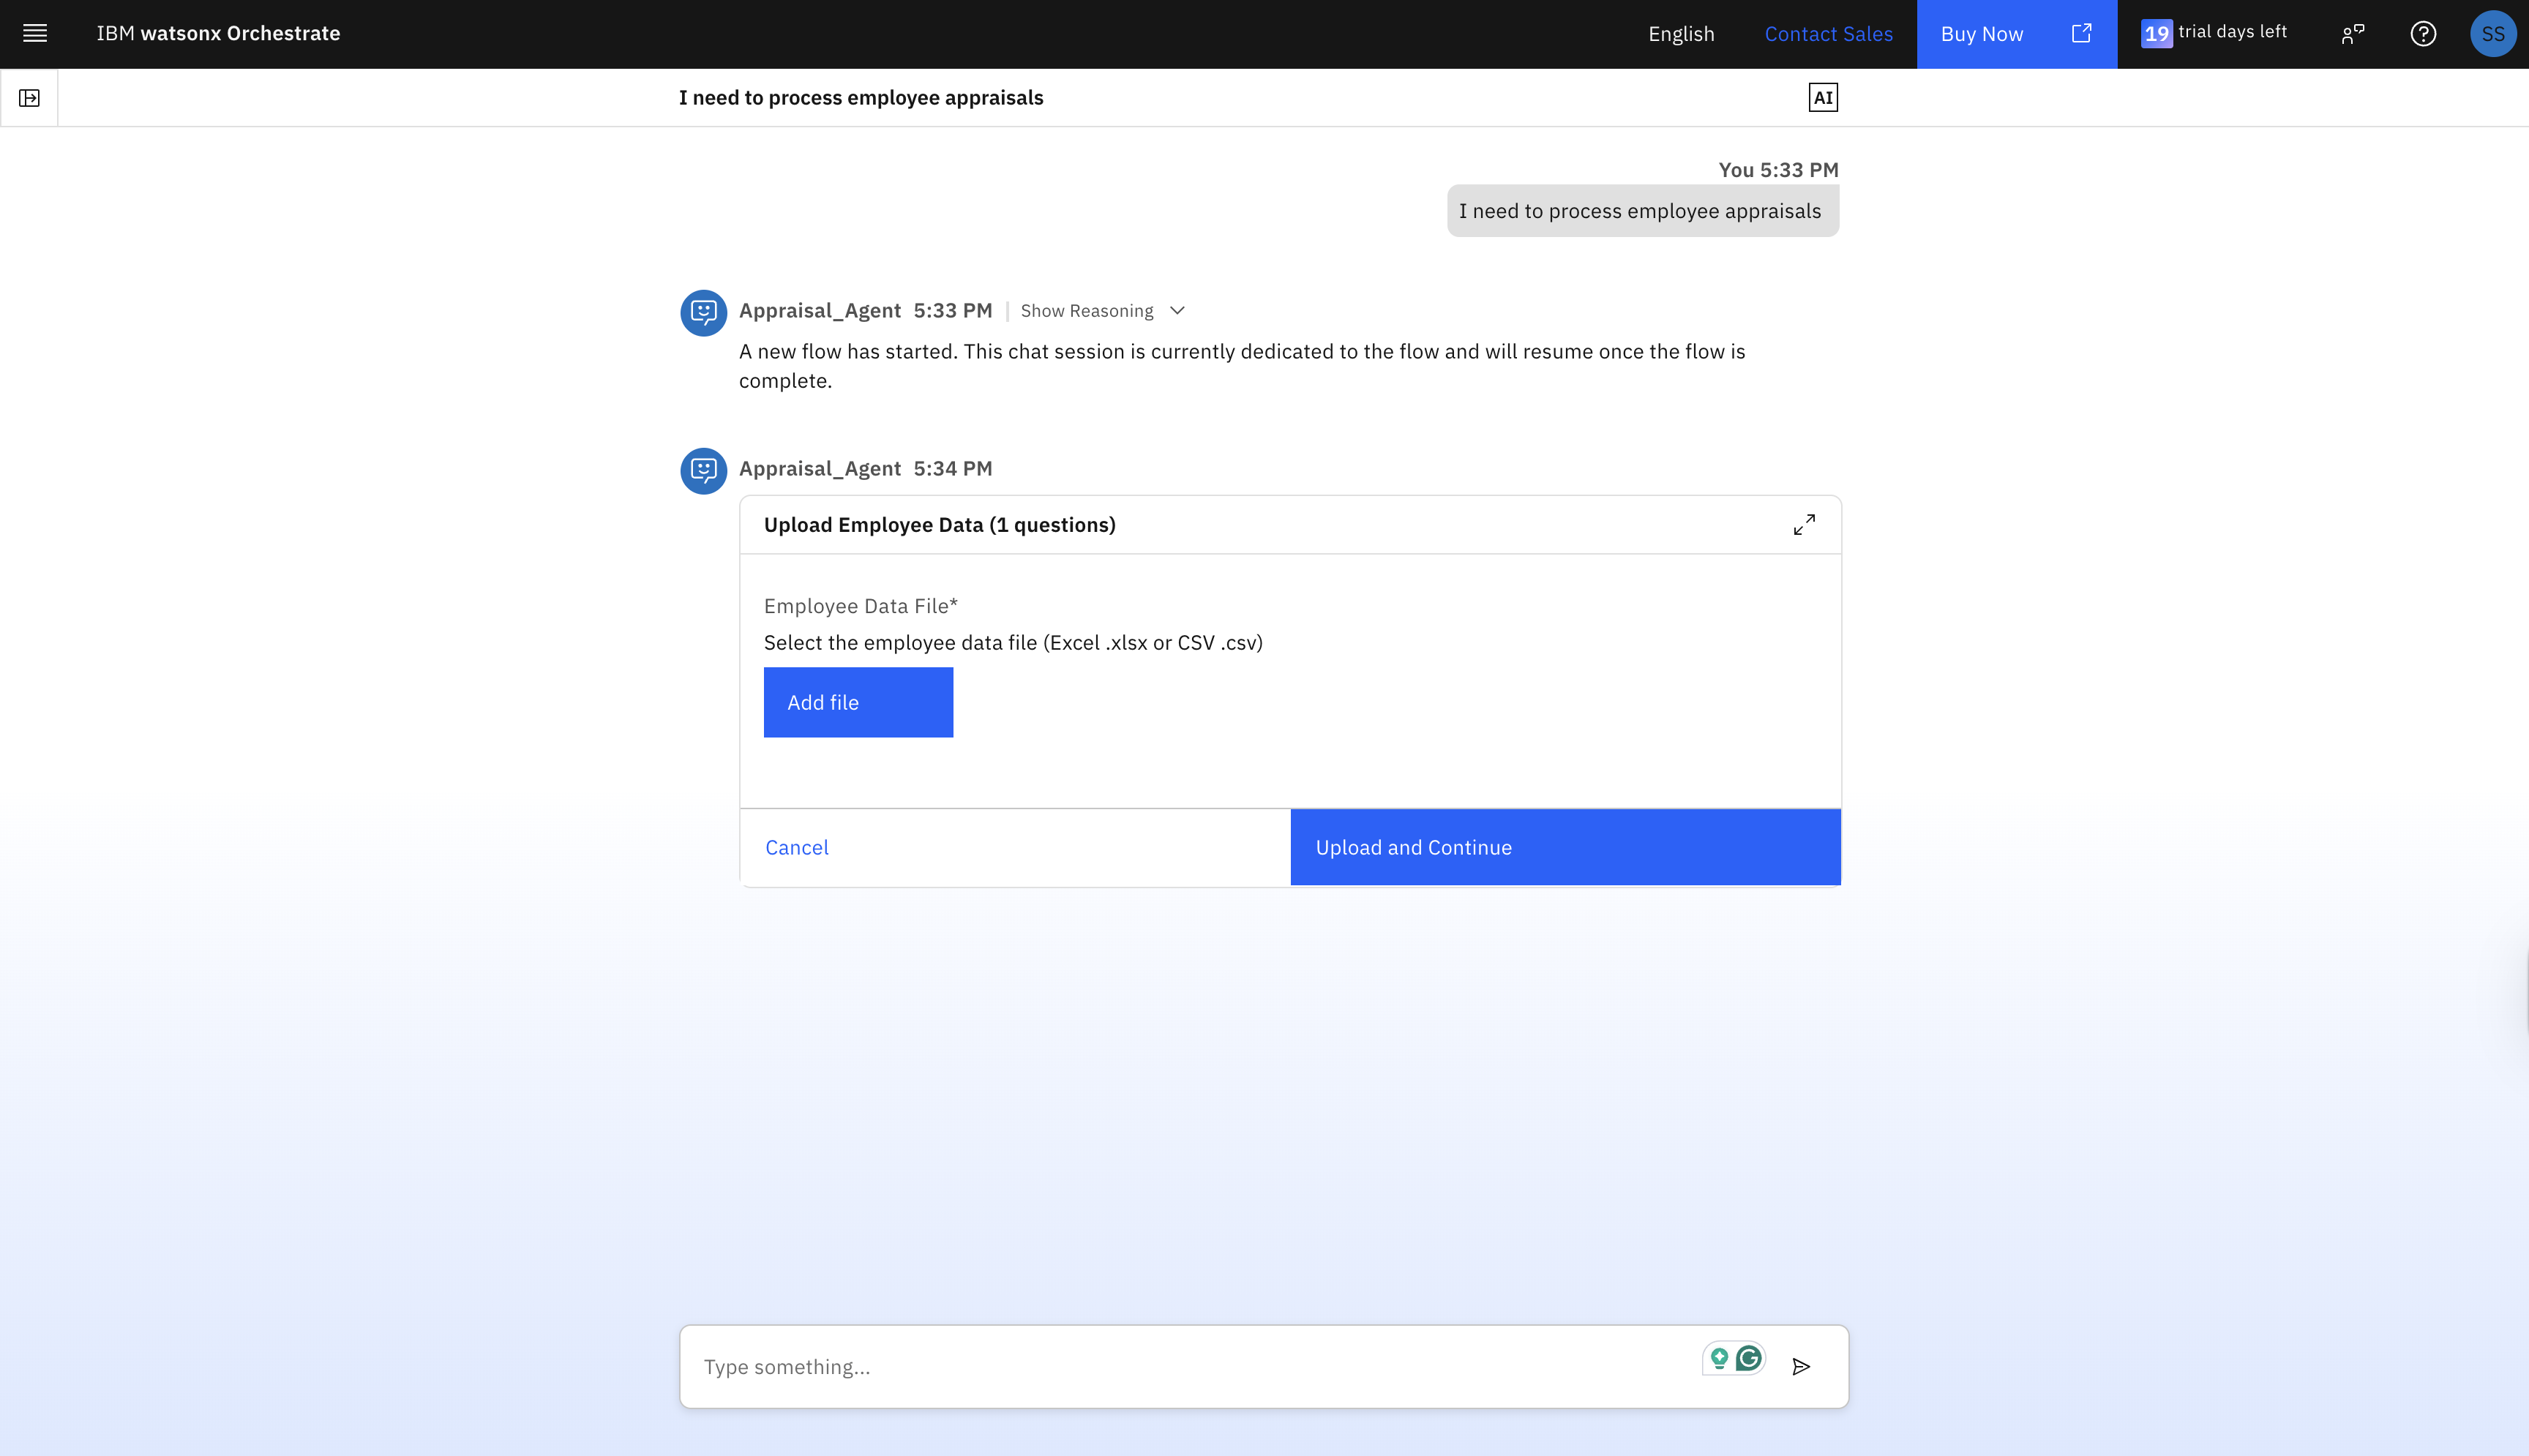
Upload the
employee_data.csvfile from thesample_datafolder, and then click Upload and Continue.The workflow displays the uploaded employee data in an editable table. You can review or modify the values if needed, and then click Proceed with Appraisal.
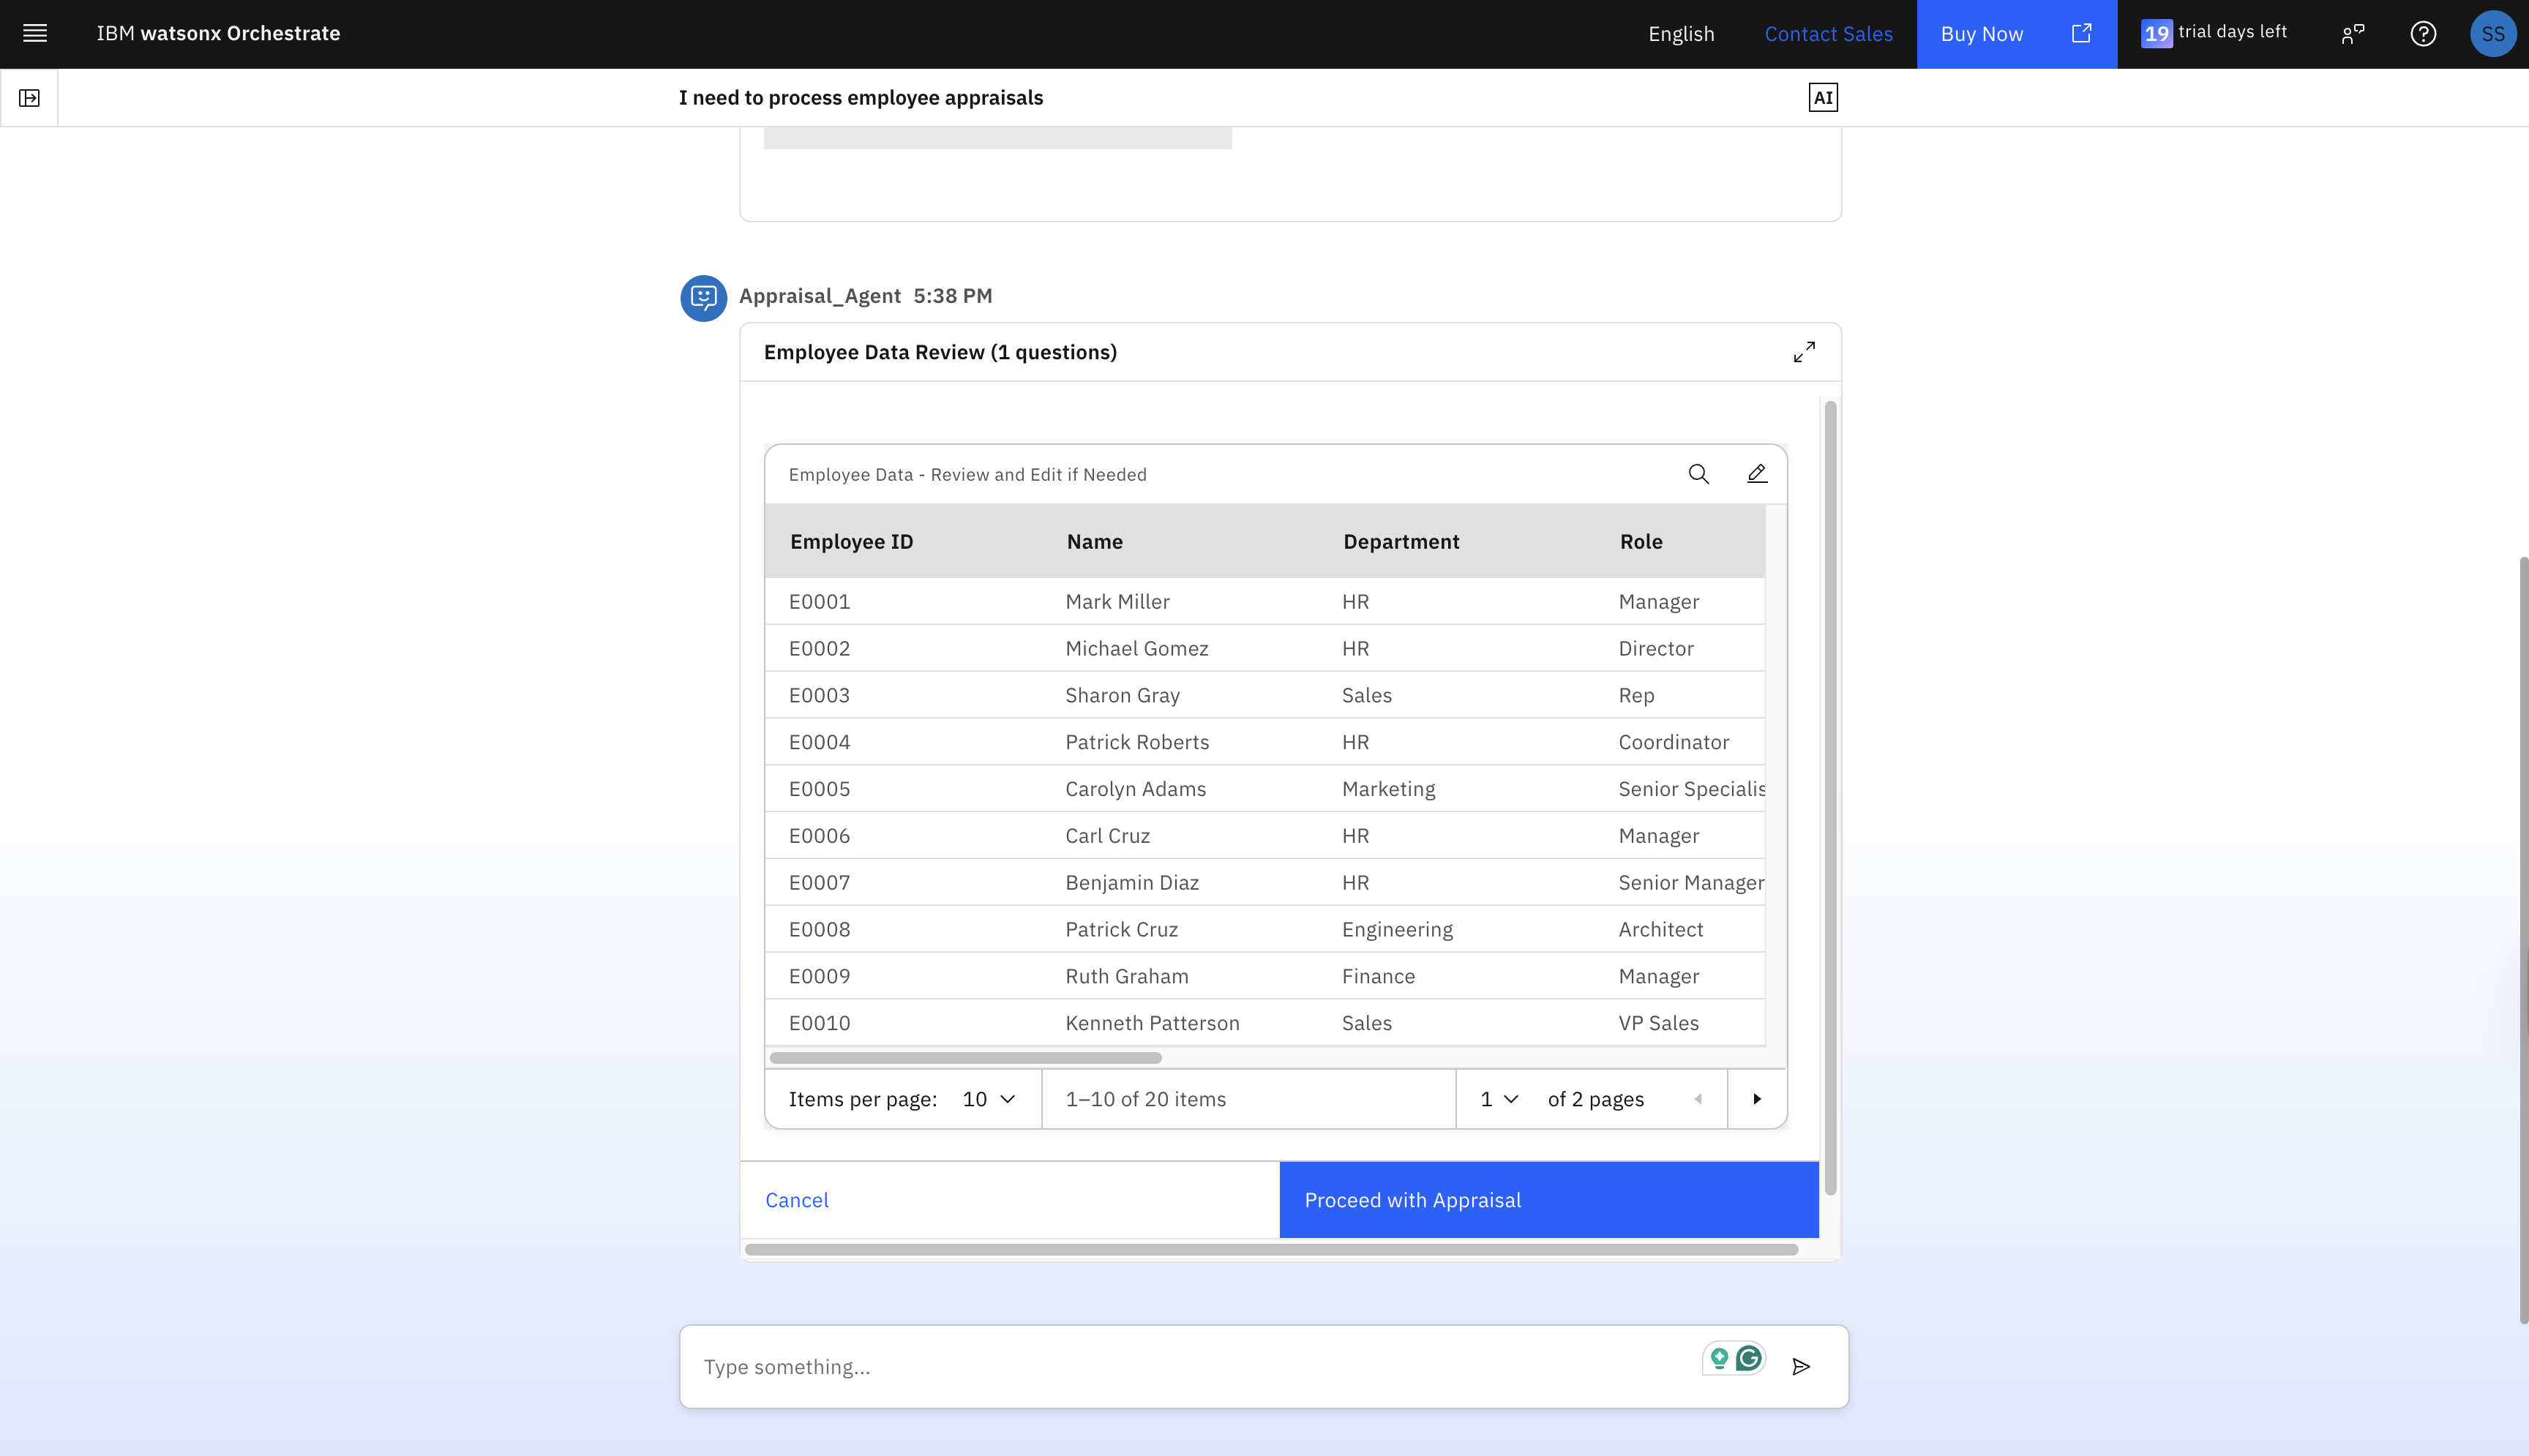
After the workflow completes the calculations, the results are returned to the agent, and the agent response is displayed.
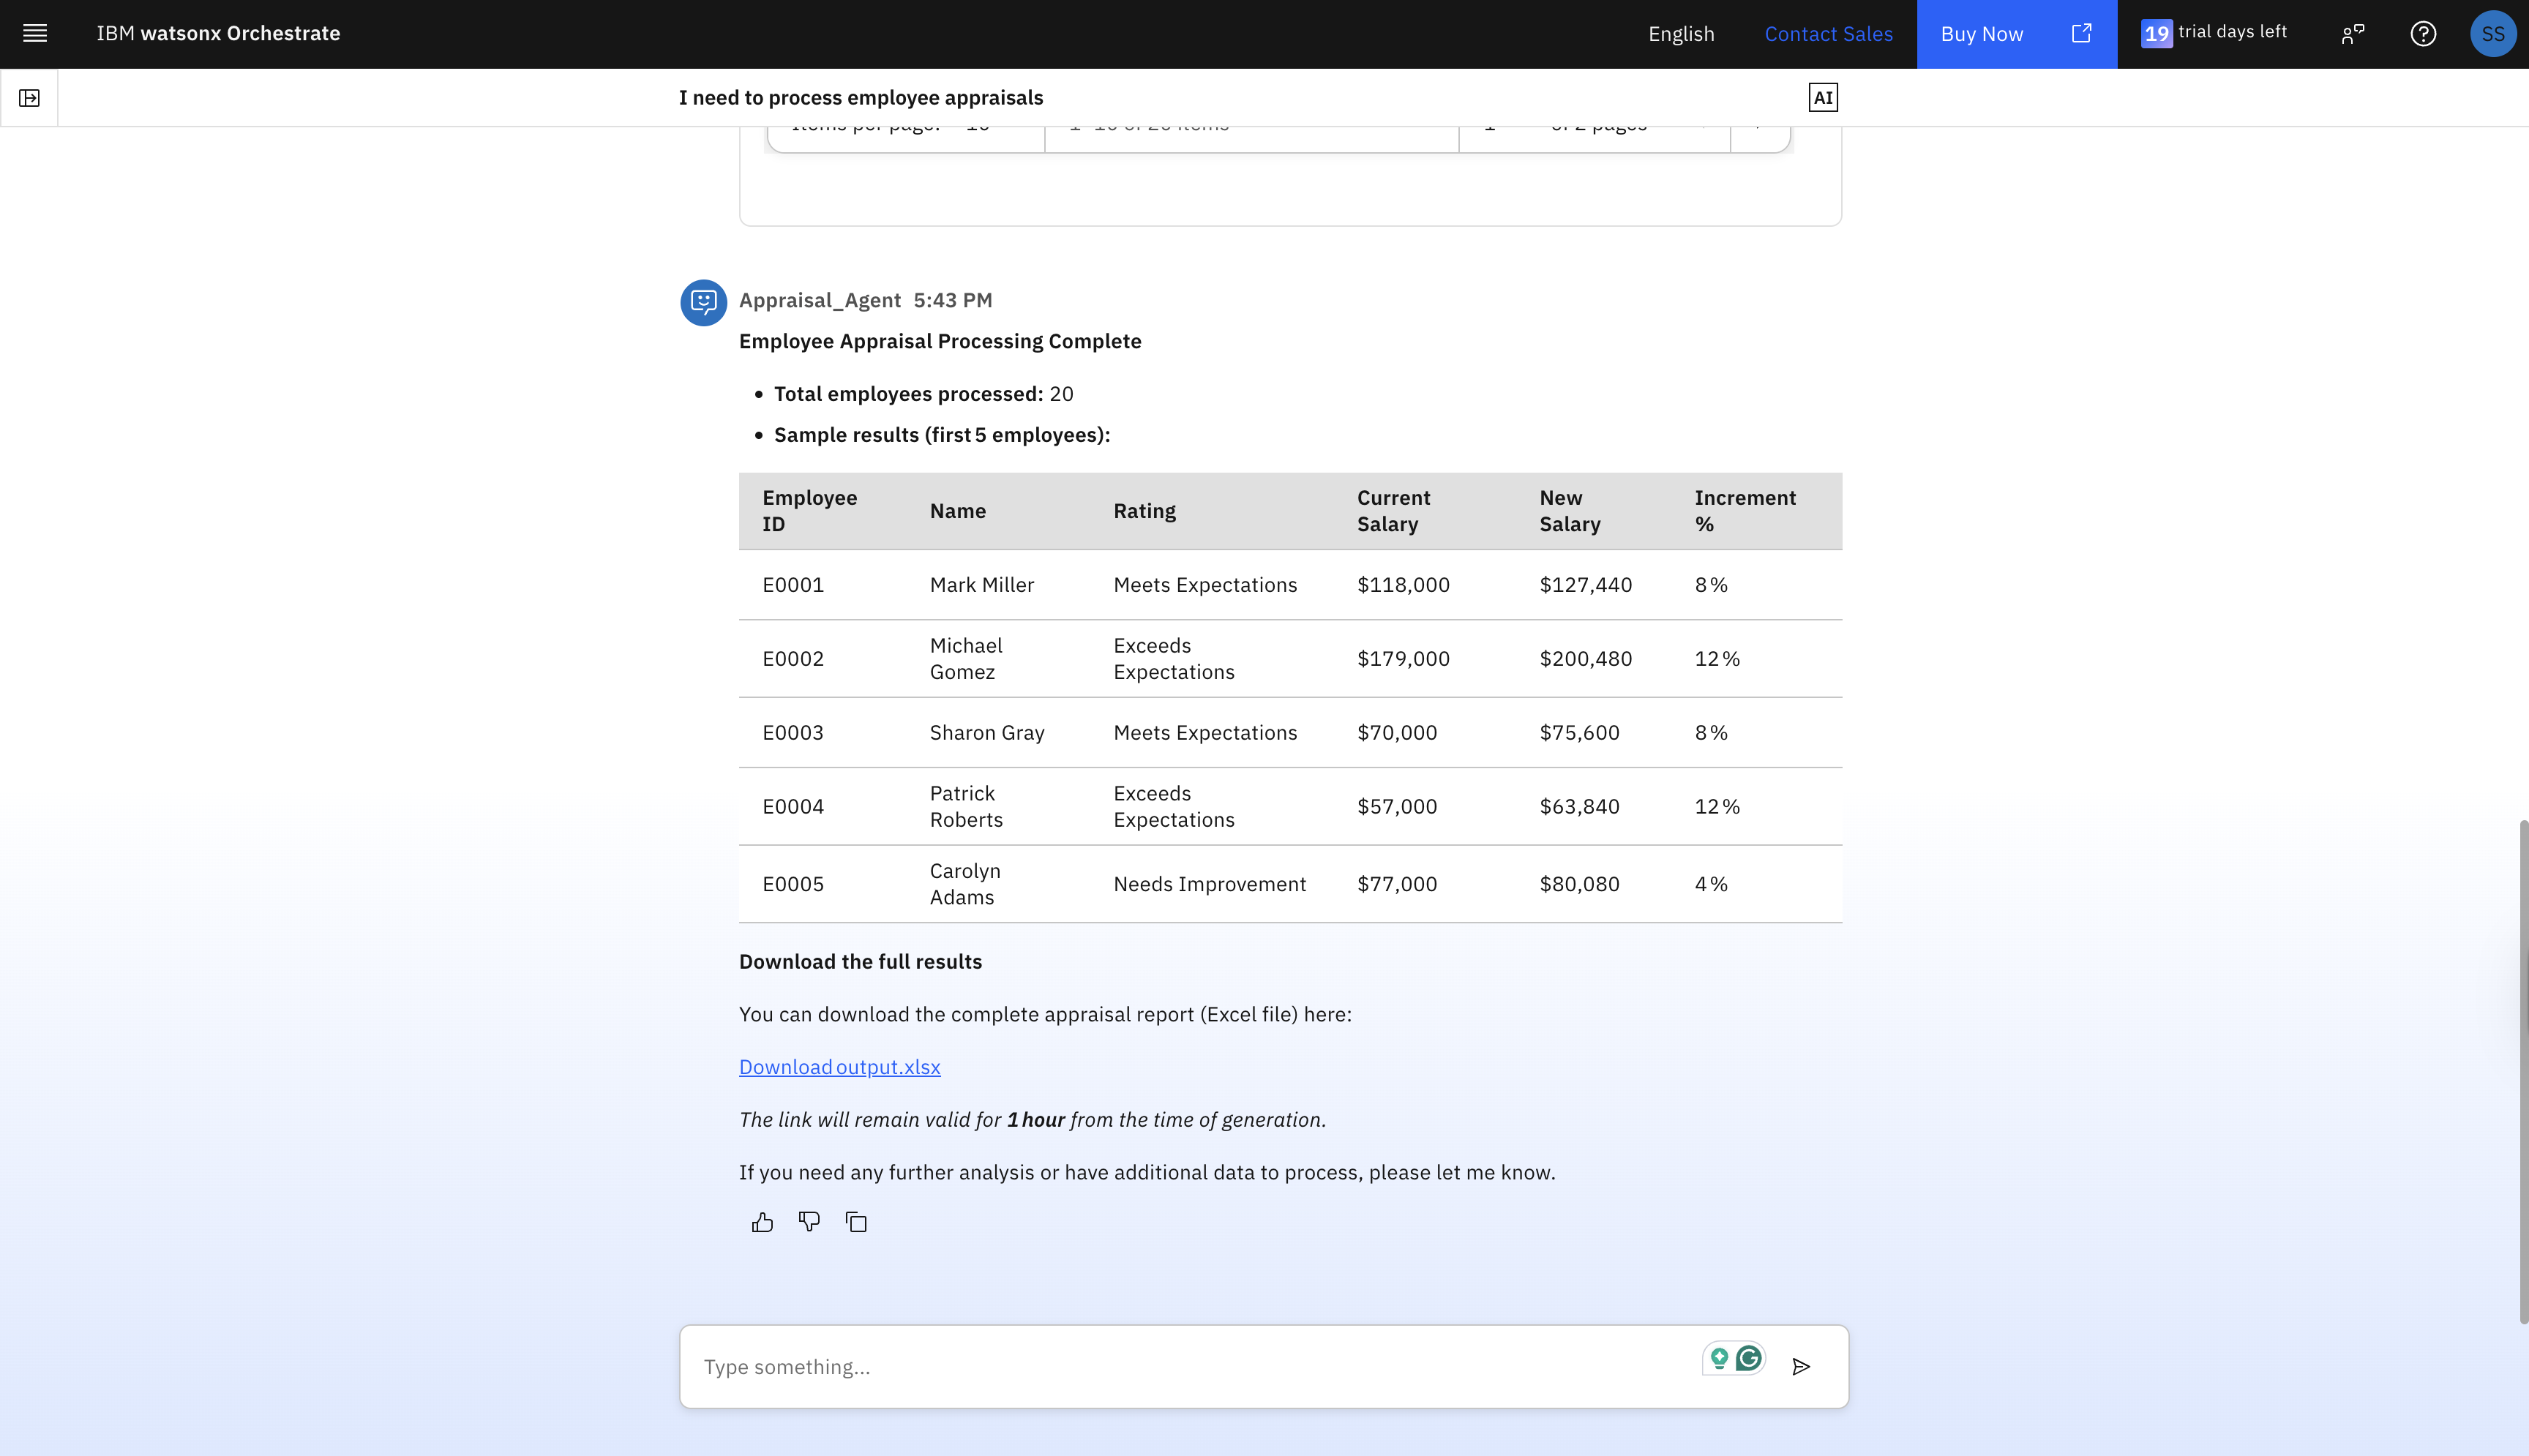
You can also download the generated Microsoft Excel report or ask the agent additional questions about the appraisal results.
The following video shows the end-to-end execution of the agentic workflow.
Step 5. Troubleshoot the agentic workflow with the flow inspector
If anything goes wrong during the workflow execution, you can inspect the workflow logs using the flow inspector.
- Click the menu icon in the upper left corner.
- Select Build > All tools.
- Locate the tool
employee_appraisal_parallel_workflow. - Click the options menu next to the tool.
Select Open flow inspector.
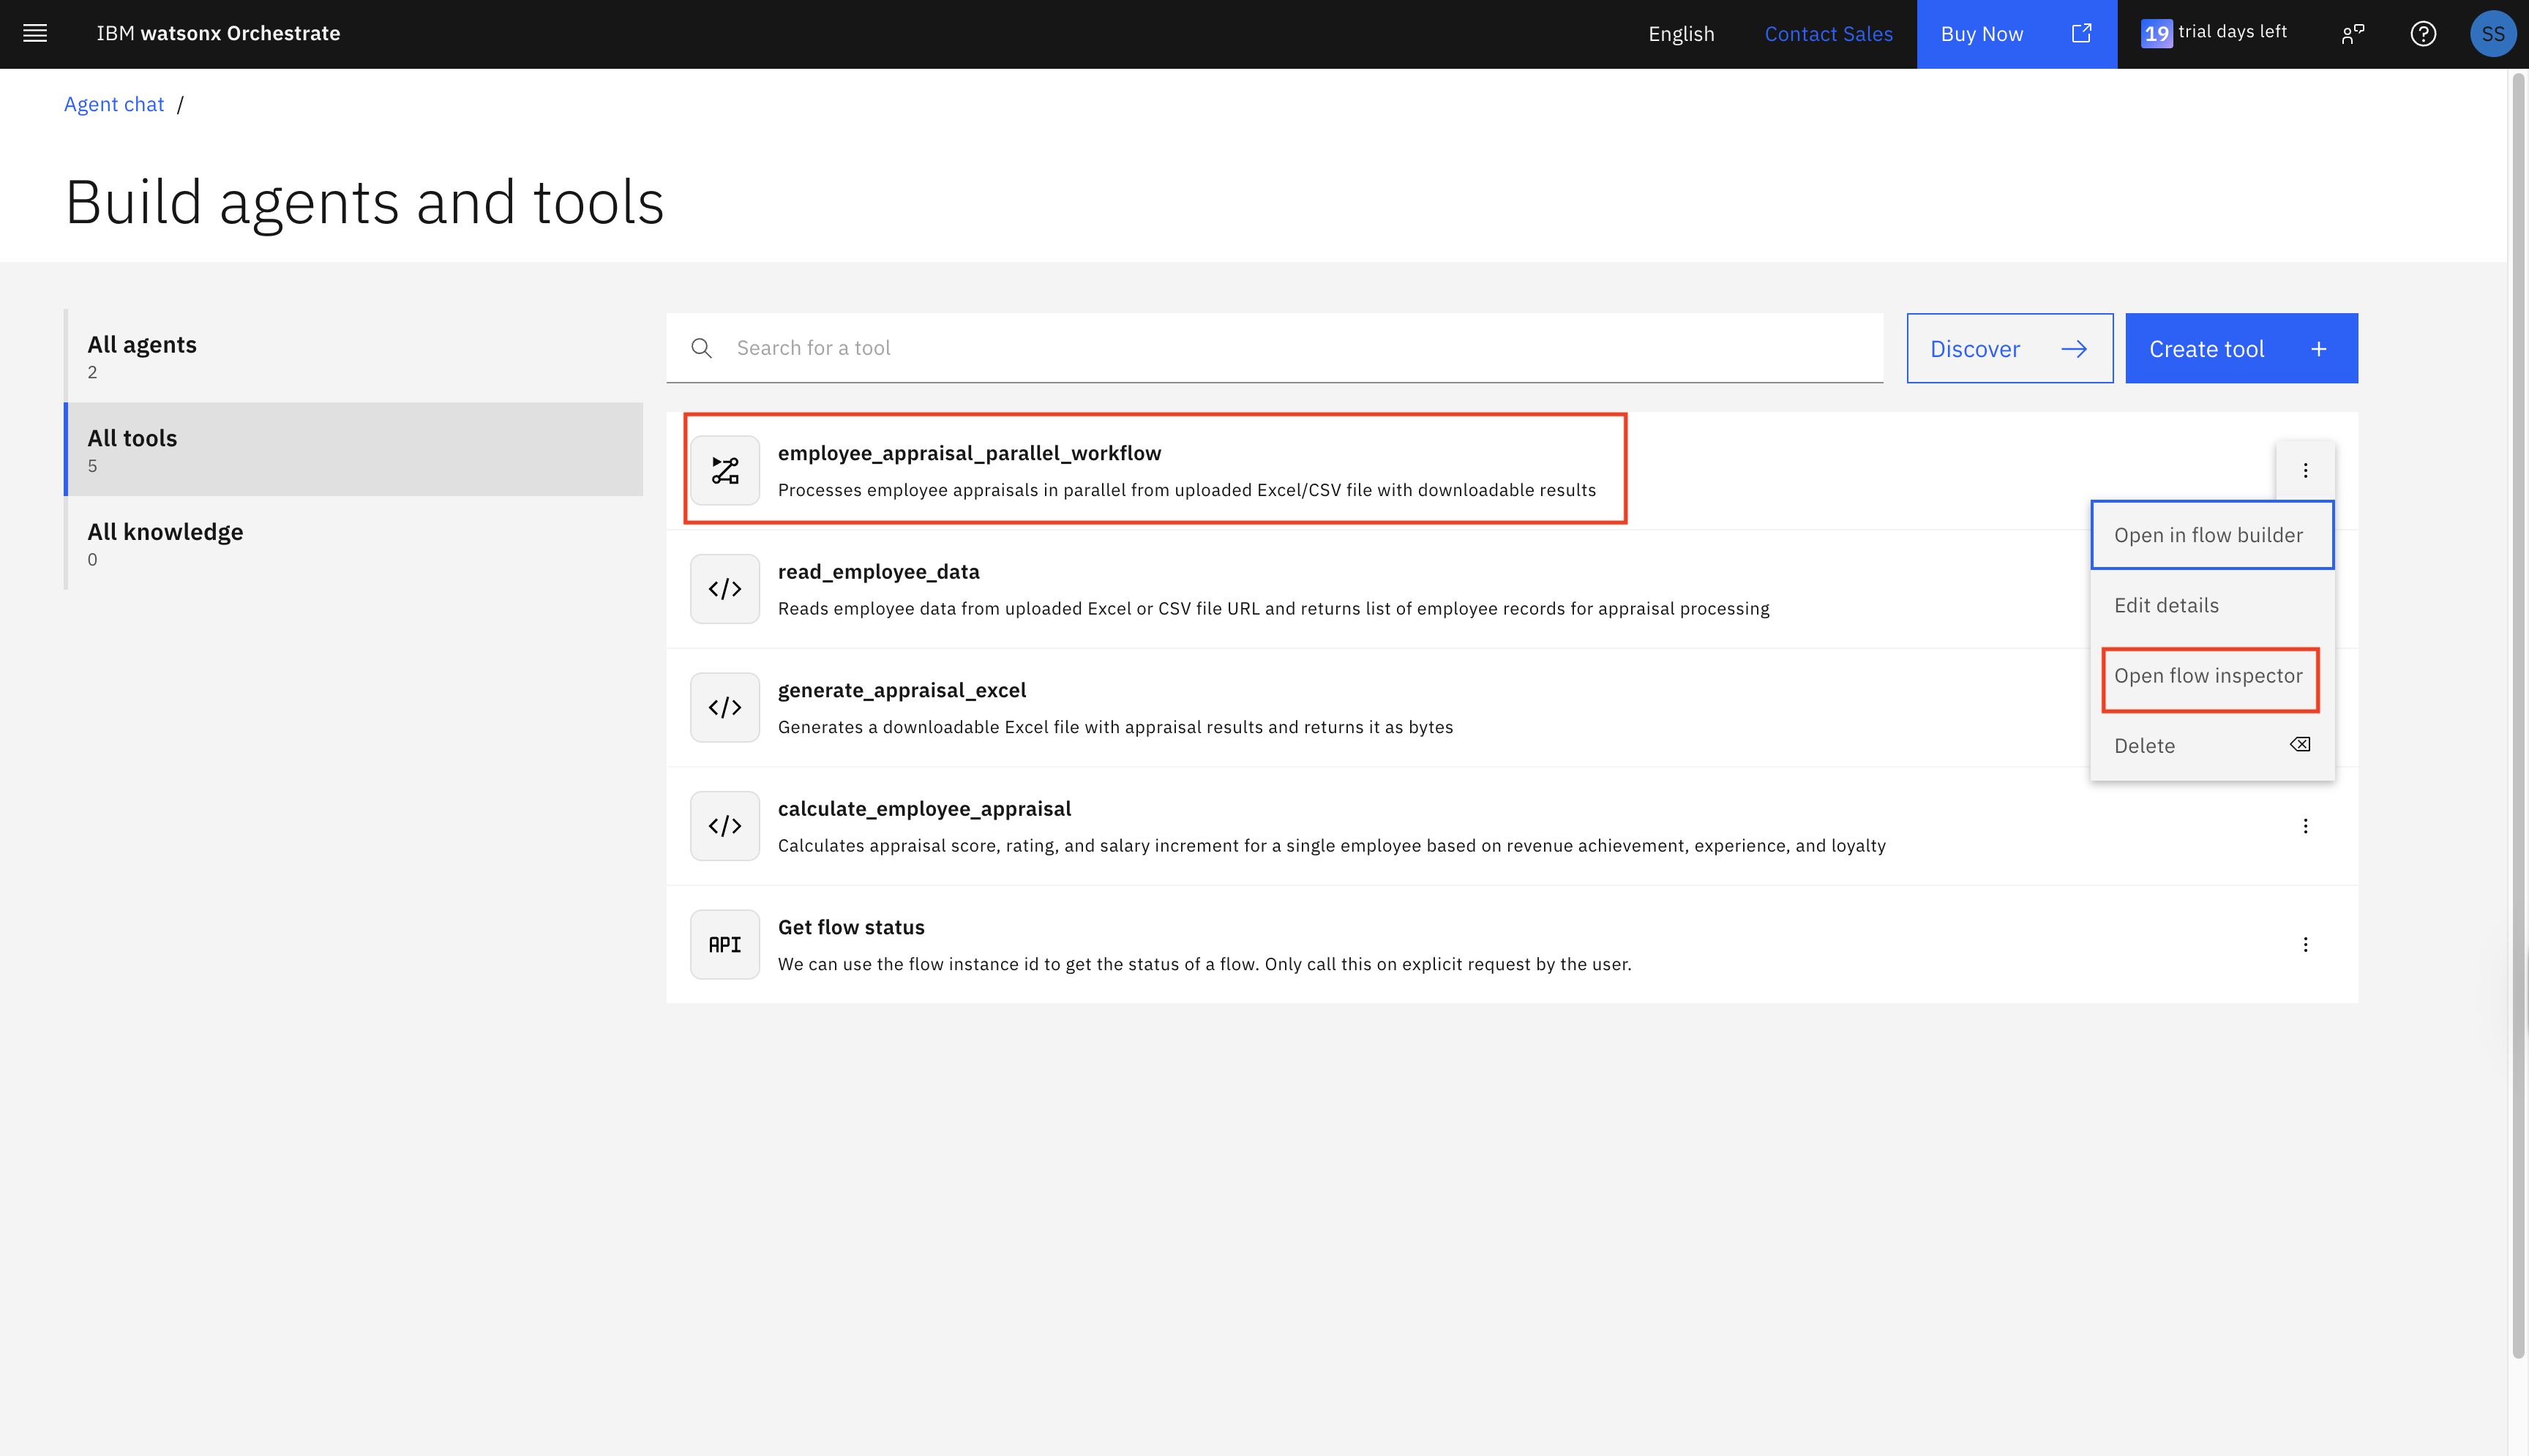
After the flow inspector opens, select the Instance ID that you want to inspect. The workflow execution details are displayed.
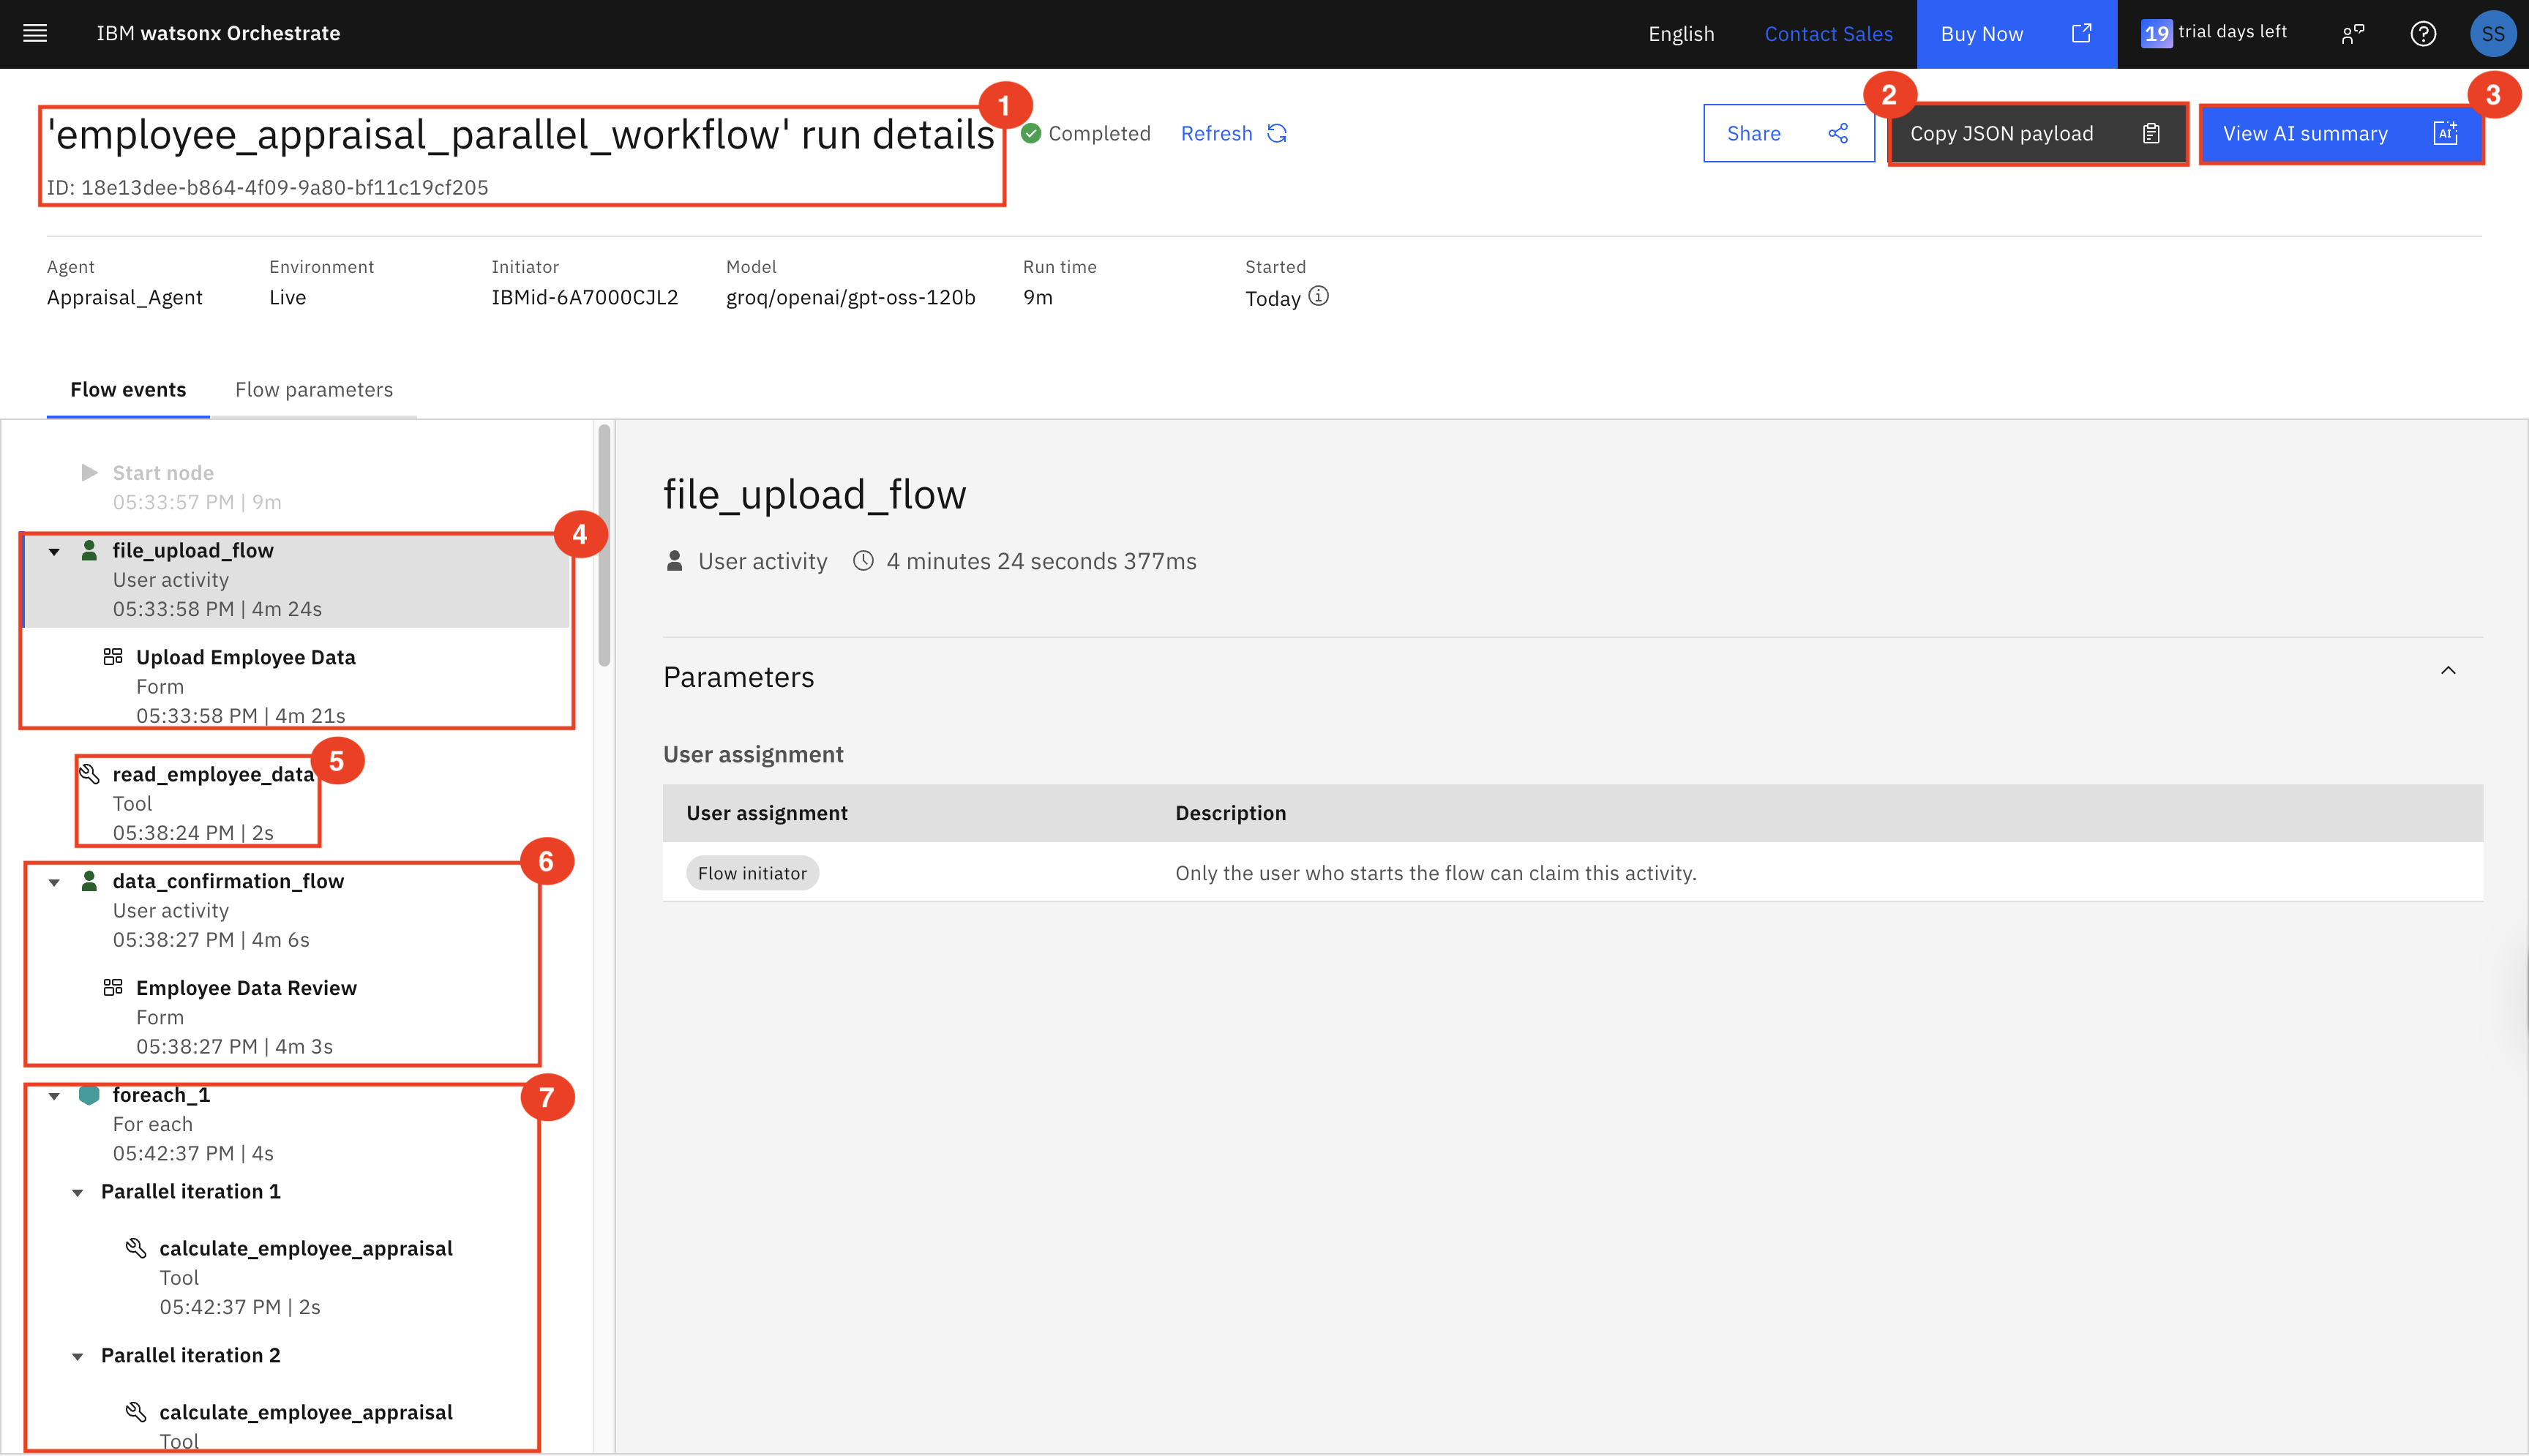
The Flow Inspector provides visibility into each workflow step, including node inputs and outputs, execution logs, errors, and parallel iteration details. This makes it easier to identify failures and debug issues effectively.
The flow inspector view of the employee_appraisal_parallel_workflow execution in IBM watsonx Orchestrate provides a detailed breakdown of each step involved in the workflow:
- Displays the workflow name, status, and execution metadata.
- Provides an option to copy the workflow execution data.
- Shows an AI-generated summary of the run.
- Allows the user to upload employee data through a form.
- Processes the uploaded file and extracts the data.
- Displays the data in an editable table for review.
- Executes appraisal calculations concurrently for each employee using a for each node.
Summary
In this tutorial, you implemented a scalable agentic workflow for bulk data processing using watsonx Orchestrate. By combining file ingestion, human-in-the-loop validation, and parallel execution, you significantly improved processing efficiency and built a reusable enterprise pattern for large-scale data operations.
Acknowledgments
This tutorial was produced as part of the IBM Open Innovation Community initiative: Agentic AI (AI for Developers and Ecosystem).
The authors deeply appreciate the technical reviewer Madan S, Albert Sunil David, Sindhoor Bhagwat, Arjid H Prabhakar, Gayathri E S, and Dennis Parrot for their thorough reviews, insightful feedback, and technical expertise. The authors also extend their sincere thanks to Michelle Corbin for her editorial guidance and support, which significantly enhanced the clarity and quality of this tutorial.