Tutorial
Sending images to Maximo Visual Inspection Edge and optical character resolution (OCR) to identify brands
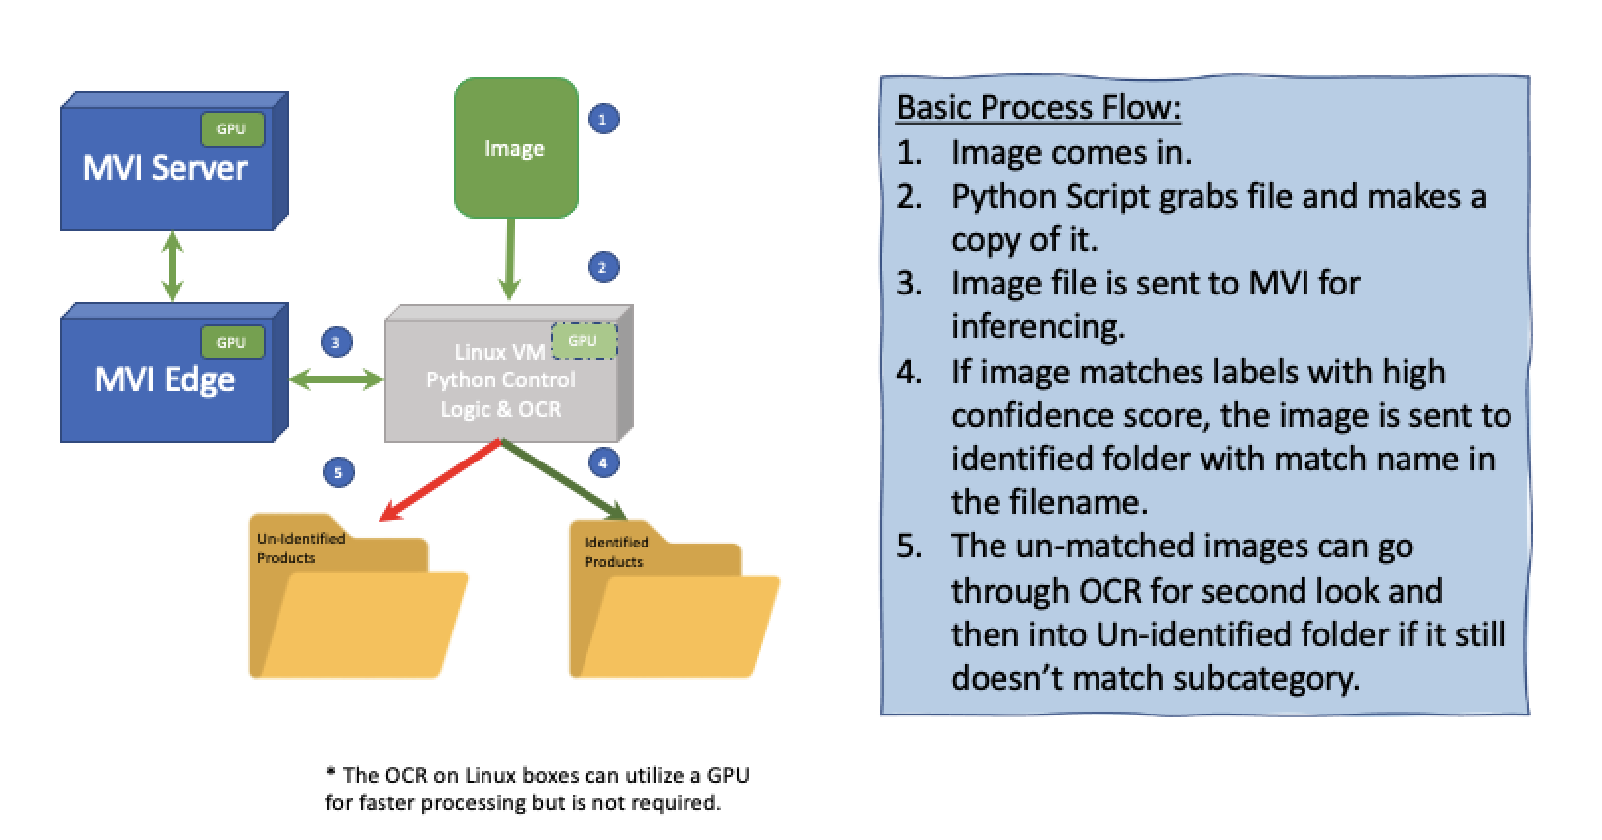
Use OCR on text in images to help in object detectionWhen you use Maximo Visual Inspection (MVI) for object detection, you might require additional categorization that is dependent on specific text on the object, such as recognizing brands or sub-brands. To help with this additional categorization, you can use MVI with an optical character recognition (OCR) solution if the confidence scores are low.
Although the solution we developed is specific to product recognition, you can use these scripts for any project where you are using MVI for object recognition where there can be text on the object that might contribute to a second categorization.
Prerequisites
- Maximo Visual Inspection, part of the Maximo Application Suite.
- Maximo Visual Inspection Edge
- Python (v3.9 or v3.10)
- Optionally, a separate VM with an additional GPU that the OCR solution can use for faster processing
Estimated time
It should take you approximately 30 minutes to complete the tutorial.
Steps
Download the solution
You can download and customize this solution to address your particular use case. Our solution uses Python automation scripts that uses APIs exposed by MVI Edge to upload images to MVI Edge for inspections and to fetch inferences. Our Python Web app was built using the Python Flask framework and the Web UI was built using the Jinja - Web template engine.
Clone the solution using this command: git clone https://github.com/ibm-build-lab/maximo.git
Log in to the VM
Since this solution is meant for handling thousands of files per hour, you might want to separate the logic into a separate VM with an additional GPU that the OCR solution can use for faster processing. You can then tie in some of your customized logic on that VM.
If you are using a VM to run this solution, log in to that VM: ssh <user>@<host> -i <p_key>
Deploy the source code
Create a directory named /home/mvi-ocr on the server, and then deploy the source code by either cloning it from git or by copying the source code to that VM.
If you have a downloaded zip file, then you can copy that .zip file to the VM by using the following command: scp -i <p_key> <file>.zip <user>@<ip>:/home/mvi-ocr/
Then, unzip the file:
cd /home/mvi-ocr/
unzip <file>.zip
Update the configurations
To send an API request to MVI Edge, you must log in and get the token from MVI Edge by passing the username and password. You can specify this username and password in the config.py file.
Update the config.py file in the /app/ directory to update the configuration. Most of the configurations remain the same. You'll only change a few configurations when a new inspection or input source is created on MVI Edge.
| Configuration | Description |
|---|---|
| BASE_DIR | Base directory where all inference-related data will be stored. For example, input, processed directories, and other csv files that store the inferences results. |
| MVIE_BASE_URL | MVI Edge URL |
| MVIE_USERNAME | MVI Edge user name |
| MVIE_PASSWORD | MVI Edge password |
| MVIE_INPUT_SRC_UUID | MVI Edge input source id |
| MVIE_INSPTN_UUID | MVI Edge inspection id |
| OCR_LABELS_TO_MATCH | List of labels to match with OCR |
Make sure that the path for BASE_DIR exists.
To retrieve MVIE_INPUT_SRC_UUID, you must log in to MVI Edge by calling the REST API to get the token. Pass MVI Edge the username and password in the request body.
POST https://<MVIE_URL>/api/v1/users/sessions
Request Body:
{
  "grant_type": "password",
  "password": "",
  "username": ""
}
In response, you will get token in the response body:
{
    "result": "success",
    "token": "sqcX************ZU",
    "user_id": "admin",
    "role": "admin"
}
Use this token to pass in mvie-controller as a header in the following REST API to retieve the MVIE_INPUT_SRC_UUID:
GET https://<MVIE_URL>/devices
Header:
mvie-controller : <session_token>
You can retrieve the MVI Edge inspection ID (MVIE_INSPTN_UUID) by going to the MVI Edge instance and from the dashboard clicking Inspection to open the inspection configuration page. From the browser address bar, copy the inspection ID: https://{host}/#/stations/{station_id}/inspections/{inspection_id}.
We suggest that you set the value of SSL_VALIDATION=True in the config.py file, otherwise it will expose the application to security risk.
Whenever we run the Python script, it will log in to MVI Edge and will update the token in the token.json file, and that token will be used to communicate with MVI Edge. The time to live (TTL) for the token is 30 mins and TTL is refreshed when a new API call is made to Edge.
Moreover, token.json also stores the max_image_id retrieved from MVI Edge. MVI Edge uses the max_image_id value to fetches inferences that occurred only after a particular ID. The Python script automatically updates this ID in the token.json file as it fetches inferences and the next time it fetches inferences it will fetch only those inferences that have and ID that is greater than the stored inference ID.
Install the dependencies
This project uses dependencies that must be installed before running an application. Navigate to the location of the requirements.txt file and run the following command: pip3 install -r requirements.txt.
Run the application
To run an application, navigate to the root directory of the project and run the following command: flask --app app run --port 5000.
If you are running an application on a VM, make sure that you add –host 0.0.0.0 in the command to access the app using the server IP address at the specified port.
After running this command, the application will be available at: http://<host>:5000/.
With the default configuration, some directories and csv files will be automatically created under the directory name you specified for BASE_DIR. These directory names can configured in the config.py file.
Put the files in an input directory that you want to upload to the input source of MVI Edge for inference.
Click the Upload Image button on the home page to send the files to MVI Edge. After the files are uploaded, files from the input directory will be moved to an uploaded directory for backup purposes.
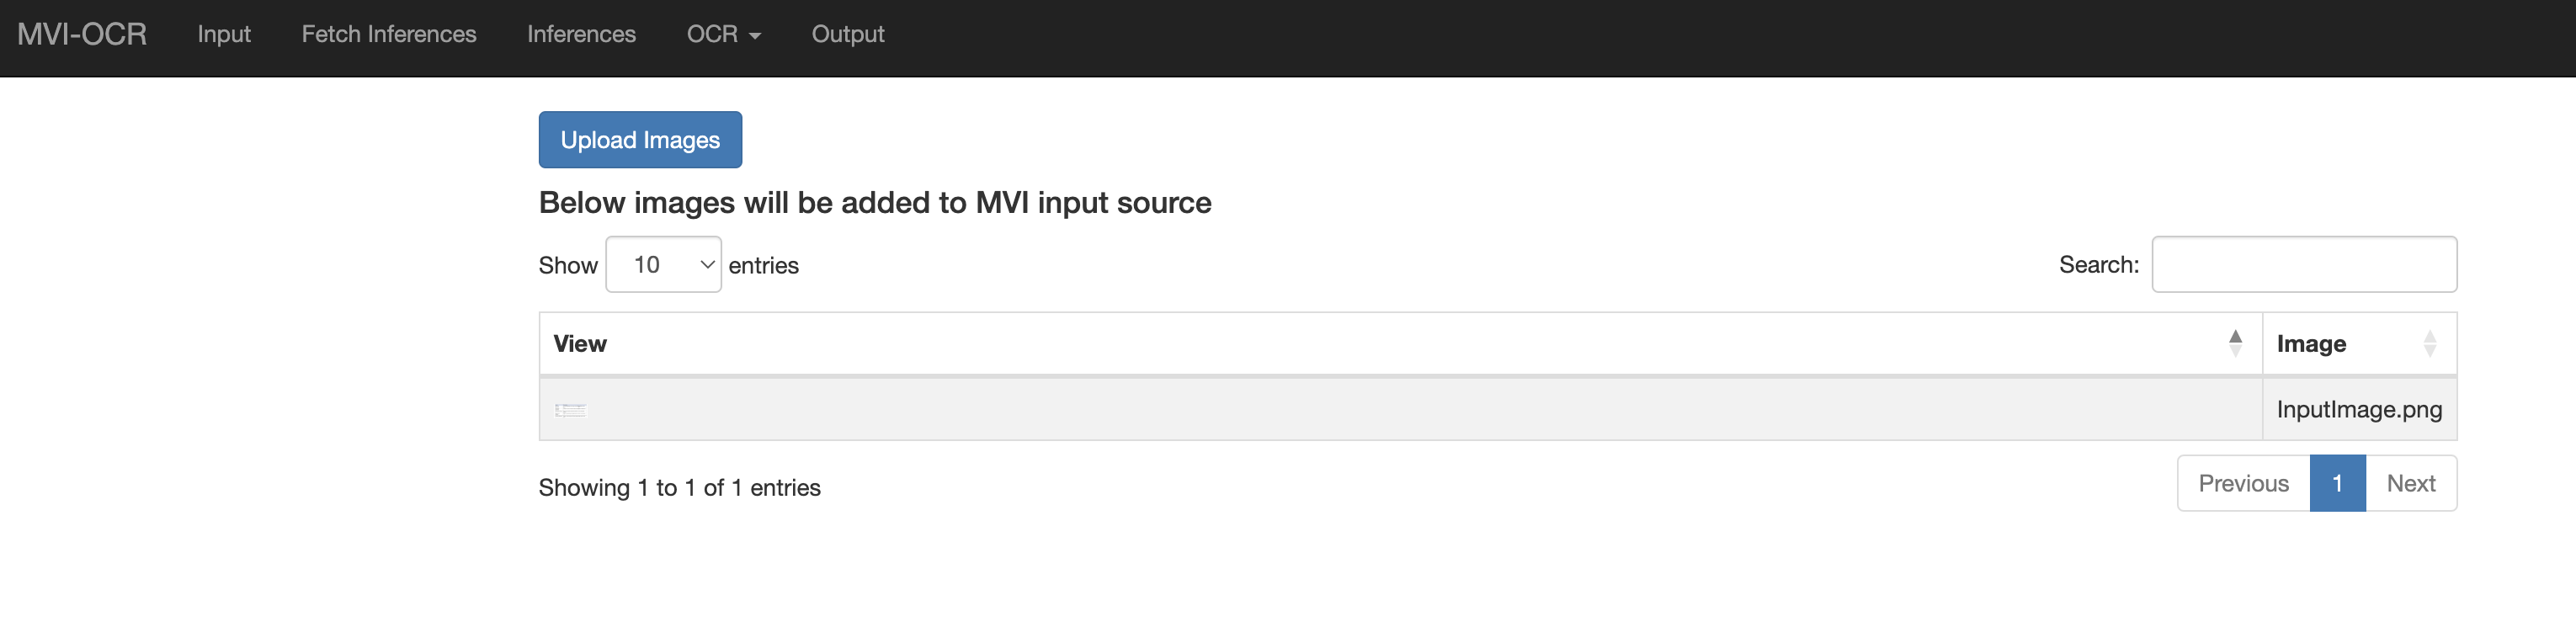
Click Fetch Inferences to fetch the inferences of recently uploaded images. After fetching the inferences, images with a detected object will be downloaded to the processed directory by creating subdirectories. For example, if ABC is an object that is detected on the image, then a new directory named ABC will be created and that image will be downloaded to the processed/ABC directory.
The Inferences page displays the list of fetched inferences with the label detected on the image, the confidence score, and other metadata.

If additional categorization is need on the fetched inferences, click OCR/Process to pass images to the OCR solution. This will display only those images for which object is detected and is in the processed directory.
The OCR solution will use the labels configured for OCR_LABELS_TO_MATCH config to match the text. If a match is found, images will be copied to the ocr_processed/<MATCHED_TEXT> directory; otherwise, images will be moved to the ocr_uncategorized directory.
The Ouput page displays the list of all processed OCR images.
Summary
This solution explained how this solution can be use with MVI to recognize the brand and attempt to recognize the sub-brand. We can also use an Optical Character Recognition (OCR) solution if the confidence scores are low or if additional categorization is needed.