Tutorial
Spin up a single-node Red Hat OpenShift cluster with one command
Use Ansible playbooks and the OpenShift Assisted Installer to automate and manage the installation processIn this tutorial, you use an Ansible playbook to automate the creation of a small, production-ready, single-node Red Hat OpenShift cluster. For the installation, you utilize the new OpenShift Assisted Installer to manage your installation of OpenShift and make the process much easier. This single-node OpenShift instance is one of the smallest production-ready instances of OpenShift that can be deployed to resource-constrained environments for demos, proof of concepts, or even on-premises edge deployments. Single Node OpenShift (SNO) is also ideal for running workloads close to your factory floor where time-sensitive decisions need to be made without the latency of communicating to the cloud. Although this tutorial deploys the cluster to IBM Cloud, you can reuse many of these playbooks for your on-prem deployments by targeting a local virtual or bare metal machine instead of one running on IBM Cloud. Likewise, you can replicate these tutorial steps on other cloud platform infrastructures, such as Microsoft Azure or Amazon Web Services (AWS).
Prerequisites
- IBM Cloud account
- IBM Cloud CLI
- Red Hat account
Note: Basic knowledge of Ansible is helpful, but not required.
Estimated time
This tutorial will take you 1 to 2 hours to complete.
Overview
If you haven't used Ansible before, you can think of it as a tool that allows you to write automation scripts in the form of YAML files called playbooks. What makes Ansible so powerful, compared to writing bash scripts, is the rich set of collections available in the Ansible Galaxy hub, which help you to perform provisioning and configuration tasks with ease. These collections include modules that make it easier to integrate with other tools and to provision infrastructure on public clouds. For the playbooks in this tutorial, you use the IBM Cloud collection within Ansible Galaxy to configure the resources on IBM Cloud.
This tutorial contains a collection of Ansible playbooks that provisions a SNO cluster on Linux Kernel-based Virtual Machine (KVM) on IBM Cloud by using the OpenShift Assisted Service. This approach of using Ansible playbooks along with the Assisted Installer greatly reduces the time to install OpenShift and makes the installation process more user-friendly because the Assisted Installer console shows the progress of the installation.
The playbooks are bundled into the following modules:
- ic.vpc.v0.1 Infrastructure provisioning (IBM Cloud Virtual Private Cloud (VPC), v0.1)
- ic.vsi.v0.1 Virtualization (IBM Cloud virtual server instance (VSI) with Linux KVM, v0.1)
- ic.sno.v0.1 Single Node OpenShift installation (IBM Cloud, Single Node OpenShift (SNO), v0.1)
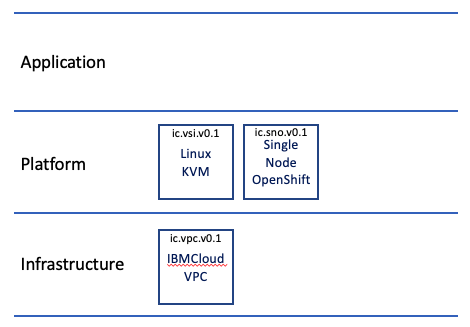
Figure 1. Ansible playbook modules.
Specifically, the modules provision the following resources on IBM Cloud.
VPC infrastructure (network) resources, which include:
- VPC
- Subnet
- Floating IP
- Access Control List (ACL)
- Security Group
Compute resources, which include:
- VSI running Linux KVM
- SSH Key
KVM guest user for the SNO cluster on the VSI.
Another KVM guest user running Fedora 34 that provides domain name server (DNS) and Dynamic Host Configuration Protocol (DHCP) services for the SNO cluster KVM guest during installation.
HAProxy on the KVM VSI to route inbound traffic to the OpenShift cluster running on the private KVM Network Address Translation (NAT) network.
SNO cluster. The playbooks use the Assisted Installer service to install OpenShift.
By provisioning these resources, you create the architecture illustrated in the following diagram.

Figure 2. Architecture diagram.
Running the lead playbook to install the SNO cluster can be done with a single command, but there are some prerequisites that must be in place before running that command.
Step 1. Clone the repo
From a terminal window, clone the GitHub repo for this tutorial to your local system.
git clone https://github.com/IBM/sno-on-ibm-cloud-vpc-ansible.git
Go to the ansible sub-folder of the cloned repo's root folder. Note: All subsequent command line instructions assume that you will be in this folder.
cd sno-on-ibm-cloud-vpc-ansible
export HOME_DIR=$(pwd)
cd ansible
Step 2. Set up your local machine
2.1. Install Ansible 2.9
The playbooks were only tested with Ansible 2.9 (the version supported by Red Hat), so we recommended you use the 2.9 version to avoid potential incompatibilities with other versions.
The following table shows the install process for various operating systems.
| OS family | Commands |
|---|---|
| RHEL, CentOS, Fedora, and Rocky | dnf install epel-releasednf updatednf install ansible |
| Ubuntu and Debian | sudo apt updatesudo apt install software-properties-commonsudo apt-add-repository --yes --update ppa:ansible/ansiblesudo apt install ansible-2.9 |
| MacOS | brew install ansible@2.9 |
2.2. Install the required Ansible collections
Run the following commands to install the Ansible collections.
ansible-galaxy collection install ibm.cloudcollection
ansible-galaxy collection install community.libvirt
2.3. Install jq
You need the jq utility to parse curl commands in the complete_sno_install step of the playbook. We tested the installation with jq version 1.6.
| OS family | Commands |
|---|---|
| RHEL, CentOS, Fedora, and Rocky | dnf install jq |
| Ubuntu and Debian | sudo apt install jq |
| MacOS | brew install jq@1.6 |
Step 3. Get the required credentials
The following table lists the credentials required by the playbooks.
| Credential | How to obtain |
|---|---|
| IBM Cloud API key | See product documentation for instructions. Download the API key as a file, or copy the value to your clipboard and paste it into a local file. Note: Alternatively, you can create an IBM Cloud API key through the IBM Cloud CLI. |
| OpenShift pull secret | If you don't have a Red Hat OpenShift subscription, you can get a no-cost Red Hat Developer Subscription. Once you have a subscription, download the pull secret. Note: Be sure to use the Download option and not the Copy option. The Copy option removes the double quotation marks, which will be considered an invalid JSON format and cause the playbooks to fail. |
| OpenShift Cluster Manager API token | Copy the secret and save it in a local file called token.txt. |
After you log in to your IBM Cloud account, you can create a new IBM Cloud API key as follows:
export IC_API_KEY_NAME="IBM Cloud SNO"
ibmcloud iam api-key-create $IC_API_KEY_NAME -d "API key for SNO on KVM on VSI for VPC" --file $IC_API_KEY_NAME.txt
export IC_API_KEY=$(cat $IC_API_KEY_NAME.txt | jq -r '.apikey')
echo $IC_API_KEY
Step 4. Set the playbook variables
4.1. Set the environment variables
The playbooks expect your IBM Cloud API key to be available as an environment variable. This was already done for you if you used the alternate method of creating the API key by using the IBM Cloud CLI. However, if you created the API key from the IBM Cloud console, then you must do the following tasks to create an environment variable or the playbook execution will fail.
From the terminal window you opened in Step 1, export the IBM Cloud API key as follows:
export IC_API_KEY="<your api key value>"
echo $IC_API_KEY
You can verify that the API key was set up correctly by running the following ad hoc Ansible command:
ansible localhost -m ibm.cloudcollection.ibm_is_images_info -a "name=ibm-debian-11-2-minimal-amd64-1"
The output should look similar to the following example:
localhost | SUCCESS => {
    "changed": false,
    "rc": 0,
    "resource": {
        "id": "2022-03-17 12:08:24.745036 +0000 UTC",
        "images": [
            {
                "architecture": "amd64",
                "checksum": "38a853cd338d8cea2b01b5b216da8d966310fc6aa3693b6cfb274522ccf6fe3e",
                "crn": "crn:v1:bluemix:public:is:us-south:a/811f8abfbd32425597dc7ba40da98fa6::image:r006-3bfa4c4f-9c9e-454b-83fb-2f473cc015bd",
                "encryption": "none",
                "encryption_key": "",
                "id": "r006-3bfa4c4f-9c9e-454b-83fb-2f473cc015bd",
                "name": "ibm-debian-11-2-minimal-amd64-1",
                "os": "debian-11-amd64",
                "source_volume": "",
                "status": "available",
                "visibility": "public"
            }
        ],
        "name": "ibm-debian-11-2-minimal-amd64-1",
        "resource_group": null,
        "visibility": null
    },
    "stderr": "",
    "stderr_lines": [],
    "stdout": "data.ibm_is_images.ansible_ibmdebian112minimalamd641: Refreshing state...\n\nWarning: Argument is deprecated\n\nThe generation field is deprecated and will be removed after couple of\nreleases\n\n\nApply complete! Resources: 0 added, 0 changed, 0 destroyed.\n",
    "stdout_lines": [
        "data.ibm_is_images.ansible_ibmdebian112minimalamd641: Refreshing state...",
        "",
        "Warning: Argument is deprecated",
        "",
        "The generation field is deprecated and will be removed after couple of",
        "releases",
        "",
        "",
        "Apply complete! Resources: 0 added, 0 changed, 0 destroyed."
    ]
}
4.2. Set the OpenShift pull secret
Copy the pull secret that you downloaded in Step 3 (pull-secret.txt) to the ansible/auth folder in the directory tree of your local copy of the GitHub repo.
mv pull-secret.txt auth/
4.3. Set the Cluster Manager API token
Copy the API token file that you saved in Step 3 (token.txt) to the ansible/auth folder in the directory tree of your local copy of the GitHub repo.
mv token.txt auth/
4.4. Set the required playbook parameters
Create a copy of the ansible/group_vars/all.example file in the same folder that is named all.
cp group_vars/all.example group_vars/all
The all file should appear as follows:
---
name_prefix: "CHANGE_NAMEPREFIX"
zone: "CHANGE_ZONE"
region: "CHANGE_REGION"
resource_group_name: "CHANGE_RESOURCEGROUP"
sno_domain_name: "CHANGE_DOMAIN"
sno_cluster_name: "CHANGE_CLUSTERNAME"
setup_vsi_gui: true
Edit the ansible/group_vars/all file, replacing all of the values set to CHANGE_ with valid values. The following table provides more details about the required and optional parameters.
| Parameter | Type | Description | Required | Default value |
|---|---|---|---|---|
name_prefix |
String | The prefix used for all IBM Cloud resources provisioned by the playbooks. Suffixes are added to indicate the type of resource. For example, mynameprefix-vpc for a VPC instance and mynameprefix-vsi for a VSI. |
Yes | None |
region |
String | Short name of an IBM Cloud region where VPC resources are created. For example, us-south, us-east, eu-gb, jp-tok, or au-syd. |
Yes | None |
zone |
String | Short name of an IBM Cloud zone with a selected region. It is comprised of the region short name and a numeric suffix, such as us-east-2 or eu-de-1. |
Yes | None |
resource_group_name |
String | Name of an existing IBM Cloud resource group in which VPC resources are created. | Yes | None |
sno_cluster_name |
String | Name of an OpenShift cluster used by the Assisted Installer API. | Yes | None |
sno_domain_name |
String | Name of an OpenShift cluster domain name used by the Assisted Installer API. The format should be a valid domain, such as example.com, but it does not have to resolve through public DNS servers. |
Yes | None |
setup_vsi_gui |
Boolean | When set to true, the KVM VSI is provisioned with a GUI desktop and access through VNC is configured. If false, access to the KVM VSI is only through SSH. |
No | false |
sno_version |
String | The OpenShift version to install. Valid values are 4.8,4.9, 4.10, and 4.11. |
No | 4.11 |
To edit the ansible/grou_vars/all file, you can open the file in your text editor of choice.
Optionally, if you are running on a Mac, you can configure the ansible/group_vars/all file by running the following commands, replacing the values in <> with your values.
export MY_NAMEPREFIX=<choose a name prefix>
ibmcloud is regions
export MY_REGION=<select a region name>
ibmcloud target -r $MY_REGION
ibmcloud is zones
export MY_ZONE=<select a zone in your targeted region>
export MY_RESOURCEGROUP=$MY_NAMEPREFIX-rg
echo $MY_RESOURCEGROUP

ibmcloud resource group-create $MY_RESOURCEGROUP

export MY_DOMAIN="$MY_NAMEPREFIX.cloud"
echo $MY_DOMAIN
export MY_CLUSTERNAME=<clustername, such as sno49kvm6cl1>

sed -i "" "s/CHANGE_NAMEPREFIX/$MY_NAMEPREFIX/g" $HOME_DIR/ansible/group_vars/all
sed -i "" "s/CHANGE_ZONE/$MY_ZONE/g" $HOME_DIR/ansible/group_vars/all
sed -i "" "s/CHANGE_REGION/$MY_REGION/" $HOME_DIR/ansible/group_vars/all
sed -i "" "s/CHANGE_RESOURCEGROUP/$MY_RESOURCEGROUP/" $HOME_DIR/ansible/group_vars/all
sed -i "" "s/CHANGE_DOMAIN/$MY_DOMAIN/" $HOME_DIR/ansible/group_vars/all
sed -i "" "s/CHANGE_CLUSTERNAME/$MY_CLUSTERNAME/" $HOME_DIR/ansible/group_vars/all
On Linux, use the following commands:
export MY_NAMEPREFIX=<choose a name prefix>
ibmcloud is regions
export MY_REGION=<select a region name>
ibmcloud target -r $MY_REGION
ibmcloud is zones
export MY_ZONE=<select a zone in your targeted region>
export MY_RESOURCEGROUP=$MY_NAMEPREFIX-rg
echo $MY_RESOURCEGROUP

ibmcloud resource group-create $MY_RESOURCEGROUP

export MY_DOMAIN="$MY_NAMEPREFIX.cloud"
echo $MY_DOMAIN
export MY_CLUSTERNAME=<clustername, such as sno49kvm6cl1>

sed -i "s/CHANGE_NAMEPREFIX/$MY_NAMEPREFIX/g" $HOME_DIR/ansible/group_vars/all
sed -i "s/CHANGE_ZONE/$MY_ZONE/g" $HOME_DIR/ansible/group_vars/all
sed -i "s/CHANGE_REGION/$MY_REGION/" $HOME_DIR/ansible/group_vars/all
sed -i "s/CHANGE_RESOURCEGROUP/$MY_RESOURCEGROUP/" $HOME_DIR/ansible/group_vars/all
sed -i "s/CHANGE_DOMAIN/$MY_DOMAIN/" $HOME_DIR/ansible/group_vars/all
sed -i "s/CHANGE_CLUSTERNAME/$MY_CLUSTERNAME/" $HOME_DIR/ansible/group_vars/all
Check the result by running the following command:
cat group_vars/all
4.5. Validate the parameters
Run the following playbook to validate the parameters:
ansible-playbook validate_parms.yml
You should see an output message that ends with the following information:
TASK [Success message] *************************************************************************************************************************************************************************************
ok: [localhost] => {
    "msg": "Parameter validation successful"
}

PLAY RECAP *************************************************************************************************************************************************************************************************
localhost                  : ok=12   changed=0    unreachable=0    failed=0    skipped=0    rescued=0    ignored=0
Step 5. Run the lead playbook and monitor progress
During our tests, the end-to-end process took 30 to 45 minutes. Your time may vary depending on your network speed, IBM Cloud region, and such.
5.1. Run the lead playbook
Run the following command:
ansible-playbook quickstart.yml
While the playbook is running, feel free to step away. It will take awhile for the process to complete.
5.2. Monitor progress
Progress is displayed by Ansible in the terminal. The longest task is monitoring the Assisted Installer after the cluster install starts. Your screen will look similar to the following image.

Figure 3. Polling the Assisted Installer.
Log in to the IBM Cloud web console and browse your VPC resources.
Log in to the Assisted Installer portal to see more granular progress updates.
Select the corresponding cluster from the list.
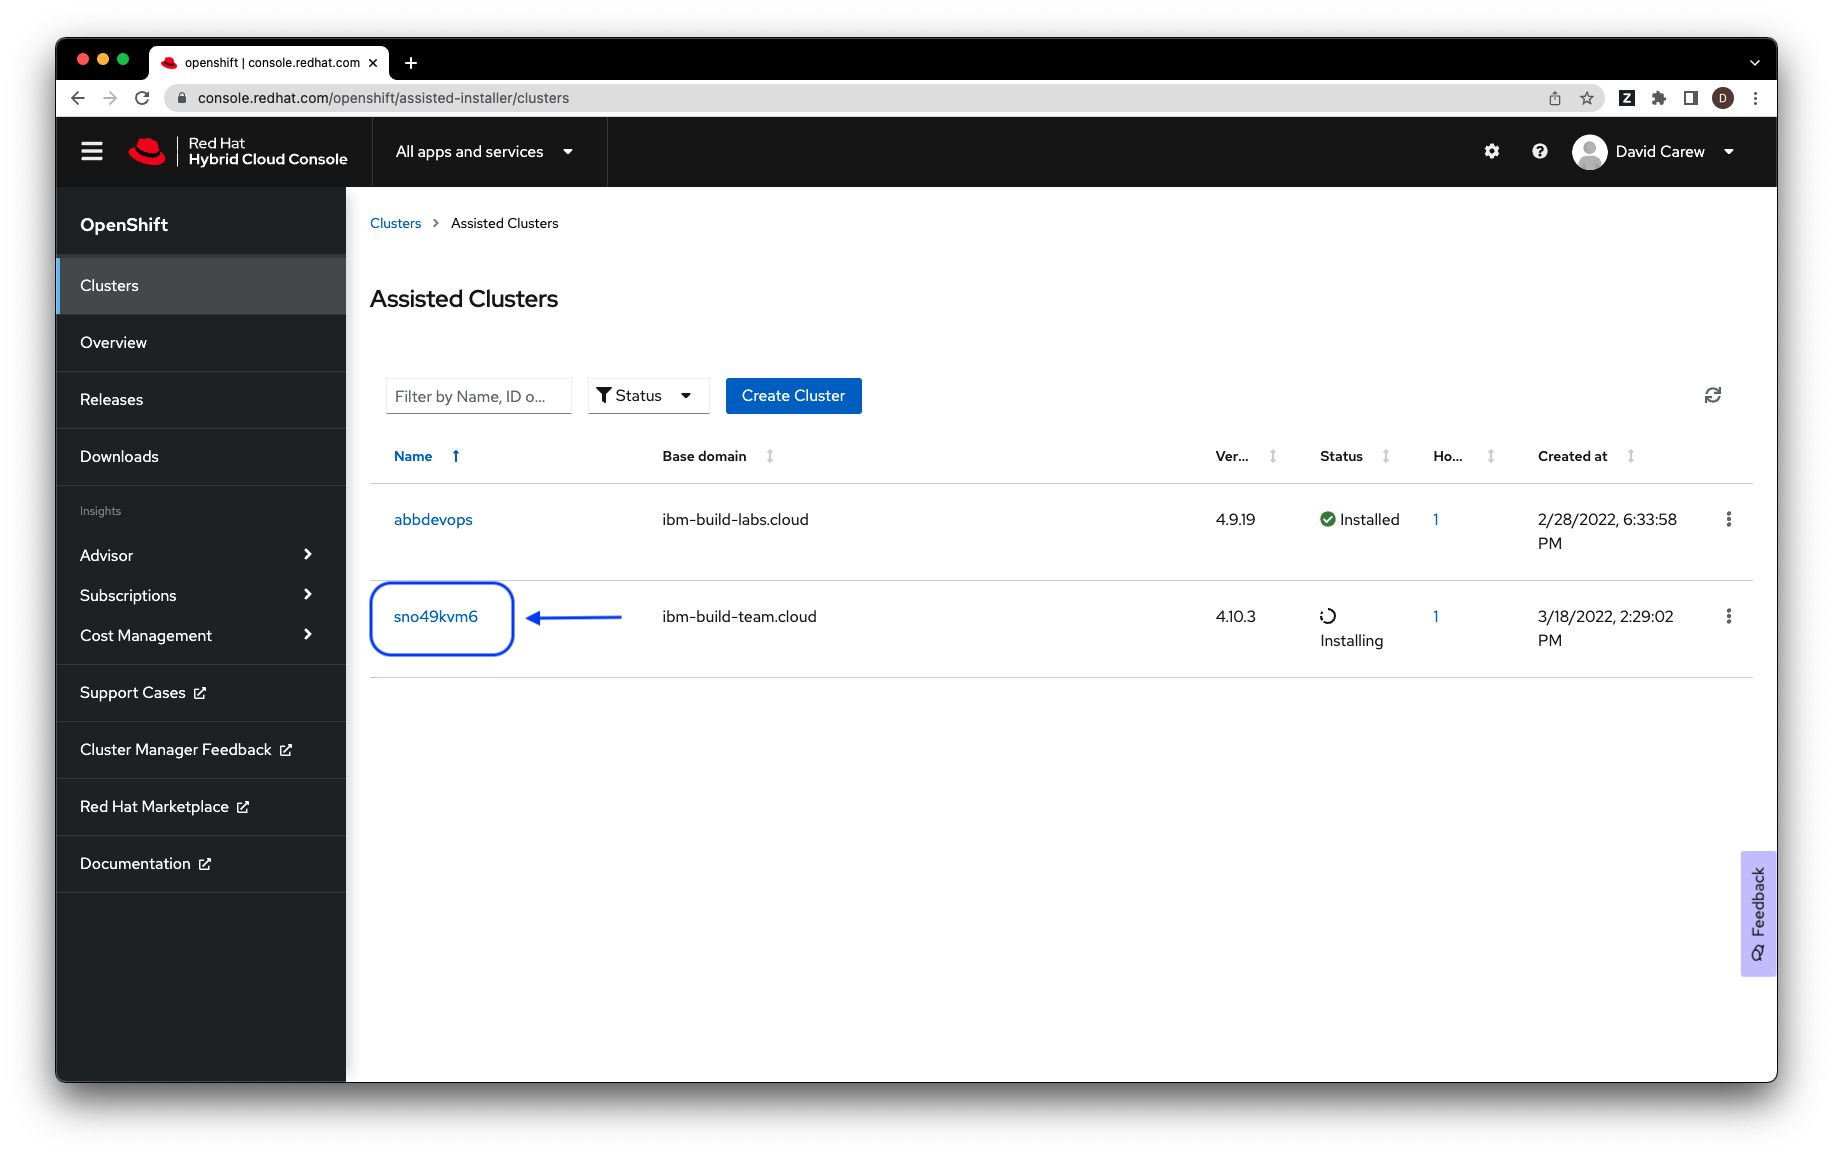
Figure 4. Example list of clusters.
View the progress of your cluster. The overall installation progress is shown in the Status section of the page, as indicated in the following screen capture.

Figure 5. Installation progress example.
5.3. Terminate the playbook
When the playbook completes the install, the terminal window will look similar to Figure 6. Note that if you selected the GUI option for the KVM host install, you will get additional details about accessing the KVM host from virtual network computing (VNC).
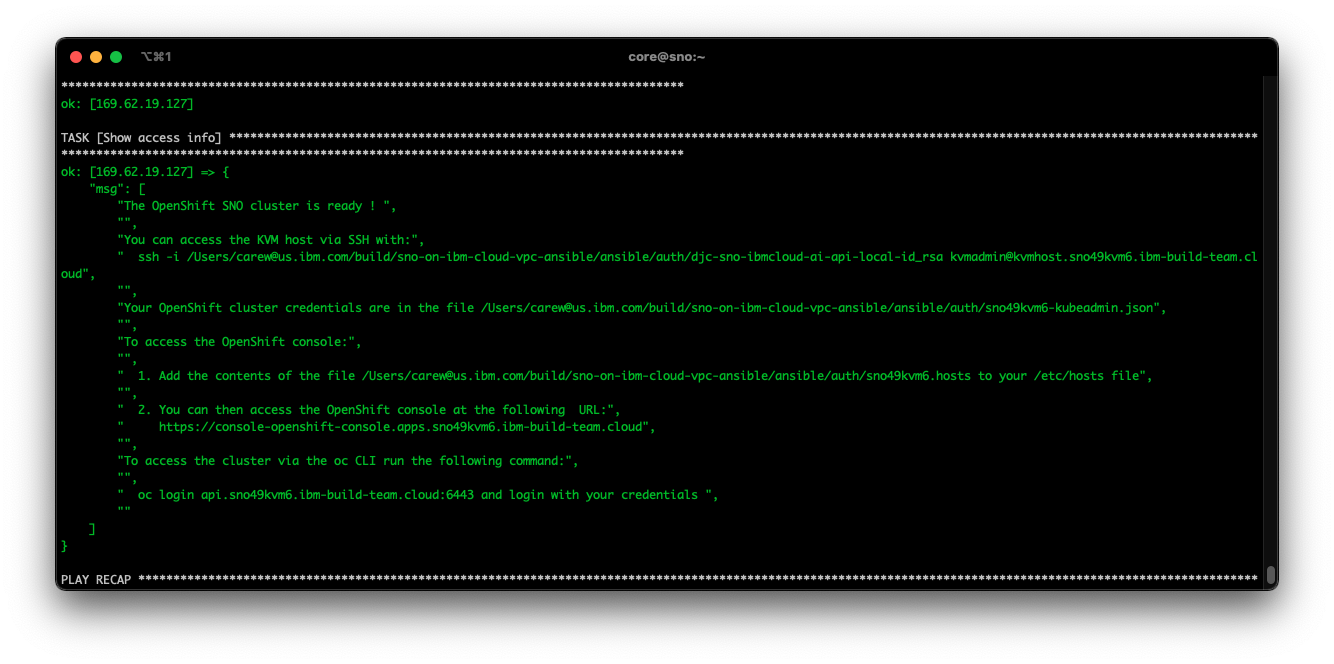
Figure 6. Sample access information.
With the playbook is complete, you are almost ready to access your cluster. Next, you must set up access to the cluster with your terminal and set up access to the OpenShift console with your browser.
Step 6. Access the cluster
6.1. How to access the cluster from your local machine
Before you try to access your cluster, make sure the installation is complete. To access your cluster from your local machine setup, you must:
- Add the contents of the
auth/[your cluster name].hostsfile to your local/etc/hostsfile. - Open the
auth/[your cluster name]-kubeadmin.jsonfile to see your cluster credentials. For browser access, go to the
https://console-openshift-console.apps.[your cluster name].[your cluster domain]URL and log in with your cluster credentials.For OpenShift CLI access, enter the following command:
oc login api.[your cluster name].[your cluster domain]:6443When prompted, enter your cluster credentials.
For SSH access to the KVM host, enter the following command:
ssh -i auth/[your cluster name]-local-id_rsa kvmadmin@kvmhost.[your cluster name].[your cluster domain]For SSH access to your SNO cluster, enter the following command:
ssh -i auth/[your cluster name]-remote-id_rsa core@sno.[your cluster name].[your cluster domain] -p 8022
6.2. How to access the cluster if you selected the GUI option for the KVM host
If you selected the GUI option for the KVM host, then you can access it through VNC.
Access the KVM host through SSH as described in Step 6.1.
Run the following commands to set the VNC password and restart the VNC server:
 vncpasswd
 sudo systemctl restart vncserver@:1.service
Run the following command to set the
kvmadminuser password:sudo passwd kvmadminConnect your VNC client to:
kvmadmin@kvmhost.[your cluster name].[your cluster domain]:5901
Step 7. Uninstall the cluster
As long as you still have the same group_var/all file that you used to install the cluster, you can remove the cluster and all of its components by running the following command:
ansible-playbook teardown_kvm_host.yml
Troubleshoot a timeout failure
A timeout failure may occur on some tasks depending on the latency of the network or the time that certain processes take to complete. For example:
TASK [create_sno_vm : Wait for VM to become reachable over SSH] **************************************************************************************************************************
fatal: [1.2.3.4]: FAILED! => {"changed": false, "elapsed": 190, "msg": "Timeout when waiting for 192.168.122.3:22"}
The solution is to increase the timeout value in the relevant task. For example, Wait for VM to become reachable over SSH in the relevant playbook, such as create_sno_vm:
- name: Wait for VM to become reachable over SSH
  wait_for:
    host: "{{ sno_ip_address }}"
    port: 22
    delay: 20
    **timeout: 360**
    sleep: 10
    state: started
Summary
In this tutorial, you learned how to deploy your own single-node OpenShift cluster on IBM Cloud by using the Assisted Installer tool. You used a series of Ansible playbooks to automate creation of the infrastructure on IBM Cloud and to install the cluster with Assisted Installer.
Now that you have an understanding of how the OpenShift installation process works, you can extend the process further by adding additional playbooks. For example, operator installs, cluster admin tasks, and even deploying applications to your newly created cluster.
To make this solution more repeatable and enterprise-ready, you can import the playbooks into AWX Project or the Red Hat Ansible Automation Platform. The automation controller within the Ansible Automation Platform provides a management console for playbook runs, and exposes an API that you can use to integrate AWX workflows into existing systems. You can also create a front end for your cluster provisioning process.