Article
Extract and analyze medical data with Docling, CrewAI, and AI Agents
Build an agent-based workflow that parses scanned blood reports, extracts key health parameters, and predicts CKD using a trained AI modelEarly detection of chronic kidney disease (CKD) is key to slowing or even stopping its progression. It helps manage common risk factors such as diabetes, high blood pressure, and heart disease. Timely action can protect kidney function and lower the chances of expensive treatments such as hospitalization, dialysis, or transplants.
This article shows how an agentic workflow can support early CKD detection. By combining structured patient data and AI, especially in nephrology, we can identify CKD in its early stages using routine blood and urine tests. This example focuses on a key marker of kidney health: the blood’s filtration capacity, measured by estimated Glomerular Filtration Rate (eGFR). For more information, see PMC Article on CKD.
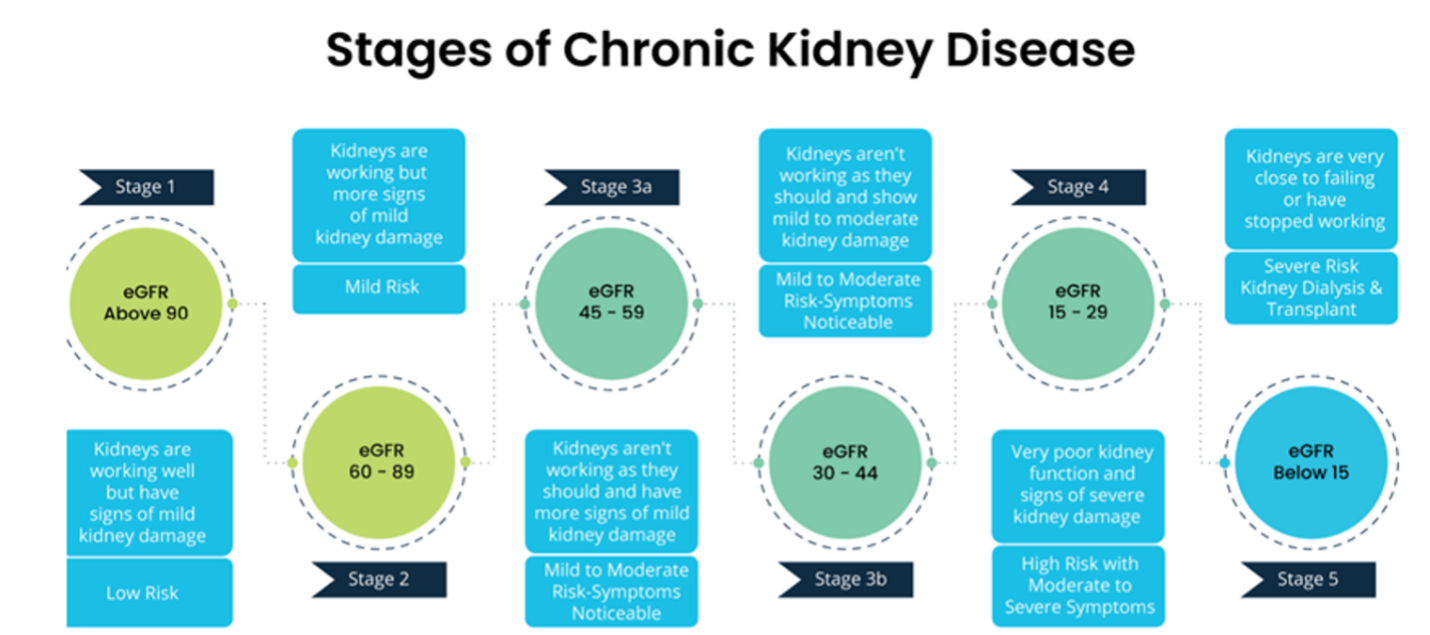
eGFR is an important diagnostic marker used to check how well the kidneys are filtering the blood. It gives an estimate of the glomerular filtration rate (GFR), which is the rate at which the kidneys remove waste and extra fluids from the body. eGFR is calculated using formulas like the CKD-EPI or MDRD equation, based on:
Serum creatinine level
Age
Sex
Race (in some cases)
The following image shows the eGFR ranges and the related stages of kidney function.
Prerequisites
You need an IBM Cloud account to create a watsonx.ai project.
Make sure Python version 3.10 or 3.11 is installed on your system.
Set up a watsonx.ai project
To create a watsonx.ai project, complete the following steps:
Log in to your IBM Cloud account.
Go to Manage > Access (IAM) > API Keys and create a new API key. Save it as your
WATSONX_APIKEY.Open watsonx.ai and sign in using your IBM Cloud account.
Create a new project by following the steps in IBM Cloud documentation.
To get your project ID, open the project in watsonx.ai, go to the Manage tab, and copy the Project ID under the General section. Save it as your
WATSONX_PROJECT_ID.
This setup will allow CrewAI agents to access foundation models in watsonx.ai and connect with other tools as needed.
Set up Python environment and variables
Make sure Python version 3.10 or 3.11 is installed. Check with:
python --versionCreate a virtual environment:
python -m venv crewai_watsonx_venvActivate the virtual environment:
On Windows:
crewai_watsonx_venv\Scripts\activateOn Linux or macOS:
source crewai_watsonx_venv/bin/activate
Install the required packages:
pip install crewai==0.75.0 langchain==0.3.4 langchain-community==0.3.3 litellm==1.50.2 crewai.toolCreate a
.envfile in your project folder and add these lines:WATSONX_APIKEY=<Your Watsonx API Key> WATSONX_PROJECT_ID=<Your Watsonx Project ID> WATSONX_URL=https://us-south.ml.cloud.ibm.com
Define custom tools for Docling
You can create custom tools to interact with the Docling environment.
Start by importing the required libraries:
import subprocess
import os
import json
from crewai.tools import BaseTool
from typing import Type
from pydantic import BaseModel, Field
Define input schema for Docling tool
Create the input schema to pass the PDF file path:
class DoclingToolInput(BaseModel):
    pdf_file_name: str = Field(..., description="Path of the PDF file")
Create tool to convert PDF to JSON
Define the tool that parses a PDF file and returns a JSON output:
class DoclingTool(BaseTool):
    name: str = "Docling"
    description: str = "Tool used to parse input PDF file and convert it into a JSON file"
    args_schema: Type[BaseModel] = DoclingToolInput
Convert PDF to JSON using command line
This function uses the Docling command-line tool to convert a PDF file into a JSON file.
def _run(self, pdf_file_name: str) -> str:
    """Uses Docling to process a PDF file and convert it to a JSON file."""
    try:
        cmd = f"docling --to json --force-ocr {pdf_file_name}"
        result = subprocess.run(cmd, shell=True, capture_output=True, text=True)

        if result.returncode == 0:
            json_file = os.path.splitext(pdf_file_name)[0] + ".json"
            print("Document processed successfully! Output saved to file:", json_file)
            return json_file
        else:
            return f"Error processing document: {result.stderr}"
    except Exception as e:
        return f"Exception occurred: {str(e)}"
Search JSON for next text node
This tool searches a JSON file for a specific key-value pair and returns the next node with a "text" key.
class Find_Next_Text_NodeInput(BaseModel):
    """Input schema for the JSON search tool."""
    file_name_json: str = Field(..., description="Name of the JSON file to parse")
    value: str = Field(..., description="The value to search for in the JSON file")
class Find_Next_Text_Node(BaseTool):
    name: str = "find_next_text_node"
    description: str = "Searches a JSON file for a key-value pair and returns the next node with key 'text'"
    args_schema: Type[BaseModel] = Find_Next_Text_NodeInput

    def _run(self, file_name_json: str, value: str) -> str:
        print("File name JSON:", file_name_json)

        with open(file_name_json, "r") as file:
            data = json.load(file)

        next_text_node = self.find_next_text_node_func(data, 'text', value)
        return f"The value of {value} is {next_text_node['text']}"
    def find_next_text_node_func(self, json_data, target_key, target_value):
        """
        Searches for a matching key-value pair and returns the next node with the key 'text'.
        """
        found_target = False

        def recursive_search(node):
            nonlocal found_target

            if isinstance(node, dict):
                for key, value in node.items():
                    if key == target_key and value == target_value:
                        found_target = True
                    elif key == "text" and found_target:
                        return node
                    elif isinstance(value, (dict, list)):
                        result = recursive_search(value)
                        if result:
                            return result

            elif isinstance(node, list):
                for item in node:
                    result = recursive_search(item)
                    if result:
                        return result

            return None

        return recursive_search(json_data)
YAML configuration for Agent setup
This YAML setup makes it easier to manage and maintain agent roles and goals.
docling_agent:
  role: >
    Document Processing Specialist
  goal: >
    Extract, process, and structure documents using IBM Docling.
  backstory: >
    An AI-powered assistant that helps process documents for AI applications.

JSON_data_extractor:
  role: >
    Data Extraction Specialist
  goal: >
    Extract the value of the input field from the JSON file.
  backstory: >
    You are a data extraction specialist trained to accurately parse and retrieve
    key-value pairs from structured JSON data. You ensure precise and relevant
    outputs for data analysis, reporting, or automation tasks.
Reference YAML files
For information about recommended YAML configurations, see:
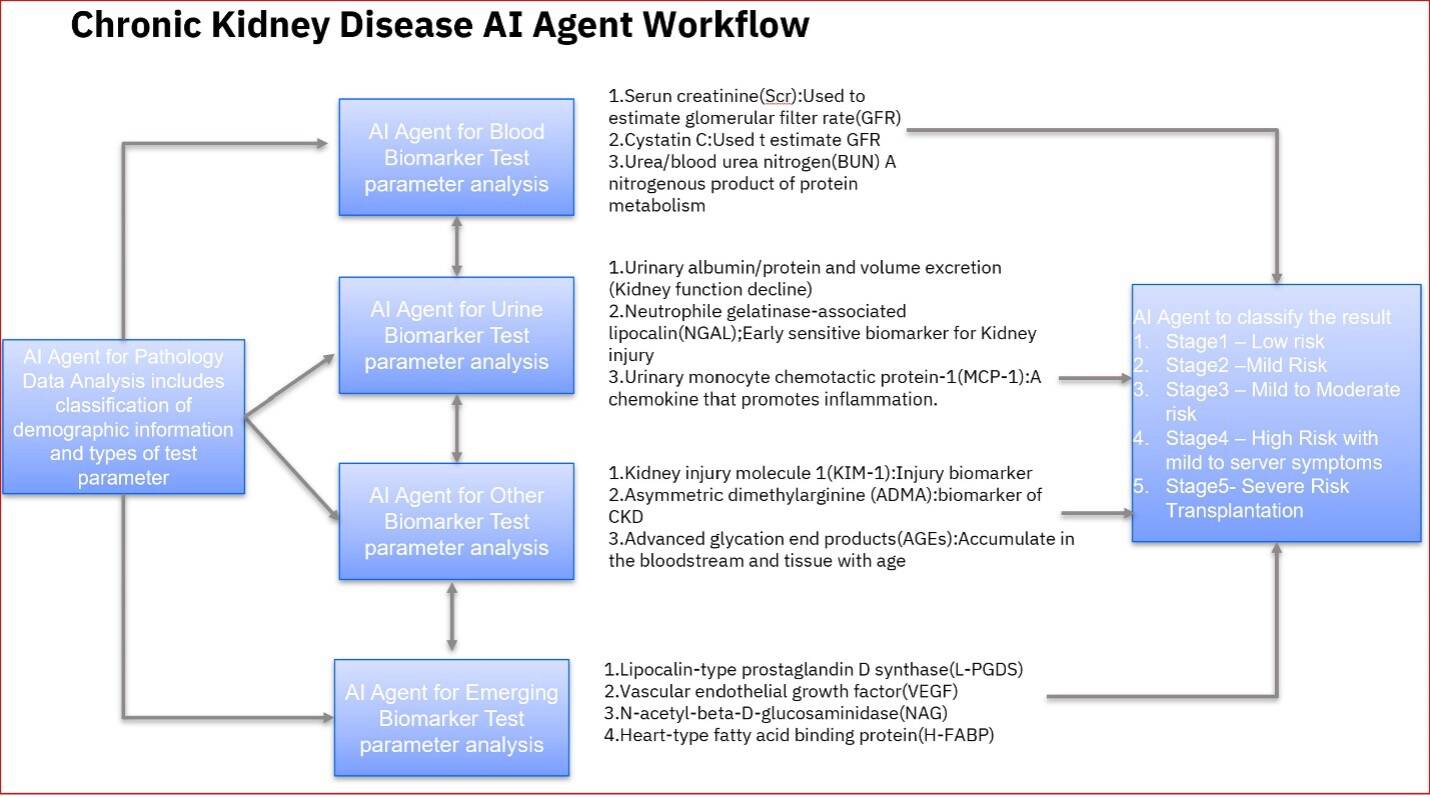
Chronic Kidney Disease AI Agent workflow
This workflow shows how AI agents can help analyze biomarker tests to manage CKD. Key steps include:
Comprehensive biomarker analysis
Early detection and risk assessment
Disease stage classification
Personalized treatment suggestions
Scalable and adaptable framework for various use cases
Agentic workflow for blood report analysis
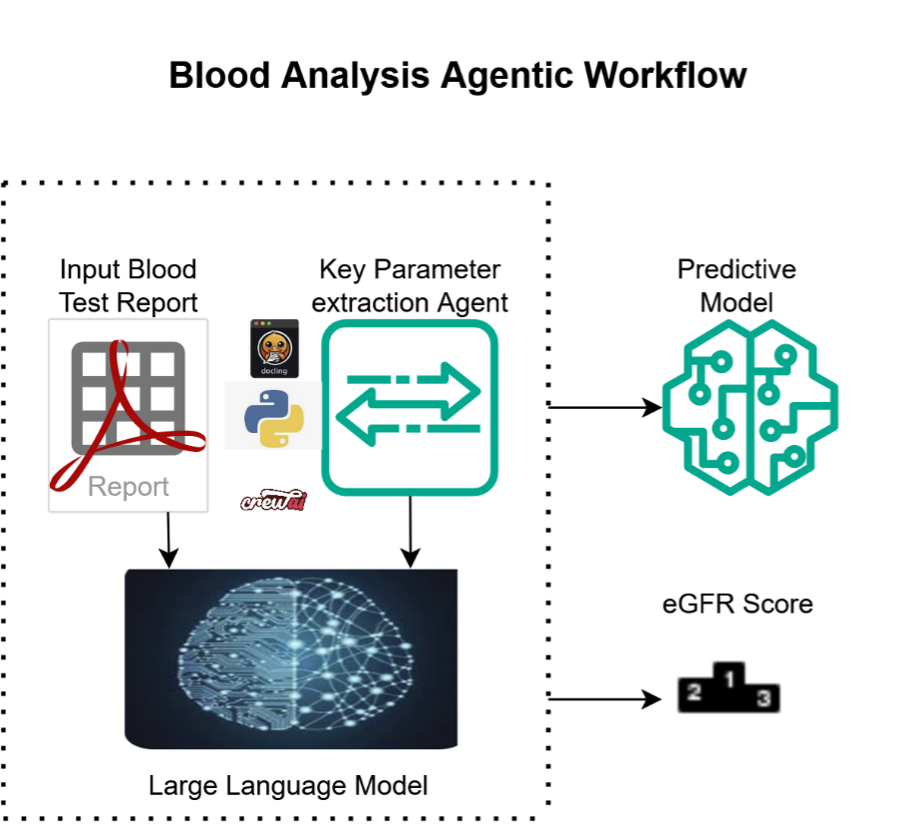
This workflow uses Docling to read scanned blood test reports, CrewAI to manage agents, and IBM Watsonx as the language model to guide agent interactions.
The input reader agent (Docling + CrewAI) converts the scanned blood report into JSON format. Key parameters from the report are then extracted and passed to a trained prediction model to classify the case as CKD or non-CKD.
The following steps outline how this agent-based system supports early detection of chronic kidney disease using blood analysis.
Key steps in the blood report Agent workflow
Blood report ingestion agent: Collects and digitizes routine blood test reports from labs or hospital systems.
Key parameter extraction Agent: Automatically extracts important biomarkers such as:
Serum Creatinine
Blood Urea Nitrogen (BUN)
Albumin
eGFR (calculated)
Contextual data Agent: Adds patient details like age, sex, and medical history to support accurate interpretation.
Prediction Agent: Uses a trained AI model to classify the case as CKD or non-CKD based on the extracted data.
Initialize CrewAI tools and language model
Use the following code to import necessary components and set up tools for agent interaction:
from crewai import Agent, Crew, Process, Task, LLM
from crewai.project import CrewBase, agent, crew, task
from ckd_v3.tools.custom_tool import DoclingTool
from ckd_v3.tools.custom_tool import Find_Next_Text_Node
Refer to the Crew Class with Decorators documentation for setup examples.
Next, configure the IBM Watsonx language model. This use case uses the watsonx/meta-llama/llama-3-1-70b-instruct model:
llm = LLM(
    model="watsonx/meta-llama/llama-3-1-70b-instruct",
    base_url="<your-watsonx-base-url>",
    api_key="<your-watsonx-api-key>"
)
Define the CKD Crew and Docling Agent
This example sets up the CkdV3 crew and a document processing agent using configurations from YAML files.
@CrewBase
class CkdV3():
    """CKD crew setup"""
    agents_config = 'config/agents.yaml'
    tasks_config = 'config/tasks.yaml'

    def docling_agent(self) -> Agent:
        return Agent(
            config=self.agents_config['docling_agent'],
            verbose=True,
            tools=[DoclingTool()],
            llm=llm,
        )
Define tasks for PDF and JSON parsing
These tasks handle the parsing of a PDF file and the resulting JSON data.
@task
def parse_pdf(self) -> Task:
    return Task(
        config=self.tasks_config['parse_pdf'],
    )

def parse_json(self) -> Task:
    return Task(
        config=self.tasks_config['parse_json'],
        context=[self.parse_pdf()]
    )
Create the CKD Crew
This function sets up the CKD crew with defined agents and tasks.
@crew
def crew(self) -> Crew:
    return Crew(
        agents=self.agents,
        tasks=self.tasks,
        process=Process.sequential,
        verbose=True,
    )
Build a machine learning model for CKD prediction
To predict Chronic Kidney Disease (CKD), we the following dataset from Kaggle: Chronic Kidney Disease
We trained a predictive model using this dataset and hosted it on watsonx.ai in IBM Cloud.
To download the dataset:
Go to the dataset page.
Click the Data tab.
Download the required files manually.
Reference for building and deploying the model: IBM Cloud tutorial for ML model lifecycle.
Prediction input and output details
Model input:
Fields: Example fields include
bp(blood pressure),sg(specific gravity),pc(pus cell), and othersValues: Corresponding values for each input field
Model output:
Prediction:
0indicates CKD is present,1means CKD is not presentProbability: Shows how confident the model is about the prediction
Steps to get a prediction:
Authentication: Use your API key to get an authentication token
Scoring: Send the input fields and values along with the token to get the prediction
The following examples show how to use cURL to send requests to the model. The token is stored in the IAM_TOKEN environment variable.
Example 1: Two inputs with CKD detected
Request:
The following curl command sends two patient records for prediction. Both are expected to be classified as having CKD.
curl -X POST \
  --header "Content-Type: application/json" \
  --header "Accept: application/json" \
  --header "Authorization: Bearer $IAM_TOKEN" \
  -d '{
    "input_data": [
      {
        "fields": [
          "age", "blood_pressure", "specific_gravity", "albumin", "sugar",
          "red_blood_cells", "pus_cell", "pus_cell_clumps", "bacteria",
          "blood_glucose_random", "blood_urea", "serum_creatinine", "sodium",
          "potassium", "haemoglobin", "packed_cell_volume",
          "white_blood_cell_count", "red_blood_cell_count", "hypertension",
          "diabetes_mellitus", "coronary_artery_disease", "appetite",
          "peda_edema", "aanemia"
        ],
        "values": [
          [
            "48.0", "70.0", "1.005", "4.0", "0.0", 1, 0, 1, 0,
            "117.0", "56.0", "3.8", "111.0", "2.5", "11.2", "32",
            "6700", "3.9", 1, 0, 0, 1, 1, 1
          ],
          [
            "63.0", "70.0", "1.01", "3.0", "0.0", 0, 0, 1, 0,
            "380.0", "60.0", "2.7", "131.0", "4.2", "10.8", "32",
            "4500", "3.8", 1, 1, 0, 1, 1, 0
          ]
        ]
      }
    ]
  }' <API endpoint>
Response:
{
  "predictions": [
    {
      "fields": ["prediction", "probability"],
      "values": [
        [0, [0.9997, 0.0003]],
        [0, [1.0, 0.0]]
      ]
    }
  ]
}
Note: A prediction value of 0 means CKD is present.
Example 2: One CKD positive and One CKD negative input
Request:
This curl command submits two patient records. The first is predicted as CKD (positive), the second as non-CKD (negative).
curl -X POST \
  --header "Content-Type: application/json" \
  --header "Accept: application/json" \
  --header "Authorization: Bearer $IAM_TOKEN" \
  -d '{
    "input_data": [
      {
        "fields": [
          "age", "blood_pressure", "specific_gravity", "albumin", "sugar",
          "red_blood_cells", "pus_cell", "pus_cell_clumps", "bacteria",
          "blood_glucose_random", "blood_urea", "serum_creatinine", "sodium",
          "potassium", "haemoglobin", "packed_cell_volume",
          "white_blood_cell_count", "red_blood_cell_count", "hypertension",
          "diabetes_mellitus", "coronary_artery_disease", "appetite",
          "peda_edema", "aanemia"
        ],
        "values": [
          [
            "48.0", "70.0", "1.005", "4.0", "0.0", 1, 0, 1, 0,
            "117.0", "56.0", "3.8", "111.0", "2.5", "11.2", "32",
            "6700", "3.9", 1, 0, 0, 1, 1, 1
          ],
          [
            "40.0", "80.0", "1.025", "0.0", "0.0", 1, 1, 0, 0,
            "140.0", "10.0", "1.2", "135.0", "5.0", "15.0", "48",
            "10400", "4.5", 0, 0, 0, 0, 0, 0
          ]
        ]
      }
    ]
  }' <API endpoint>
Response:
{
  "predictions": [
    {
      "fields": ["prediction", "probability"],
      "values": [
        [0, [0.9997, 0.0003]],
        [1, [0.0755, 0.9245]]
      ]
    }
  ]
}
Note:
prediction: 0indicates CKD is presentprediction: 1indicates is not presentThe probabilities indicate the model's confidence level for each prediction.
Summary
This article illustrated how to build an AI-powered system to detect Chronic Kidney Disease (CKD) early using scanned blood reports. It uses Docling to extract data from PDF files and converts them to structured JSON format. CrewAI agents process the extracted data, identify key biomarkers, and prepare it for prediction. A machine learning model hosted on IBM watsonx.ai classifies the inputs as CKD or non-CKD. The model uses patient parameters like creatinine levels, blood pressure, and albumin levels for prediction. Examples show how to send inputs and interpret the prediction results.
Acknowledgments
This article was created as part of the IBM Open Innovation Community Initiative:
Better Together: Better Together Data and AI – AI Assistants Healthcare
We extend our sincere thanks to our colleagues and leadership teams for their guidance, mentorship, and support throughout this journey—from early experimentation to successful validation of the concepts and technologies.
IBM Professionals:
Ahmad Azraq, Vishnu Kambampati, Mekki MacAulay
Red Hat Professionals:
Thalia Hooker, Kris Verlaenen
Source code
The source code is published in GitHub repo. Note that this is a proof-of-concept (PoC) implementation and not production-ready. It has been tested on Windows 11 but can be adapted to other platforms.
At a high-level, these are the steps to run the solution:
Clone the repository:
git clone https://github.com/IBM/i-oic-better-together-data-ai-healthcareIn the
tools/ckd_v3folder, find the custom tool configuration, including Docling integration for PDF parsing.The
yamlfolder contains YAML files defining agents and task configurations.From the
localfolder, runmain.pyto execute the agentic workflow locally. Change the input data as needed.