Article
Building a PyTorch based transfer learning application with Bob
Use a pretrained ResNet-18 model to fine-tune a PyTorch deep learning model and accelerate accuracy with transfer learningBuilding an AI deep learning model from scratch is challenging. It requires choosing an architecture, large dataset, immense computational power, complex optimization, and significant training time. For many use cases, transfer learning is a better starting point.
Transfer learning reuses a model trained on a large dataset and fine-tunes it for a new task. It delivers dramatically better accuracy in far less training time. For example, a neural network trained on a large set of images has already learned useful features such as edges, shapes, and patterns. You can reuse these learned features for a new image classification task.
This article walks you through a demo (built with IBM Bob) to help you understand this foundational technique of transfer learning.
PyTorch is a leading open source framework for machine learning, in particular deep learning. PyTorch core and related libraries are hosted on the PyTorch Foundation. One of the ecosystem libraries, TorchVision, provides pretrained models including the ResNet-18 model that we use in our demo.
The demo creates a PyTorch ResNet-18 model from scratch, and then uses a pretrained ResNet-18 model (provided by the TorchVision project) to fine-tune it to demonstrate the benefits of transfer learning.
ResNet, or Residual Network, is a deep neural network architecture widely used in production for image classification across industries such as medicine. The pretrained ResNet-18 model was trained on the ImageNet dataset, which contains 1.2 million images across 1,000 categories. For faster download and fine-tuning in our demo, we used the CIFAR-10 (Canadian Institute for Advanced Research 10-class) dataset, which contains 60,000 32×32 color images across 10 distinct classes.
Building the transfer learning demo
Using IBM Bob, we installed PyTorch and created our transfer learning demo with a production-ready pretrained model architecture.
First, we created a text file, called project_blueprint.txt, in plain English describing what we wanted from our demo.
In the Bob IDE, we opened the folder containing the project_blueprint.txt file, and in Agent mode, we ran the /init command. The /init command scanned our project folder and generated a set of AGENTS.md context files, automatically saved in the .bob/ folder. Bob references these files for tasks such as generating a plan and code for the demo.
Next, after switching to Plan mode, we asked Bob to create a project plan from the project blueprint with a simple prompt: "Based on the project_blueprint.txt, create an implementation plan for this demo project." Bob generates the following structured plan and writes it to pytorch-demo-plan.md.

After reviewing the project plan, we switched to Agent mode and asked Bob to implement the plan with a simple prompt: "Implement the project demo plan, pytorch-demo-plan.md."
Bob created a Todo list of tasks and waited for our review and approval to start them. Bob also created the Python script files for us to review and confirm our environment and setup.
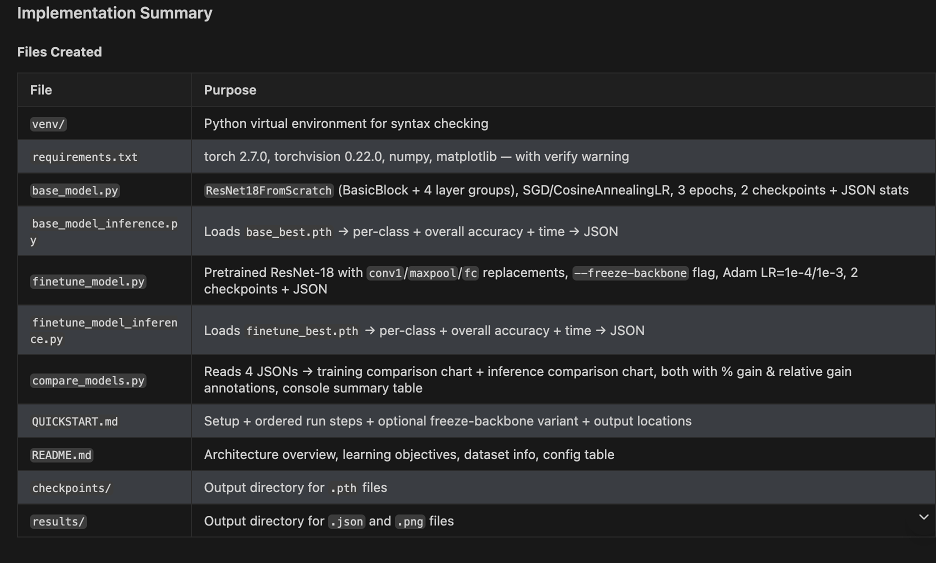
You can refer to the various scripts created by Bob from the code repository, but the Bob-generated code in the train_base_model.py script, for example, takes care of the following:
- Device detection (for example, Metal Performance Shaders (MPS), CUDA, or CPU)
- Model architecture including basic residual block for the ResNet-18
- Data loading of CIFAR-10 to feed to the model training and testing
- Training loop
- Testing loop
- Saving model checkpoints
The code includes plenty of comments and print statements for the training and testing accuracy that we had wanted from the demo.
In train_base_model.py or train_finetuned_model.py, if you increase the number of epochs, you gain better training and test accuracy for both the base and fine-tuned model. We used 3 epochs to run the training and testing quickly.
The QUICKSTART.md file gives steps to run the training and inference scripts, followed by the model accuracy comparison in compare_models.py. Follow those steps to see accuracy details from the training and inferencing scripts. The comparison script produces .json files and .png files for visualization.
Transfer learning accuracy advantage
From running the demo, the training_accuracy_comparison.png file shows the following chart.
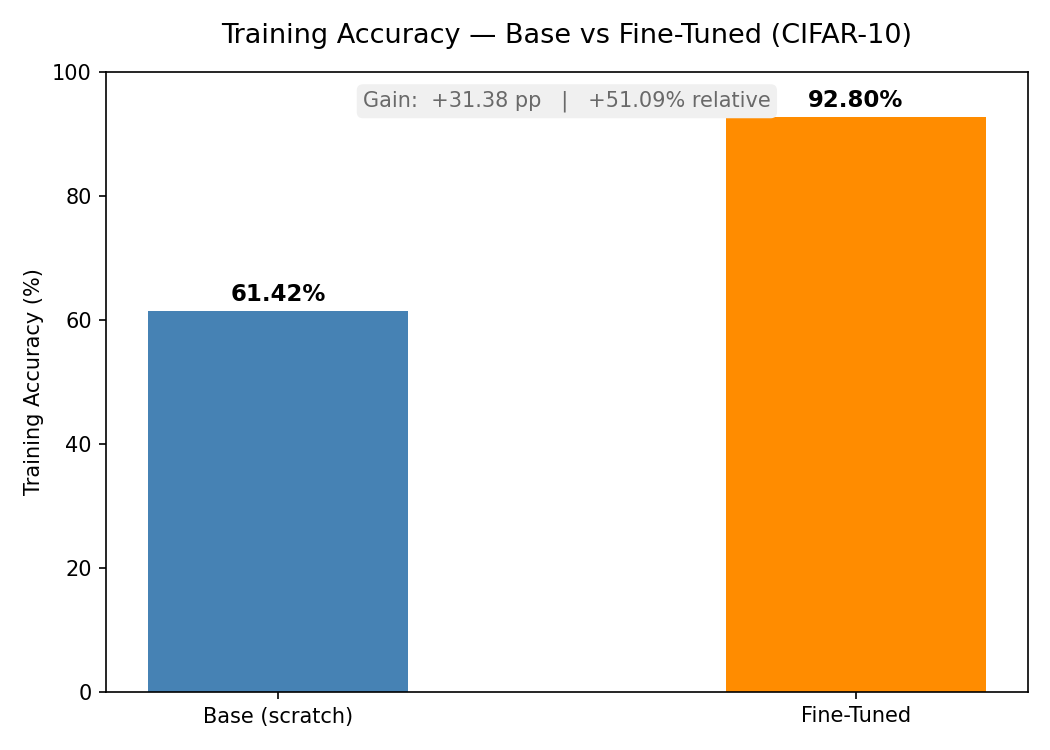
After 3 identical epochs, fine-tuning produced 31.38 percentage points higher and 51.09% higher relative accuracy than training from scratch. In other words, the fine-tuned model was about 50% more accurate than the base model.
The inference_accuracy_comparison.png file shows the following chart.

Inference accuracy produced similar results to the training accuracy.
The pretrained ResNet-18 brings transferable visual features — edges, shapes, and textures — learned from 1.2 million ImageNet images. The base model had only 3 epochs on 50,000 CIFAR-10 images to learn all of those features from scratch.
Summary
This demo used Bob to build a transfer learning demo that shows the benefits of PyTorch transfer learning by comparing two ResNet-18 models on the CIFAR-10 dataset.
A base model was trained from scratch with no pretrained weights, while a fine-tuned model started from TorchVision's ImageNet-pretrained ResNet-18. Both models were then run through dedicated inference scripts to produce side-by-side bar charts illustrating accuracy gains.
By using transfer learning with PyTorch and building with Bob, you save coding time, training time, and resource costs. Both training and inference accuracy improve quickly.
Try the demo yourself! Refer to the README and QuickStart.