Tutorial
Automate QRadar app access using IBM Security Verify SaaS
Keep malicious actors out of your systemsArchive date: 2026-01-01
This content is no longer being updated or maintained. The content is provided “as is.” Given the rapid evolution of technology, some content, steps, or illustrations may have changed.We know the importance of security for a customer-facing application. Any compromise can result in the loss of customers, as well as an impact on revenue and reputation.
With IBM Security QRadar and IBM Security Verify SaaS, you can help to ensure that the malicious users are kept at bay or have their access removed at the first hint of ill-intentioned behavior.
What is IBM Security QRadar?
IBM Security QRadar is a market-leading Security Information and Event Management (SIEM) solution that creates prioritized, high-fidelity alerts in real time by correlating analytics, threat intelligence, and network and user behavior anomalies to help security analysts stay focused on investigating and remediating the right threats. QRadar SIEM makes it easy to remediate threats faster and helps clients catch threats that other solutions simply miss. With QRadar, you and your security team can:
- Detect targeted threats with prioritized, high-fidelity alerts in real time
- Fully integrate Network Detection and Response (NDR) for monitoring network flows anchored to an event or log data
- Take advantage of over 700 integrations for proactive detection and response with a broad range of tightly integrated add-on offerings
- Implement 1,500 out-of-the-box use cases aligned to MITRE ATT&CK to quickly identify and correlate activities throughout the kill chain with end-to-end visibility
- Use an intuitive, automatic query builder built-in with smart property detection to quickly search and pinpoint valuable data without writing rules and code
What is IBM Security Verify SaaS?
IBM Security Verify SaaS is a completely cloud-based IAM solution, offering hybrid cloud deployment options from cloud to private, native, and on-premises.
Verify SaaS offers:
- Core identity base capabilities for both your workforce and consumers, including adaptive access and advanced authentication capabilities, powered by Trusteer’s AI-enabled engine
- Single sign-on for centralized access control to cloud and on-prem resources
- Adaptive access for risk-based authentication
- Advanced authentication for frictionless access
- Embedded privacy and consent management capabilities that are pre-built into easy-to-adopt workflows
- Full lifecycle management to connect application access with business governance workflows
QRadar plays a critical role for an enterprise's security and you should definitely control who gets access to it. Rather than onboarding users manually in the system, an enterprise should mandate the use of a request-based automated process where the QRadar app owners need to approve the request before onboarding the analysts into the application.
Verify SaaS can make user onboarding easier and add a layer of security in the form of single sign-on (SSO) and multi-factor authorization (MFA). You can further enhance your security posture by using the adaptive access capabilities provided by Verify SaaS. You can onboard users into QRadar with the right set of permissions through Verify SaaS only, meaning the administrator doesn’t need to intervene to make updates.
The following diagram shows how the QRadar console can be protected through Verify SaaS. Only authorized users who can successfully authenticate against their enterprise identity provider (IDP) can access the console.
Verify SaaS is compatible to use any Security Assertion Markup Language (SAML) or OpenID Connect (OIDC) compliant identity provider or social IDP. If the provider adheres to the protocols for SAML or OIDC, the enterprise can use it as a form of authentication.
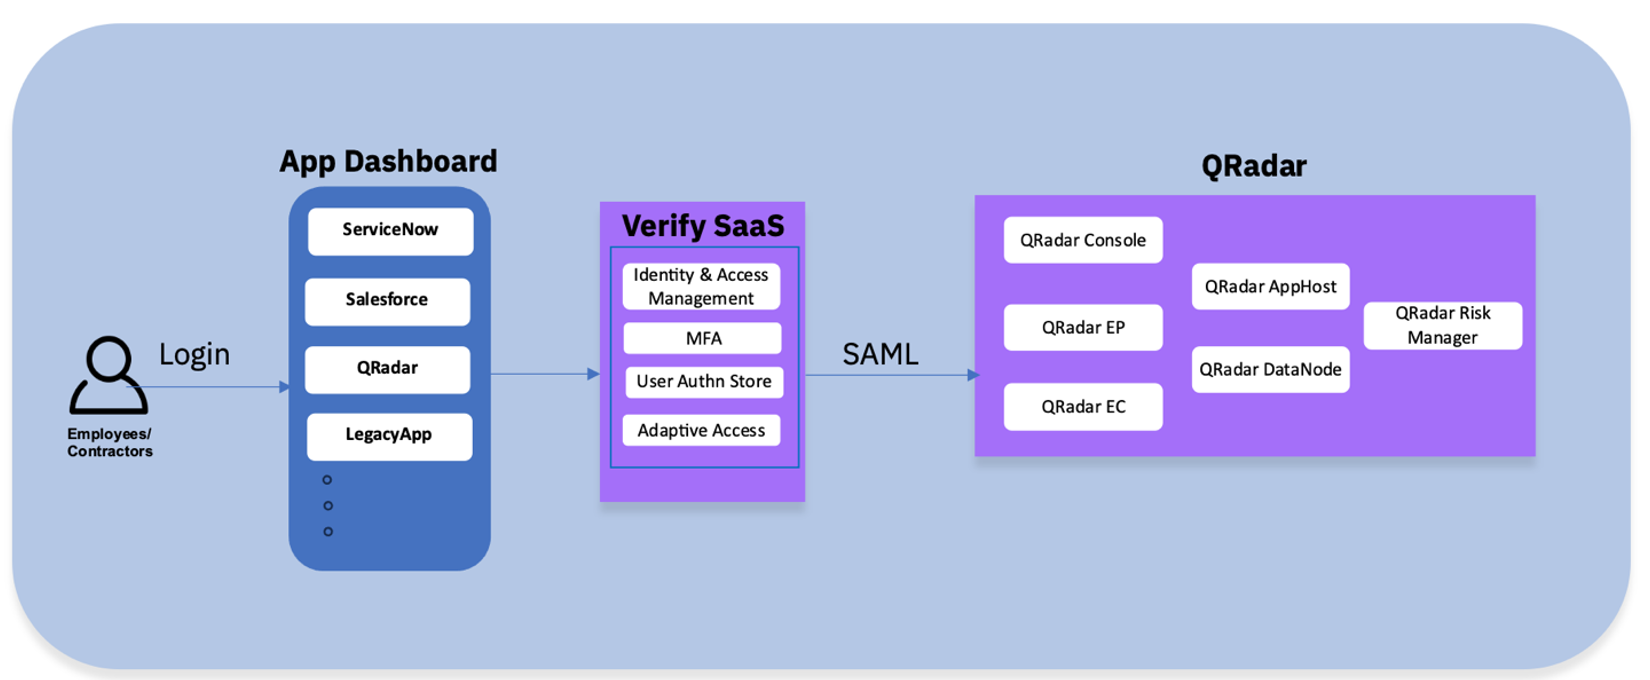 Figure 1: Verify SaaS and QRadar
To enhance security access, you can use a two-factor authentication mechanism. Verify SaaS supports the use of SMS, voice, or email-based one-time password (OTP), time-based one-time password (TOTP), and authenticator apps. To prevent fraudulent users from accessing QRadar, you can build access policies that will block access in the case of a high-risk profile.
Use case
For this tutorial, you will take the role of a security operations center (SOC) analyst who has recently moved to the team and who needs to get access to the QRadar console to be able to administer and manage it. Normally, the traditional method to provide access would be to create a service ticket and wait for the proper assignment, followed by the QRadar administrator creating the user in the application. In this kind of manual process, there is always the possibility that the administrator might make a mistake, assign an incorrect role, or make another error that might lead to delays before the analyst has the required access.
To avoid this potential for wasted time, the analyst can use Verify SaaS to submit a request for QRadar. Once approved, the analyst is onboarded and becomes functional immediately. Additionally, an approver raises the accountability so that no random user can gain access to a critical app like QRadar.
Learning objectives
These steps show you how to onboard a SOC analyst to QRadar using Verify SaaS, and secure the application with multi-factor authorization and risk-based adaptive access using IBM Security Verify SaaS.
Prerequisites
- IBM Security Verify SaaS tenant access (register for a free IBM Security Verify SaaS trial)
- IBM Security QRadar console administrator access
Estimated time
Completing this tutorial should take about 15 minutes.
Steps
To automatially provide access to QRadar using Verify SaaS, you need to configure both software products.
Step 1. Configure IBM Security QRadar
To configure IBM Security QRadar, complete the following steps:
- Log in to the QRadar console as an administrator.
- In the top menu, click Admin.
- In the Admin window's User Management section, click Authentication.
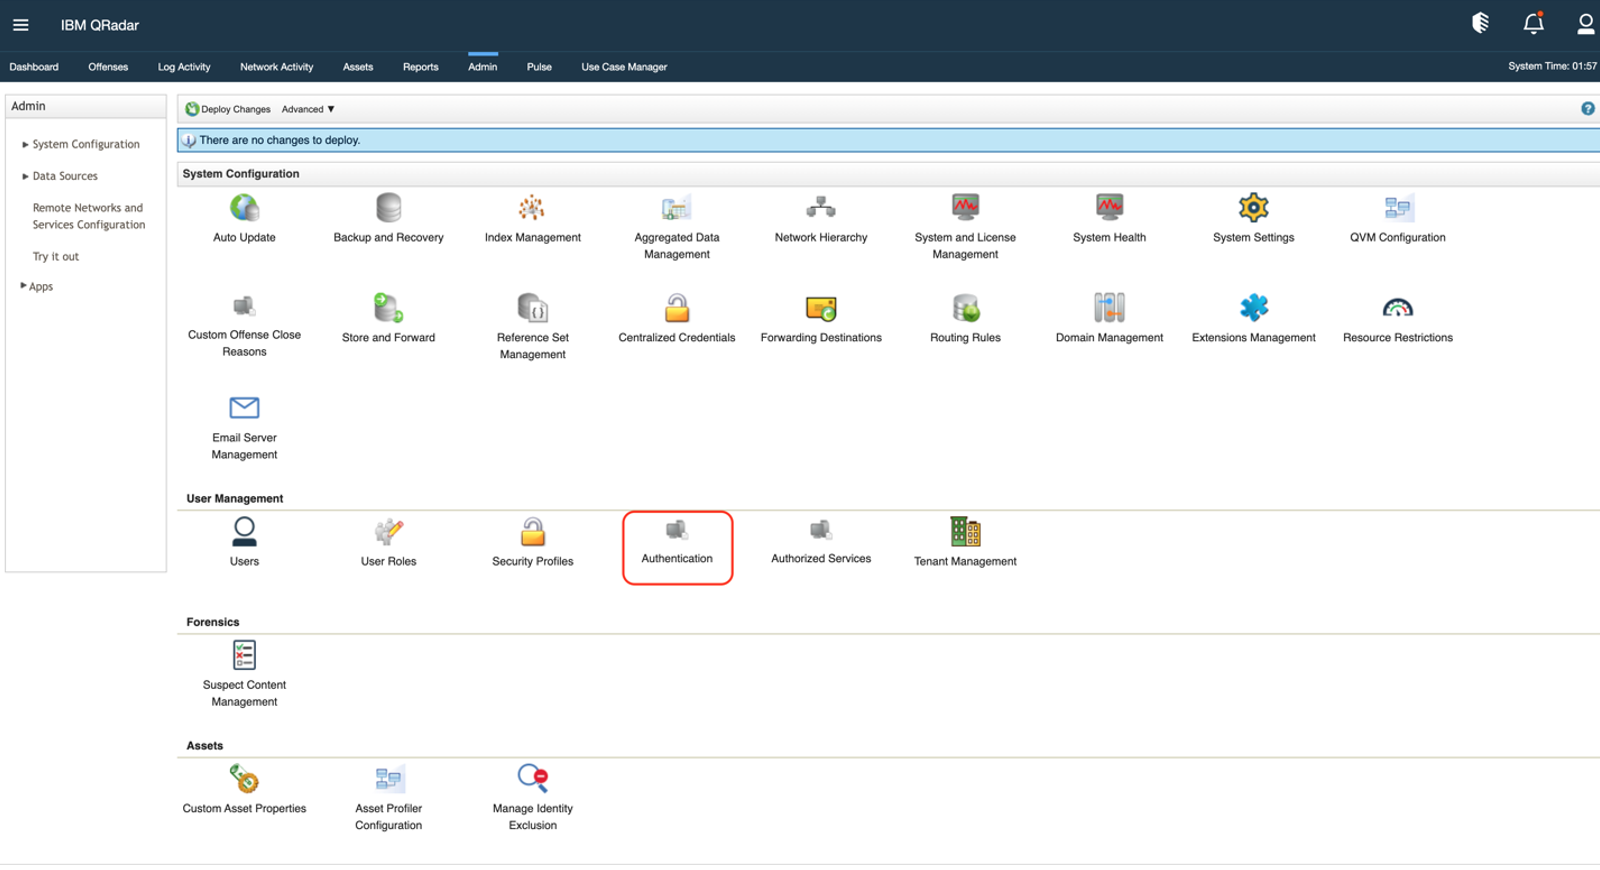
Click Authentication Module Settings. Update the settings as follows:
- From the Authentication Module Settings drop-down list, select SAML 2.0.
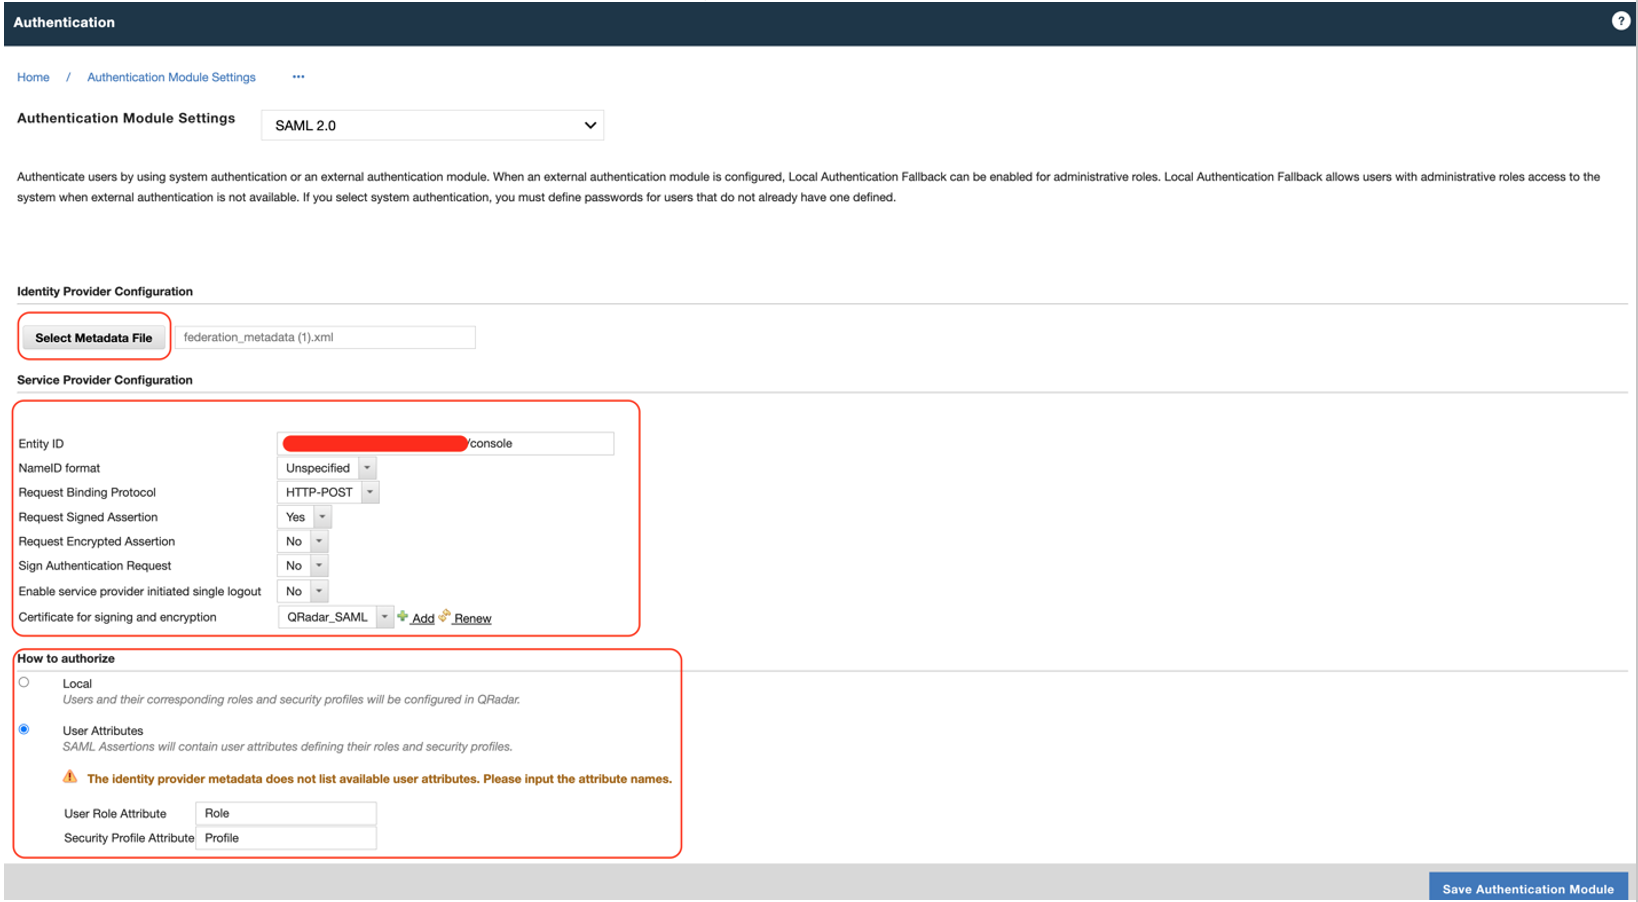
- In the Identity Provider Configuration section, click Select Metadata File, browse to the XML metadata file that was created by your identity provider, and click Open.
- In the Service Provider Configuration section, enter the Entity ID URL (the fully qualified domain name of your QRadar machine). You do not need to update any other fields in this section.
- In the How to authorize section, select User Attributes. (Note: QRadar uses the attributes provided in the SAML assertions to create local users automatically upon authentication requests.)
- Click Save Authentication Module. The QRadar SAML metadata file is automatically downloaded.
- From the Authentication Module Settings drop-down list, select SAML 2.0.
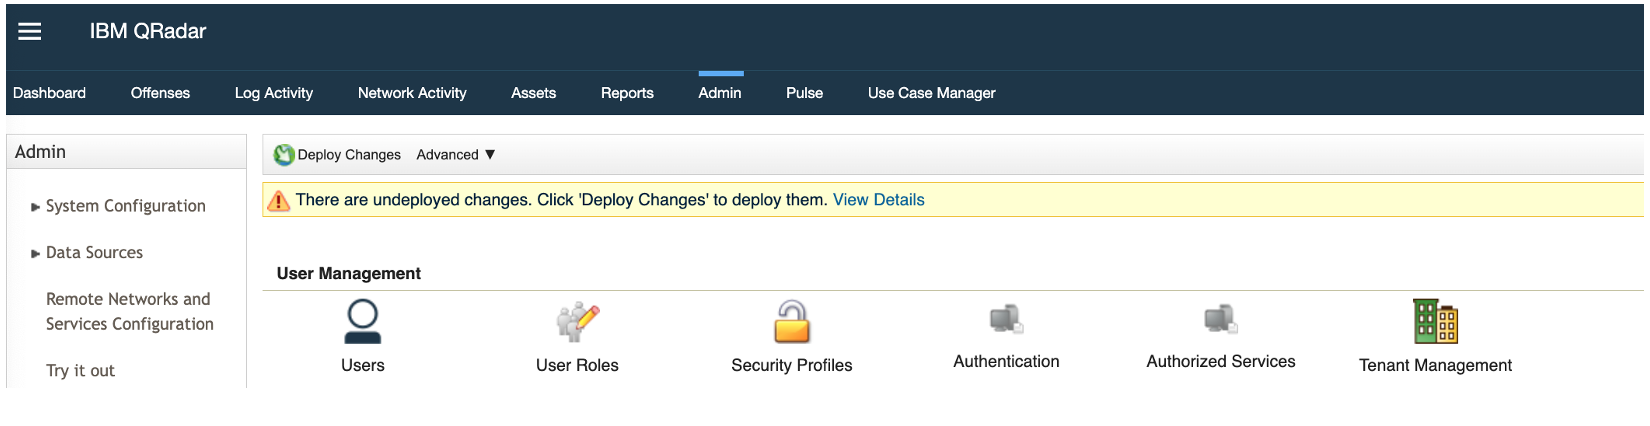
In the Admin window, click Deploy Changes.
Step 2. Register the QRadar instance in Verify SaaS
To register the instance of the IBM QRadar application in IBM Security Verify SaaS, complete the following steps:
- Log in to your Verify SaaS tenant and go to Applications > Add Application.
- Search for QRadar and click Add.
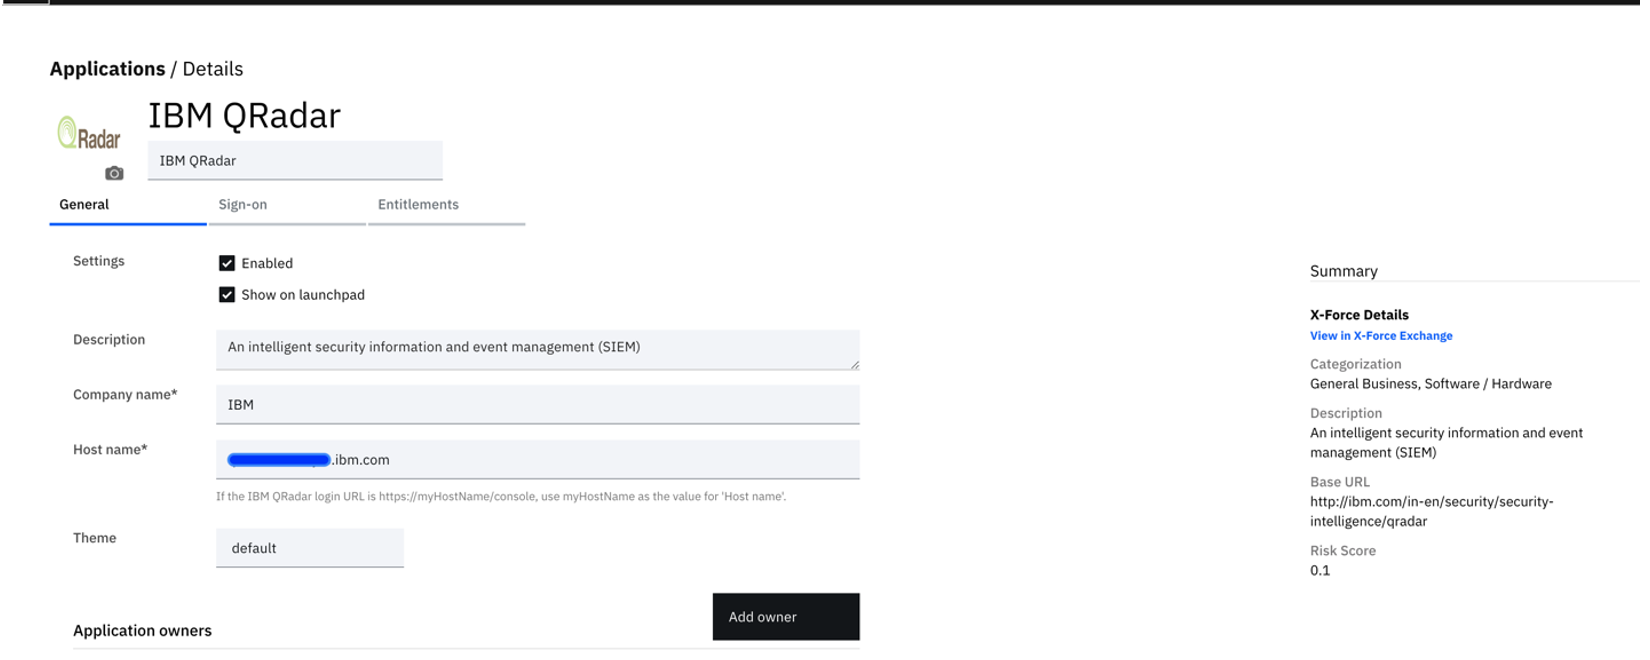
- Click the General tab and then enter the hostname of your QRadar instance. Click Add owner and add your application owners.
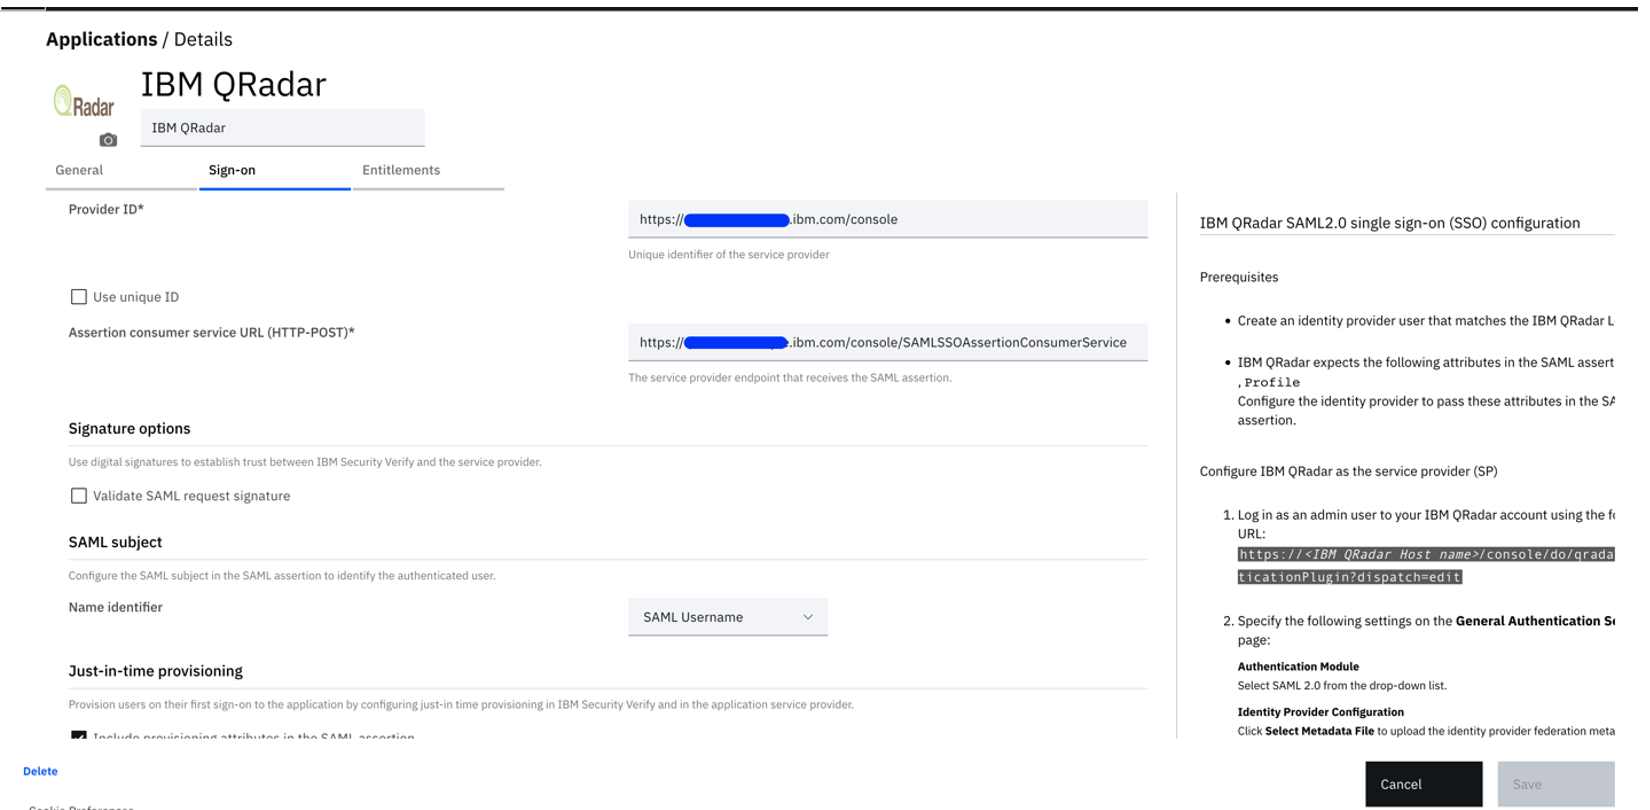
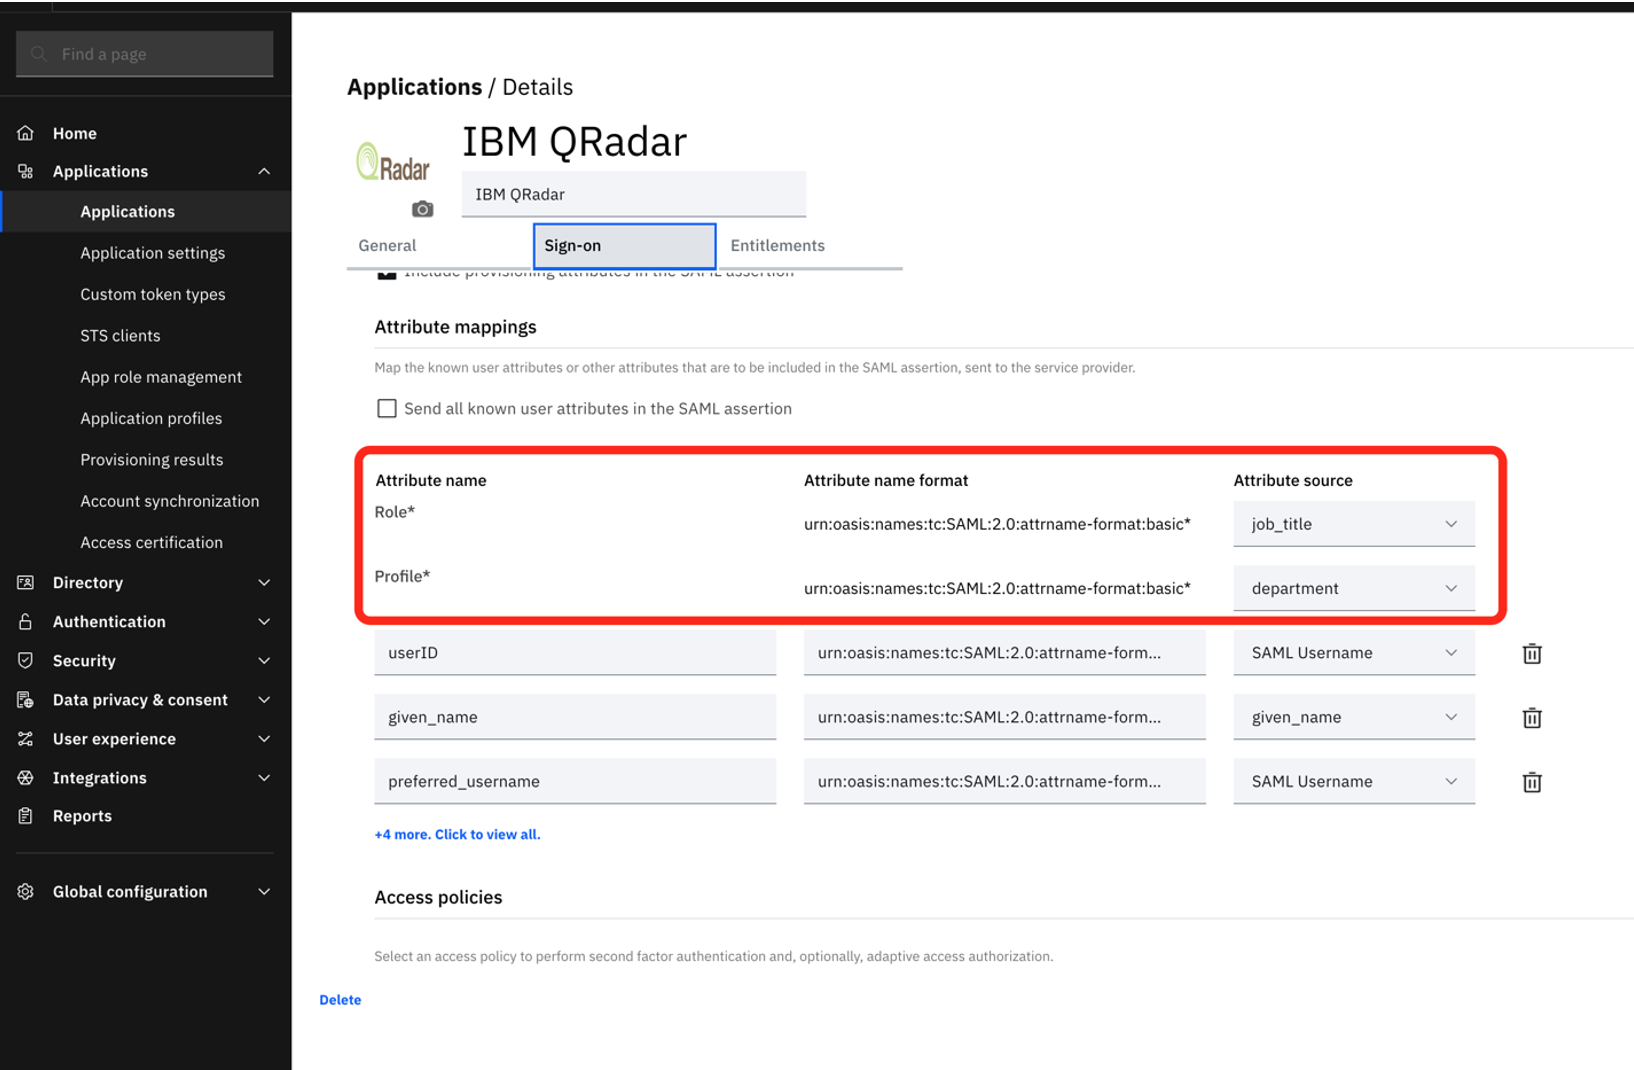
- Click the Sign-on tab to display the sign-on details. Validate that the details are correct as provided in the metadata file received from the QRadar team. Note: You must ensure that the Role and Profile attribute sources are specified because those sources determine the level of permission in QRadar. If those values are not specified or are incorrect, the user will encounter access issues.
- Click the Entitlements tab and then click the Approval required for all users and groups radio button. Click Save.
Note: If you are unable to login to QRadar using Verify SaaS, complete the following steps:
- Access the QRadar command line using PuTTY.
- Copy the
login.conffile from/opt/qradar/conf/templates/to/opt/qradar/conf/using the following command:cp /opt/qradar/conf/templates/login.conf /opt/qradar/conf/
Summary
In this tutorial, you've learned that you can protect your QRadar application with multi-factor authentication and adaptive access. You completed the steps to automate the onboarding process for a SOC analyst. You can prevent malicious users gaining access to IBM Security QRadar by seamlessly protecting it using IBM Security Verify SaaS.
Next steps
If you're interested in learning more about how to protect your organization's applications and data, check out the IBM Security Verify SaaS free demo.