Tutorial
Build an automated predictive maintenance system using a multi-agent architecture with BeeAI and watsonx Orchestrate
A hands-on guide to building a scalable, observable multi-agent workflow that predicts equipment failures, automates maintenance decisions, schedules actions, and orchestrates enterprise-grade agentsFleet maintenance often fails at the worst possible moment. A truck breaks down on the road, a delivery is delayed, or a service appointment is missed because the warning signs were not detected early enough.
Predictive maintenance solves this problem, but only when it runs automatically, connects to real operational data, and executes actions without manual intervention. Modern agent-based systems make this possible by combining reasoning, tools, workflows, and scheduling into a single automation pipeline.
In this tutorial, you build a fully automated predictive maintenance system using BeeAI, IBM watsonx.ai, IBM Granite 4, and IBM watsonx Orchestrate. The system analyzes vehicle conditions, predicts failures, estimates repair costs, orders parts, books service appointments, and notifies drivers. The system also runs on a schedule, so maintenance checks happen at the right time without human coordination.
You deploy BeeAI as an external agent, connect it to watsonx Orchestrate workflows, add enterprise scheduling, and observe every decision using Langfuse. By the end of the tutorial, you have a production-ready maintenance automation system that moves from reactive responses to proactive fleet operations.
Architecture of end-to-end predictive maintenance automation
The system consists of five main components that work together to deliver automated predictive maintenance.
- The BeeAI Framework performs agent-based reasoning and executes tools to analyze operational data.
- IBM watsonx.ai provides the managed inference platform that is used by the BeeAI service
- IBM Granite 4 serves as the language model for reasoning and instruction following.
- IBM watsonx Orchestrate manages enterprise agents, workflows, tools, and schedules to execute maintenance actions.
- Langfuse captures execution traces and metrics across agents, tools, and language model calls to provide end-to-end observability.
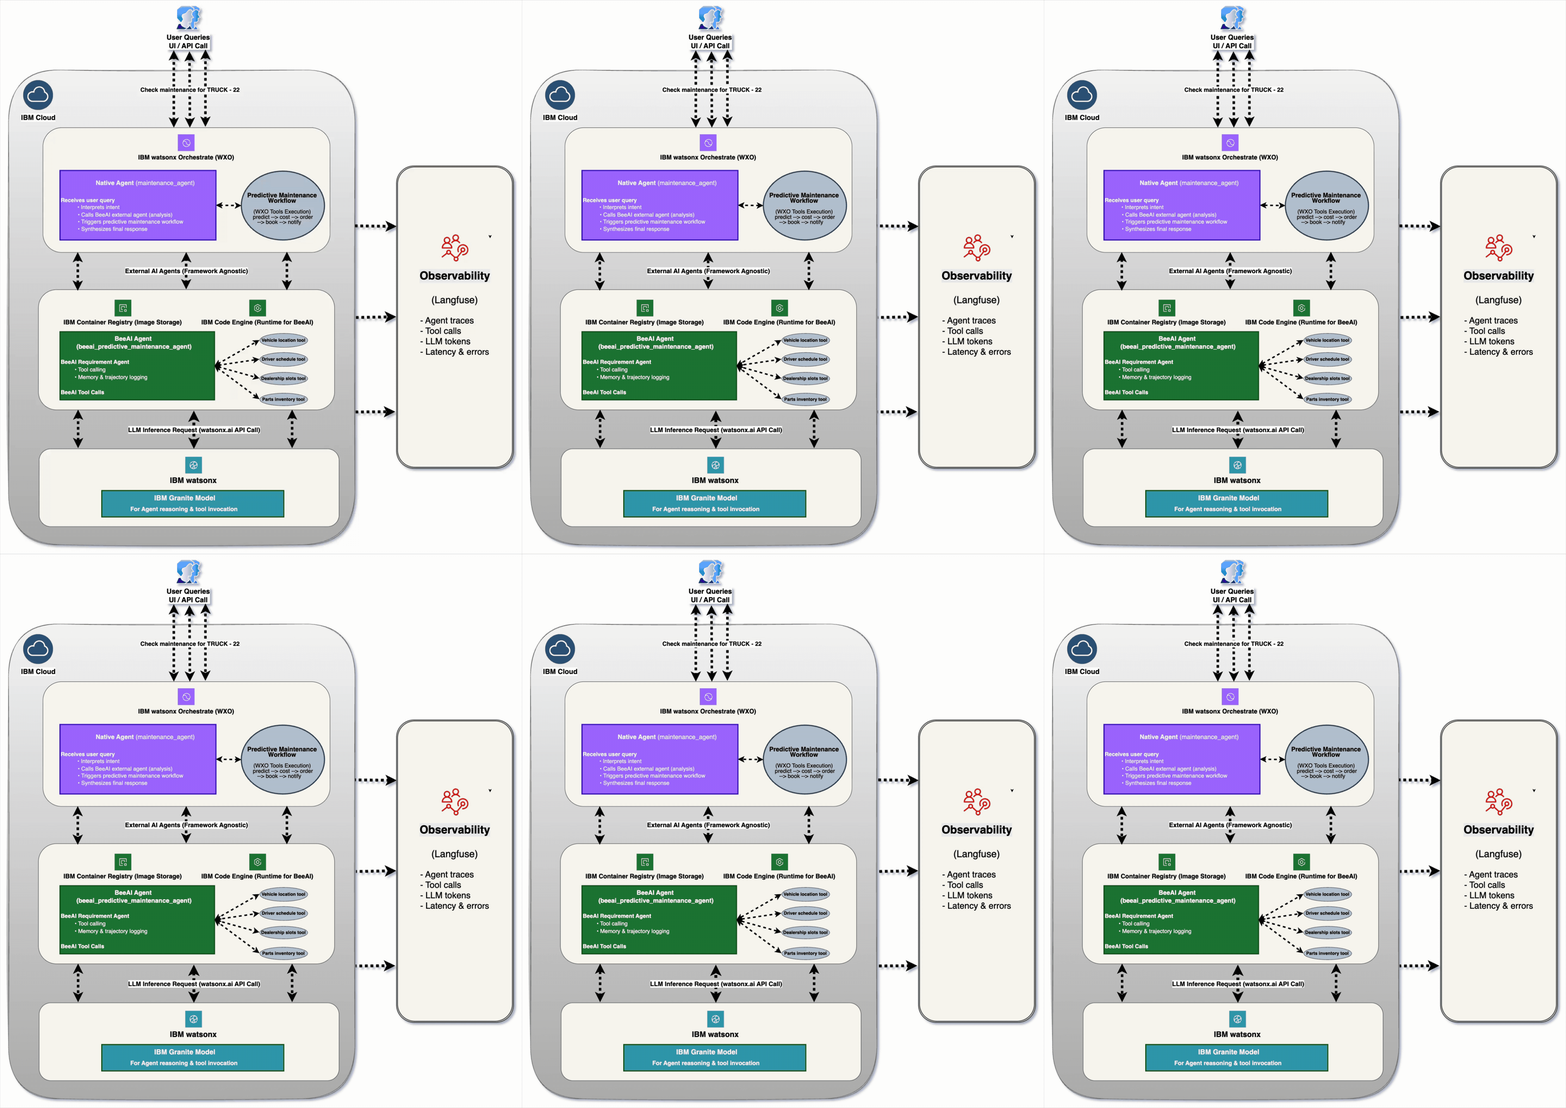
Data flow
When a user sends the request Check maintenance for TRUCK-22, the system follows these steps:
- IBM watsonx Orchestrate receives the request through the
maintenance_agent. - The agent sends an HTTP POST request to the BeeAI external agent at the
/chat/completionsendpoint. The BeeAI service, running as a FastAPI application on IBM Code Engine, executes four tools:
- get_vehicle_location: Retrieves the current city of the vehicle.
- get_driver_schedule: Checks driver availability.
- get_dealership_slots: Finds available service appointment slots.
- get_parts_inventory: Confirms the availability of required replacement parts.
- The IBM Granite 4 model on IBM watsonx.ai analyzes the collected data and generates a complete response.
IBM watsonx Orchestrate can also start the
predictive_maintenance_flowworkflow, which runs the following steps in order:predict_failure → check_maintenance_cost → order_parts → book_service_slot → notify_driver- Langfuse records a full execution trace, including agent actions, tool calls, execution timing, token usage, and cost data.
- The user receives a complete maintenance plan that includes repair details and service booking information.
The system uses well-defined integration points:
| From | To | Protocol | Description |
|---|---|---|---|
| WXO Agent | BeeAI Service | HTTP POST | External agent communication using chat completions |
| BeeAI Service | IBM watsonx.ai | REST API | Language model inference using IBM Granite 4 |
| All Services | Langfuse | OpenTelemetry | Trace collection and system observability |
| WXO Scheduler | WXO Workflow | Internal | Scheduled automation using cron patterns |
Prerequisites
- The local development environment must include the watsonx Orchestrate ADK. This tutorial is built and tested with ADK version 1.13.0.
- The IBM Cloud account must have the watsonx.ai service enabled, a project created with access to the Granite 4 model, and an API key generated. For more information, refer to Understanding API keys and Finding the project ID
- A Langfuse account provides tracing and observability for agent execution. A free account is available at Langfuse account sign up.
- Python is required for local development and service implementation.
- A container runtime is required to build and run the BeeAI service. For more information, see Podman Downloads and Install Docker Desktop.
- The IBM Cloud command-line interface is required for deploying services to IBM Code Engine.
- A development editor such as Visual Studio Code or any preferred text editor is required.
Steps
Step 1. Build the BeeAI predictive maintenance service
In this step, set up and run the BeeAI agent service. This service provides predictive maintenance capabilities using IBM watsonx.ai and the Granite 4 model. The service exposes an OpenAI-compatible /chat/completions endpoint that IBM watsonx Orchestrate calls as an external agent.
Clone the GitHub repository to your local machine.
git clone https://github.com/IBM/oic-i-agentic-ai-tutorialsCreate a
.envfile inside thebeeai_service/directory. Then, copy the template file env.example provided in the repository.cd oic-i-agentic-ai-tutorials/beeaia2a/automotive_system/beeai_servicecp env.example .envIn the template file, replace only the values that are enclosed in
< >. These placeholders indicate the required configuration fields.Update the following environment variables with your IBM Cloud values:
 WATSONX_API_KEY=<your-watsonx-api-key>
WATSONX_URL=<your-watsonx-url>
WATSONX_PROJECT_ID=<your-watsonx-project-id>
Where to obtain these values:
- WATSONX_API_KEY: Create this key in the IBM Cloud console under Manage → Access (IAM) → API Keys.
- WATSONX_PROJECT_ID: Find this value in the settings page of your watsonx.ai project.
WATSONX_URL: Use the base service endpoint for watsonx.ai in your IBM Cloud region.
The complete reference for all configurable variables (from env.example) follows:
# BeeAI Service Configuration BEEAI_WXO_PORT=8080 # HTTP port the service listens on BEEAI_WXO_HOST=0.0.0.0 # Bind address (0.0.0.0 = all interfaces) BEEAI_API_KEY=beeai-maintenance-key-2024 # API key used by WXO to authenticate requests BEEAI_LLM_MODEL=watsonx:ibm/granite-4-h-small # LLM model identifier # Logging BEEAI_LOG_LEVEL=INFO # Set to DEBUG for verbose output BEEAI_LOG_INTERMEDIATE_STEPS=false # Set to true to log each tool call during agent execution # IBM watsonx.ai Configuration WATSONX_API_KEY=your-watsonx-api-key WATSONX_URL=https://us-south.ml.cloud.ibm.com WATSONX_PROJECT_ID=your-watsonx-project-id WATSONX_MODEL_ID=ibm/granite-4-h-small WATSONX_MAX_TOKENS=4096 # Maximum response tokens WATSONX_TEMPERATURE=0.7 # Model temperature (0.0 = deterministic, 1.0 = creative)Note: The
env.examplefile sets a default value forBEEAI_API_KEYasbeeai-maintenance-key-2024. Confirm that all four variables are present in your.envfile before continuing.
The BeeAI service runs in a container that is built from a Dockerfile. The container uses Python 3.11, runs as a non-root user named
beeaiwith user ID 1000, and includes a built-in health check. The docker-compose.yml file manages the service lifecycle and restarts the container automatically if a failure occurs.To Start the service, run the following commands from the project root:
 cd beeai_service
chmod +x setup_local.sh
./setup_local.sh
The setup_local.sh script performs the following actions:
- Validates the
.envfile. - Verifies required environment variables:
WATSONX_API_KEY,WATSONX_URL,WATSONX_PROJECT_ID, andBEEAI_API_KEY. - Builds the container image using Podman.
- Starts the BeeAI service.
Runs a service health check.
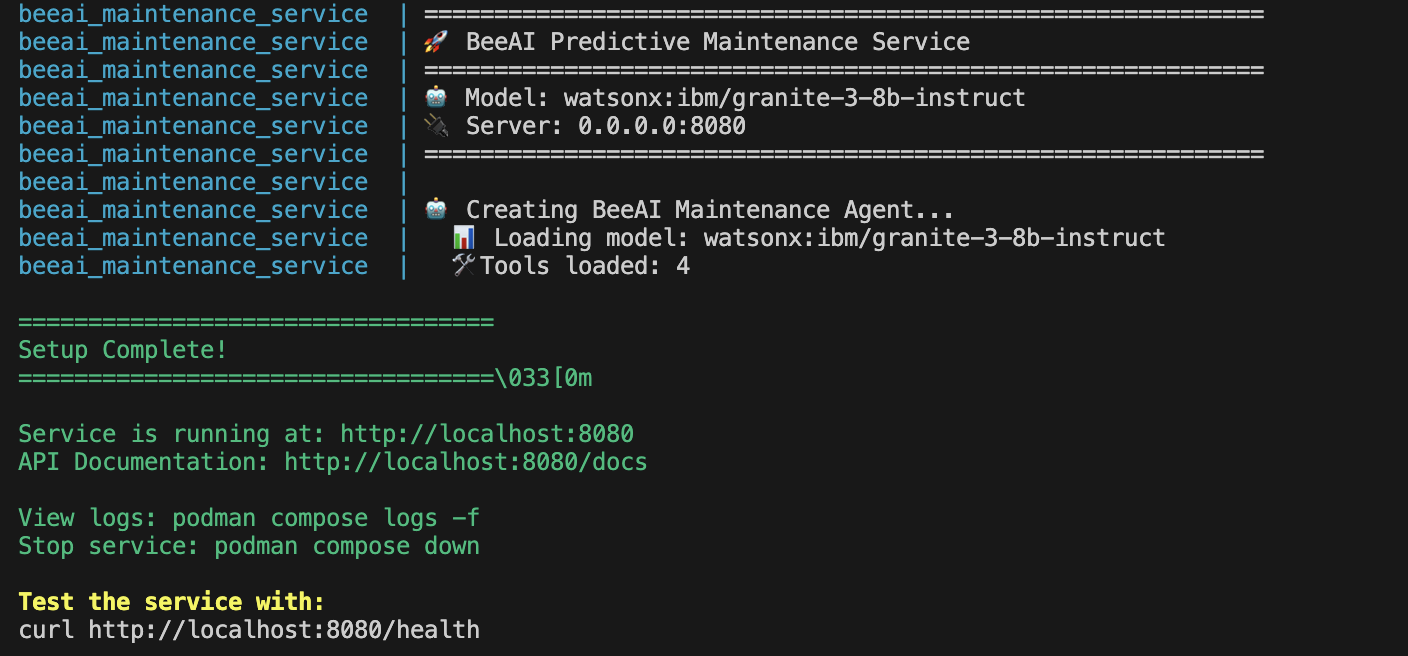
If the service starts correctly, the terminal output shows that the container is built and started, the model and tools are loaded, agent is initialized, and the server is running.
- Validates the
Use the following command to test the BeeAI agent with a streaming response.
 curl -X POST http://localhost:8080/chat/completions \
 -H "Content-Type: application/json" \
 -H "x-api-key: beeai-maintenance-key-2024" \
 -d '{
     "messages": [
     {
         "role": "user",
         "content": "Check maintenance status for vehicle TRUCK-22"
     }
     ],
     "stream": true
 }'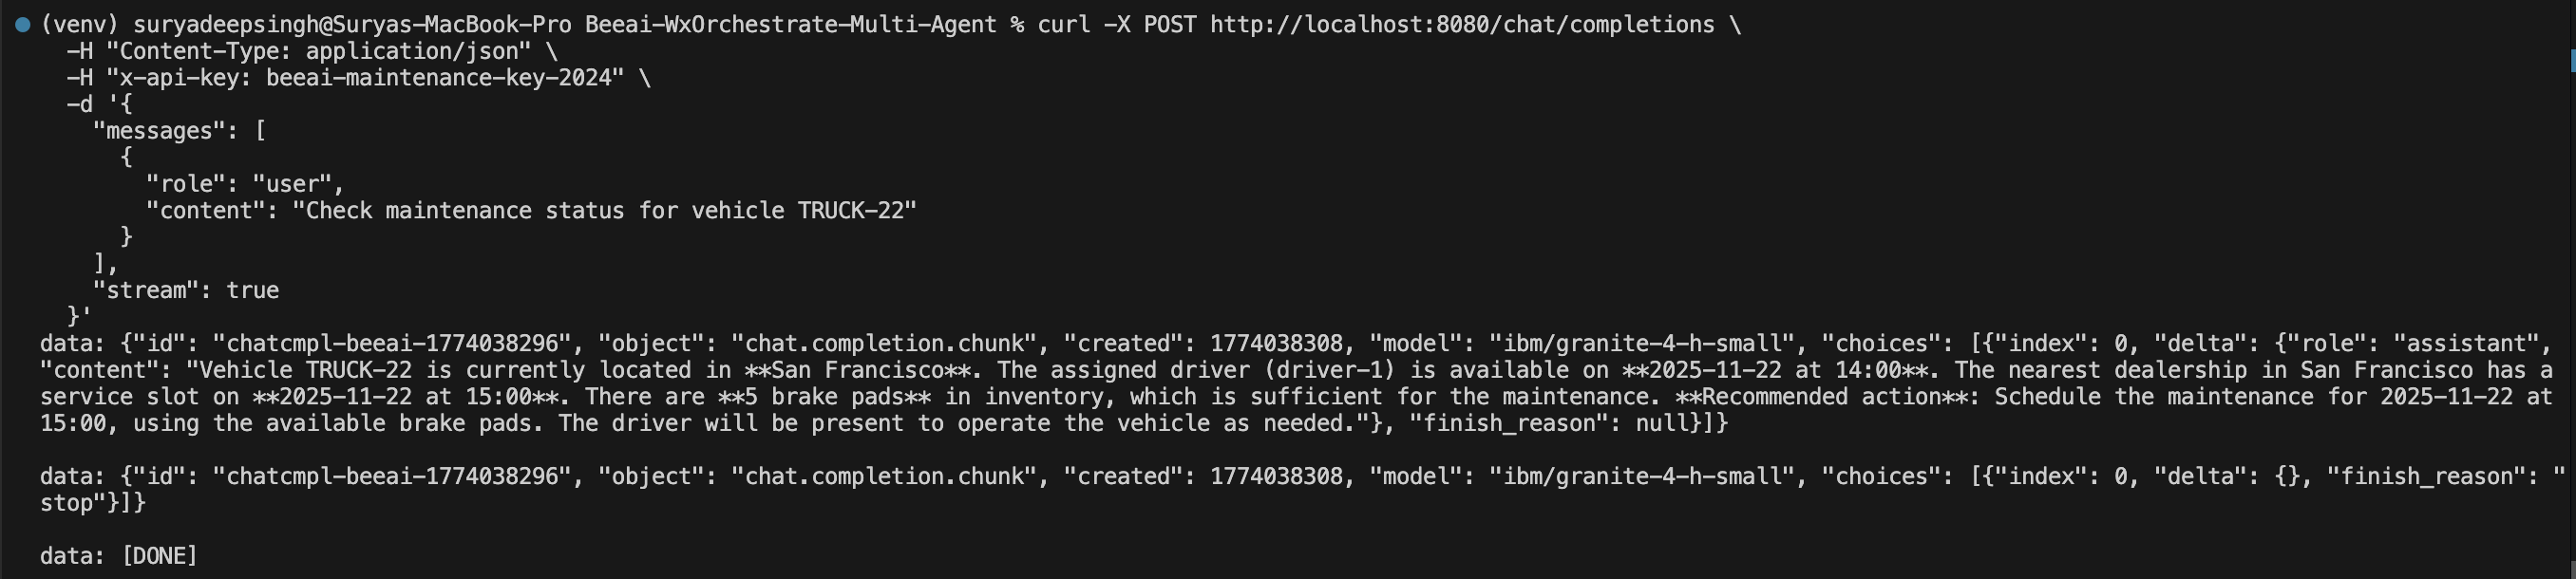
The response appears as a Server-Sent Events (SSE) stream. The stream contains the agent’s maintenance analysis, including:
- Vehicle location
- Driver availability
- Available dealership service slots
- Parts inventory status
- Recommended maintenance actions
Step 2. Deploy the BeeAI service to IBM Code Engine
For production use, deploy the BeeAI service to IBM Code Engine. IBM Code Engine is a fully managed, serverless platform on IBM Cloud.
Add the following variables to your
.envfile. Replace only the values enclosed in< >.IBM_CLOUD_API_KEY=<your-ibm-cloud-api-key> NAMESPACE=<your-container-registry-namespace> IMAGE_NAME=beeai_maintenance_service IMAGE_TAG=v1 APP_NAME=beeai-maintenance PROJECT_ID=<your-code-engine-project-id> RESOURCE_GROUP=<your-resource-group> REGION=<your-region>Use the following sources to obtain the required values:
- IBM_CLOUD_API_KEY: Create this key in the IBM Cloud console under
IAM → API Keys. - NAMESPACE: Use your IBM Container Registry namespace. Create or view the namespace with this command:
ibmcloud cr namespace-add <namespace> - PROJECT_ID: Locate the project ID in the IBM Code Engine dashboard.
- RESOURCE_GROUP: Use the IBM Cloud resource group where the Code Engine project is deployed.
- REGION: Use the IBM Cloud region where the Code Engine project runs. A common value is
us-south.
- IBM_CLOUD_API_KEY: Create this key in the IBM Cloud console under
Deploy the BeeAI service to IBM Code Engine.
 cd beeai_service
chmod +x deploy_to_code_engine.sh
./deploy_to_code_engine.sh
The deploy_to_code_engine.sh script performs the following actions:
- Validates all required environment variables.
- Authenticates with IBM Cloud using the IBM Cloud API key.
- Authenticates with IBM Container Registry at
us.icr.io. - Builds the container image for the
linux/amd64platform using Podman. - Tags the container image and pushes it to IBM Container Registry.
- Selects the IBM Code Engine project and creates a Container Registry secret.
- Deploys the application with configured environment variables, one CPU, two gigabytes of memory, a minimum scale of one instance, and a maximum scale of two instances.
- Waits for the service health check to succeed.
- Prints the public service URL to the terminal.
Retrieve the public URL of the deployed BeeAI service.
ibmcloud ce app get --name beeai-maintenanceThe output includes the application status and the public endpoint URL.
Stream logs from the running service.
ibmcloud ce app logs --name beeai-maintenance --follow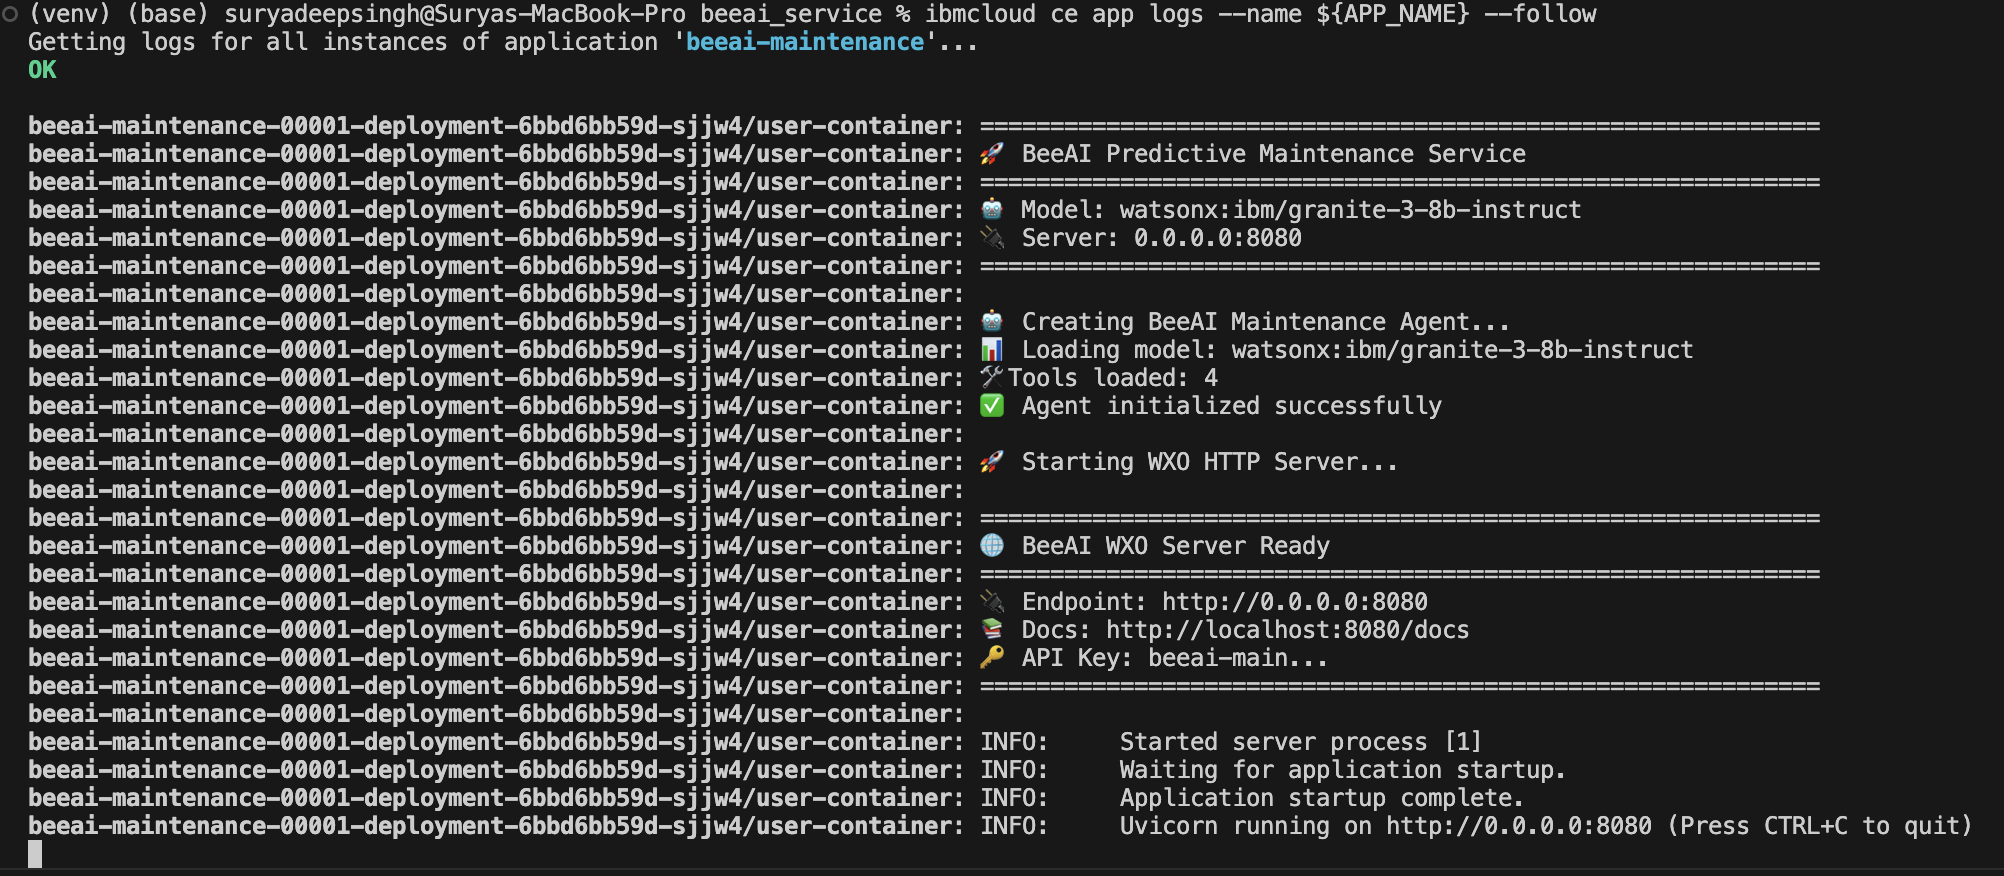
The log output shows container startup messages, health check status, model loading events, tool initialization, and request processing details.
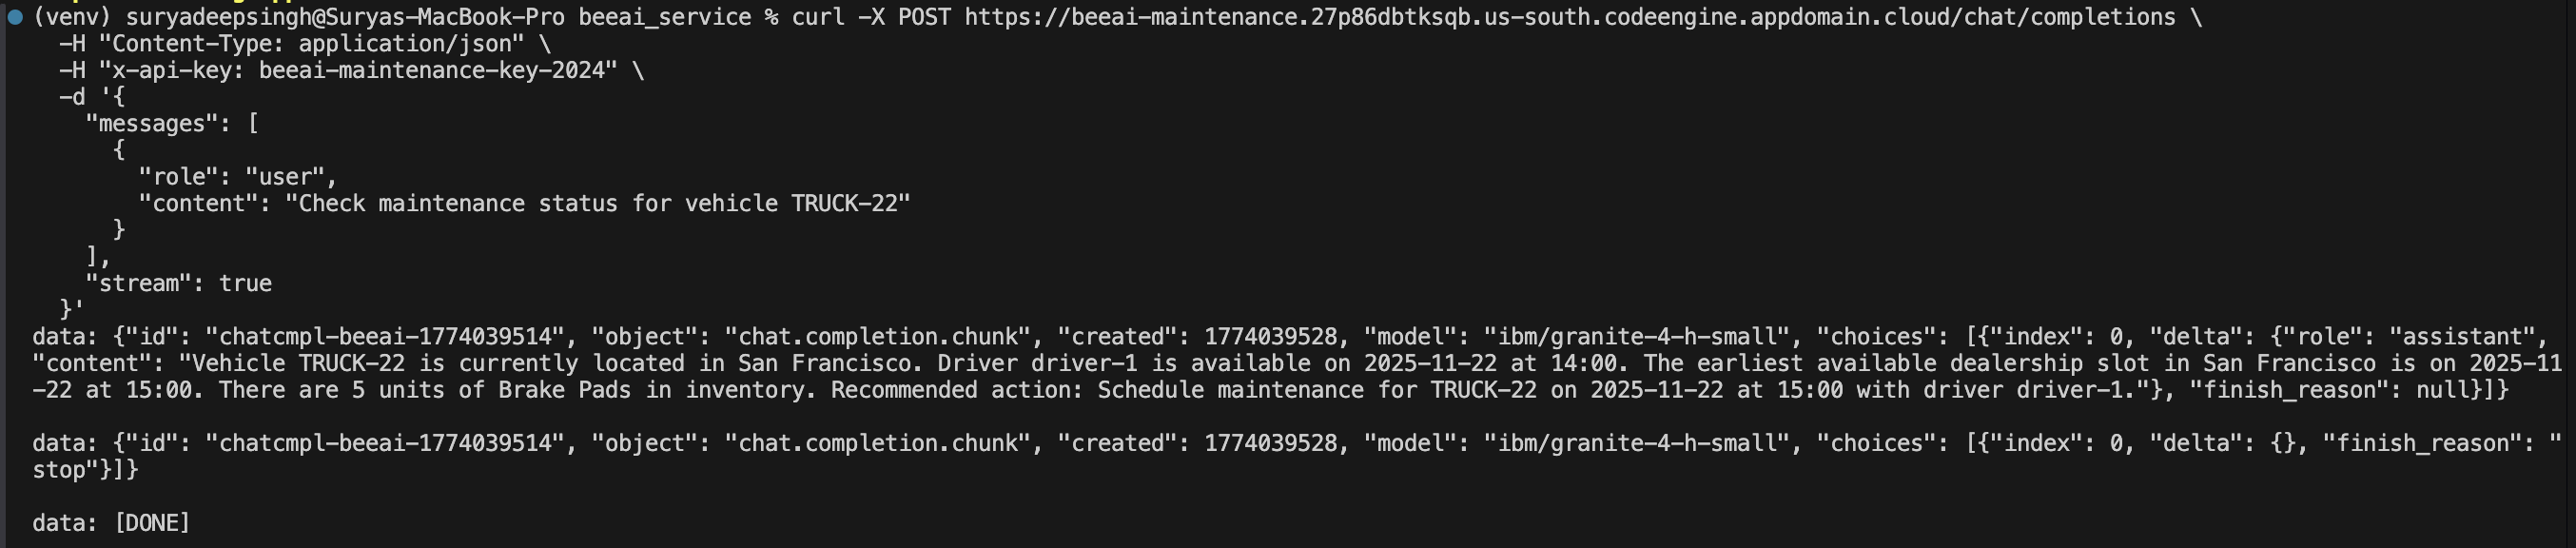
Test the BeeAI service running on IBM Code Engine.
     curl -X POST https://<your-app-url>/chat/completions \
 -H "Content-Type: application/json" \
 -H "x-api-key: beeai-maintenance-key-2024" \
 -d '{
     "messages": [
     {
         "role": "user",
         "content": "Check maintenance status for vehicle TRUCK-22"
     }
     ],
     "stream": true
 }'
The response is returned as a Server-Sent Events stream. The stream contains a complete maintenance analysis for the vehicle, including operational data, maintenance recommendations, and next steps.
Note:
Use the following commands to verify and manage the deployed BeeAI service on IBM Code Engine.
Display real-time logs from the BeeAI service.
ibmcloud ce app logs --name beeai-maintenance --followShow the application status, configuration, and public URL.
ibmcloud ce app get --name beeai-maintenanceUpdate the minimum and maximum number of running instances.
ibmcloud ce app update --name beeai-maintenance --min-scale 2 --max-scale 5Remove the BeeAI service from IBM Code Engine.
ibmcloud ce app delete --name beeai-maintenance --force
Step 3. Create watsonx Orchestrate tools
In this step, create watsonx Orchestrate native tools that support the maintenance workflow. These tools implement the business logic for predictive maintenance. The business logic includes failure prediction, maintenance cost estimation, parts ordering, service booking, and driver notification.
These watsonx Orchestrate tools are separate from the BeeAI tools. The BeeAI tools handle data gathering and reasoning, while the watsonx Orchestrate tools manage enterprise workflow actions.
Each tool uses the watsonx Orchestrate Agent Development Kit @tool decorator. Each tool follows a pass-through design. The tool receives context such as vehicle ID or component name and returns an updated dictionary. The next tool in the workflow receives this dictionary as input.
All five watsonx Orchestrate tools are located in the wxo_tools directory.
| File | Tool name | Permission | Purpose |
|---|---|---|---|
predict_failure.py |
predict_vehicle_failure |
READ_ONLY | Predicts component failure time and returns component name, days to failure, and confidence score |
maintenance_cost_tool.py |
check_maintenance_cost |
READ_ONLY | Estimates maintenance cost based on component type and urgency |
order_parts_tool.py |
order_parts |
READ_WRITE | Orders replacement parts for the specified component |
book_slot_tool.py |
book_service_slot |
READ_WRITE | Books a service appointment and returns a booking reference |
send_notification_tool.py |
notify_driver |
READ_WRITE | Sends maintenance details and booking information to the driver |
Each tool returns a dictionary that includes shared context fields such as vehicle_id and component. These fields pass through each step so the next tool receives the required input.
Data moves through all five tools from start to finish.
| Step | Tool name | Key output fields |
|---|---|---|
| 1 | predict_vehicle_failure |
component, failure_in_days, confidence |
| 2 | check_maintenance_cost |
estimated_cost, recommended (true when failure_in_days is less than 8) |
| 3 | order_parts |
status set to ordered, order_id such as ORD-Brake-Pads-001 |
| 4 | book_service_slot |
status set to confirmed, booking_ref such as BOOK-TRUCK-22-2025-11-22T15-00-00 |
| 5 | notify_driver |
sent set to true, message, summary |
Note: The tools use simulated data for this tutorial. The predict_failure tool returns a randomized failure window between five and twelve days. The maintenance_cost_tool tool returns a fixed cost of 250 USD for brake pads. Replace these simulated values with real fleet machine learning models and enterprise resource planning systems in a production environment.
Together, these five tools form a complete maintenance workflow. The workflow predicts component failure, estimates maintenance cost, orders replacement parts, books a service appointment, and notifies the driver.
Step 4. Build the predictive maintenance workflow
In this step, connect all five watsonx Orchestrate tools into a single workflow. This workflow runs the predictive maintenance process from start to finish.
The workflow definition is located in wxo_flows/predictive_maintenance_flow.py.
The workflow uses the following components:
- A Pydantic
MaintenanceInputschema: The schema defines input fields for the workflow. The schema requiresvehicle_idand uses a default value of"driver-1"fordriver_id. - The
@flowdecorator withschedulable=True: This setting makes the workflow available to the watsonx Orchestrate Scheduler. Users can create time-based triggers without adding additional code. - A linear execution sequence: The workflow uses
aflow.sequence(START, predict, cost, order, book, notify, END)to define a step-by-step pipeline. Each tool receives the output from the previous tool.
Because the workflow is marked as schedulable, it appears in the watsonx Orchestrate user interface. You can run the workflow on demand or create one-time or recurring schedules directly in the scheduler.
Step 5. Configure watsonx Orchestrate agents
In this step, create two watsonx Orchestrate agents and register BeeAI as an external agent.
The Maintenance Agent (wxo_agents/maintenance_agent.yaml) is the main agent that you interact with. This agent combines two capabilities:
- The BeeAI external agent, which provides real-time operational data.
The predictive maintenance workflow, which performs maintenance actions.
The
collaborator_agentsfield defines the connection to the BeeAI service:collaborator_agents: beeai_predictive_maintenance_agent
This configuration links the watsonx Orchestrate agent to the BeeAI external agent and enables multi-agent collaboration across frameworks.
Language model usage: The watsonx Orchestrate native agents use the language model that is defined in the
llm:field of their YAML configuration files. This model controls orchestration logic such as tool selection and response construction.The BeeAI service uses the IBM Granite 4 model with the identifier
ibm/granite-4-h-smallthrough IBM watsonx.ai. This model performs internal reasoning and tool coordination inside the BeeAI service.Failure handling behavior: The Maintenance Agent includes a fallback mechanism. If the BeeAI external agent is unavailable, the agent continues execution using only the
predictive_maintenance_flow. In this case, the agent informs the user that real-time data such as vehicle location, driver schedule, and parts inventory is unavailable.The Scheduler Agent(wxo_agents/maintenance_scheduler_agent.yaml) adds time-based execution to the maintenance system. This agent manages scheduled runs of the predictive maintenance workflow.
The agent uses a combination of custom tools and watsonx Orchestrate intrinsic tools.
predictive_maintenance_flow: Runs the full predictive maintenance workflow.i__get_flow_status_intrinsic_tool__: Retrieves the status and execution history of a workflow run.i__get_schedule_intrinsic_tool__: Lists all active schedules with timing and recurrence details.i__delete_schedule_intrinsic_tool__: Deletes a schedule using its uniqueschedule_id.
These tools allow the Scheduler Agent to start workflows, check execution status, list active schedules, and remove schedules. This capability enables watsonx Orchestrate to support recurring and automated maintenance operations.
Step 6. Configure Langfuse observability
Langfuse provides end-to-end observability for the predictive maintenance system. Langfuse records agent decisions, tool executions, and language model interactions across the entire workflow.
Create a Langfuse account.
- Sign up at
https://cloud.langfuse.com. - Create a new project, for example
predictive-maintenance-fleet. - Open the project settings and navigate to API Keys.
- Copy the API key and public key values.
- Sign up at
Update the Langfuse configuration file.
- Open the configuration file at
agents_observability/langfuse_config.yml. Replace the placeholder values with your Langfuse project information. The configuration file follows the standard Langfuse format and includes the following fields:
 spec_version: v1
 kind: langfuse
 project_id: predictive-maintenance-fleet
 api_key: "sk-lf-<your-secret-key>"
 url: "https://cloud.langfuse.com/api/public/otel"
 host_health_uri: "https://cloud.langfuse.com"
 config_json:
 public_key: "pk-lf-<your-public-key>"
 mask_pii: false
- Open the configuration file at
Step 7. Import resources into watsonx Orchestrate
In this step, import the tools, workflows, agents, and observability configuration into watsonx Orchestrate. After this step, the system can run and schedule predictive maintenance tasks.
Activate your watsonx Orchestrate environment using the watsonx Orchestrate command-line interface (CLI):
orchestrate env activate <your_environment_name> --api-key <your_api_key>This command sets the active environment for all import operations.
Use the provided script to import all resources at once:
 cd scripts
chmod +x import_all.sh
./import_all.sh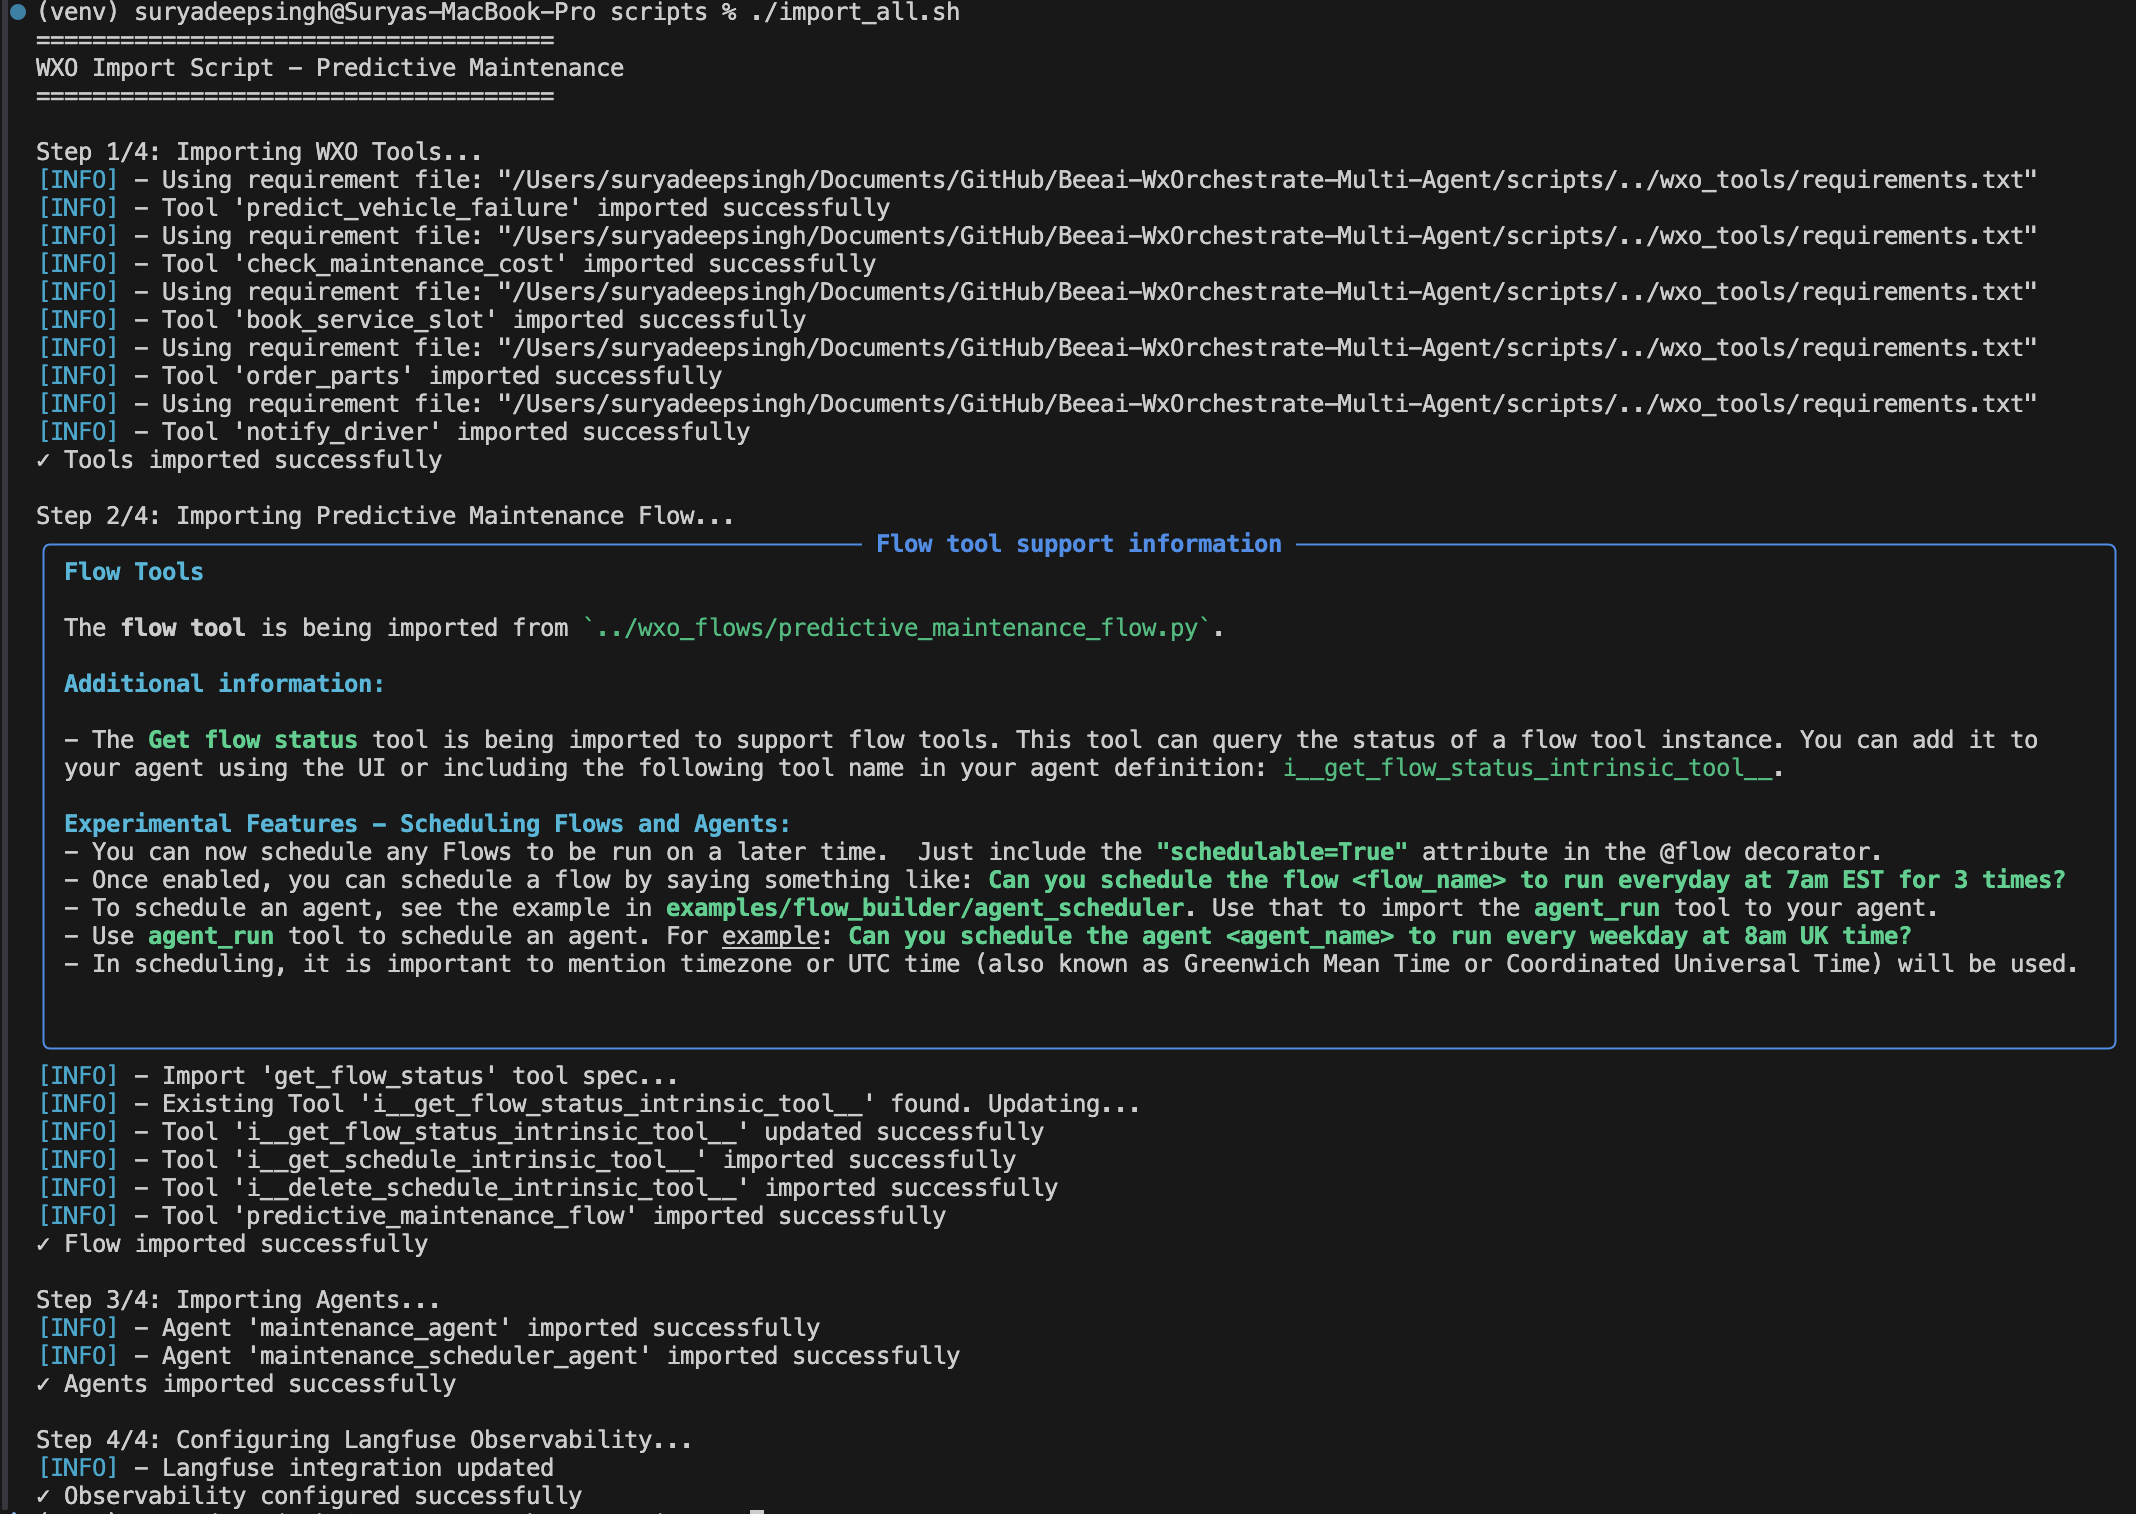
The import_all.sh script completes the following actions:
- Imports all watsonx Orchestrate tools from the
wxo_toolsdirectory. - Imports the BeeAI integration tool for external agent communication.
- Imports the
predictive_maintenance_flowworkflow from thewxo_flowsdirectory. - Imports the
maintenance_agentandmaintenance_scheduler_agentdefinitions from thewxo_agentsdirectory. - Applies the Langfuse observability configuration from
agents_observability/langfuse_config.yml.
After the script completes, all required components are available in the watsonx Orchestrate user interface and ready for execution and scheduling.
- Imports all watsonx Orchestrate tools from the
Step 8: Register BeeAI as an external agent in watsonx Orchestrate
In this step, connect the BeeAI service running on IBM Code Engine to watsonx Orchestrate as an external agent.
In the watsonx Orchestrate user interface, navigate to Agents and select Import agent.
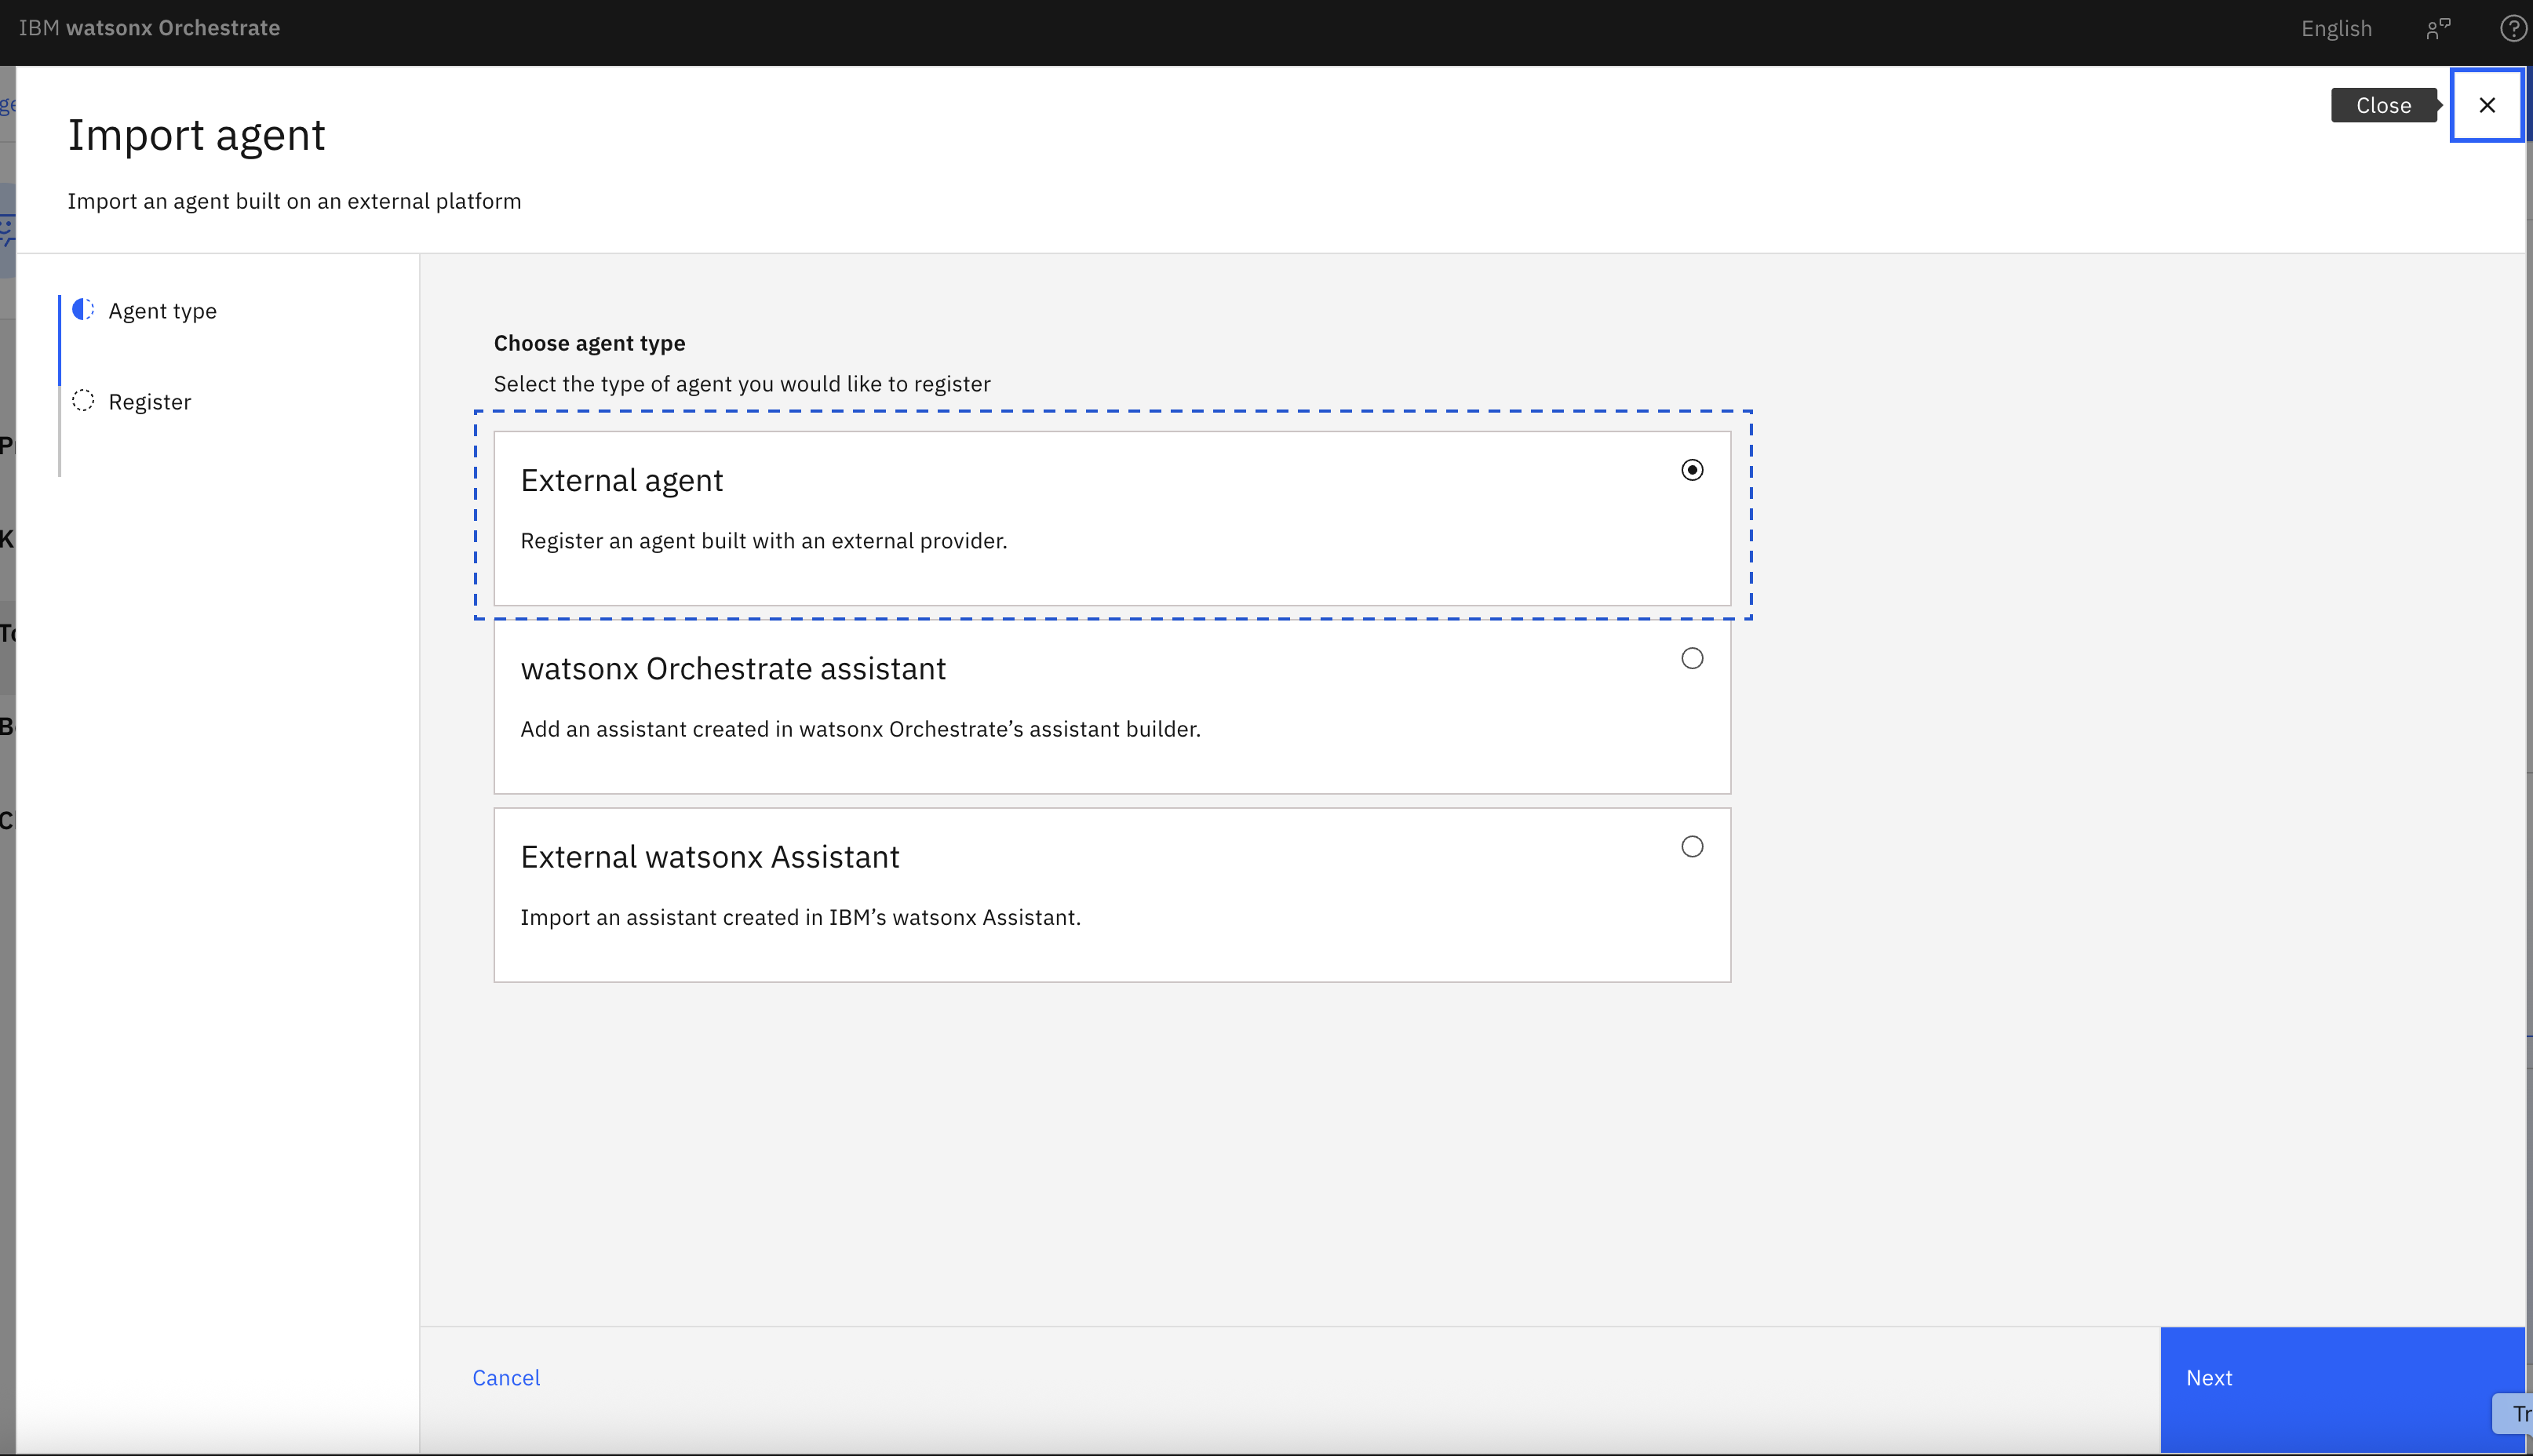
Choose External agent and click Next.
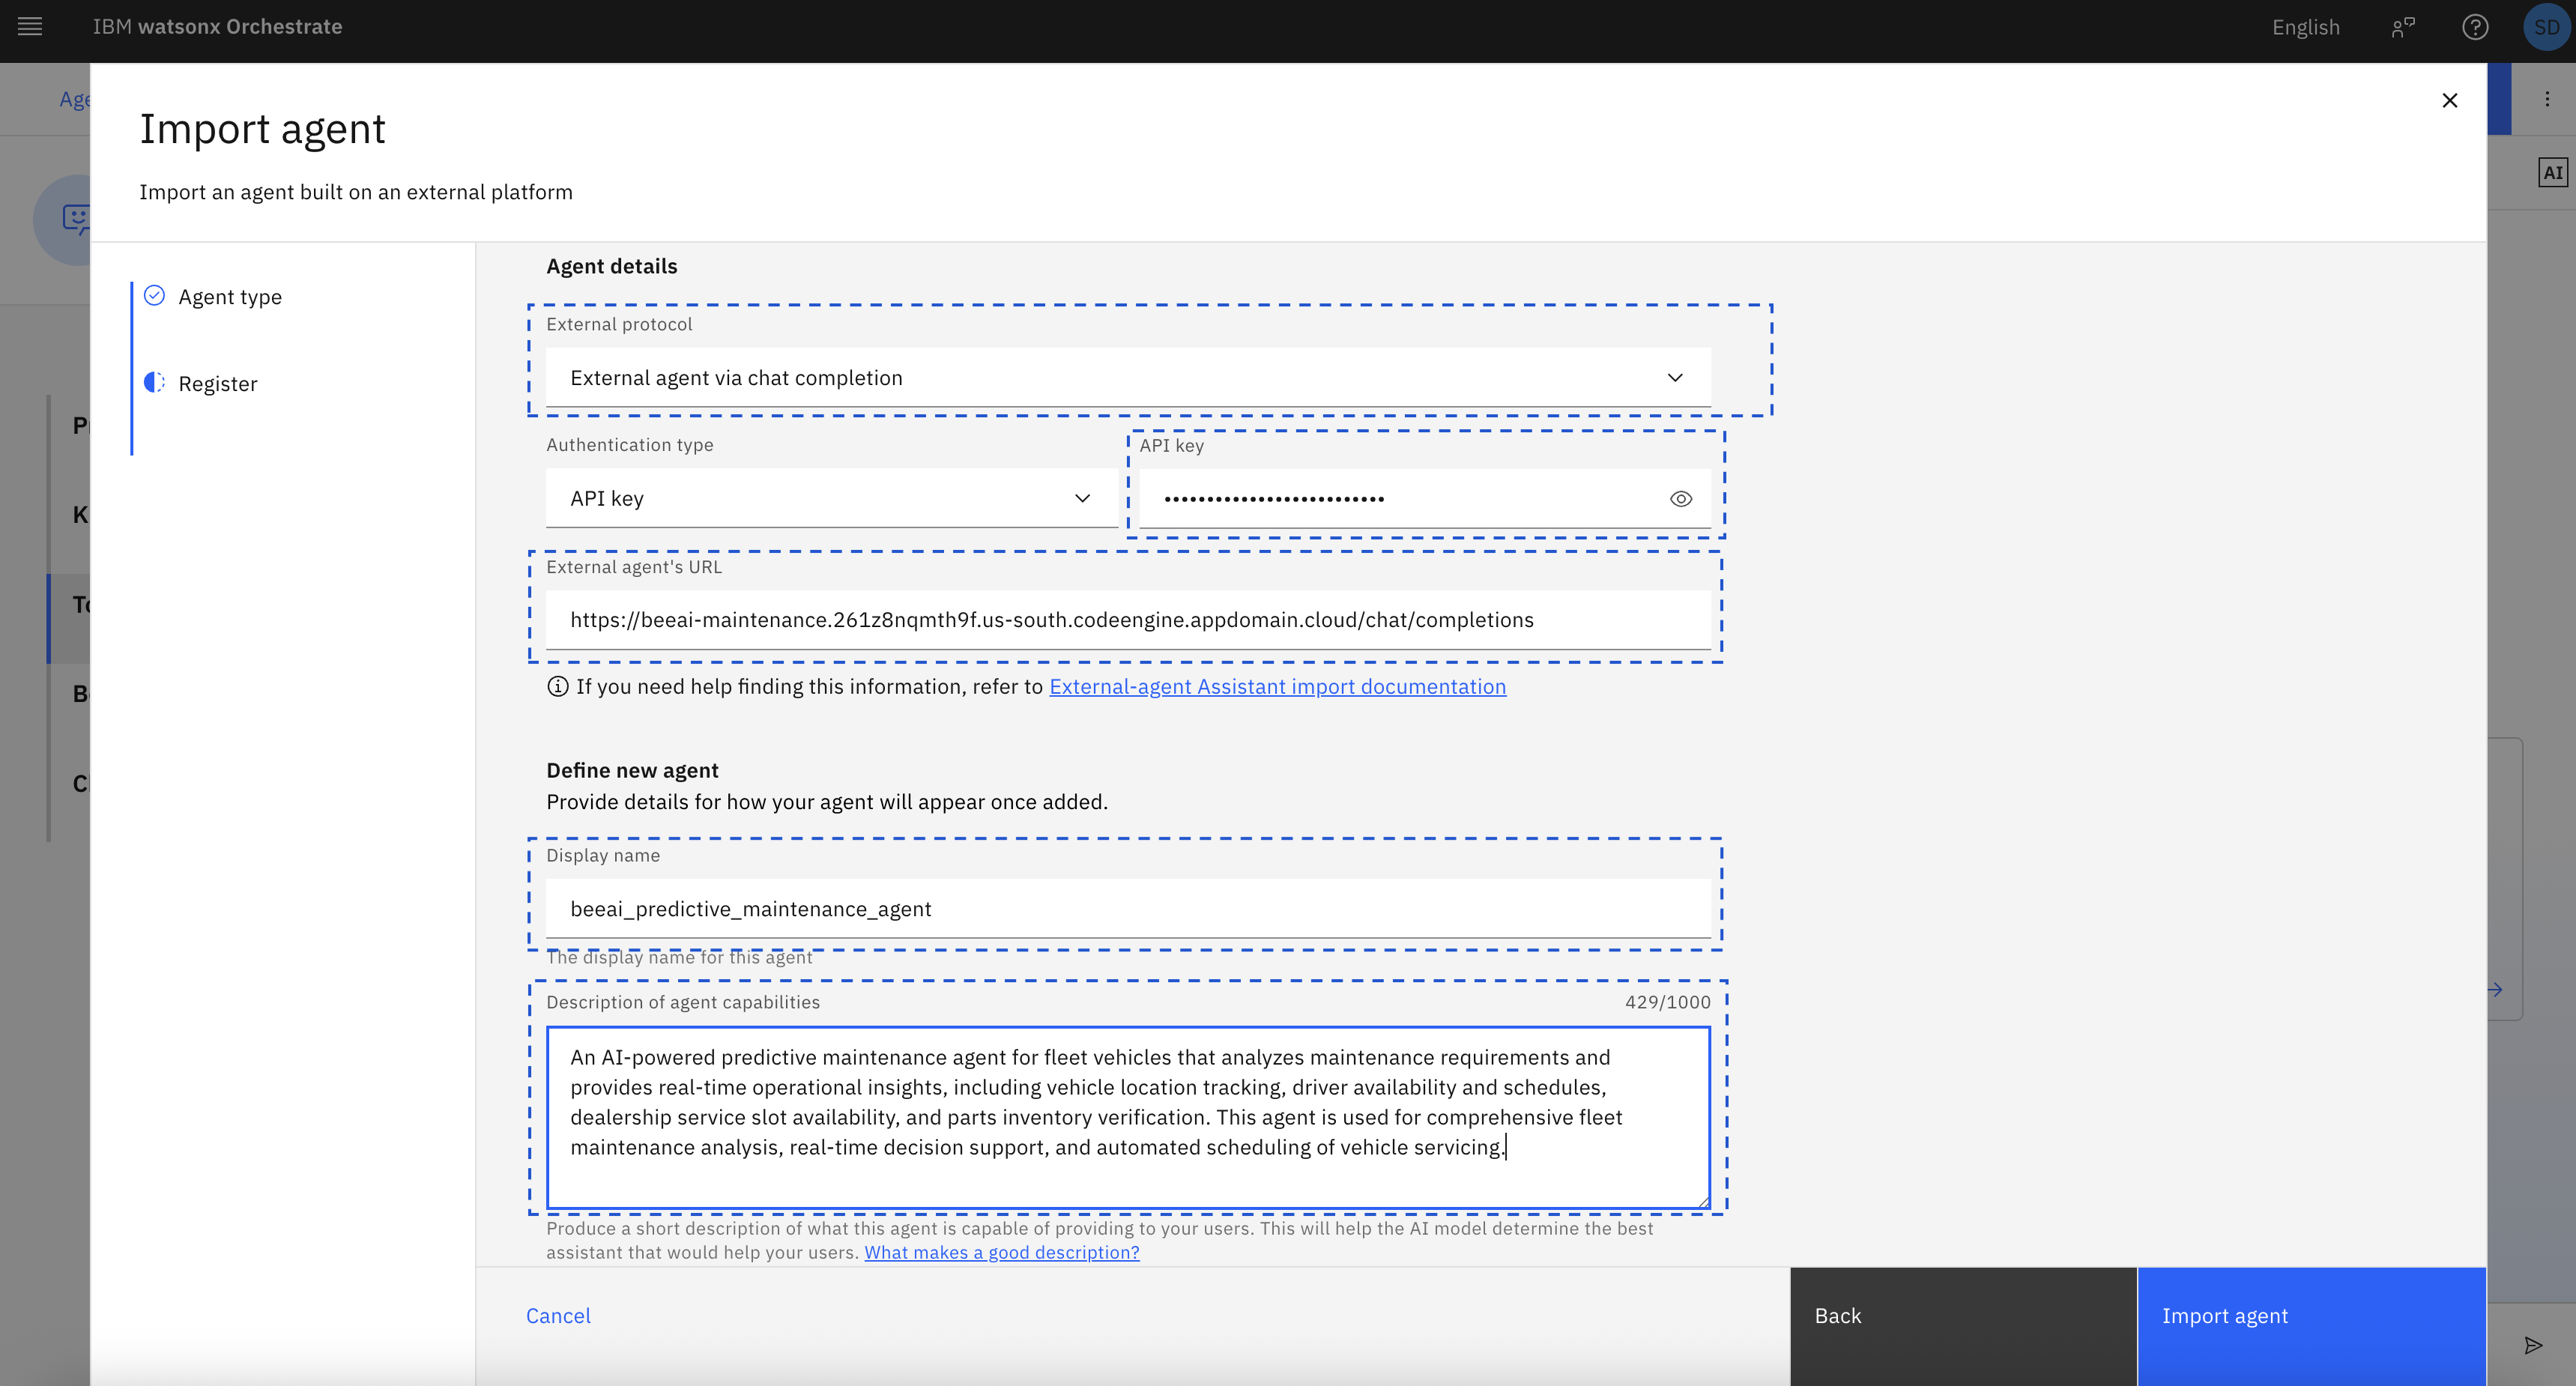
Enter the following values in the agent configuration form:
- External protocol: External agent via chat completion
- Authentication type: API key
- API key: beeai-maintenance-key-2024
- Display name: beeai_predictive_maintenance_agent
- Description: AI-powered predictive maintenance agent for fleet vehicles that analyzes maintenance requirements and provides real-time operational insights, including vehicle location, driver availability, service slot availability, and parts inventory status
Click Import agent and then click Done to complete the registration.
After registration, the
maintenance_agentin watsonx Orchestrate can call the BeeAI service as a collaborator agent using the standard chat completions interface.
Step 9. Verify in the watsonx Orchestrate user interface
After completing the import operation, open the watsonx Orchestrate web interface.
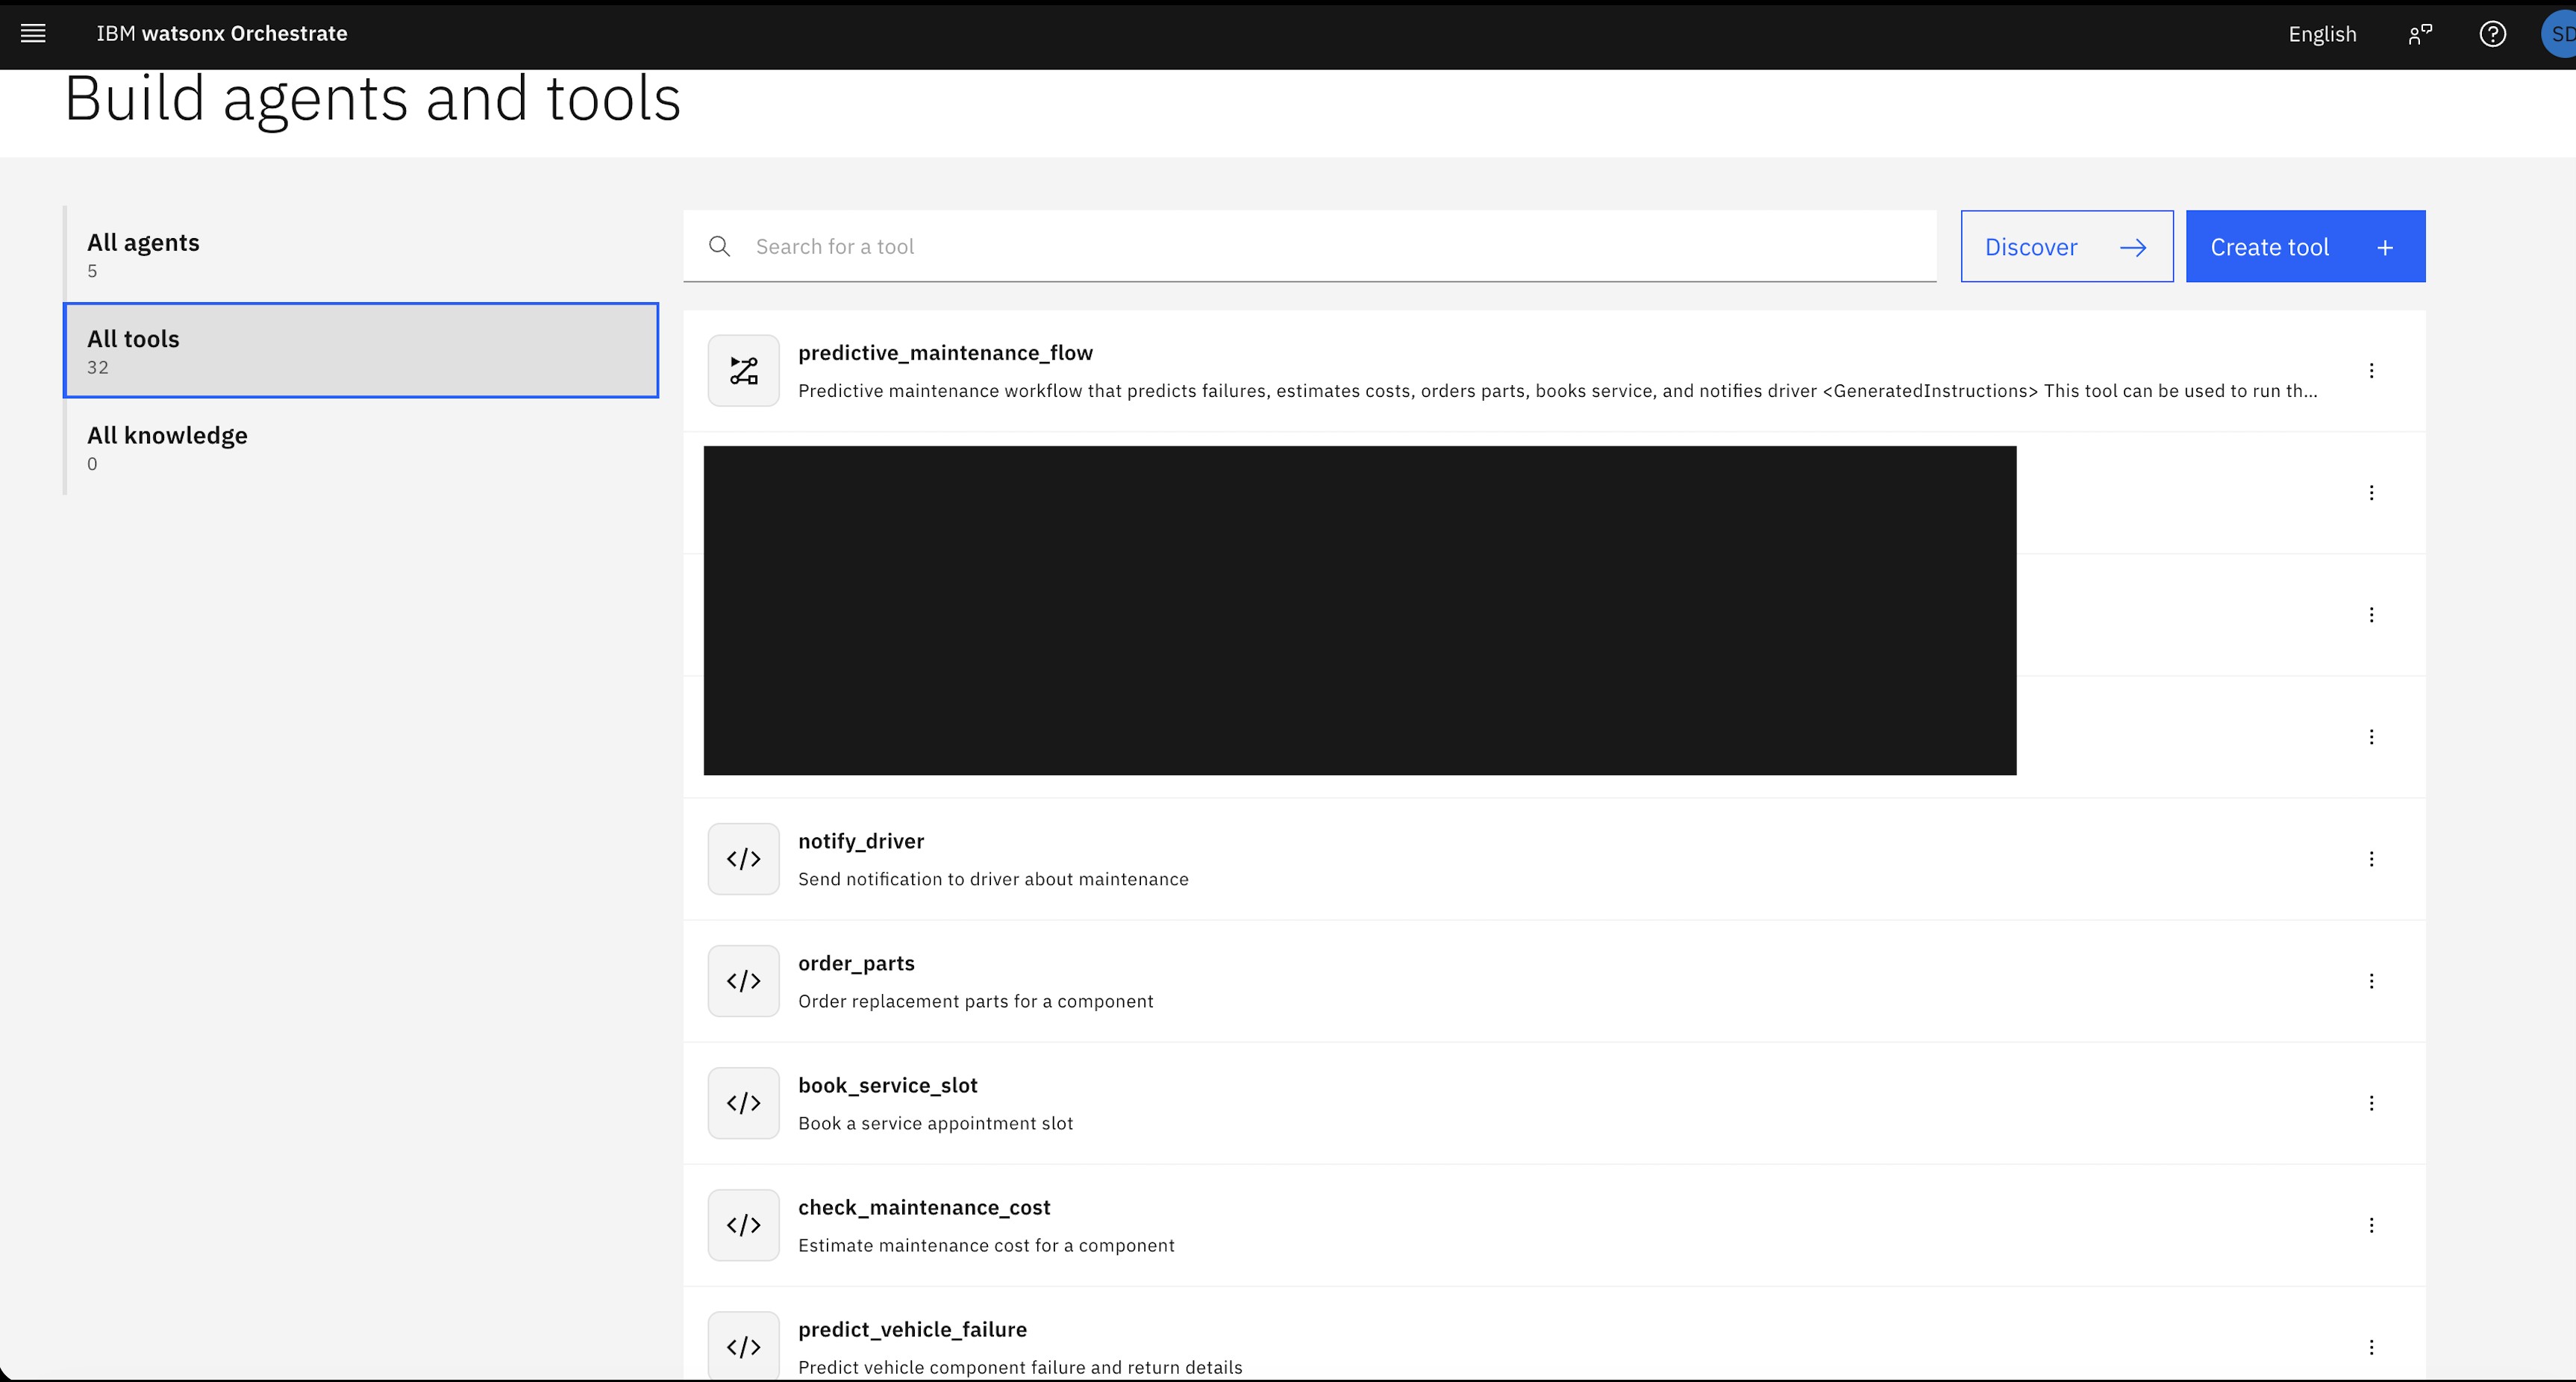
Open All Agents and confirm that both agents are listed:
maintenance_agentmaintenance_scheduler_agent
Open All Tools and confirm that all five tools and the predictive maintenance workflow are present. These resources are now available to run immediately or on a schedule.
In the watsonx Orchestrate user interface, search for the maintenance_agent. Enter the following request:
Can you help me check vehicle TRUCK-22When the request runs, the Maintenance Agent performs the following actions:
- Calls the BeeAI external agent to collect real-time operational data such as vehicle location, driver availability, service slot availability, and parts inventory.
- Executes the
predictive_maintenance_flowworkflow to predict failure, estimate cost, order parts, book a service appointment, and notify the driver. Returns a complete maintenance plan that includes recommendations and booking details.
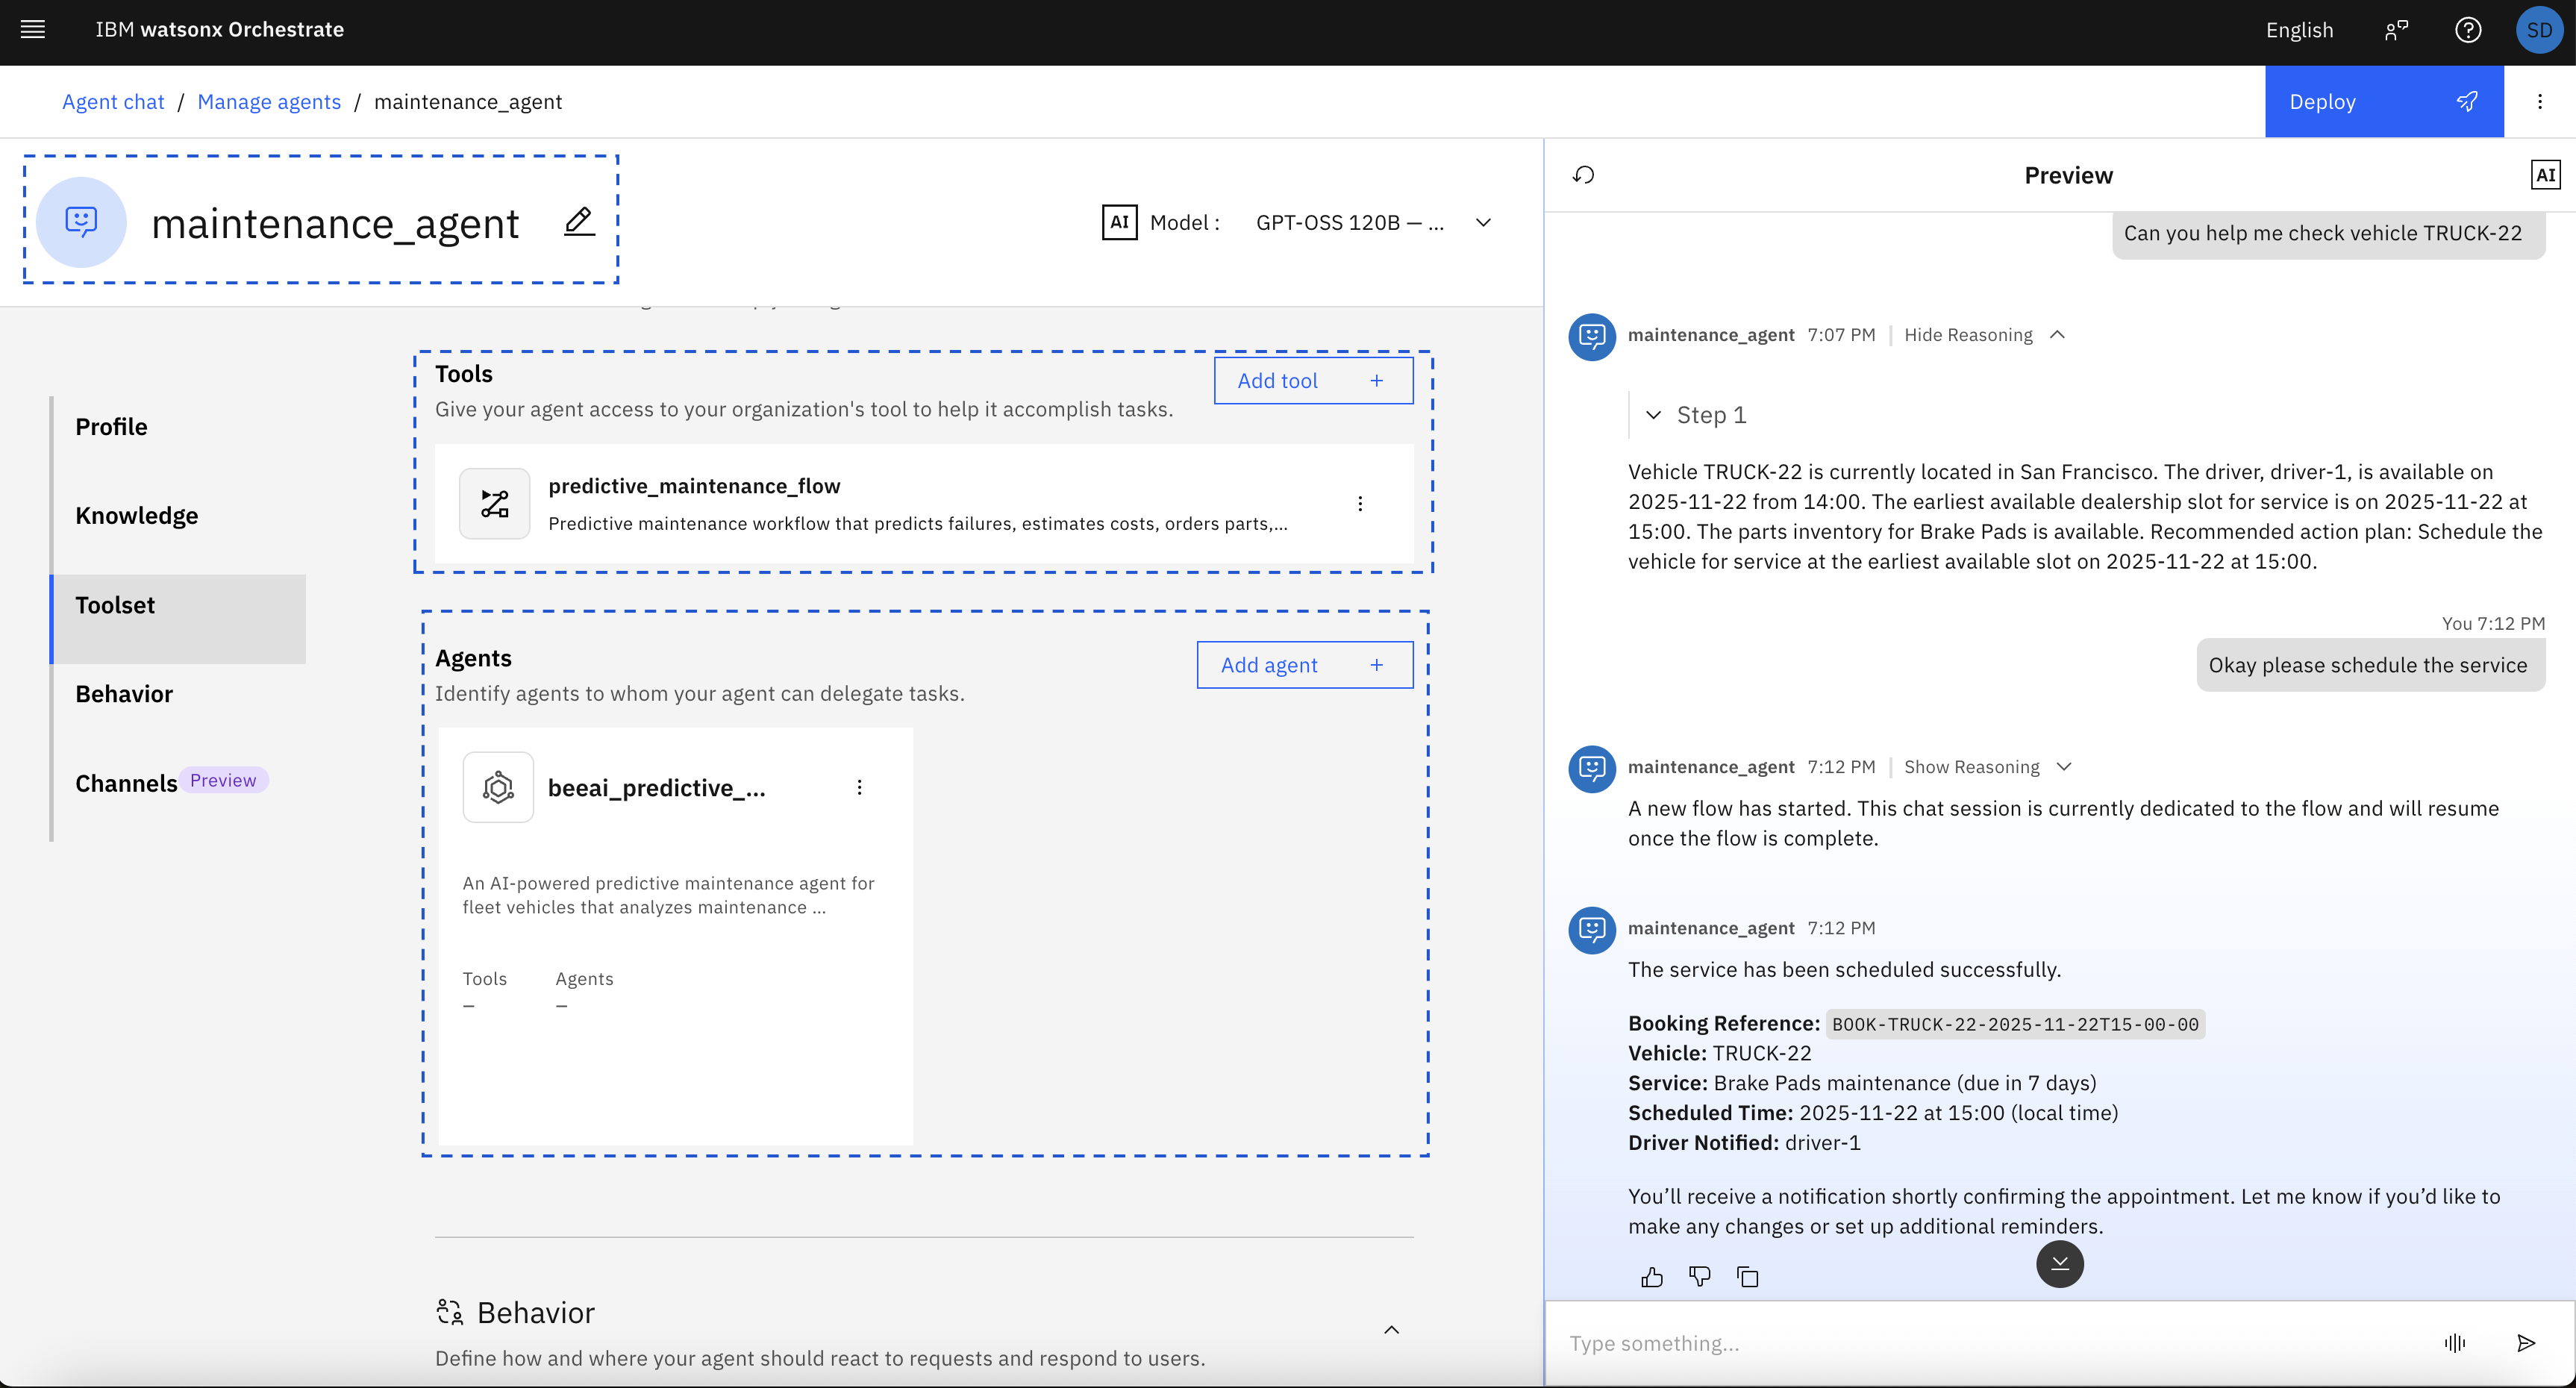
Use the watsonx Orchestrate chat interface to create a recurring maintenance schedule. In the chat interface, search for maintenance_scheduler_agent and enter the following request:
Schedule daily maintenance checks for TRUCK-22 at 9am ESTAfter receiving the request, the Scheduler Agent performs these actions:
- Requests missing information such as vehicle ID, frequency, or time zone if required.
- Creates a schedule using a cron expression.
- Confirms that the schedule is active.
- Runs the predictive maintenance workflow automatically at the scheduled time.
You can also manage schedules using natural language commands.
List all active schedules:
List all schedulesDelete a specific schedule:
Delete schedule <schedule_id>These commands allow you to review and control all scheduled maintenance tasks directly from the chat interface.
Understand the scheduler response. After the scheduler creates a maintenance schedule, watsonx Orchestrate returns a JSON response similar to the following:
 {
 "schedule_id": "18fc1ba0-2c4b-4e23-baf2-9e421c395a1e",
 "schedule_name": "predict_maintenance_TRUCK-22_daily_9AM",
 "schedule_pattern": "0 09 * * *",
 "schedule_timezone": "America/New_York",
 "schedule_limit": 100,
 "total": 1
 }
Response fields
- schedule_id: A unique identifier for the schedule. Use this value to list, update, or delete the schedule later.
- schedule_name: A readable name generated by watsonx Orchestrate. The name includes the workflow name, recurrence pattern, and time.
- schedule_pattern: A cron expression that defines when the workflow runs. In this example, the workflow runs every day at 9:00 AM.
- schedule_timezone: The time zone used by the scheduler, such as
America/New_York. - schedule_limit: The maximum number of times the scheduler triggers the workflow before stopping.
total: The number of schedules created by the request. This value is usually
1.Note: Each schedule uses a unique
schedule_id. This identifier allows precise management of schedules, including listing active schedules or deleting outdated schedules by using built-in watsonx Orchestrate scheduler tools.
Step 10. View end-to-end agent traces in Langfuse
In this step, review the full execution history of the predictive maintenance system.
- Open the Langfuse dashboard at
https://cloud.langfuse.com. - Select your Langfuse project, for example
predictive-maintenance-fleet. - Open the Traces section.
Select a trace created from a watsonx Orchestrate agent request. Each trace represents one complete run of the maintenance system. A trace includes:
- Agent decision steps
- Tool execution order
- Language model inputs and outputs
- Timing and performance data
These traces allow you to understand system behavior, troubleshoot failures, and monitor production performance.
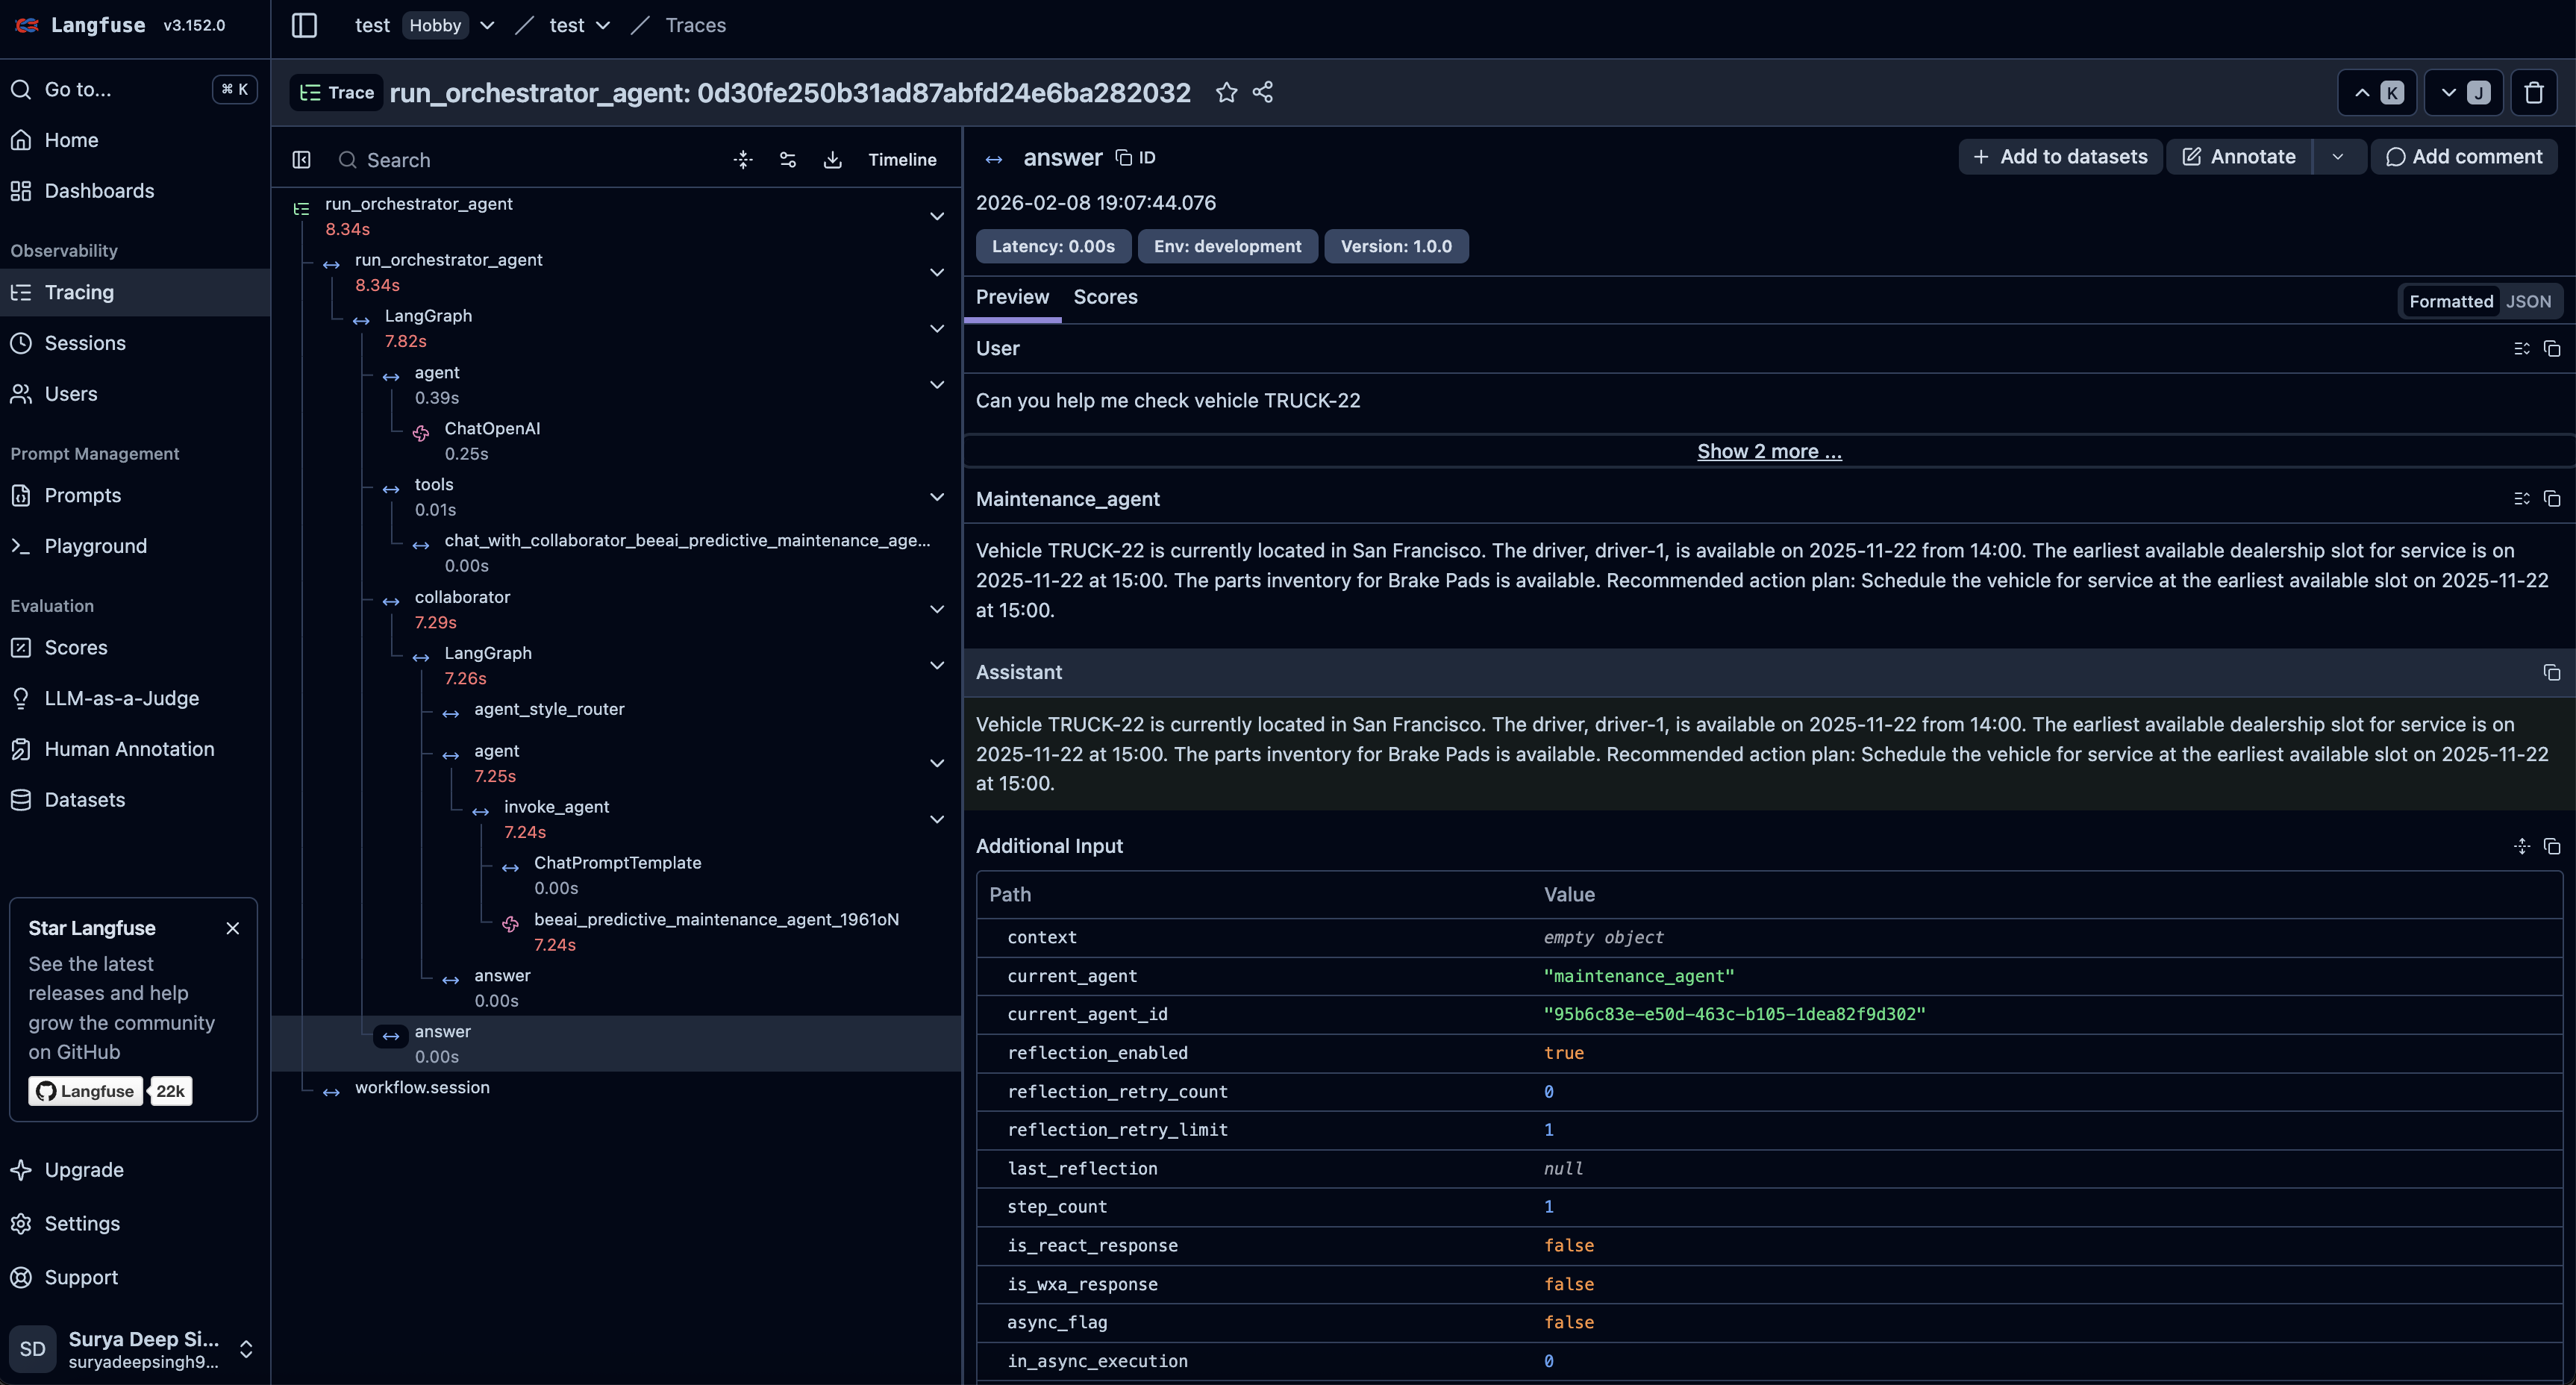
Langfuse records detailed telemetry across the entire predictive maintenance system. Langfuse captures the following data:
- User requests and agent responses
- Agent name and agent version for each request
- Tool executions with input parameters and output results
- Language model calls, including input token count, output token count, model identifier, estimated cost
- Execution time for each workflow step
- Total end-to-end execution time
- Error details and stack traces, when errors occur
Because the BeeAI service, watsonx Orchestrate agents, and all tools include instrumentation, Langfuse provides full visibility across the multi-agent system.
This level of observability helps to:
- Debug agent behavior
- Identify slow tool calls and performance bottlenecks
- Track token usage and operational cost
- Understand how the system makes decisions
This visibility is critical for running agent-based AI systems reliably in production environments.
Summary and next steps
In this tutorial, you completed the following tasks:
- Built a BeeAI predictive maintenance agent with four tools using the IBM Granite 4 model on IBM watsonx.ai.
- Packaged the BeeAI service in a container and deployed the service to IBM Code Engine.
- Created five watsonx Orchestrate tools for vehicle failure prediction, maintenance cost estimation, parts ordering, service booking, and driver notification.
- Built a schedulable predictive maintenance workflow that connects all five tools.
- Configured two watsonx Orchestrate agents, one agent for on-demand maintenance analysis and one agent for scheduled execution.
- Registered BeeAI as an external agent in watsonx Orchestrate to enable multi-agent coordination.
- Imported all tools, agents, workflows, and schedules into watsonx Orchestrate.
- Configured Langfuse to capture execution traces and system observability.
You now have a fully automated predictive maintenance system built with BeeAI, IBM Granite 4, IBM watsonx.ai, IBM watsonx Orchestrate, and Langfuse.
You can extend this system in several ways:
- Ingest real vehicle telemetry data from IoT sensors.
- Replace simulated logic with production machine learning models for failure prediction.
- Schedule maintenance workflows across large vehicle fleets.
- Send driver notifications through email, SMS, or collaboration tools such as Slack.
- Integrate supplier APIs for automated parts replenishment.
- Create custom Langfuse dashboards for fleet-level monitoring and analytics.
These extensions help transform the system demonstrated in this tutorial into a production-ready fleet maintenance platform.
Acknowledgments
This tutorial is produced as part of an IBM Open Innovation Community initiative.
The authors deeply appreciate the support of Jenna Winkler, Tomas Dvorak, Ahmed Azraq, Madan S, and Bindu Umesh for the guidance on reviewing this tutorial.