Tutorial
Deploy Guardium Data Security Center using Red Hat OpenShift CodeReady Containers
Simplify deployment to boost efficient security management and development testingRed Hat CodeReady Containers is a local OpenShift solution designed to simplify learning and development for OpenShift. In this tutorial, you'll learn the steps to deploy Guardium Data Security Center using CodeReady Containers in OpenShift.
From a high-level perspective, CodeReady Containers creates a virtual machine that runs a single-node OpenShift cluster. This node plays the role of a master and a worker node at the same time. No OpenShift installation takes place while deploying CodeReady Containers. Instead, CodeReady Containers launches OpenShift from a pre-installed virtual machine image. The diagram below depicts the CodeReady Containers deployment:
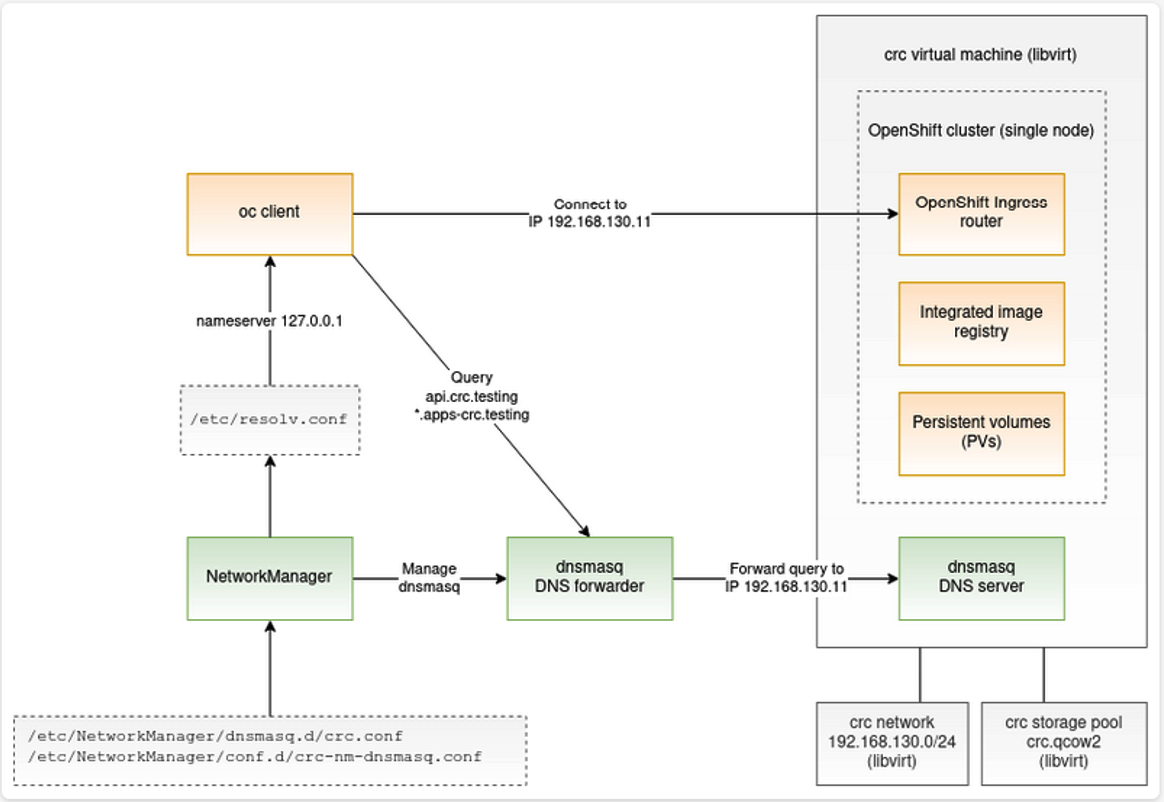
This tutorial walks you step by step through deploying IBM Guardium Data Security Center on a Red Hat OpenShift Single Node environment running on Linux. It's intended for security architects, data protection engineers, and system administrators who want to evaluate or develop a PoC for Guardium Data Security Center in a local, resource-efficient OpenShift environment.
By deploying Guardium Data Security Center in a CodeReady Containters-based OpenShift cluster, you can take advantage of Guardium features such as data activity monitoring and policy enforcement without requiring a full OpenShift cluster.
Learning goals
In this tutorial, you’ll learn how to:
- Set up CodeReady Containers
- Configure Red Hat OpenShift for Guardium Data Security Center
- Deploy supporting components like the NFS provisioner
- Prepare the platform for a successful Guardium Data Security Center deployment
This tutorial focuses on the integration and configuration steps not directly covered in standard installation guides.
Prerequisites
- CodeReady Containers version 1.30.7, which is based on OpenShift Container Platform (OCP) version 4.17.14. For details, see the CodeReady Containers installation guide.
CodeReady Containers minimum requirements
- CPUs: 4
- RAM: 10.5 GB
- Disk space: 35 GB
Guardium Data Security Center v3.6.2 system requirements
- CPUs: Minimum of 48
- RAM: 400 GB
- HDD: 3.2 TB
The deployment of Guardium Data Security Center v3.6.2 involves the installation of Guardium Quantum Safe, which consists of three components. The detailed deployment process for Guardium Quantum Safe is similar to the Guardium Data Security Center deployment. For details beyond the scope of this tutorial, see the following resources:
- Guardium Data Security Center v3.6.x system requirements and prerequisites
- Download and set up the Guardium Data Security Center CASE file
- Guardium Data Security Center Online installation guide
Steps
Step 1: Create an OpenShift Cluster
You need to create a single-node cluster for Red Hat OpenShift Container Platform. Complete the following steps:
- Ensure that CodeReady Containers is installed on your machine.
- Prepare your machine to create a Virtual Machine (VM) using:
crc setup - Run CodeReady Containers with an administrator account (without root login).
The OpenShift preset creates a minimal, single-node cluster for Red Hat OpenShift Container Platform. This cluster is similar to real Red Hat OpenShift Container Platform setups in cloud environments such as AWS, Google Cloud Platform, and Azure. It is only intended to be used for development and testing purposes.
Step 2: Install Red Had OpenShift
- If you do not already have a Red Hat account, go to Red Hat OpenShift Console and register. Log in to your account.
- Go to the Local tab.
- Download CodeReady Containers and the pull secret.
- Upload the files to the target server.
- Extract CodeReady Containers:
tar xvf crc-linux-amd64.tar.xz Add CodeReady Containers to the PATH and set up environment variables:
 export PATH=$PATH:/root/ocp/crc-linux-2.47.0-amd64
 source ~/.bashrc
 chmod +x /root/ocp/crc-linux-2.47.0-amd64/crc
 exec bash
 crc version
Expected output:
 CRC version: 2.47.0+457b65
 OpenShift version: 4.17.14
When you’ve set up the environment for your OpenShift cluster, you can start it. When you start the cluster, you will be asked for a pull secret that you downloaded previously.
Step 3: Configure CodeReady Containers
To configure CodeReady Containers, run the following command: crc setup
Example output:
$ crc setup
INFO Using bundle path /home/admin/.crc/cache/crc_libvirt_4.17.14_amd64.crcbundleINFO Checking if running as non-root
INFO Checking if running inside WSL2
INFO Checking if crc-admin-helper executable is cached
INFO Checking if running on a supported CPU architecture
INFO Checking if crc executable symlink exists
INFO Checking minimum RAM requirements
INFO Check if Podman binary exists in: /home/admin/.crc/bin/oc
INFO Checking if Virtualization is enabled
INFO Checking if KVM is enabled
INFO Checking if libvirt is installed
INFO Installing libvirt service and dependencies
INFO Using root access: Installing virtualization packages
[sudo] password for admin:

INFO Checking if user is part of libvirt group

INFO Adding user to libvirt group

INFO Using root access: Adding user to the libvirt group

INFO Checking if active user/process is currently part of the libvirt group

INFO Checking if libvirt daemon is running

WARN No active (running) libvirtd systemd unit could be found - make sure one of libvirt systemd units is enabled so that it's autostarted at boot time.

INFO Starting libvirt service

INFO Using root access: Executing systemctl daemon-reload command

INFO Using root access: Executing systemctl start libvirtd

INFO Checking if a supported libvirt version is installed

INFO Checking if crc-driver-libvirt is installed

INFO Installing crc-driver-libvirt

INFO Checking crc daemon systemd service

INFO Setting up crc daemon systemd service

INFO Checking crc daemon systemd socket units

INFO Setting up crc daemon systemd socket units

INFO Checking if vsock is correctly configured

INFO Setting up vsock support

INFO Using root access: Setting CAP_NET_BIND_SERVICE capability for /home/admin/Desktop/crc-linux-2.47.0-amd64/crc executable

INFO Using root access: Creating udev rule for /dev/vsock

INFO Using root access: Changing permissions for /etc/udev/rules.d/99-crc-vsock.rules to 644

INFO Using root access: Reloading udev rules database

INFO Using root access: Loading vhost_vsock kernel module

INFO Using root access: Creating file /etc/modules-load.d/vhost_vsock.conf

INFO Using root access: Changing permissions for /etc/modules-load.d/vhost_vsock.conf to 644

INFO Checking if CRC bundle is extracted in '$HOME/.crc'

INFO Checking if /home/admin/.crc/cache/crc_libvirt_4.17.14_amd64.crcbundle exists

INFO Getting bundle for the CRC executable

INFO Downloading bundle: /home/admin/.crc/cache/crc_libvirt_4.17.14_amd64.crcbundle...

5.24 GiB / 5.24 GiB [----------------------------------------------------------------------------------------------------------------------------------------------------] 100.00% 73.04 MiB/s

INFO Uncompressing /home/admin/.crc/cache/crc_libvirt_4.17.14_amd64.crcbundle

crc.qcow2:  19.43 GiB / 19.43 GiB [--------------------------------------------------------------------------------------------------------------------------------------------------] 100.00%

oc:  158.81 MiB / 158.81 MiB [-------------------------------------------------------------------------------------------------------------------------------------------------------] 100.00%

Your system is correctly setup for using CodeReady Containers. Use 'crc start' to start the instance
Step 4: Setup the CPU, memory, and disk
Following is an example setup:
[admin@localhost Desktop]$ crc config set cpus 48
Changes to the configuration property cpus are only applied when the CodeReady Containers instance is started.
If you already have a running CodeReady Containers instance, then for this configuration change to take effect, stop the CodeReady Containers instance with crc stop and restart it with crc start.
[admin@localhost Desktop]$ crc config set memory 30000
Changes to the configuration property memory are only applied when the CodeReady Containers instance is started.
If you already have a running CodeReady Containers instance, then for this configuration change to take effect, stop the CodeReady Containers instance with crc stop and restart it with crc start.
$ crc config set disk-size 2560
Verify the following settings:
 crc config get cpu
 crc config get memory
 sudo virsh domblkinfo crc vda
 crc start
Start CodeReady Containers with the pull secret:
crc start -p pull-secretExample output:
 [admin@localhost Desktop]$ crc start -p pull-secret
 INFO Using bundle path /home/admin/.crc/cache/crc_libvirt_4.17.14_amd64.crcbundle
 INFO Checking if running as non-root
 INFO Checking if running inside WSL2
 INFO Checking if crc-admin-helper executable is cached
 INFO Checking if running on a supported CPU architecture
 INFO Checking if crc executable symlink exists
 INFO Checking minimum RAM requirements
 INFO Check if Podman binary exists in: /home/admin/.crc/bin/oc
 INFO Checking if Virtualization is enabled
 INFO Checking if KVM is enabled
 INFO Checking if libvirt is installed
 INFO Checking if user is part of libvirt group
 INFO Checking if active user/process is currently part of the libvirt group
 INFO Checking if libvirt daemon is running
 INFO Checking if a supported libvirt version is installed
 INFO Checking if crc-driver-libvirt is installed
 INFO Checking crc daemon systemd socket units
 INFO Checking if vsock is correctly configured
 INFO Loading bundle: crc_libvirt_4.17.14_amd64...
 INFO Creating CRC VM for OpenShift 4.17.14...
 INFO Generating new SSH key pair...
 INFO Generating new password for the kubeadmin user
 INFO Starting CRC VM for openshift 4.17.14...
 INFO CRC instance is running with IP 127.0.0.1
 INFO CRC VM is running
 INFO Updating authorized keys...
 INFO Configuring shared directories
 INFO Check internal and public DNS query...
 INFO Check DNS query from host...
 INFO Verifying validity of the kubelet certificates...
 INFO Starting kubelet service
 INFO Waiting for kube-apiserver availability... [takes around 2min]
 INFO Adding user's pull secret to the cluster...
 INFO Updating SSH key to machine config resource...
 INFO Waiting until the user's pull secret is written to the instance disk...
 INFO Changing the password for the kubeadmin user
 INFO Updating cluster ID...
 INFO Updating root CA cert to admin-kubeconfig-client-ca configmap...
 INFO Starting openshift instance... [waiting for the cluster to stabilize]
 INFO 3 operators are progressing: image-registry, ingress, network
 INFO Operator console is progressing
 INFO Operator console is progressing
 INFO All operators are available. Ensuring stability...
 INFO Operators are stable (2/3)...
 INFO Operators are stable (3/3)...
 INFO Adding crc-admin and crc-developer contexts to kubeconfig...
 Started the OpenShift cluster.

 The server is accessible via web console at:
   <https://console-openshift-console.apps-crc.testing>
 Log in as administrator:
   Username: kubeadmin
   Password: LIWQY-6UYVK-L6Aah-rxjcB
 Log in as user:
   Username: developer
   Password: developer
Use the
occommand line interface:eval $(crc oc-env) $ oc login -u developer https://api.crc.testing:6443 $ oc get node NAME STATUS ROLES AGE VERSION crc Ready control-plane,master,worker 21d v1.30.7Configure the routing for the OpenShift Container Platform external connection:
 sudo nmcli connection modify ens34 +ipv4.routes “192.168.1.0/18 192.168.1.1”
 sudo nmcli connection up ens34
Step 5: Access the OpenShift cluster
You will now access the OpenShift Container Platform cluster running in the CodeReady Containers instance using the OpenShift Container Platform web console or OpenShift CLI.
To access the OpenShift Container Platform web console using your web browser, you must use either the kubeadmin or developer user. Use the developer user for creating projects or OpenShift applications and for application deployment. Use the kubeadmin user only for administrative tasks, such as creating new users or setting roles.
- To access the OpenShift Container Platform web console with your default web browser, run the following command:
$ crc console Log in as the developer user with the password printed in the output of the
crc startcommand. You can also view the password for thedeveloperandkubeadminusers by running the following command:$ crc console --credentials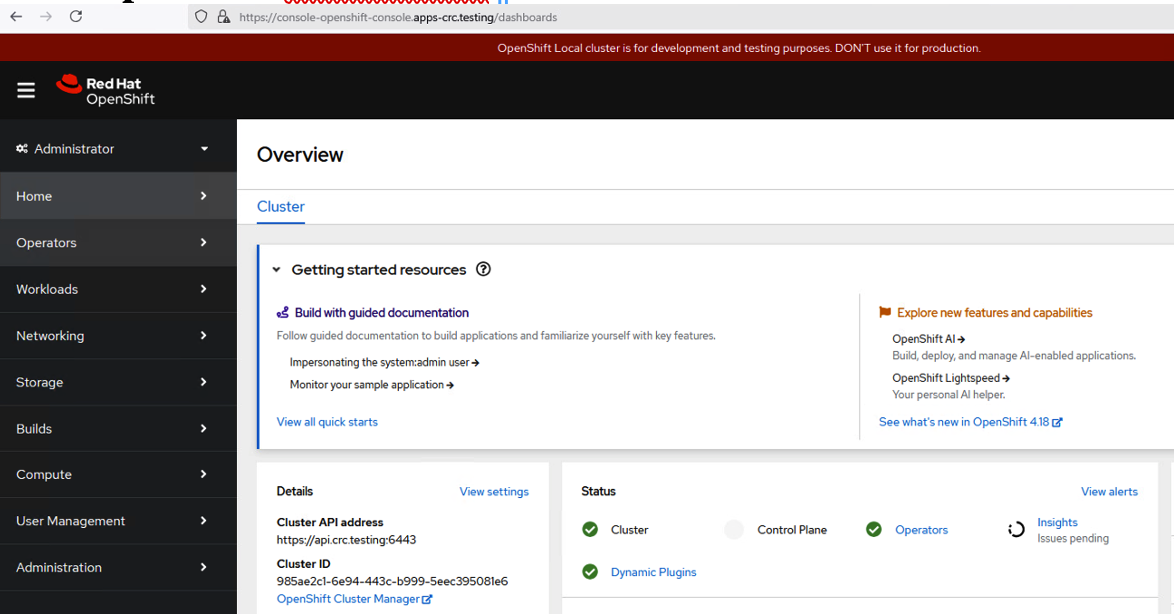
Step 6: Create and manage local persistent volumes with CodeReady Containers
A persistent volume is a common way to preserve data in case a container is accidentally lost in Kubernetes or Red Hat OpenShift. This step shows you how to manage persistent volumes with the NFS Provisioner Operator that the author developed.
The NFS Provisioner Operator is open source and available on OperatorHub.io, which means that it can be easily installed using OpenShift's OperatorHub menu. The Operator uses the Kubernetes NFS subdir external provisioner from kubernetes-sigs internally.
To install NFS Provisioner Operator:
- Log in to OpenShift:
oc login -u kubeadmin -p kubeadmin <https://api.crc.testing:6443> - Create a new namespace:
oc new-project nfsprovisioner-operator Deploy NFS Provisioner Operator:
 cat << EOF | oc apply -f -
 apiVersion: operators.coreos.com/v1alpha1
 kind: Subscription
 metadata:
   name: nfs-provisioner-operator
   namespace: openshift-operators
 spec:
   channel: alpha
   installPlanApproval: Automatic
   name: nfs-provisioner-operator
   source: community-operators
   sourceNamespace: openshift-marketplace
 EOF
Label the target node:
 export target_node=$(oc get node --no-headers -o name | cut -d'/' -f2)
 oc label node/${target_node} app=nfs-provisioner
Set up an NFS server:
 oc debug node/${target_node}
 chroot /host
 mkdir -p /home/core/nfs
 chcon -Rvt svirt_sandbox_file_t /home/core/nfs
 exit; exit
You need to deploy an NFS server using the created folder on a HostPath volume. Note: You can also use an existing persistent volume claim for the NFS server. To deploy NFS Provisioner, run the following:
 cat << EOF | oc apply -f -
 apiVersion: cache.jhouse.com/v1alpha1
 kind: NFSProvisioner
 metadata:
   name: nfsprovisioner-sample
   namespace: nfsprovisioner-operator
 spec:
   nodeSelector:
     app: nfs-provisioner
   hostPathDir: "/home/core/nfs"
 EOF
Verify that NFS Provisioner is running:
 oc get pod

 NAME                               READY   STATUS    RESTARTS   AGE
 nfs-provisioner-77bc99bd9c-57jf2   1/1     Running   0          2m32s
Set NFS StorageClass as the default:
oc patch storageclass nfs -p '{"metadata": {"annotations":{"storageclass.kubernetes.io/is-default-class":"true"}}}'Verify the NFS StorageClass has been set:
oc get scExpected output:NAME PROVISIONER RECLAIMPOLICY VOLUMEBINDINGMODE ALLOWVOLUMEEXPANSION AGE nfs (default) example.com/nfs Delete Immediate false 4m29sThe output shown here indicates that the NFS server, NFS provisioner, and NFS StorageClass are all working as expected. You can use the NFS StorageClass for any test scenarios that need the persistent volume claim.
Step 7: Deploy IBM Guardium Data Security Center
Next , you will create and verify a Guardium Data Security Center instance using a Custom Resource (CR).
Notes:
- Refer to the tutorial prerequisites for Guardium Data Security Center requirements and installation instructions.
- See the Guardium Data Security Center CR suite YAML file.
To create the Guardium Data Security instance, complete the following steps:
- Apply the example custom resource YAML file to create the instance:
oc apply -f <guardium-data-security-center-custom-resource-example.yaml>
Example output
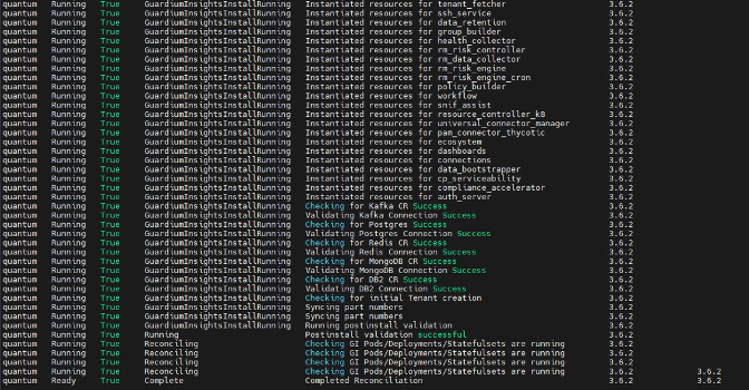
- Verify the status of the deployed instance:
oc get guardiumdatasecuritycenter
Example
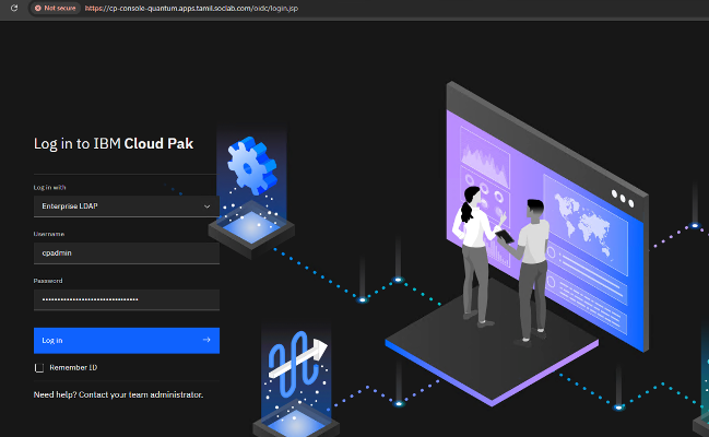
Guardium Data Security Center login page
You can now navigate to the exposed route for the Guardium Data Security Center UI. You should see the following login screen:
Step 8: Configure LDAP authentication
To configure LDAP authentication, see this guide to setting up LDAP authentication in Guardium Data Security Center.
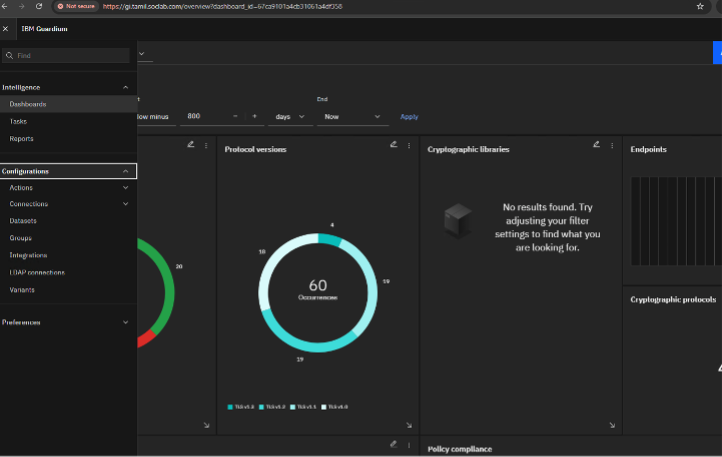
Guardium Data Security Center Dashboard
When you have successfully logged in to Guardium Data Security Center, you’ll see the main dashboard. This is your control center for data activity monitoring, policy management, and compliance reporting
Summary and next steps
In this tutorial, you have completed the steps to deploy IBM Guardium Data Security Center on a Red Hat OpenShift Single Node environment running on Linux. You have learned how to simplify the deployment process and enable efficient security management and development testing in a controlled environment.
Your environment is now ready to begin data security operations using Guardium. You can use the Guardium Data Security Center dashboard to:
- Monitor data access and behavior
- Define policies for sensitive data protection
- Trigger alerts and generate compliance reports
To continue to expand your knowledge and skills, check out these additional IBM Developer resources: