Tutorial
Build a document processing workflow using Docling Serve and watsonx Orchestrate
A hands‑on guide to deploying Docling Serve, integrating it with watsonx Orchestrate, and enabling automated extraction of tables, text, and metadata from documents within conversational workflowsMany automation workflows depend on information that lives in PDFs, reports, and scanned documents. Developers often need a simple way to extract tables and structured content from these files without building a custom parsing stack or maintaining complex pipelines.
This tutorial shows how to bring document intelligence directly into a IBM watsonx Orchestrate agent by integrating a Python tool with Docling Serve running on IBM Code Engine. You will deploy Docling Serve as a containerized service, configure secure connections, and import a custom tool that streams uploaded documents for analysis. The agent will then return extracted tables to the user inside a natural language conversation.
By the end of this tutorial, you will have a working document processing flow that accepts a file from the chat interface, sends it to Docling Serve for parsing, receives structured JSON results, and presents the extracted tables to the user. The same pattern can be extended to add richer document understanding features such as body text extraction, key value extraction, and image extraction.
Architecture of document processing workflow
The following figure shows how watsonx Orchestrate connects to a Python document processing tool and Docling Serve running on IBM Code Engine.
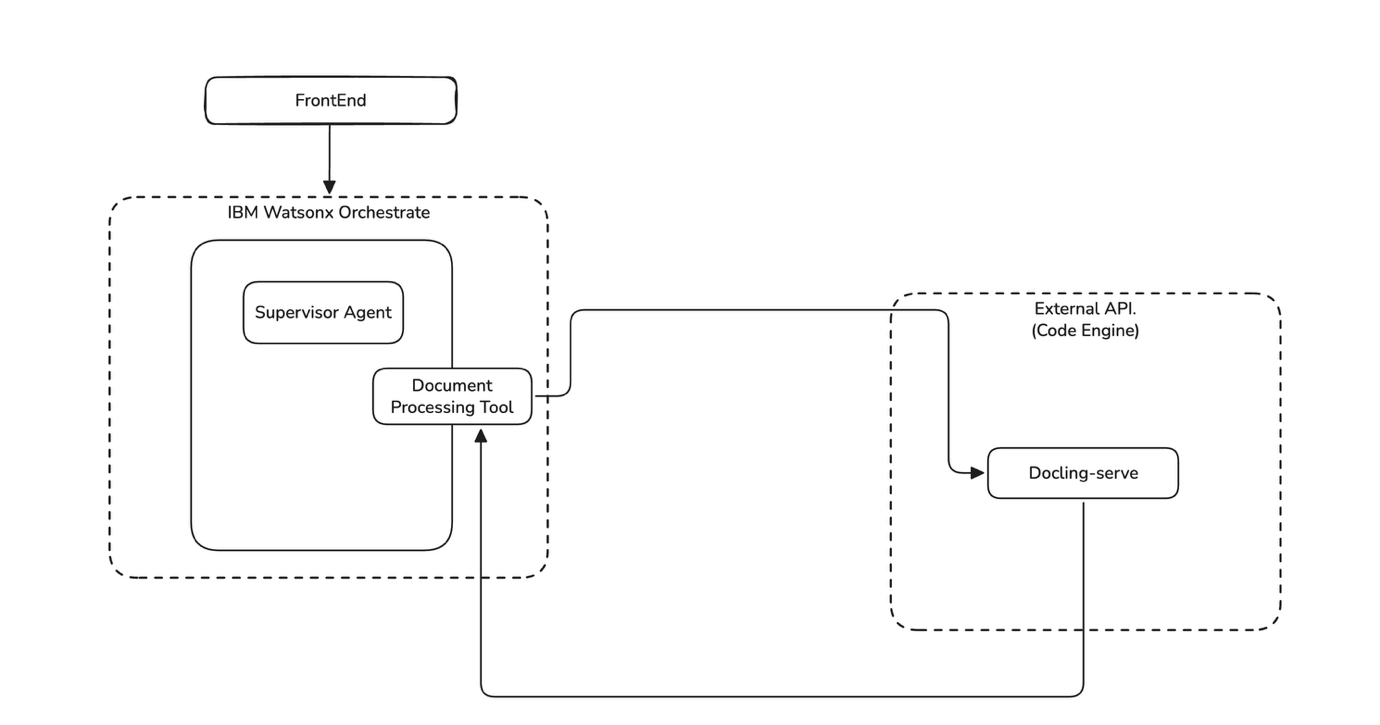
- The user interacts with the watsonx Orchestrate chat interface and uploads a document or starts a
Process Documentaction. - The Supervisor Agent sends a request to the Document Processing Tool.
- The Document Processing Tool streams the uploaded document to the Docling Serve service through a multipart HTTP request, where the service parses and analyzes the document.
- The processed results, such as tabular data, extracted text, key-value pairs, and metadata, return through the tool to the Orchestrate agent. The agent then presents these insights to the user.
Prerequisites
Before you begin, make sure that you have:
- An IBM Cloud account with access to IBM Code Engine for deploying the microservice. You can also sign up for a trial account.
- Access to watsonx Orchestrate (either SaaS or watsonx Orchestrate Application Development Kit (ADK)). Check out the getting started with ADK tutorial if you don’t have an active instance.
- Python 3.10 or later installed on your local machine for API testing.
Step 1: Deploy Docling Serve on IBM Cloud Code Engine
Set up Docling Serve as a containerized service on IBM Code Engine. This service will receive documents from the tool and return structured results.
- Log in to the IBM Cloud Console.
- Go to Menu → Containers → Serverless Projects.
Select your Code Engine project. If you do not have a project, click Create project and choose the required options.
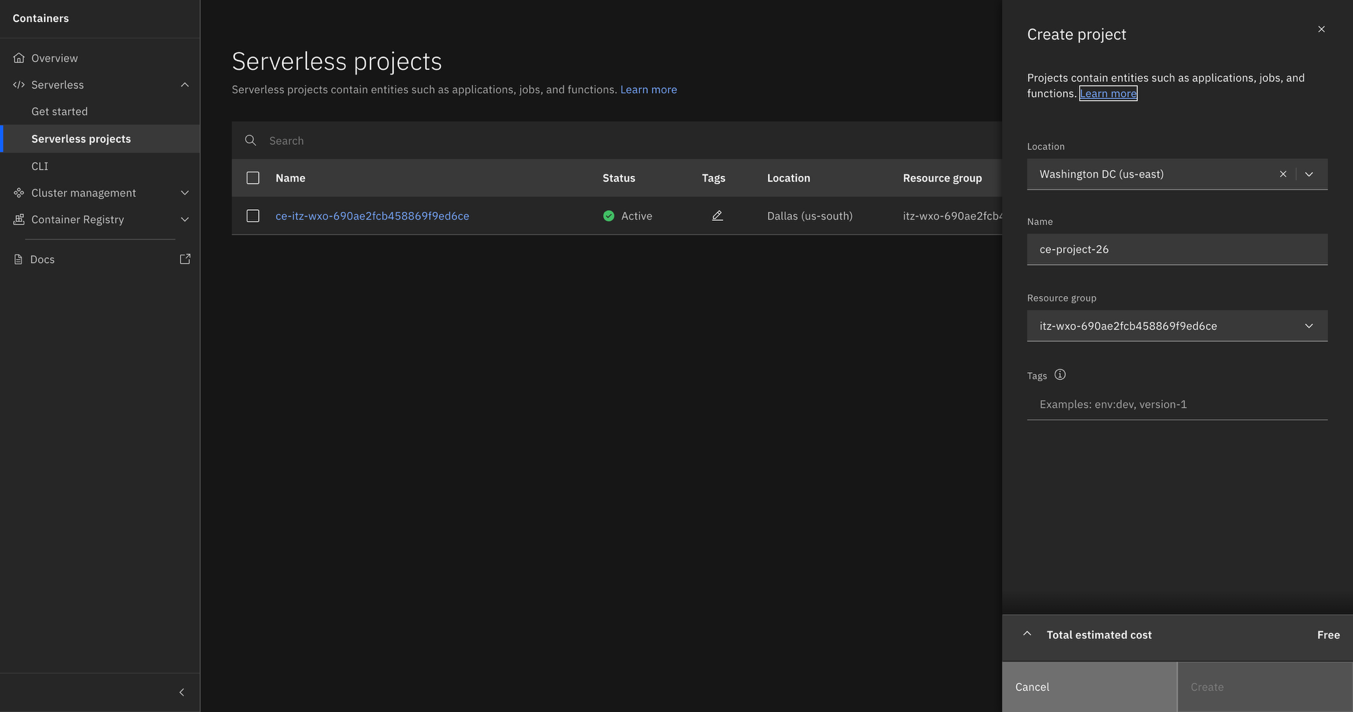
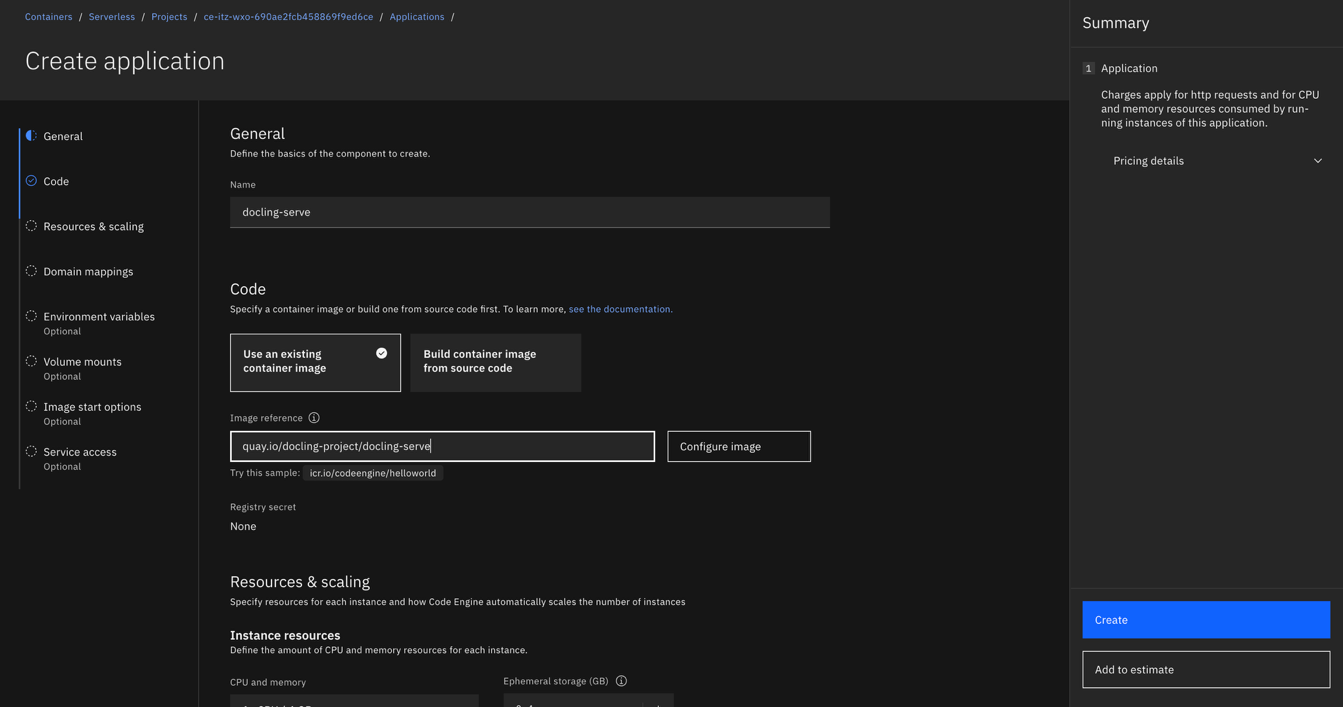
In the Applications dashboard, click Create.
- Enter the application name docling-serve.
Select Use an existing container image and enter the image reference.
quay.io/docling-project/docling-serve-cpuConfigure the runtime settings:
- Resources
- CPU: 4 vCPU
- Memory: 8 GB
- Ephemeral storage: 4 GB
- Scaling
- Minimum instances: 1
- Maximum instances: 2
These settings support stable PDF processing and table extraction workloads.
- Resources
Change the listening port from 8080 to 5001, which is the port that is exposed by Docling Serve.
(Optional) Enable the Docling Serve user interface:
- Click Environment variables.
Set Name = DOCLING_SERVE_ENABLE_UI and Value = 1.
This setting enables the optional Docling Serve user interface.
Click Create to deploy the application.
After the deployment completes and the application is ready, copy the public URL in the Domain mappings section. This URL is used by watsonx Orchestrate tools to send documents for processing.
Step 2. Create the Python tool
In this step, you will create a Python document processing tool.
Create a Python tool similar to the document processing tool in the Git repository. The project structure follows:
/Doc_processing_docling&WXO/
├── main.py
├── requirements.txt
The main.py file has the following requirements:
- Accept a document uploaded through the chat interface
- Read the uploaded file in memory as a byte stream
- Send the file to Docling Serve using a multipart HTTP request
- Parse the structured response returned by Docling Serve, for example extracted tables
- Return the extracted tables and other structured results to the Orchestrate agent
Step 3: Install the watsonx Orchestrate ADK, configure connections, and import the tool
Install the watsonx Orchestrate ADK, set up secure connections for external services, and import the Python document processing tool into watsonx Orchestrate.
Configure your environment in the ADK:
- Get the service instance URL from the watsonx Orchestrate settings page.
- Run the following command in the terminal where the ADK is installed:
orchestrate env add -n <environment-name> -u <service-instance-url>Activate your environment by running:
orchestrate env activate <environment-name>Add and configure connections in the watsonx Orchestrate user interface:
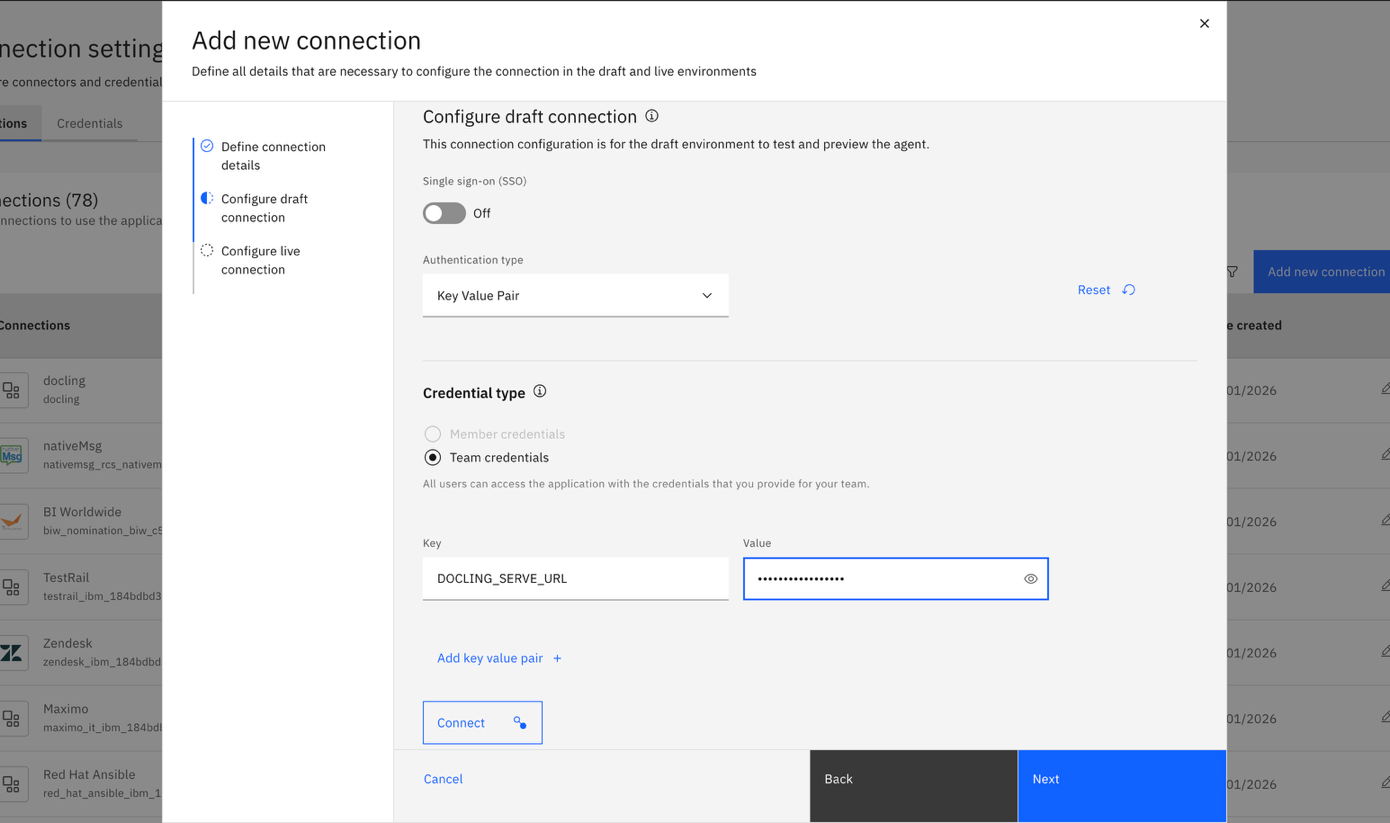
- Go to Orchestrate Menu → Manage → Connections.
- Click Add new connection.
- Enter a Connection ID that the tool will use later.
- Select the authentication type Key Value Pair.
Enter the URL of the deployed Docling Serve service from Step 1 as the value for DOCLING_SERVE_URL.
Import the tool into watsonx Orchestrate.
- Use the following command to import the Python tool into watsonx Orchestrate.
- Use the same Connection ID that you created in the previous step.
orchestrate tools import -k python -f <my-tool.py> -r <requirements.txt> -a <connection-id>Refer to the watsonx Orchestrate documentation for more details.
Step 4: Import the agent configuration
Import the pre-configured agent using the watsonx Orchestrate ADK. The agent configuration includes the tool reference, instructions, welcome message, and starter prompts.
Clone the tutorial repository and navigate to the project folder:
git clone https://github.com/IBM/oic-i-agentic-ai-tutorials
cd oic-i-agentic-ai-tutorials/Doc_processing_docling&WXO
Import the agent configuration using the ADK:
orchestrate agents import -f table_extraction_agent.yamlThis command imports the complete agent configuration, which includes:
- Agent name:
table_extraction_agent - Tool reference:
extract_tables(imported in Step 3) - Workflow instructions for table extraction
- Welcome message and starter prompts
- LLM configuration
- Agent name:
Test the agent in the watsonx Orchestrate chat interface:
The agent is now ready to use. You can test it by uploading a PDF document and asking it to extract tables. The agent will invoke the
extract_tablestool, which sends the document to Docling Serve and returns the extracted tables in a formatted response.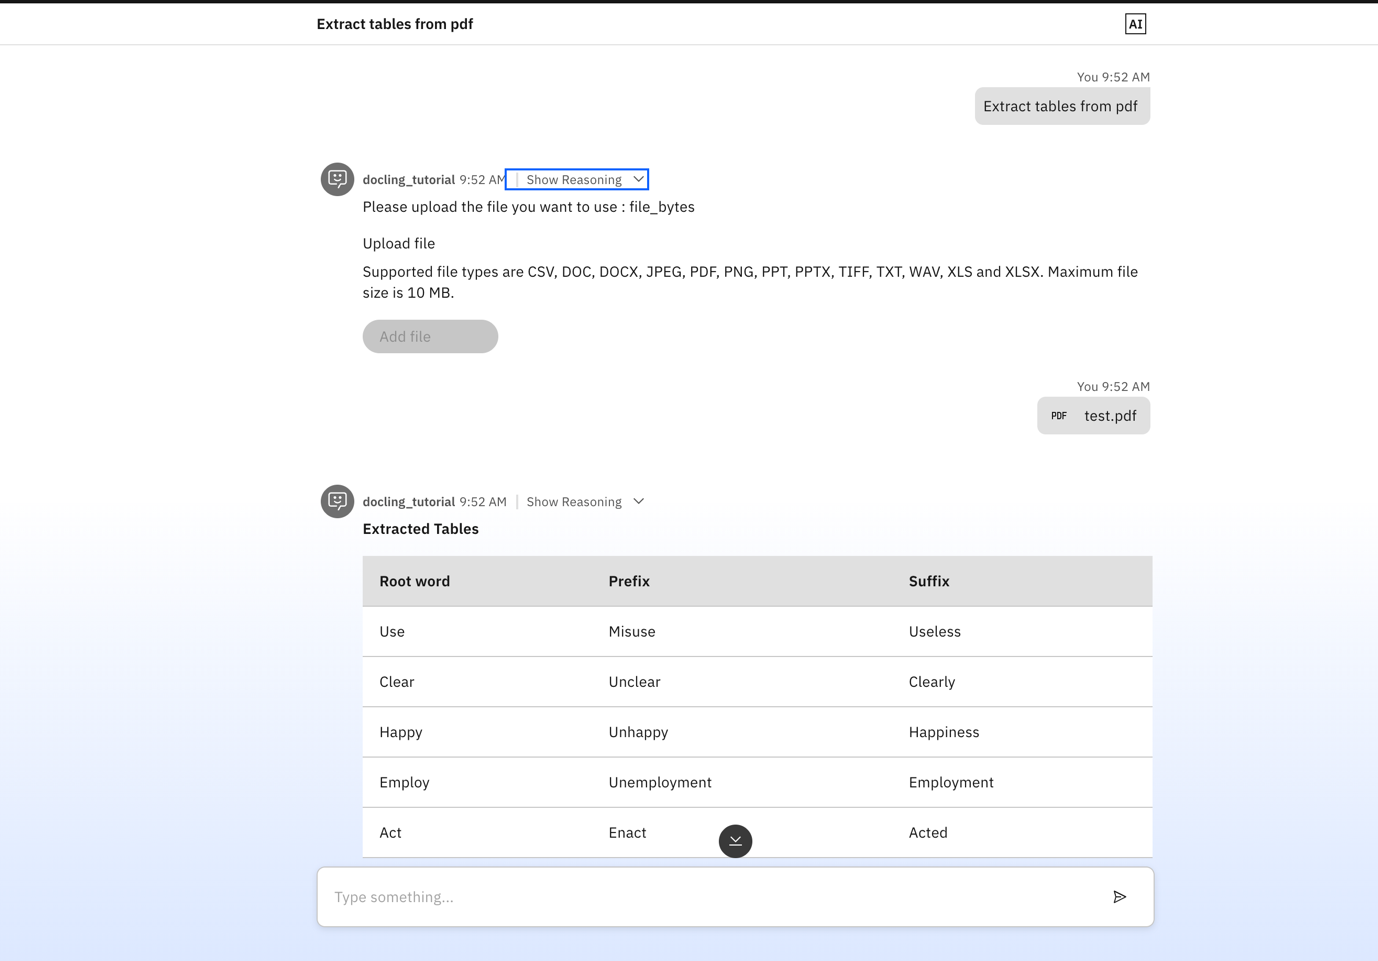
Summary
You have now deployed a Docling Serve document processing service on IBM Code Engine and connected it to IBM watsonx Orchestrate using an ADK-based external tool.
This setup allows watsonx Orchestrate agents to use document intelligence by sending documents to Docling Serve and receiving structured JSON results. The processing logic stays separate from Orchestrate, which allows you to update or extend document understanding features without changing the agent.
With table extraction working end to end, you can now expand the document intelligence features supported by Docling Serve. You can enhance the tool by updating the Docling Serve request configuration and improving the response parsing logic inside the tool’s processing function. Docling Serve supports many extraction features beyond tables.
Next steps
- Request JSON output from Docling Serve and parse the normalized text blocks to return clean, structured document text.
- Enable and parse structured outputs such as key‑value pairs and form fields from the Docling Serve JSON response so downstream agents can use them easily.
- Enable image extraction and return image references or Base64‑encoded image content for further analysis or display.
Acknowledgments
The authors deeply appreciate the support of Goura Mohanty, Ahmed Azraq, Michele Dolfi, and Bindu Umesh for the guidance on reviewing and contributing to this tutorial.
This tutorial was produced as part of the IBM Open Innovation Communityinitiative: Agentic AI (AI for Developers and Ecosystem).