Tutorial
Getting started with Red Hat OpenShift Data Foundation on IBM Power Systems
Step-by-step instructions to deploy OpenShift Data FoundationArchive date: 2025-09-28
This content is no longer being updated or maintained. The content is provided “as is.” Given the rapid evolution of technology, some content, steps, or illustrations may have changed.Introduction
Red Hat OpenShift Data Foundation—previously Red Hat OpenShift Container Storage—is software-defined storage for containers.
Red Hat OpenShift Data Foundation is an implementation of open source Ceph Storage software on an OpenShift container environment. This tutorial provides an overview of Red Hat OpenShift Data Foundation on Red Hat OpenShift Container Platform and shows step-by-step instructions for system administrators to deploy OpenShift Data Foundation on OpenShift Container Platform on IBM Power Systems and use block and file storage in application workload containers.
The following diagram describes the architecture of OpenShift Container Platform on the IBM Power Systems platform. As shown in Figure 1, Ceph Storage is wrapped into OpenShift operators along with the Rook orchestrator. The OpenShift Data Foundation Operator manages the deployment of OpenShift Data Foundation using the open source Rook project.
Figure 1. Architecture of OpenShift Container Platform on IBM Power Systems
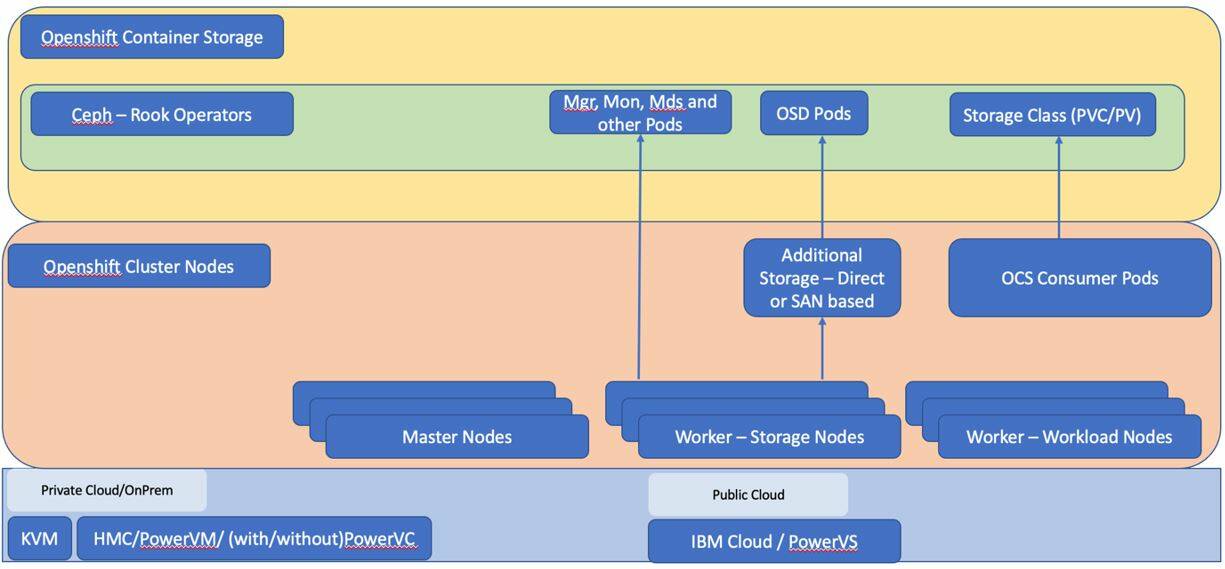
Red Hat OpenShift Data Foundation on IBM Power Systems is supported in two on-premises cloud configurations based on IBM PowerVC and IBM PowerVM and Hardware Management Console (HMC). The public cloud implementation is based on IBM Power Systems Virtual Servers in the IBM Cloud.
Controller nodes provide services that are cluster-wide in scope, including the Kubernetes API server, node configuration management, and etcd. The controller nodes manage all the nodes in the cluster and schedules pods to run on those nodes.
Storage nodes aggregate the storage provided by storage worker nodes into storage pools with cluster-wide scope. These nodes provide APIs allowing storage to be consumed by the pods. Each storage worker node is deployed with one or more data disks that individually have a minimum size of 500 GB. OpenShift Data Foundation uses these nodes and the attached storage to configure Ceph Storage on them.
Workload nodes are dedicated for application workloads. Containerized applications can run on these nodes and use persistent volume claims and persistent volumes prepared with Ceph block or file storage classes.
It is also possible to configure the environment without storage and workload separation for worker nodes. However, it is recommended that this separation exists for optimum performance.
The following section shows how to deploy OpenShift Data Foundation and use it in application workload.
Prerequisites
Make sure that the following prerequisites are fulfilled before deploying OpenShift Data Foundation:
- A functioning OpenShift Container Platform on IBM Power architecture.
- An understanding of storage architecture in Kubernetes/OpenShift platform including Ceph and Rook.
- Awareness of the hierarchy of storage classes, persistent volumes, and persistent volume claims in the Kubernetes/OpenShift platform
- Awareness about the integration of OpenShift Cluster Storage block and file storage into an application
- Availability of block and file storage in a Kubernetes/Openshift environment
- Ability to write an YAML file to create a persistent volume claim using specific storage class and deploy a simple application pod using an NGINX image with persistent volume claim mounted
- Familiarity with the ceph-tools pod to interact with embedded Ceph inside OpenShift Container Platform
With these prerequisites, you will be able to create a persistent volume claim from a user-provided YAML file and deploy a simple application pod using NGINX that mounts that persistent volume. This example with be provided in a separate tutorial in this series.
Estimated time
Deploying OpenShift Data Foundation on OpenShift Container Platform as described in this tutorial requires about an hour's time.
Steps
This section describes the procedure to deploy OpenShift Data Foundation on OpenShift Container Platform.
Using CLI
This section describes how to install OpenShift Container for Storage using CLI. It is assumed that the OpenShift Container Platform is already installed and running.
Note: If you don't have an existing cluster you can spin up an OpenShift cluster in IBM Power Systems Virtual Server by following the instructions mentioned at: https://github.com/ocp-power-automation/openshift-install-power
Run the
oc get nodescommand. An output with a list of nodes is displayed.If theSTATUScolumn in the output showsReady, it means that your cluster is ready.If all nodes are in the ready state, proceed to deploy a local storage operator and related objects (for example, local-storage-47.yaml).
apiVersion: v1
kind: Namespace
metadata:
name: openshift-local-storage
---
apiVersion: operators.coreos.com/v1
kind: OperatorGroup
metadata:
  name: local-storage
  namespace: openshift-local-storage
spec:
  targetNamespaces:
   - openshift-local-storage
---
apiVersion: operators.coreos.com/v1alpha1
kind: Subscription
metadata:
  name: local-storage-operator
  namespace: openshift-local-storage
spec:
  channel: "4.7"
  installPlanApproval: Automatic
  name: local-storage-operator
  source: redhat-operators
  sourceNamespace: openshift-marketplace
This file contains information for the following three objects:
- Namespace definition
- Operator group
- Subscription for the local storage
Run the following command to deploy these objects:
$oc create -f local-storage-47.yamlOn successful completion, you will see the three objects created. Now, check the corresponding CSV file in the openshift-local-storage namespace.
# oc get csv  -n openshift-local-storage
NAME                                           DISPLAY         VERSION                 REPLACES   PHASE
local-storage-operator.4.7.0-202104250659.p0   Local Storage   4.7.0-202104250659.p0              Succeeded
Create the local volume set.
Before creating the volume set, we need to check that we have the worker nodes that are needed. In this case we are using three worker nodes. Note that the local volume set will automatically detect the additional volumes attached to the worker nodes. To get the volumes we need to perform the following steps:
Label each of the worker nodes as shown in the following examples.
$ oc label nodes worker-0 cluster.ocs.openshift.io/openshift-storage=’’ Node/worker0.sridhar-ocp-ocs.cp.fyre.ibm.com labeled. $ oc label nodes worker-1 cluster.ocs.openshift.io/openshift-storage=’’ Node/worker1.sridhar-ocp-ocs.cp.fyre.ibm.com labeled. $ oc label nodes worker-2 cluster.ocs.openshift.io/openshift-storage=’’ Node/worker2.sridhar-ocp-ocs.cp.fyre.ibm.com labeled.Note: Replace the
worker-0,worker-1, andworker-2worker node names with the appropriate values from your environment.Refer to the following local-volume-set.yaml file. It contains the hostnames of the worker nodes on which you want to deploy OpenShift Data Foundation. In this example, OpenShift Data Foundation is deployed on all worker nodes. You need to make sure that the
minSizeparameter matches the size of the additional OpenShift Data Foundation disk attached to the worker nodes.local-volume-set.yaml
apiVersion: local.storage.openshift.io/v1alpha1 kind: LocalVolumeSet metadata: name: localblock namespace: openshift-local-storage spec: deviceInclusionSpec: deviceMechanicalProperties: - Rotational deviceTypes: - disk - part minSize: 500Gi nodeSelector: nodeSelectorTerms: - matchExpressions: - key: kubernetes.io/hostname operator: In values: - worker-0 - worker-1 - worker-2 storageClassName: localblock volumeMode: BlockNote: Replace the worker-0, worker-1 and worker-2 worker node names with appropriate values from your environment.
Create the volume set by running the following command:
$ oc create -f local-volume-set.yaml
Localvolumeset.local.storage.openshift.io/localblock created
Wait for a few minutes for the actual volumes to be created. Then run the following command to check the status of the persistent volumes created.
$ oc get pvIn the output, you might see as many entries as the total number of disks attached to all of the worker nodes. With this step, deployment of local storage operator and local volume set objects are complete.
Create the OpenShift Data Foundation operator and related objects.
The openshift-storage-ns-operatorgroup.yaml file contains the definitions of OpenShift storage namespace and its operator group.
openshift-storage-ns-operatorgroup.yaml
---
apiVersion: v1
kind: Namespace
metadata:
  labels:
    openshift.io/cluster-monitoring: "true"
  name: openshift-storage
spec: {}
---
apiVersion: operators.coreos.com/v1
kind: OperatorGroup
metadata:
  name: openshift-storage-operatorgroup
  namespace: openshift-storage
spec:
  creationTimestamp: null
  targetNamespaces:
        - openshift-storage

# oc create -f openshift-storage-ns-operatorgroup.yaml
namespace/openshift-storage created
operatorgroup.operators.coreos.com/openshift-storage-operatorgroup created
Create the catalog source that contains the OpenShift Data Foundation code (in this example, the catalogsource.yaml file).
Catalogsource.yaml
apiVersion: operators.coreos.com/v1alpha1
kind: CatalogSource
metadata:
  labels:
    ocs-operator-internal: 'true'
  name: ocs-catalogsource
  namespace: openshift-marketplace
spec:
  displayName: Openshift Container Storage
  icon:
    base64data: ''
    mediatype: ''
  image: registry.redhat.io/redhat/redhat-operator-index:v4.7
  publisher: Red Hat
  sourceType: grpc
Notice that the location specified in the
imageparameter is the location of the production level OpenShift Data Foundation operator code.Run the following command to create catalog source:
oc create -f catalogsource.yamlSet up the subscription for the OpenShift Data Foundation operator (for example, in the subscribe.yaml file).
subscribe.yaml
apiVersion: operators.coreos.com/v1alpha1
kind: Subscription
metadata:
  name: ocs-operator
  namespace: openshift-storage
spec:
  channel: stable-4.7
  name: ocs-operator
  source: ocs-catalogsource
  sourceNamespace: openshift-marketplace
Run the following command to create a subscription:
oc create -f subscribe.yamlRun the following command and notice that there are four pods in the openshift-storage namespace:
# oc get pods -n openshift-storage
NAME                                    READY   STATUS    RESTARTS   AGE
noobaa-operator-7c78fd8589-c9rt6        1/1     Running   0          96s
ocs-metrics-exporter-844cd5988b-khg7b   1/1     Running   0          95s
ocs-operator-7dcc6dc48f-4kzjw           1/1     Running   0          96s
rook-ceph-operator-5c98f687bc-gdd4l     1/1     Running   0          96s
Also, run the following command to identify the storage cluster service version (CSV):
# oc get csv  -n openshift-storage
NAME                      DISPLAY                       VERSION   REPLACES       PHASE
ocs-operator.v4.7.0   OpenShift Container Storage   4.7.0                    Succeeded
Ensure that the storage class
localblockis properly setup.# oc get sc NAME PROVISIONER RECLAIMPOLICY VOLUMEBINDINGMODE ALLOWVOLUMEEXPANSION AGE localblock kubernetes.io/no-provisioner Delete WaitForFirstConsumer false 48mFinally, deploy the storage cluster using the storage_cluster.yaml file. Also, ensure that the storage class name specified in this YAML file matches with the storage class created while generating the local volume set. (in this example, it is
localblock).apiVersion: ocs.openshift.io/v1 kind: StorageCluster metadata: annotations: cluster.ocs.openshift.io/local-devices: 'true' name: ocs-storagecluster namespace: openshift-storage spec: manageNodes: false monDataDirHostPath: /var/lib/rook storageDeviceSets: - count: 1 dataPVCTemplate: spec: accessModes: - ReadWriteOnce resources: requests: storage: 100Gi storageClassName: localblock volumeMode: Block name: ocs-deviceset-localblock placement: {} portable: false replica: 3 resources: limits: cpu: 2 memory: 5Gi requests: cpu: 1 memory: 5Gi # oc create -f storagecluster.yaml storagecluster.ocs.openshift.io/ocs-storagecluster createdEnsure that both CSV and the storage clusters are initiated. You can verify with these commands:
# oc get csv -n openshift-storage
NAME                  DISPLAY                       VERSION   REPLACES   PHASE
ocs-operator.v4.7.0   OpenShift Container Storage   4.7.0                Installing

# oc get storagecluster -n openshift-storage
NAME                 AGE     PHASE         EXTERNAL   CREATED AT             VERSION
ocs-storagecluster   2m47s   Progressing              2021-05-21T14:54:48Z   4.7.0
Wait until the phase moves to Succeeded.
Once completed, they should look like this:
# oc get storagecluster -n openshift-storage
NAME                 AGE    PHASE   EXTERNAL   CREATED AT             VERSION
ocs-storagecluster   4m9s   Ready              2021-05-21T14:54:48Z   4.7.0

#oc get csv -n openshift-storage
NAME                  DISPLAY                       VERSION   REPLACES   PHASE
ocs-operator.v4.7.0   OpenShift Container Storage   4.7.0                Succeeded
At this point, the OpenShift Data Foundation is ready to be used.
Refer to subsequent tutorials in this series on how to verify this installation and use it as block and file storage for your application workloads.
Using UI
If you want to deploy OpenShift Data Foundation using OpenShift Container Platform web UI, refer:
- Documentation landing page for OpenShift Container Storage 4.7 docs
- Release nodes for OpenShift Container Storage 4.7
Summary
Using the steps in this tutorial, you should now be able to deploy OpenShift Data Foundation on OpenShift Container Platform.
As an alternative to the step-by-step instructions, there is a GitHub project developed by the IBM OpenShift Data Foundation Power Development Team that fully automates the creation of an OpenShift Container Platform cluster and the deployment of OpenShift Data Foundation. It is available at https://github.com/ocp-power-automation/ocs-upi-kvm
Note: The ocs-upi-kvm project is misnamed. It supports multiple platforms: Power Virtual Server, PowerVC, and KVM.
This is used by the OpenShift Data Foundation development team to perform OCS-CI quality engineering testing and as one would expect it is fully automated. With the specification of Red Hat and IBM Cloud credentials, you can create an OpenShift Container Platform cluster running OpenShift Data Foundation in a single command. You can use this to test or evaluate OpenShift Data Foundation in your environment.
Refer to the following tutorials for more information: