Tutorial
Migrating from VSCSI to NPIV on IBM i
An example of how to migrate an IBM i client partitionArchive date: 2025-02-19
This content is no longer being updated or maintained. The content is provided “as is.” Given the rapid evolution of technology, some content, steps, or illustrations may have changed.Introduction
This tutorial shows an example for migrating an IBM i client partition of the IBM® PowerVM® virtual I/O client from a virtual Small Computer System Interface (VSCSI) to an N_Port ID Virtualization (NPIV) attachment. This tutorial is intended to help the test team to successfully plan and perform an IBM i partition migration from VSCSI to NPIV in IBM Power Systems™ servers.
In this tutorial, it is assumed that storage area network (SAN) is supported, NPIV is enabled in SAN switch, disks are NPIV capable, required license is available for IBM i, and the supported tape library is used to configure IBM i client partition of IBM Power Systems. For queries related to SAN and IBM i, it is recommended to contact the respective teams.
Considerations for using N_Port ID Virtualization
NPIV is an advanced technology to virtualize the Fibre Channel networks to connect multiple logical partitions to one physical port of a physical fibre channel adapter. This can help to assign independent physical storages directly to the logical partitions using a unique worldwide port name (WWPN).
Virtual SCSI versus N_Port ID Virtualization
While for VSCSI the VIOS performs generic SCSI device emulation, with NPIV the VIOS simply acts as a Fibre Channel (FC) pass-through. Compared to VSCSI, an NPIV storage environment typically requires less effort to be configured and maintained as there is no multipath device driver, virtual target device creation, and administration of corresponding volume device mappings required on the VIOS instance.
NPIV allows the IBM i client partition to see its storage devices with its machine type / model and all device characteristics through virtual Fibre Channel adapters as if it would be natively attached to the storage devices. Some licensed programs on the IBM i client partition don't support VSCSI attached devices as they require knowledge about the hardware device characteristics.
Migration planning considerations
Consider the following recommendations for migrating an IBM i client partition of the IBM PowerVM VIOS from VSCSI to NPIV:
- Reuse existing volumes on the SAN created for IBM i VSCSI attachment for NPIV attachment.
- Each virtual Fibre Channel client adapter for IBM i supports up to 64 logical unit numbers (LUNs) vs. up to 16 VSCSI LUNs supported for each VSCSI client adapter.
- The remapping of the volumes from a VSCSI to an NPIV configuration while the IBM i partition is powered off (that is heterogeneous multipathing along with simultaneous use of VSCSI and NPIV is not supported in IBM i partition).
Overview of migration steps
This section provides an overview of the steps to migrate an IBM i partition from VSCSI to an NPIV attachment of the IBM Storage Systems. This migration procedure explained in this tutorial is certainly not the only way in which this migration can be performed. However, we think it well serves its purpose by minimizing the required IBM i partition downtime and risks. This helps in retaining the original VSCSI configuration to allow an easy step-back if required until the targeted NPIV configuration has been verified to work successfully.
- Verify if all the prerequisites for IBM i NPIV storage attachment are fulfilled.
- Change the IBM i partition profile to remove the VSCSI client adapters and add virtual Fibre Channel client adapters.
- Change the VIOS partition configuration (current configuration and profile) by dynamically adding the virtual Fibre Channel server adapters required for NPIV.
- Enable NPIV on the SAN switch ports.
- Map the virtual Fibre Channel server adapters to physical Fibre Channel adapters.
- Add new switch zones for the new virtual Fibre Channel adapters from the IBM i client partition.
- Create a new host object for the IBM i partition on the storage system.
- 8.Power off the IBM i partition.
- Map the existing volumes to the new host object used for IBM i NPIV attachment.
- Power on the IBM i partition and verify if everything works as expected with NPIV.
- After verifying that NPIV is working successfully, remove the VSCSI disk resources from the VIOS instances.
- Remove the VSCSI server adapters from the VIOS instances.
- Delete the IBM i partition's old profile.
- Request the SAN team to unshare the old VSCSI disk resources.
Performing the migration
In this section, we provide detailed steps to migrate our IBM i client partition of two VIOS instances from a VSCSI to an NPIV attachment.
Verifying the prerequisites for IBM i NPIV storage attachment
Verify if the following prerequisites are fulfilled for IBM i NVIP storage attachment:
- Supported 8 Gb Fibre Channel (see reference 2)
- NPIV-capable SAN switch.
- OS level (IBM i 7.1 TR6 or later)
- VIOS 2.2.2.1 (fix pack 26) or later.
- Hardware Management Console (HMC) V7R3.5.0 or later
- Recommended latest Power Systems firmware.
On the VIOS instance run the
chkdevcommand for each hdisk used for IBM i to be migrated to the NPIV attachment:chkdev -dev <diskname>Example:
$ chkdev -dev hdisk15
NAME:
hdisk15
IDENTIFIER:
3321360050768028086EDD00000000000002104214503IBMfcp
PHYS2VIRT_CAPABLE:
NA
VIRT2NPIV_CAPABLE:
YES
VIRT2PHYS_CAPABLE:
YES
In the above output,
VIRT2NPIV CAPABLE : YESindicates that the VIO client is now ready for migration.
Changing the IBM i partition profile to remove the VSCSI client adapters and add virtual Fibre Channel client adapters
Perform the following steps to change the IBM i partition profile to remove the VSCSI client adapters and add virtual Fibre Channel client adapters:
As a safety measure to be able to easily revert to using VSCSI in case anything goes wrong with our NPIV setup, create a new partition profile for the NPIV configuration by creating a copy of the IBM i partition's existing profile used for VSCSI.
To do so, right-click the partition on the HMC and click Configuration -> Manage Profiles. Select the currently used profile and click Actions -> Copy. Then specify a name for the new profile, for example, default_NPIV (as shown in Figure 1) and click OK.
Figure 1. Copying the existing IBM i partition profile

In the Manage Profiles dialog box, click the newly created default_NPIV profile to open it for editing and select the Virtual Adapters tab as shown in Figure 2.
Figure 2. IBM i partition profile with existing virtual SCSI adapters
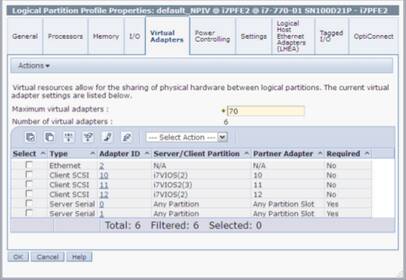
Delete the VSCSI client adapters in slots 11 and 12 we used for VSCSI attachment by selecting them and clicking Actions -> Delete. Note that we need to retain the VSCSI adapter in slot 10 that is used for a virtual DVD drive.
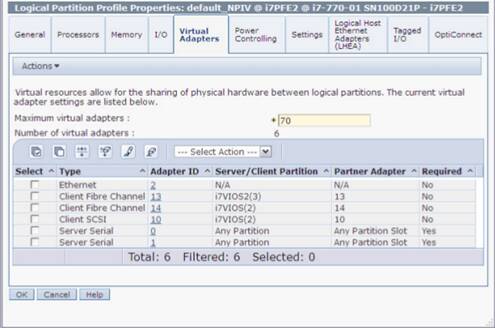
For the NPIV attachment, you need to create two corresponding virtual Fibre Channel client adapters in slots 13 and 14 each. To do so, click Actions -> Create Virtual Adapter -> Fibre Channel Adapter. You can use different slot numbers for the virtual FC other than for VSCSI to be able to easily revert to the VSCSI adapter configuration until you are fully assured that the required NPIV configuration works successfully.
The adapter with the odd slot ID 13 is already associated with the second VIOS instance adapter ID 13, and the one with the even slot ID 14 with the first VIOS instance adapter ID 14. The resulting virtual adapter configuration for our IBM i partition is shown in Figure 3. It provides us the required IBM i multi-pathing configuration for NPIV across two redundant VIOS instances.
Figure 3. IBM i partition profile with removed VSCSI and added virtual FC adapters
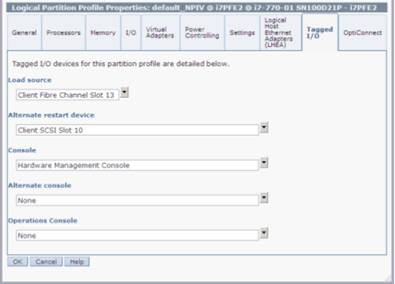
Click OK in the Virtual Adapters tab to save the changes to the partition profile. In the dialog box with the list of managed profiles, select the partition profile again and click the Tagged I/O tab. Select the previously created virtual Fibre Channel adapter for the load source (as shown in Figure 4) and click OK to save the changes.
Figure 4. IBM i I/O tagging for the load source using virtual Fibre Channel
Changing the VIOS configuration using dynamic LPAR (DLPAR)
This section explains how to change the VIOS partition configuration (current configuration and profile) by dynamically adding the virtual Fibre Channel server adapters required for NPIV. Perform the following steps:
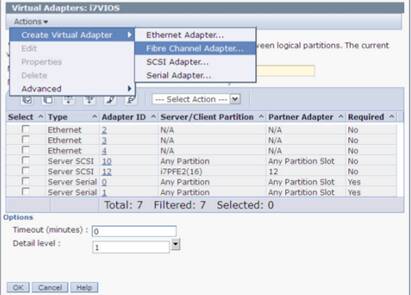
For both of VIOS partitions, you can dynamically add a virtual Fibre Channel server adapter. Right-click the VIOS partition and click Dynamic Logical Partitioning -> Virtual Adapters. Then, click Actions -> Create Virtual Adapter -> Fibre Channel Adapter (as shown in Figure 5).
Figure 5. Dynamically adding a virtual FC adapter to a VIOS partition
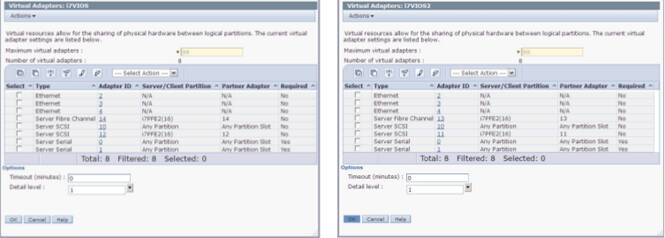
The resulting virtual adapter configuration for the two VIOS partitions is shown in Figure 6.
Figure 6. VIOS virtual adapter configuration with added virtual FC adapters
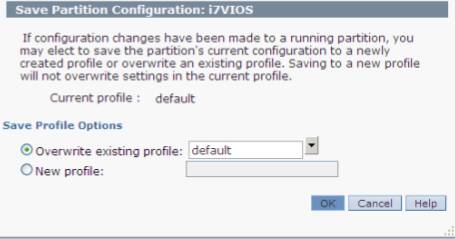
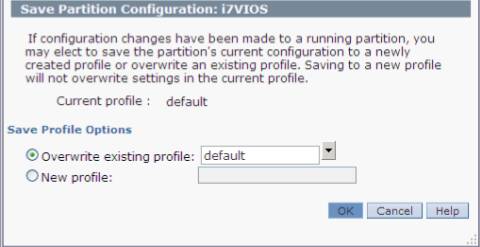
You need to make sure that the changes of dynamically adding the virtual Fibre Channel adapters are retained even after a VIOS shutdown. To do so, right-click each VIOS instance, and then click Configuration -> Save Current Configuration. In the dialog box that is displayed, select the Overwrite existing profile option and click OK (as shown in Figure 7).
Figure 7. Saving the VIOS current configuration to its profile
Enabling NPIV on the SAN switch
We need to contact the SAN team to enable the NPIV capable on the SAN switch. We can use the lsnports command to display information about all the ports capable of NPIV.
Mapping the virtual Fibre Channel server adapters to physical Fibre Channel adapters
Perform the following steps to map virtual FC server adapter to physical FC adapters:
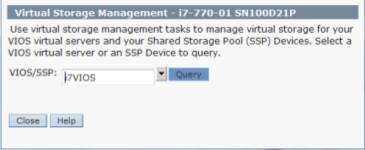
The virtual Fibre Channel adapters can easily be mapped to the physical Fibre Channel adapters owned by the Virtual I/O Servers using the Virtual Storage Management function of the HMC GUI. In the Tasks pane, select the physical server and click Configuration -> Virtual Resources -> Virtual Storage Management. In the Virtual Storage Management dialog box, select the corresponding VIOS from the drop-down list and click Query to retrieve its configuration information (as shown in Figure 8).
Figure 8. Retrieving VIOS configuration information
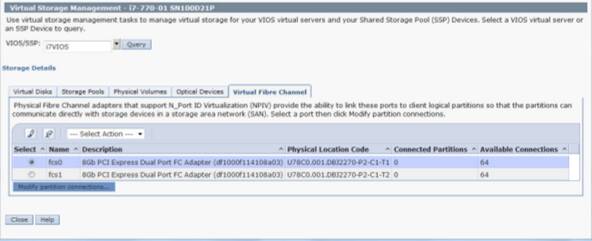
To modify the virtual Fibre Channel port connections, click the Virtual Fibre Channel tab, select the physical FC adapter port fcs0 you need to map the virtual Fibre Channel adapter for the IBM i client partition to, and click Modify partition connections (as shown in Figure 9).
Figure 9. Virtual Storage Management virtual FC adapter connections
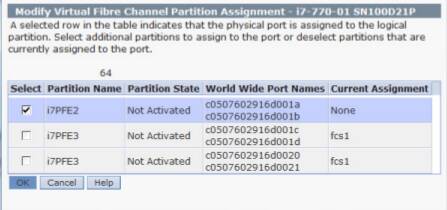
In the Modify Virtual Fibre Channel Partition Assignment dialog box, select IBM i client partition i7PFE2 and click OK (as shown in Figure 10).
Figure 10. Selecting the virtual FC adapter to be mapped to the physical port
Repeat the above steps for mapping the virtual Fibre Channel adapter to a physical Fibre Channel adapter port for the second VIOS instance.
Instead of using the Virtual Storage Management function of the HMC GUI, alternatively, you can create the virtual to physical FC adapter mappings from the VIOS command line using the
vfcmapcommand.On the VIOS instances, the dynamically added virtual Fibre Channel server adapter is displayed as an available vfchostX resource.
Refer to the following output of the
lsdevcommand for the virtual Fibre Channel server adapter in slot 14:lsdev -slots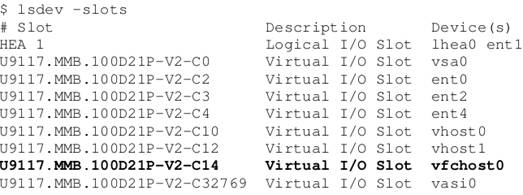
On each VIOS instance, map each virtual Fibre Channel server adapter vfchostX to a physical Fibre Channel port fcsX. You can use the
lsnportscommand to list the NPIV capable physical Fibre Channel ports with aports information showing the available virtual ports of the physical port, while the actual mapping is done using thevfcmapcommand like shown below:lsnports
vfcmap -vadapter vfchost0 -fcp fcs0Our The newly created mapping of the virtual Fibre Channel server adapter vfchost0 to the physical port fcs0 is shown in the following
lsmap -all -npivcommand output.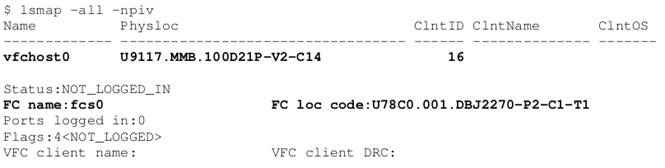
Adding new switch zones for the new virtual Fibre Channel adapters from the IBM i client partition
Perform the following steps to create the SAN switch zoning for the new virtual Fibre Channel adapters:
Retrieve the virtual worldwide port name (WWPN) from each virtual Fibre Channel client adapter of the IBM i client partition. On the HMC, right-click the IBM i client partition and click Configuration -> Manage Profiles. In the Manage Profiles dialog box, click the default_NPIV profile created for the NPIV configuration. In the Virtual Adapters tab click each virtual Fibre Channel adapter we created and make a note of both virtual WWPNs along with its slot number (as shown in Figure 11).
Figure 11. IBM i virtual Fibre Channel adapter WWPNs
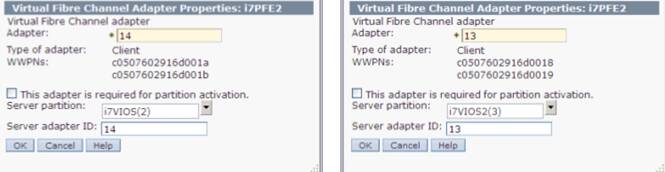
Use the WWPNs from Figure 11 and request the SAN team to perform the zoning to map from the virtual Fibre Channel adapter to the physical Fibre Channel adapter.
Turning off the IBM i partition
Now, you must engage the SAN team and share the LUN IDs that are needs to be shared from VSCSI to NPIV.
Note: The remapping of the volumes from a VSCSI to an NPIV configuration has to be performed while the IBM i partition is powered off. That is, heterogeneous multipathing with simultaneous use of VSCSI and NPIV is not supported in an IBM i partition.
Powering on the IBM i partition and verifying if everything works as expected with NPIV
Perform the following steps to power on the IBM i partition and verify if everything works as expected with NPIV:
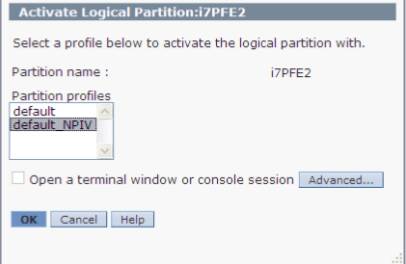
From the HMC, activate the IBM i client partition again using the new partition profile (default_NPIV) which we created for the NPIV configuration (as shown in Figure 12).
Figure 12. Activating the IBM i partition with the new profile for NPIV
Removing the virtual SCSI disk resources from the VIOS instances
Now that we have successfully migrated the IBM i volumes from the VSCSI attachment to the NPIV attachment, we need to remove the virtual target devices and corresponding hdisk devices on each VIOS instance used for hosting the IBM i client partition.
Run the
rmdevcommand.rmdev -dev IBM_i_4 rmdev -dev IBM_i_3 rmdev -dev IBM_i_2 rmdev -dev IBM_i_1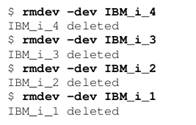
Run the
lsdevcommand to find the disk names and then run thermdevcommand to delete those disks.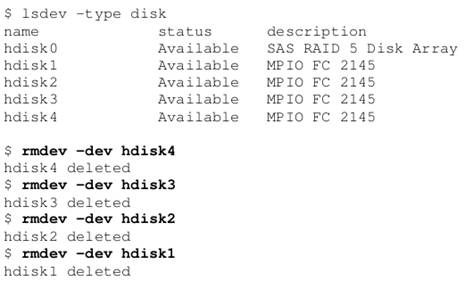
Removing the virtual SCSI server adapters from the VIOS instances
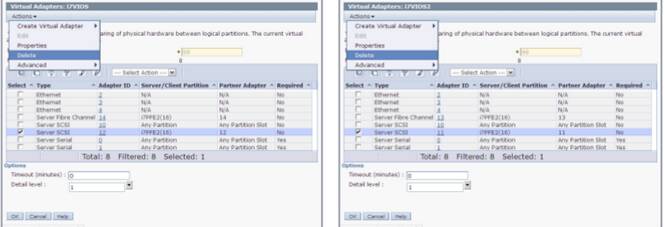
Perform the following steps to dynamically remove the Virtual SCSI adapters from the VIOS instances we used before for serving the virtual SCSI LUNs to our IBM i client partition:
Right-click the VIOS partition on the HMC and click Dynamic Logical Partitioning -> Virtual Adapters. In the Virtual Adapters dialog box, select the virtual SCSI server adapters to be deleted and click Actions -> Delete (as shown in Figure 13) and click OK.
Figure 13. Dynamically removing the unused VSCSI adapters from the VIOS instances
To also apply the change of virtual SCSI adapter deletion to the partition profile, you need to save the current configuration for the VIOS instances. Right-click each VIOS partition hosting the IBM i client partition on the HMC and click Configuration -> Save Current Configuration, select the appropriate (default) profile, and click OK (as shown in Figure 14).
Figure 14. Saving the VIOS current configuration into its profile
Summary
This tutorial explained the migration of an IBM i client partition of the IBM PowerVM virtual I/O client from a virtual SCSI to an NPIV attachment.
Connect with the the IBM i community
Connect, learn, share, and engage with other IBM i users as you follow what’s trending and join the discussion. Join now