Tutorial
Building cloud-native reactive Java messaging applications
Use Quarkus, SmallRye, and IBM MQ to build a minimal footprint reactive applicationBuild highly efficient, lightweight reactive Java messaging applications with Quarkus and IBM MQ to optimize cloud resource consumption. In this tutorial, you learn how to configure Advanced Message Queuing Protocol (AMQP) in an IBM MQ container. Then, you will run and deploy a reactive Quarkus application in development, JVM, and native GraalVM modes.
Modern cloud deployment often relies on custom containers managed in Kubernetes. In this environment, keeping your technology stack minimal is crucial. Instead of shipping a full JVM, you can compile Java applications into optimized native binaries using GraalVM.
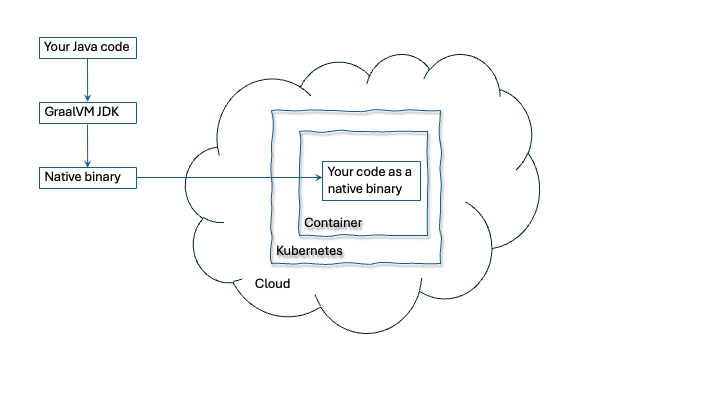
Pair Quarkus with GraalVM, a cloud-native virtual machine designed to create highly optimized images. GraalVM includes only the necessary runtime stack for your application. Building native binaries with GraalVM eliminates the need to package .jar files or run a full containerized JVM.
Instead, GraalVM packages only the small fraction of the Java stack your application actually uses. This produces an optimized, super-lightweight binary executable with a tiny footprint and ultra-fast startup times.
Quarkus contains a reactive framework (SmallRye) that lets you create reactive applications. Reactive applications, as outlined in The Reactive Manifesto, are responsive, resilient, elastic, and message-driven. IBM MQ provides asynchronous, non-blocking communication between applications to support message-driven architectures. By using Quarkus, you can write reactive, cloud-native Java applications that satisfy these properties and are easy to deploy and manage.
Building reactive Java apps with Quarkus and IBM MQ
To create a Quarkus messaging app using the AMQP JMS Qpid classes with IBM MQ, see the IBM Developer tutorial on running IBM MQ apps on Quarkus and GraalVM.
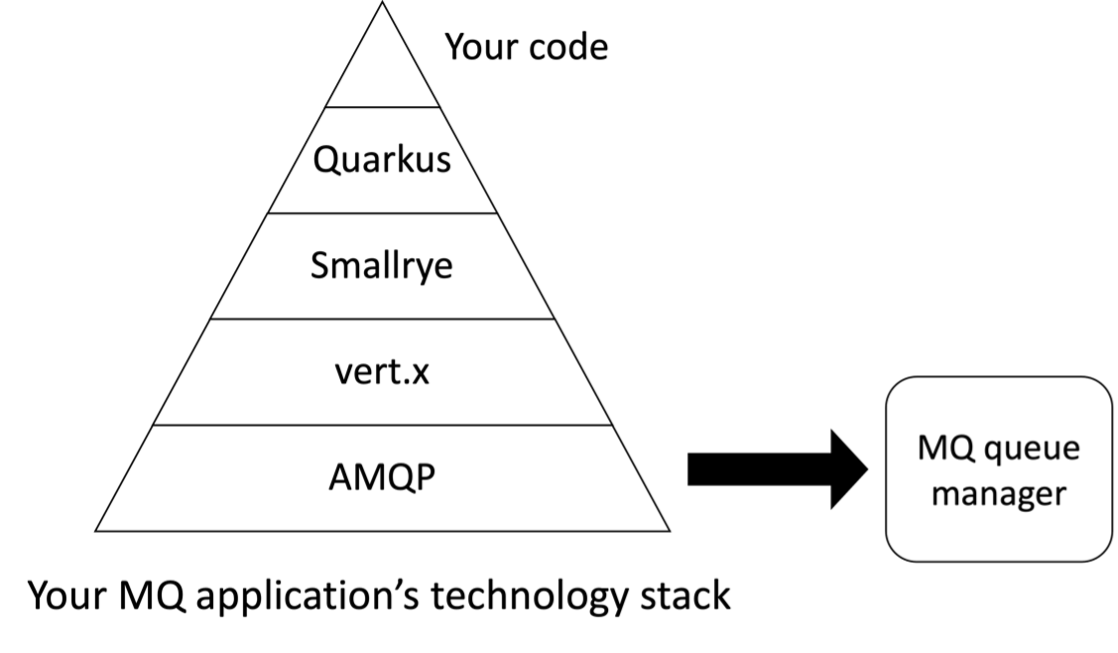
IBM MQ applications that use Quarkus communicate with MQ queue managers through Advanced Message Queuing Protocol (AMQP), an open source messaging protocol. The Quarkus application relies on two key open source technologies to achieve reactive messaging. These are the SmallRye Reactive Messaging framework and the Eclipse Vert.x AMQP client. Run your Quarkus application on a standard JVM, or use GraalVM JDK to compile a native-image executable. This native executable is ready for highly optimized cloud deployment.
The following figure shows how the technology stack fits together inside your application:
Sample reactive messaging app
In this tutorial, you run sample code that simulates a REST call to part of a reactive microservice architecture, where two applications communicate using IBM MQ over AMQP. This sample application was adapted from the Quarkus.io guide for reactive messaging with AMQP to work with IBM MQ. You can find the sample code in the mq_amqp_demo GitHub repository.
The sample code includes two applications that communicate by using the publish-subscribe messaging pattern with IBM MQ, working with a web page to generate random price quotes. The workflow operates as shown in the following diagram:
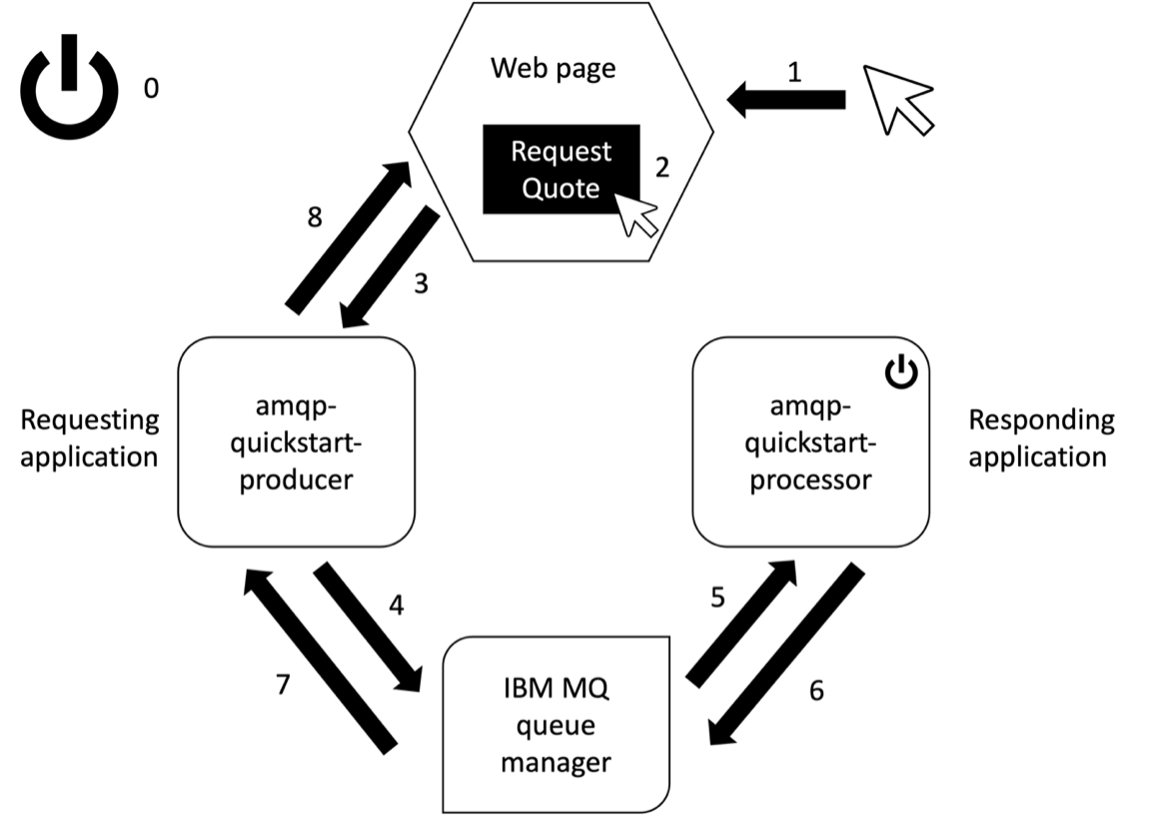
The steps in this application are as follows (corresponding to the numbers in the previous figure):
- (0) When the system runs, the
amqp-quickstart-processorapplication subscribes to the topicquote-requestson the queue manager by using the publish-subscribe pattern. - (1) The user opens the web page, which causes the
amqp-quickstart-producerapplication to subscribe to the topicquotes. - (2) The user clicks the Request Quote button.
- (3) The browser sends a POST request to the requesting application (
amqp-quickstart-producer) and registers an event listener on the web page to receive the response. - (4) The producer requests a quote from the quote-processing application (
amqp-quickstart-processor) by sending a message to an IBM MQ topic namedquote-requests. - (5) Because the quote-processing application is subscribed to the
quote-requeststopic, it receives the quote request. - (6) The quote-processing application generates a quote and publishes it to the
quotestopic. - (7) Because
amqp-quickstart-produceris subscribed to thequotestopic, it receives the quote message from theamqp-quickstart-processorapplication. - (8) The message is sent to the web page, which replaces the
pendingmessage with the actual quote value.
This pattern represents the microservice architecture that organizations use when modernizing monolithic applications for cloud environments.
The key files inside each application are QuotesResource.java, QuoteProcessor.java, and quotes.html. Connection and configuration properties are set in each application.properties file. The docker-compose.yml file defines and runs the complete multi-container setup outside developer mode.
Prerequisites
- Java 11 or above
- Maven
- GraalVM, if you want to create an optimized native image
You can use SDKMAN! to install each prerequisite.
Steps
Step 1. Get the MQ image and enable AMQP
To get a queue manager set up with AMQP enabled, follow the steps in the IBM Developer tutorial on setting up AMQP with IBM MQ.
After you complete this step, in your terminal window, enter the following command:
podman ps
The output indicates a port mapping to port 5672, which is the port used by AMQP:

When the AMQP-enabled container is running, you are ready to download and run the sample applications.
Step 2. Get the sample code
First, navigate in your terminal to somewhere you want to download the code. Get the sample by entering these commands:
git clone https://github.com/ibm-messaging/mq_amqp_demo.git
cd mq_amqp_demo
By default, the application does not use username and password authentication and relies on a publish-subscribe messaging pattern. You can modify the application behavior in the application.properties file for the producer and processor components.
Step 3. Run the sample in developer mode
Now you are ready to run the sample in developer mode, which connects to your IBM MQ container instance to perform messaging.
The application.properties file in each application specifies the connection details for your application. It is populated with default values for IBM MQ running in a container. For example:
amqp-host=localhost
amqp-port=5672
To add basic authentication, set the credentials of the app user as follows:
amqp-username=app
amqp-password=passw0rd
Switching to queue-based point-to-point messaging
The AMQP Attach frame describes the address of the messaging resource, but it does not describe its type, such as queue or topic.
By default, IBM MQ assumes that the address is an AMQP topic. However, IBM MQ checks the capabilities field of the AMQP frame to determine the type of the AMQP address endpoint, following the convention used in the Apache Qpid client. For more information about IBM MQ AMQP support, see the IBM MQ documentation.
The capability can be set to topic, temporary queue, queue, or shared. For Quarkus 2.8.0.CR1 (or later), you can configure capabilities as a property in the relevant application.properties file. To switch to queue-based messaging, set these properties for both the producer and processor application components.
Running the application in developer mode
Run the following commands in two separate terminals:
mvn -f amqp-quickstart-processor quarkus:dev
mvn -f amqp-quickstart-producer quarkus:dev
The message "AMQP Receiver listening address" appears in each terminal. For two side-by-side terminals, your output looks similar to the following figure:

In your browser, go to http://localhost:8080/quotes.html. A web page opens with a button that allows you to request a quote.
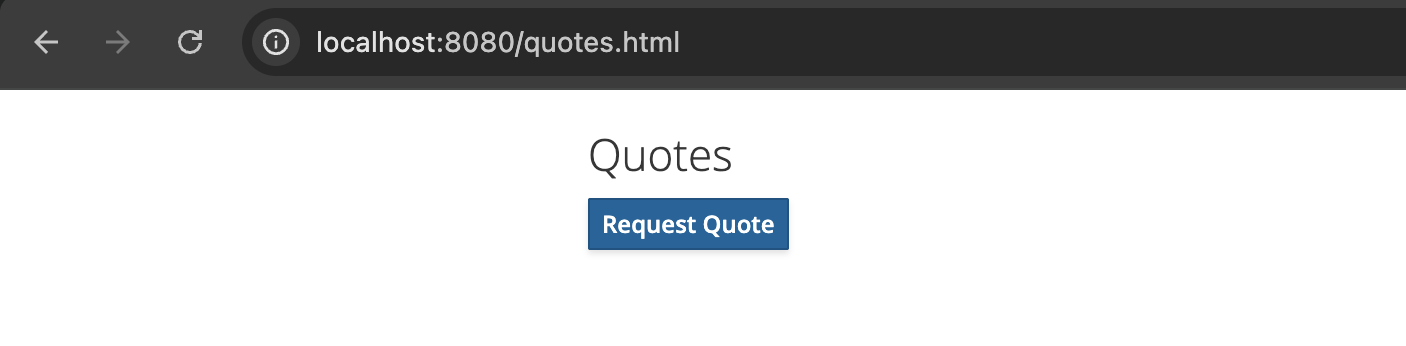
When you click Request Quote, the application generates a request ID and displays the message "pending". This message is replaced by a dollar amount for the quote as the amqp-quickstart-processor application generates a quote, passes it to the amqp-quickstart-producer application, and updates the quote on the page.
In developer mode, Quarkus lets you change lines of your application code without recompiling.
Try this feature by editing the QuoteProcessor.java file in the amqp-quickstart-processor application.
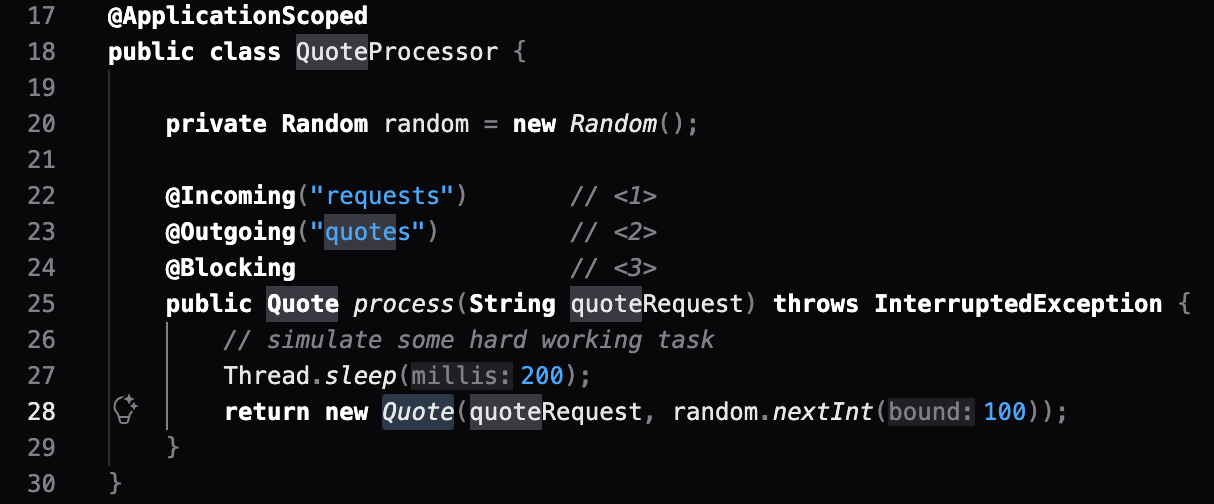
Line 28 contains the logic that generates the quote value for each quote request by returning a random integer between 0 and 99. To raise the upper limit to 199, change line 28 to the following code:
return new Quote(quoteRequest, random.nextInt(200));
Refresh the http://localhost:8080/quotes.html page to confirm that some new quotes exceed $99. (One request remains pending because the new subscription occurs only when a user sends a POST request to the amqp-quickstart-producer application.)
Step 4. Run the sample in JVM mode in containers
To test that this code works outside developer mode, build the applications with Maven.
Stop the applications running in developer mode by pressing Ctrl + C in each terminal window. You must also stop the IBM MQ container created earlier because the multi-container setup creates and configures one with Podman Compose.
Get the container ID for the running IBM MQ container with podman ps, and then run the following command to stop the container:
podman stop <container-id>
Build the applications with the following commands:
mvn -f amqp-quickstart-producer clean package -DskipTests
mvn -f amqp-quickstart-processor clean package -DskipTests
This creates a .jar file for each application, such as:
amqp-quickstart-producer/target/amqp-quickstart-producer-1.0.0-SNAPSHOT.jar
Start the demo by building the containers from the docker-compose.yml file with the following command:
podman compose up --build
After startup, the terminal displays output similar to the following figure:

Go to http://localhost:8080/quotes.html and refresh the page to allow the amqp-quickstart-producer application to subscribe to the quotes topic on the new broker.
The demo functions as before, using a full Quarkus JVM stack that can run in production when combined with an authorization framework.
Step 5. Run the sample in native-image mode using GraalVM
To run the application with a smaller footprint and faster startup, transition to GraalVM without changing the application code. Use the GraalVM documentation to install and set up GraalVM. Select the host platform (Windows, macOS, or Linux; do not select the Docker container). Set the PATH and JAVA_HOME environment variables for your terminal session. If you use SDKMAN! to install GraalVM, these environment variables are configured automatically.
After you install GraalVM, verify the installation by running the following command:
java --version
The output indicates that GraalVM is active:

Build the applications with the following Maven commands:
mvn -f amqp-quickstart-producer clean package -Pnative -DskipTests -Dquarkus.native.container-build=true
mvn -f amqp-quickstart-processor clean package -Pnative -DskipTests -Dquarkus.native.container-build=true
This build step takes longer because the stack is optimized during compilation. Ensure that Podman has at least 4 GB of memory allocated.
The binaries are generated in the application target directory, such as:
amqp-quickstart-producer/target/amqp-quickstart-producer-1.0.0-SNAPSHOT-runner
Next, set the QUARKUS_MODE environment variable to use native-image mode and run the native-image builds in containers with the following commands:
export QUARKUS_MODE=native
podman compose up --build
Go to http://localhost:8080/quotes.html and refresh the page. The applications now run optimized for a cloud-native deployment.
Run the following command to list the running containers:
podman ps
Output:

Note that the application containers are the native containers, such as: amqp-quickstart-producer:1.0-native.
Run the following command to see the respective size of the 4 containers that have been created.
podman image ls | grep quickstart
Output:

Summary
In this tutorial, you learned how to:
- Enable AMQP in an IBM MQ container
- Run a reactive Quarkus application with IBM MQ in developer mode and apply code updates without recompiling
- Run a Quarkus demo in JVM mode deployed in containers
- Build a native-image version of the demo and deploy it in containers running highly optimized Java stacks