Tutorial
Secure communication between IBM MQ endpoints with TLS encryption
Protect your messages by encrypting connections between IBM MQ endpointsThis tutorial shows you how to configure TLS for IBM MQ so that messages are encrypted in transit between a client and a queue manager.
In the Ready, set, connect tutorial series and the Write and run your first IBM MQ Jakarta application tutorial, you learned how to set up point-to-point messaging between a JAKARTA application and an MQ server. In those tutorials, the communication was not encrypted. This meant that message contents travelled in plain text and could have been viewed by a third party.
The default developer configuration that is used in the other Ready, set, connect tutorials includes authentication and authorization controls for the app and admin users.
TLS is a cryptographic encryption protocol that protects data in transit. The following figure shows how the TLS handshake between a client and a server works:
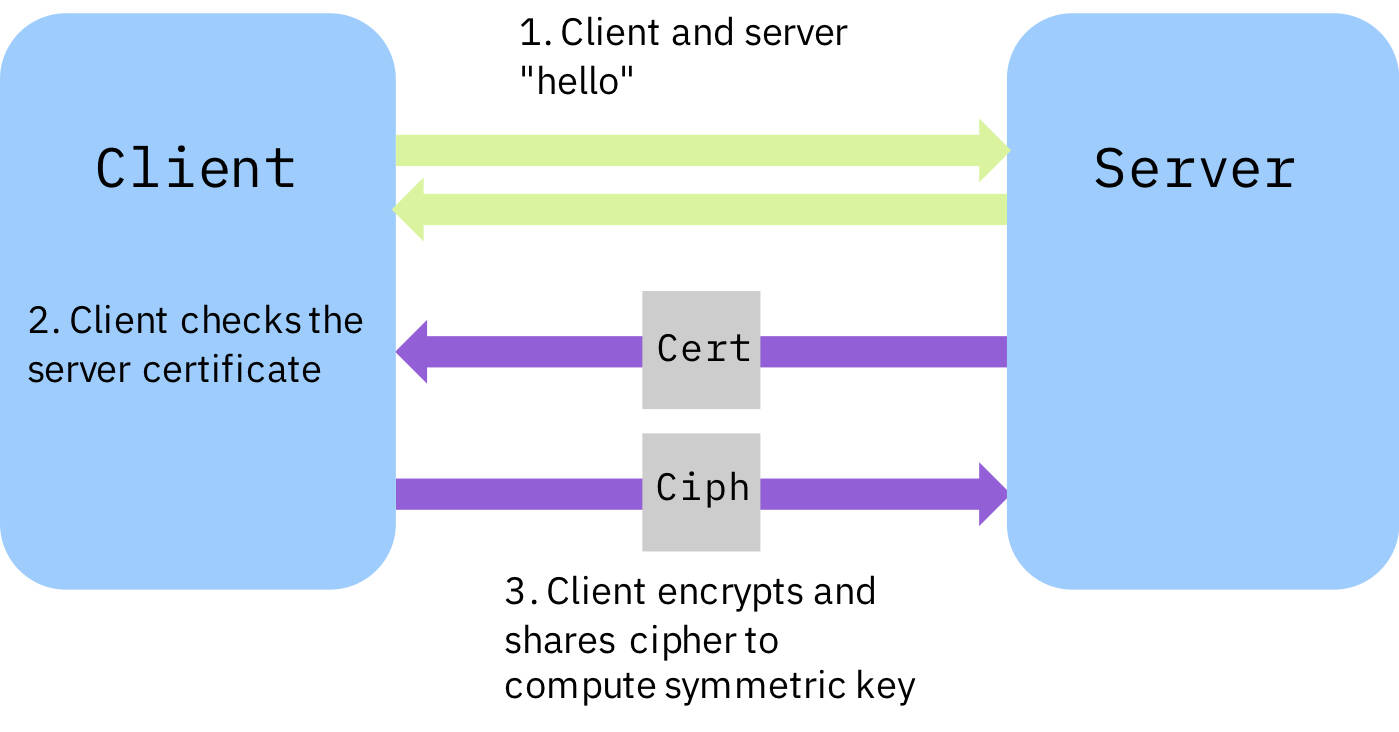
In this figure:
- The server and client communicate to establish connection settings.
- The client verifies the server certificate.
- The client generates a cipher and encrypts it using the server’s public key. This is shared with the server and used to generate a symmetric key to encrypt the remainder of the session.
TLS authentication methods include anonymous and mutual authentication.
In this tutorial, you set up the simplest configuration, in which you provide a certificate to the server side only.
How does TLS work in IBM MQ?
TLS is used in MQ to secure channels. It provides both integrity and encryption protection. When a channel is enabled for TLS, any messages that are passed by the channel will be protected while in transit. You can learn more about TLS in the IBM MQ documentation.
In a production environment, the queue manager will usually have a digital certificate issued by a certificate authority. Your MQ administrator should provide any certificates that you might need to use with your client application.
In this tutorial, you create a self-signed certificate and extract the public key from it for the client to use. A self-signed certificate is signed with its own private key (that is, the certificate is signed by the same entity it is certifying). It must not be used in a production environment, but it is useful in this example to understand how the TLS configuration works.
To demonstrate the basic MQ TLS configuration, you use the IBM MQ Container image to run an MQ server in a container. The MQ container makes it easy to configure security from an MQ administration perspective.
Prerequisites
- Latest MQ Container image. See the "Get an IBM MQ queue for development in a container" tutorial.
- Docker or Podman
- OpenSSL
- JAKARTA or MQI sample and its prereqs
Steps
These are the steps to set up TLS:
- Create TLS objects: Use OpenSSL to create the TLS objects, a self-signed server key and certificate. Then, create a client keystore to store a copy of the server certificate on the client side, so the client knows it can trust the server
- Set up the MQ server: Start an MQ queue manager (the server) running in a container that is set up for TLS encrypted messages
- Secure an application: Edit some sample code to enable it to send encrypted messages to the queue manager
Step 1. Create TLS objects
Create a server key and certificate. Then, create a client keystore, either using JAKARTA or other MQ client libraries.
Create a server key and certificate
To create the certificates needed to secure the channel, use OpenSSL, which is installed by default on most machines. Check if you have OpenSSL installed by entering this command in your terminal:
openssl version
If you need OpenSSL, you can download OpenSSL from the official source.
Create a new directory on your machine and navigate into it in your terminal.
Create the server key and certificate with this command:
openssl req -newkey rsa:2048 -nodes -keyout key.key -x509 -days 365 -out key.crt
You will be prompted to enter some information. Enter any values, as this is a self-signed certificate and is not intended for production use. Verify that the certificate has been created successfully with this command:
openssl x509 -text -noout -in key.crt
You should see the information you entered and other certificate properties such as the public key and the signature algorithm.
Create a client keystore
The instructions for creating a client keystore differ slightly for Java code using the JAKARTA API and code in other languages that use the MQ Client Libraries (such as C, Python, Node.js, or Golang).
Follow the steps for your language.
Creating a JAKARTA keystore (Java)
In this example, you secure Java code written for JAKARTA. Use keytool (a Java security tool), which is included with Java JREs and SDKs. To create a .jks client keystore and import the server certificate into it, enter:
keytool -keystore clientkey.jks -storetype jks -importcert -file key.crt -alias server-certificate
You will be prompted to create a password. Remember this password as you need it later.
Listing the contents of the directory should yield something like this:

Move the clientkey.jks file into a new folder in a different directory that you will remember. A good idea is to create a new folder in the root directory of your client application and put the .jks file there.
You should now have only the .crt file and the .key file in your current directory. If these files are not in the correct location, the container does not start. Return to the beginning of step 1 and verify that you completed all the tasks so that these files are in the right place.
Creating a keystore for MQI-based client applications (C, Python, Node.js, Golang)
If you're using MQI, whatever language you write your application in (such as C, Python, Node.js, or Golang), these steps help you create a client keystore and import the server certificate into it.
If you don’t have the MQ client libraries installed, it’s time to get them:
For macOS, follow the steps in the MQ macOS Toolkit tutorial, paying special consideration for ARM-based MacOS machines.
For Windows or Linux MQ clients, download and install one from the IBM Support site.
Now that you have the MQ client libraries, you’ll have the MQ security command line tool, runmqakm. Enter this command to create a keystore in .kdb format and store the password in a .sth file.
Remember to substitute [!!pick_a_passw0rd_here!!] for a password of your choosing.
runmqakm -keydb -create -db clientkey.kdb -pw [!!pick_a_passw0rd_here!!] -type pkcs12 -expire 1000 -stash
The stash file contains the keystore password and simplifies the following steps. If you prefer to enter the keystore password manually, remove the -stash option from the command and remember the password you set.
Next, import the server’s public key certificate into the client keystore by entering this command:
runmqakm -cert -add -label QM1.cert -db clientkey.kdb -stashed -trust enable -file key.crt
If you list the contents of the current directory, you should see these files:

Move the clientkey.kdb and clientkey.sth files into a new folder in a different directory that you will remember. A good idea is to create a new folder in the root directory of your client application and put the files there.
You should now have only the .crt file and the .key file in your current directory. If these files are not in the correct location, the container does not start. Return to the beginning of step 1 and verify that you completed all the tasks so that these files are in the right place.
Step 2. Set up the MQ server
Our first step in setting up the MQ server is to start Docker or Podman.
If you completed the "Get an IBM MQ queue for development in a container" tutorial, you installed either Docker or Podman in Step 1, and you installed MQ as a container image in Step 2. If you did not complete this tutorial, complete step 1 and step 2 in that tutorial before proceeding ahead.
You are now ready to run a container from the latest MQ Container image. If you completed the "Get an IBM MQ queue for development in a container" tutorial, you will need to stop this container by using the podman stop <container_id> command, or you need to select different ports to map to on your host OS.
Run the following commands to start the latest MQ Container.
These commands create a volume that is mounted to a specific directory of the container. The private key (.key) and public certificate (.crt) for the queue manager are copied to this directory in the container. These files remain on the volume even when the container is removed.
The first command creates a container named mqtls but doesn’t start it. It also creates a volume named tls-key-vol and mounts it onto the container. In this example, we used the password passw0rd for the app user, but you should specify the one you used previously (the one set during the “Get an IBM MQ queue for development in a container” tutorial).
With Podman:
podman create -it --name mqtls --env LICENSE=accept --env MQ_QMGR_NAME=QM1 --mount="type=volume,src=tls-key-vol,dst=/etc/mqm/pki/keys/mykey" --publish 1414:1414 --publish 9443:9443 --env MQ_ADMIN_PASSWORD=passw0rd --env MQ_APP_PASSWORD=passw0rd icr.io/ibm-messaging/mq:latest
With Docker:
docker create -it --name mqtls --env LICENSE=accept --env MQ_QMGR_NAME=QM1 --mount="type=volume,src=tls-key-vol,dst=/etc/mqm/pki/keys/mykey" --publish 1414:1414 --publish 9443:9443 --env MQ_ADMIN_PASSWORD=passw0rd --env MQ_APP_PASSWORD=passw0rd icr.io/ibm-messaging/mq:latest
Next, specify the full path to the local directory that contains your .key and .crt files and copy the files over to the directory in the container with the following command.
With Podman:
podman cp -a [!!path to directory with key and crt files!!]/. mqtls:/etc/mqm/pki/keys/mykey
With Docker:
docker cp [!!path to directory with key and crt files!!]/. mqtls:/etc/mqm/pki/keys/mykey
Now, start the container.
With Podman:
podman start mqtls
With Docker:
docker start mqtls
Note: If you're using Windows in Hyper-V mode, you might have to add the directory with the .key and .crt files to file sharing in your Docker settings or Control Panel, or Docker might not be able to access it.
Enter the following command to see the container ID.
With Podman:
podman ps
With Docker:
docker ps
You should see output similar to this:

Note your container ID as you need it later.
Verify that security has been enabled
Check that security has been enabled on the queue manager. Exec into the container with this command.
With Podman:
podman exec -it mqtls bash
With Docker:
docker exec -it mqtls bash
Then, enter this command:
runmqsc QM1
This command allows you to use the MQSC interface for the queue manager. Find out about channel properties by entering this command:
DISPLAY CHANNEL(DEV.APP.SVRCONN)
You’ll see output similar to:

We see that the SSLCIPH option has been configured to use the ANY_TLS12_OR_HIGHER CipherSpec. When the SSLCIPH option is set, it turns on TLS encryption for any connections to the queue manager using this channel.
In this tutorial, anonymous (server-only) authentication is used, as the client is authenticated with the application name and password.
Figure 2: TLS authentication methods
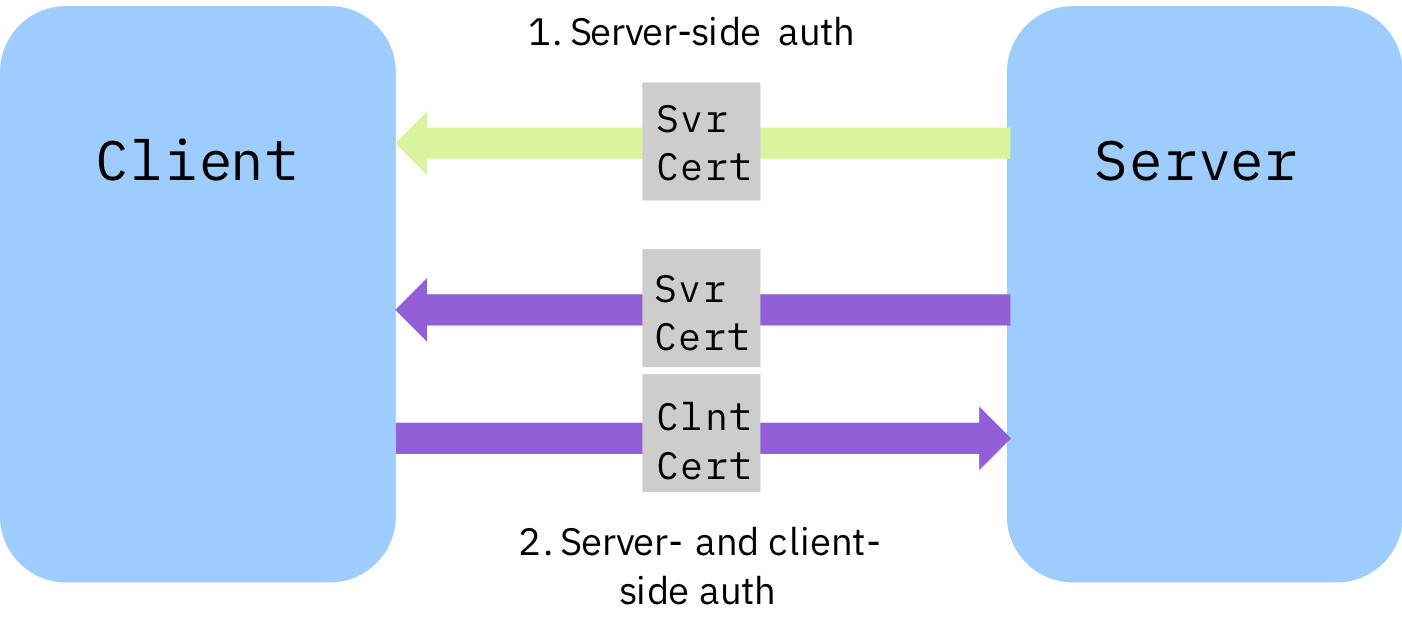
In Figure 2:
- Anonymous authentication: The server provides a certificate to the client.
- Mutual authentication: Both the server and the client provide a certificate and authenticate each other.
Specify a compatible CipherSpec on the client side so that the client and server can connect and carry out the TLS handshake.
Exit the MQSC interface with exit, and exit the container with exit too.
Step 3. Secure an application
The instructions for securing an application differ slightly for JAKARTA applications and MQI client applications (such as C, Python, Node.js, or Golang). Follow the set of steps based on your language.
Secure and run a JAKARTA application (Java)
After setting up the JAKARTA application, encrypt it and run it.
Get a JAKARTA application up and running
First, follow the steps in the "Write and run your first IBM MQ JAKARTA application" to get up and running with a JAKARTA sample application, JakartaPutGet.java. Make sure that you have the hostname and port number set up to match the details of your new TLS-enabled container.
Run a JAKARTA application without encryption
The following steps show what happens when you try to connect to the queue manager without encryption on the client side.
From your top level application directory (MQClient if you’ve followed the JAKARTA tutorial) compile the application with
javac -cp ./com.ibm.mq.jakarta.client-9.4.2.0.jar:./jakarta.jms-api-3.1.0.jar:./json-20250107.jar:. com/ibm/mq/samples/jakarta/JakartaPutGet.java
and run with
java -cp ./com.ibm.mq.jakarta.client-9.4.2.0.jar:./jakarta.jms-api-3.1.0.jar:./json-20250107.jar:. com.ibm.mq.samples.jakarta.JakartaPutGet
The queue manager rejects the connection and returns multiple errors. You see an MQRC_JSSE_ERROR, as well as a Remote CipherSpec error for channel DEV.APP.SVRCONN because no encryption cipher is specified on the client side. The stack has parts that look like this:

If the connection failed with a different error, see the IBM MQ developer best practices or IBM MQ cheat sheet to help you debug the error.
Encrypt the JAKARTA application
Add encryption to the client application. Choose a specific ANY_TLS12_OR_HIGHER-compatible CipherSpec, but you can also set the spec to be *TLS12. Edit the JakartaPutGet.java sample to add this line underneath the other connection factory properties:
cf.setStringProperty(WMQConstants.WMQ_SSL_CIPHER_SUITE, "TLS_AES_256_GCM_SHA384");
Compile as above. When running, use this command, which includes setting some environment variables. You'll need to edit the command before you run it to add in the fully qualified name of your trust store and its password.
java -Dcom.ibm.mq.cfg.useIBMCipherMappings=false -Djavax.net.ssl.trustStoreType=jks -Djavax.net.ssl.trustStore=/your_key_directory_path/clientkey.jks -Djavax.net.ssl.trustStorePassword= [the_password_that_you_set] -cp ./com.ibm.mq.jakarta.client-9.4.2.0.jar:./jakarta.jms-api-3.1.0.jar:./json-20250107.jar:. com.ibm.mq.samples.jakarta.JakartaPutGet
Success! You will see something like:

Note: the -Dcom.ibm.mq.cfg.useIBMCipherMappings=false argument in the run command was necessary because a non-IBM JRE is being used. If you want to use an IBM JRE, remove this argument.
When there is a mismatch between cipherMappings and the JRE, you see the following error:

Secure and run an MQI application (C, Python, Node.js, or Golang)
This tutorial shows an example in one language: Python. For high-quality sample code securing other languages, see the mq-dev-patterns repo. This tutorial assumes you have a Python installation and are in a Python environment where you can develop MQ applications.
Get a Python application up and running
The MQ client functionality is implemented in Python with PyMQI, which is an open-source Python wrapper over the MQ client. Installing it is as easy as typing the following command in your terminal:
pip install pymqi
Try to connect to an encrypted channel and send a message using an unencrypted Python program. Use the following command to get the Python application.
curl -o sample.py https://raw.githubusercontent.com/ibm-messaging/mq-dev-samples/refs/heads/master/gettingStarted/python/sample.py
Run a Python application without encryption
Run the Python application with this command:
python sample.py
The connection will be rejected by the queue manager, and you will see an error message as part of the returned output:

This error occurs because the unencrypted Python application tried to connect to an encrypted channel.
Encrypt the Python application
Add encryption to the client application. Choose a specific ANY_TLS12_OR_HIGHER-compatible CipherSpec, but you can also set the spec to be ANY_TLS12_OR_HIGHER.
Edit the Python file you downloaded and uncomment the following lines:
# cd.SSLCipherSpec = b'TLS_AES_256_GCM_SHA384'
# sco = pymqi.SCO()
# sco.KeyRepository = b'[!!your_keystore_location here!!]' # include file name but not file extension
Remember to substitute [!!your_keystore_location here!!] with the correct path of your keystore file.
Add the sco variable into your connect_with_options function like this:
qmgr.connect_with_options(queue_manager, user='app', password='[!!password for user "app"!!]', cd=cd, sco=sco)
Run your application again, and you should see:

Summary and next steps
Congratulations! You configured basic TLS for MQ so the queue manager and the client application can now encrypt their communication as it flows over the internet. You used OpenSSL to create a self-signed digital certificate for the queue manager. This enabled the client and the server to negotiate a shared secret key to encrypt their session.
You should now understand what needs to be configured on the MQ server and the client application side, to use TLS with MQ. You have enabled the client and the server to communicate privately and securely using a self-signed certificate. Remember to upgrade to a real certificate before you put your apps into production!
To see production-style samples with encryption and logging enabled, visit the IBM Messaging GitHub repository.