Tutorial
Spring Boot Java applications for CICS, Part 5: JMS
Use Spring Boot's JMS capabilities integrated into a CICS Liberty server, with IBM MQ as the JMS providerThe fifth and final tutorial in the Spring Boot Java applications for CICS series demonstrates how to use Spring Boot's JMS capabilities integrated into a CICS Liberty server and with IBM MQ as the JMS provider. You'll learn how to develop the application, build it with Gradle or Maven, and then deploy and test it in CICS.
Spring Boot offers a number of options for integrating with messaging systems and the JMS API. These options range from the simple convenience of the JmsTemplate to a message-driven POJO (MDP), which handles incoming asynchronous messages through use of the @JmsListener annotation.
Learning objectives
This tutorial will show you how to:
- Create and build a Spring Boot application that uses JMS.
- Send a simple JMS message using Spring's
JmsTemplate. - Receive a JMS message using a message-driven POJO (MDP).
- Add transaction management to the MDP.
- Test the sample in CICS.
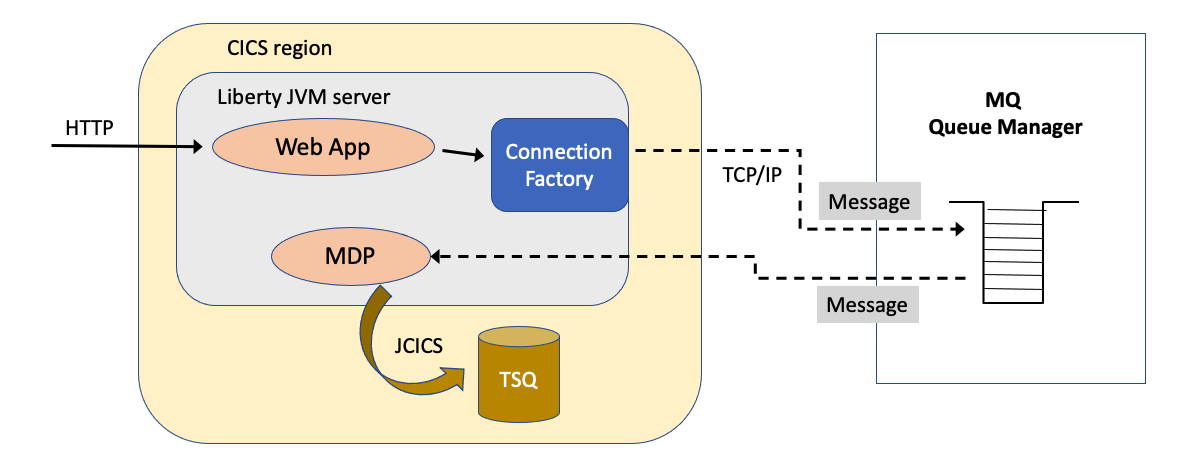
The sample is a web application and all requests can be driven from a browser. The application uses the Spring Boot web interface to process HTTP RESTful GET requests. The web application then uses a JMS connection factory to write a message to an MQ queue, which then triggers a Spring Boot MDP that receives the message and writes the contents to a CICS temporary storage queue (TSQ). In a real-world implementation, other types of REST interfaces, such as POST, would be more appropriate. GET requests are used here for simplicity (see Figure 1).
Figure 1. Application flow
The application source and build scripts are available in the cicsdev/cics-java-liberty-springboot-jms repository.
Prerequisites
- CICS TS V5.3 or later
- A configured Liberty JVM server in CICS
- IBM MQ V8.0 or later on z/OS
- Java SE 1.8 on the z/OS system
- Java SE 1.8 on the workstation
- An Eclipse development environment on the workstation (optional)
- Either Gradle or Apache Maven on the workstation (optional if using Wrappers)
- IBM MQ Resource Adapter for the WebSphere Application Server Liberty available from MQ Resource Adapter
Estimated time
It should take you about 2 hours to complete this tutorial.
Steps
1. Create and build a Spring Boot application
You can develop the code by following this tutorial step-by-step, or by downloading the cics-java-liberty-springboot-jms example in GitHub.
If you are following step-by-step, generate and download a Spring Boot web application using the Spring initializr website tool. For further details on how to do this, refer to part 1 of this tutorial series, Spring Boot Java applications for CICS, Part 1: JCICS, Gradle, and Maven. Eclipse is used as the preferred IDE.
Once your newly generated project has been imported into your IDE, you should have the Application.java and ServletInitializer.java classes which provide the basic framework of a Spring Boot web application.
For Gradle, your build file will need three additional dependencies over and above those required for the Part 1 tutorial:
javax.transaction-apijavax.jms-apispring-integration-jms
The Java EE JTA and JMS dependencies should be marked as compileOnly because the Liberty runtime provides its own implementations. You want to compile against those dependencies, but not package them into the build as would be done if the implementation directive was chosen.
Your gradle.build file should look like this:
dependencies
{
    implementation("org.springframework.boot:spring-boot-starter-web")

    providedRuntime("org.springframework.boot:spring-boot-starter-tomcat")

    compileOnly enforcedPlatform("com.ibm.cics:com.ibm.cics.ts.bom:5.5-20200519131930-PH25409")

    compileOnly("com.ibm.cics:com.ibm.cics.server")

    compileOnly("javax.transaction:javax.transaction-api")

    compileOnly("javax.jms:javax.jms-api")

    implementation("org.springframework.integration:spring-integration-jms")

}
For Maven, the equivalent pom.xml dependencies should look like this:
  <dependencyManagement>
    <dependencies>
      <dependency>
        <groupId>com.ibm.cics</groupId>
        <artifactId>com.ibm.cics.ts.bom</artifactId>
        <version>5.5-20200519131930-PH25409</version>
        <type>pom</type>
        <scope>import</scope>
      </dependency>
    </dependencies>
  </dependencyManagement>

<dependencies>

  <dependency>
    <groupId>org.springframework.boot</groupId>
    <artifactId>spring-boot-starter-web</artifactId>
  </dependency>

  <dependency>
    <groupId>org.springframework.boot</groupId>
    <artifactId>spring-boot-starter-tomcat</artifactId>
    <scope>provided</scope>
  </dependency>

  <dependency>
    <groupId>com.ibm.cics</groupId>
    <artifactId>com.ibm.cics.server</artifactId>
  </dependency>

  <dependency>
    <groupId>javax.transaction</groupId>
    <artifactId>javax.transaction-api</artifactId>
    <scope>provided</scope>
  </dependency>

  <dependency>
    <groupId>javax.jms</groupId>
    <artifactId>javax.jms-api</artifactId>
    <scope>provided</scope>
  </dependency>

  <dependency>
    <groupId>org.springframework.integration</groupId>
    <artifactId>spring-integration-jms</artifactId>
  </dependency>

</dependencies>
2. Send a simple JMS message
In this section, you’ll learn how to send a simple JMS message to an MQ queue using Spring’s JmsTemplate and a JMS connection factory.
The first task is to update your Spring Application class. You will need to add the @EnableJms and @EnableTransactionManagement Spring annotations in addition to the standard @SpringBootApplication. These annotations are necessary to enable the Spring Boot components that are required for your transactional JMS application. You also need to create a Spring Bean that returns a JMS connection factory defined in the Liberty server configuration. You will use the JNDI name jms/cf for your connection factory.
Note: See the README file for details on how to configure the JMS connection factory in the Liberty server.xml.
@SpringBootApplication
@EnableJms
@EnableTransactionManagement
public class Application
{
    private static final String CONNECTION_FACTORY = "jms/cf";

    public static void main(String[] args)
    {
        SpringApplication.run(Application.class, args);
    }

    @Bean
    public ConnectionFactory connectionFactory()
    {
        try
        {
            ConnectionFactory factory = InitialContext.doLookup(CONNECTION_FACTORY);
            return factory;
        }
        catch (NamingException e)
        {
            e.printStackTrace();
            return null;
        }
    }
}
Next, you need to add a REST controller class called JMSMessageSendController. This will provide a REST API to invoke the JMS send operation.
@RestController
public class JMSMessageSendController
{
    @Autowired
    private JmsTemplate jmsTemplate;

    @GetMapping("/")
    public String root()
    {
        Date myDate = new Date();
        SimpleDateFormat sdf = new SimpleDateFormat("yyyy-MM-dd:HH-mm-ss.SSSSSS");
        String myDateString = sdf.format(myDate);

        return "<h1>Spring Boot JMS REST sample usage: Date/Time: " + myDateString + "</h1>"
        + "<h3>Usage:</h3>"
        + "<b>/send/{queue}?data={input string}</b> - write input string to specified queue <br>"
        ;
    }


    @RequestMapping("/send/{jmsq}")
    public String send(@RequestParam(value = "data") String inputStr, @PathVariable String jmsq)
    {

        try
        {
            jmsTemplate.convertAndSend(jmsq, inputStr);
        }
        catch (JmsException jre)
        {
            return "JMSMessageSendController - ERROR on JMS send " + jre.getMessage();

        }

        return inputStr;
    }

}
The JmsTemplate interface is the central class in Spring’s JMS core package. It simplifies JMS operations leaving application code to provide the input and extract results. You inject the JmsTemplate using the @Autowired annotation.
The root() method defines a mapping to the root URL / using the @GetMapping("/") annotation, and returns usage information for the sample.
The send() method is annotated with the @RequestMapping("/send/{jmsq}") and takes as input the name of the JMS queue as a URI path parameter, and an input query string to be written to the queue. This means the URL format for your endpoint should be /send/{queue}?data={input string} where queue is the name of the MQ queue. You use the convertAndSend() method on the JmsTemplate to write the input string to the JMS queue. This method converts the input string to a JMS message. You can modify the conversion behaviour if required by implementing the MessageConverter interface and providing your own implementation of the methods fromMessage() and toMessage().
3. Receive a JMS message using an MDP
Although JmsTemplate can be used to send and receive messages, it can't easily be used to initiate work from incoming messages. Instead, Spring provides an asynchronous message-driven POJO (MDP) to provide a message-based application entry point, similar to Java EE message-driven beans.
You will now create a new class called JMSMessageReceiver to act as your MDP.
@Component
public class JMSMessageReceiver
{
    private static final String MDP_QUEUE = "SPRING.QUEUE";
    private static final String TSQ_NAME = "SPRINGQ";

    @JmsListener(destination = MDP_QUEUE, containerFactory = "myFactoryBean")
    public void receiveMessage(String data) throws Exception
    {
        System.out.println("Received <" + data + ">");

        TSQ tsq = new TSQ();
        tsq.setName(TSQ_NAME);
        tsq.writeString(data);

    }
}
JMSMessageReceiver is annotated with @Component so that it is found during classpath scanning and registered as a Spring Bean. This bean uses the receiveMessage() method to receive the input string from the JMS queue.
The @JmsListener annotation on the receiveMessage() method defines the name of the destination queue
to listen to, while containerFactory tells Spring which factory it should use to create the underlying message listener.
The JMS listener containerFactory myFactoryBean must be created as a Spring Bean in the Application class and takes as input the connection factory. Add the following code to the Application class to define myFactoryBean:
@Bean
public JmsListenerContainerFactory<?> myFactoryBean(ConnectionFactory connectionFactory)
{
    DefaultJmsListenerContainerFactory factory = new DefaultJmsListenerContainerFactory();
    factory.setConnectionFactory(connectionFactory);
    factory.setTaskExecutor(taskExecutor());
    return factory;
}
Note: In order to take advantage of CICS integration and to call the JCICS API, the container factory should set its task executor to be the DefaultManagedTaskExecutor. Although this is a Liberty executor, it has been primed to supply CICS-enabled threads -- thus Spring itself will be supplied CICS-enabled threads. The sample code uses the TSQ class to write to a CICS temporary storage queue, "SPRINGQ," and so you use setTaskExecutor(taskExecutor()) to achieve the necessary JCICS integration.
Without performing this action, the JmsListenerContainerFactory won't run on a CICS-enabled thread. If a request tries to use the JCICS API, you will get an error like this:
org.springframework.jms.listener.adapter.ListenerExecutionFailedException: Listener method 'public void com.ibm.cicsdev.springboot.jms.smokeTest.JMSMessageReceiver.receiveMessage(java.lang.String) throws com.ibm.cics.server.CicsException' threw exception; nested exception is com.ibm.cics.server.CicsRuntimeException: DTCTSQ\_WRITE: No JCICS context is associated with the current thread.
To create a suitable task executor bean, add the following taskExecutor() method to the Application class:
@Bean
public TaskExecutor taskExecutor()
{
    return new DefaultManagedTaskExecutor();
}
The final step to support use of the task executor is to add the concurrent-1.0 Liberty feature to the Liberty feature manager list in server.xml. Once you’ve done this, the MDP should be able to receive messages from MQ written to the SPRING.QUEUE and then write to the CICS temporary storage queue SPRINGQ using the JCICS API.
4. Add transaction management
In order to make the JMSMessageReceiver class fully transactional, you need to ensure that reading messages from the JMS queue is coordinated with writing to the CICS TSQ. When using the JMS resource adapter in client mode, sends and receives do not operate under the control of the CICS unit-of-work, so to coordinate these two actions you need to use a global transaction and the Java Transaction API. PlatformTransactionManager is the central interface in Spring's transaction infrastructure and Spring offers several implementations of the platform transaction manager interface for handling transactions across JDBC, JPA, Hibernate, JMS, and so on.
Spring makes available the JmsTransactionManager, which implements a local transaction using the PlatformTransactionManager or Spring's JtaTransactionManager which provides global transaction
support based on JTA. In our scenario, to integrate recoverable operations across the JMSListener and the CICS TSQ resource, you need to use the Spring JtaTransactionManager. For more information, see Spring Boot Java applications for CICS, Part 3: Transactions.
Based on the this knowledge, you can amend your Spring Application class by adding a new Spring Bean for a JTA-enabled PlatformTransactionManager as follows:
@Bean
public PlatformTransactionManager platformTransactionManager(ConnectionFactory connectionFactory)
{
    try
    {
        UserTransaction tx = InitialContext.doLookup("java:comp/UserTransaction");
        return new JtaTransactionManager(tx);
    }
    catch (NamingException e)
    {
        e.printStackTrace();
        return null;
    }
}
Next, you need to update the myFactoryBean in the Application class to set the transaction manager for your JMS listener as follows:
@Bean
public JmsListenerContainerFactory<?> myFactoryBean(ConnectionFactory connectionFactory)
{
    DefaultJmsListenerContainerFactory factory = new DefaultJmsListenerContainerFactory();
    factory.setConnectionFactory(connectionFactory);
    factory.setTaskExecutor(taskExecutor());
    factory.setTransactionManager(platformTransactionManager(connectionFactory));
    return factory;
}
Lastly, add the @Transactional (rollbackFor=Exception.class) annotation to the receiveMessage() method in the JMSMessageReceiver class to denote this as a Spring Boot container-managed transaction. The rollbackFor=Exception.class setting ensures that the method rolls back for any exceptions, not just unchecked exceptions.
In addition, you need to add a test on the input message string data, and if the data equals "rollback," then you throw an exception causing a rollback of the JTA (global) transaction. Equally, if the JCICS TSQ.writeString() method fails with a checked CICSConditionException, this will also cause a rollback.
Your JMSMessageReceiver should now look like this:
@Component
public class JMSMessageReceiver
{
    private static final String MDP_QUEUE = "SPRING.QUEUE";
    private static final String TSQ_NAME = "SPRINGQ";

    @Transactional (rollbackFor=Exception.class)
    @JmsListener(destination = MDP_QUEUE, containerFactory = "myFactoryBean")
    public void receiveMessage(String data) throws Exception
    {
        System.out.println("Received <" + data + ">");

        TSQ tsq = new TSQ();
        tsq.setName(TSQ_NAME);
        tsq.writeString(data);

        if (data.equalsIgnoreCase("rollback"))
        {
            System.out.println("Rolling back");
            throw new Exception("Expected rollback exception");
        }

        else
        {
            System.out.println("Committing");
        }
    }
}
After the above configuration, your MDP will be able to receive messages and update the CICS TSQ under a single global transaction, meaning both operations always commit or both rollback if an exception is thrown.
Note: If application security is enabled in the target Liberty server, you need to enable an authentication method and authorisation roles. To do this, create a Java EE web.xml file and place it in the src/main/webapp/WEB-INF folder.
A sample web.xml file that supports basic authentication is provided in the associated Git repository. For further details on enabling security, refer to the previous tutorial, Spring Boot Java applications for CICS, Part 2: Security.
5. Deploy and run the sample
To deploy the sample into a CICS Liberty JVM server, you need to build the application as a WAR. Gradle build.gradle and Maven pom.xml files are provided in the sample repository to simplify this task. Once you've done this, there are a couple of ways to deploy the application:
- Add an
<application>element to the Liberty server.xml that points directly to the WAR. - Add the WAR to a CICS bundle project, exporting the project to zFS, and install it using a CICS BUNDLE resource definition.
In addition, you need to:
- Create an MQ queue called
SPRING.QUEUE. - Add a CICS TSMODEL definition for the temporary storage queue SPRINGQ, defined as recoverable.
- Add the MQ resource adapter and a connection factory definition in Liberty server.xml.
Add the following Liberty features to your server.xml:
servlet-3.1orservlet-4.0wmqJmsClient-2.0concurrent-1.0
For further details on configuring Liberty and deploying the sample to CICS, see the README in the Git repository.
To invoke the application, simply find the base URL for the application in the Liberty messages.log. For example:
CWWKT0016I: Web application available (default_host): http://myzos.mycompany.com:32000/cics-java-liberty-springboot-jms-0.1.0/
Paste the base URL along with the REST service suffix
send/SPRING.QUEUE?data=I LOVE CICSinto the browser. For example:http://myzos.mycompany.com:httpPort/cics-java-liberty-springboot-jms-0.1.0/send/SPRING.QUEUE?data=I LOVE CICSThe browser will prompt for basic authentication.
Next, write the string "rollback" to the same queue using the REST service suffix
/send/SPRING.QUEUE?data=rollback.Check if the specified TSQ has the information you expected by executing the CICS command
CEBR SPRINGQ. For this example, you should just see the words "I LOVE CICS" in TSQ SPRINGQ as the second update should have rolled back.
Summary
Using JMS to access messaging systems is made easy in Spring using the JmsTemplate. This is the final tutorial in this series. Be sure to review the full set of samples on other Spring Boot applications for CICS Liberty such as Link to Liberty, Java Persistence API (JPA) and asynchronous threading from the CICS Java development team.