Learning Path
Get started with Kubernetes
Kubernetes continues to experience explosive growth and software developers that are able to understand and contribute to the Kubernetes code base are in high demand. Learning the Kubernetes code base is not easy. Kubernetes is written in Go, which is a fairly new programming language and it has a large amount of source code.
In this article, we explain key portions of the Kubernetes code base and also the techniques we have used to help us understand the code. This article will enable software developers new to Kubernetes to more quickly learn the Kubernetes source code.
In this article, we cover the flow through the code from running a simple kubectl command to sending a REST call to the API Server. Before using this article to dig into the Kubernetes code, you should read an outstanding high level overview of the Kubernetes architecture by Julia Evans (@b0rk on Twitter).
Repositories
For the kubectl command, its implementation locates in several repositories, including:
- kubernetes/kubernetes: The
main()function ofkubectlcommand is in this repository here. Use this repository to build thekubectlcommand. Themainfunction which locates in this repository could be moved tokubernetes/kubectlin the future. - kubernetes/kubectl: The impelemntation of each
kubectlsubcommand resides in this repository. In this article, you can find the subcommand -createin this repository. - kubernetes/cli-runtime: The
kubectlcommand uses some helpers from this repository, for example:resource.Helper
Although the implementation of kubectl is scattered in several repositories, you actually can find it in the kubernetes/kubernetes repository under the staging/src/k8s.io directory. Here is a list of files that we are going to modify in this article:
create.go:staging/src/k8s.io/kubectl/pkg/cmd/createhelper.go:staging/src/k8s.io/cli-runtime/pkg/resource/helper.goresult.go:staging/src/k8s.io/cli-runtime/pkg/resource/result.govisitor.go:staging/src/k8s.io/cli-runtime/pkg/resource/visitor.go
Please use the following command to clone the kubernetes/kubernetes repository and follow my lead to trace the code:
git clone https://github.com/kubernetes/kubernetes.git
cd kubernetes
Running a basic kubectl command
The command line interface for Kubernetes is called kubectl. It is used for running commands against Kubernetes clusters. When attempting to learn the Kubernetes source code, the portion of the source code that implements the command line interface is a great place to start. The command we will use to trace through the source code is the kubectl create -f command which creates a resource from a file. The resource we are creating is a single replica pod with a basic nginx container image. The specification for this resource is shown below, and it is placed in a file called ~/nginx_kube_example/nginx_pod.yaml.
apiVersion: v1
kind: ReplicationController
metadata:
  name: nginx
spec:
  replicas: 1
  selector:
    app: nginx
  template:
    metadata:
      name: nginx
      labels:
        app: nginx
    spec:
      containers:
      - name: nginx
        image: nginx
        ports:
        - containerPort: 80
From a Kubernetes development environment we can invoke kubectl as shown in the figure below:

Now that we know what kubectl command we are running and how to run it, let's look at where we can find the implementation of this command in the Kubernetes source code.
Locating the implementation of kubectl commands in the Kubernetes source code
The entry point for all the kubectl commands can be found in the github.com/kubernetes/kubectl/tree/master/pkg/cmd folder. In this folder there is a name of a folder that matches the name of the kubectl command that is implemented. For example, the kubectl create command has an initial entry point in a file named create.go under the create folder. The folder and the example go files implementing the various commands are shown in the figure below.
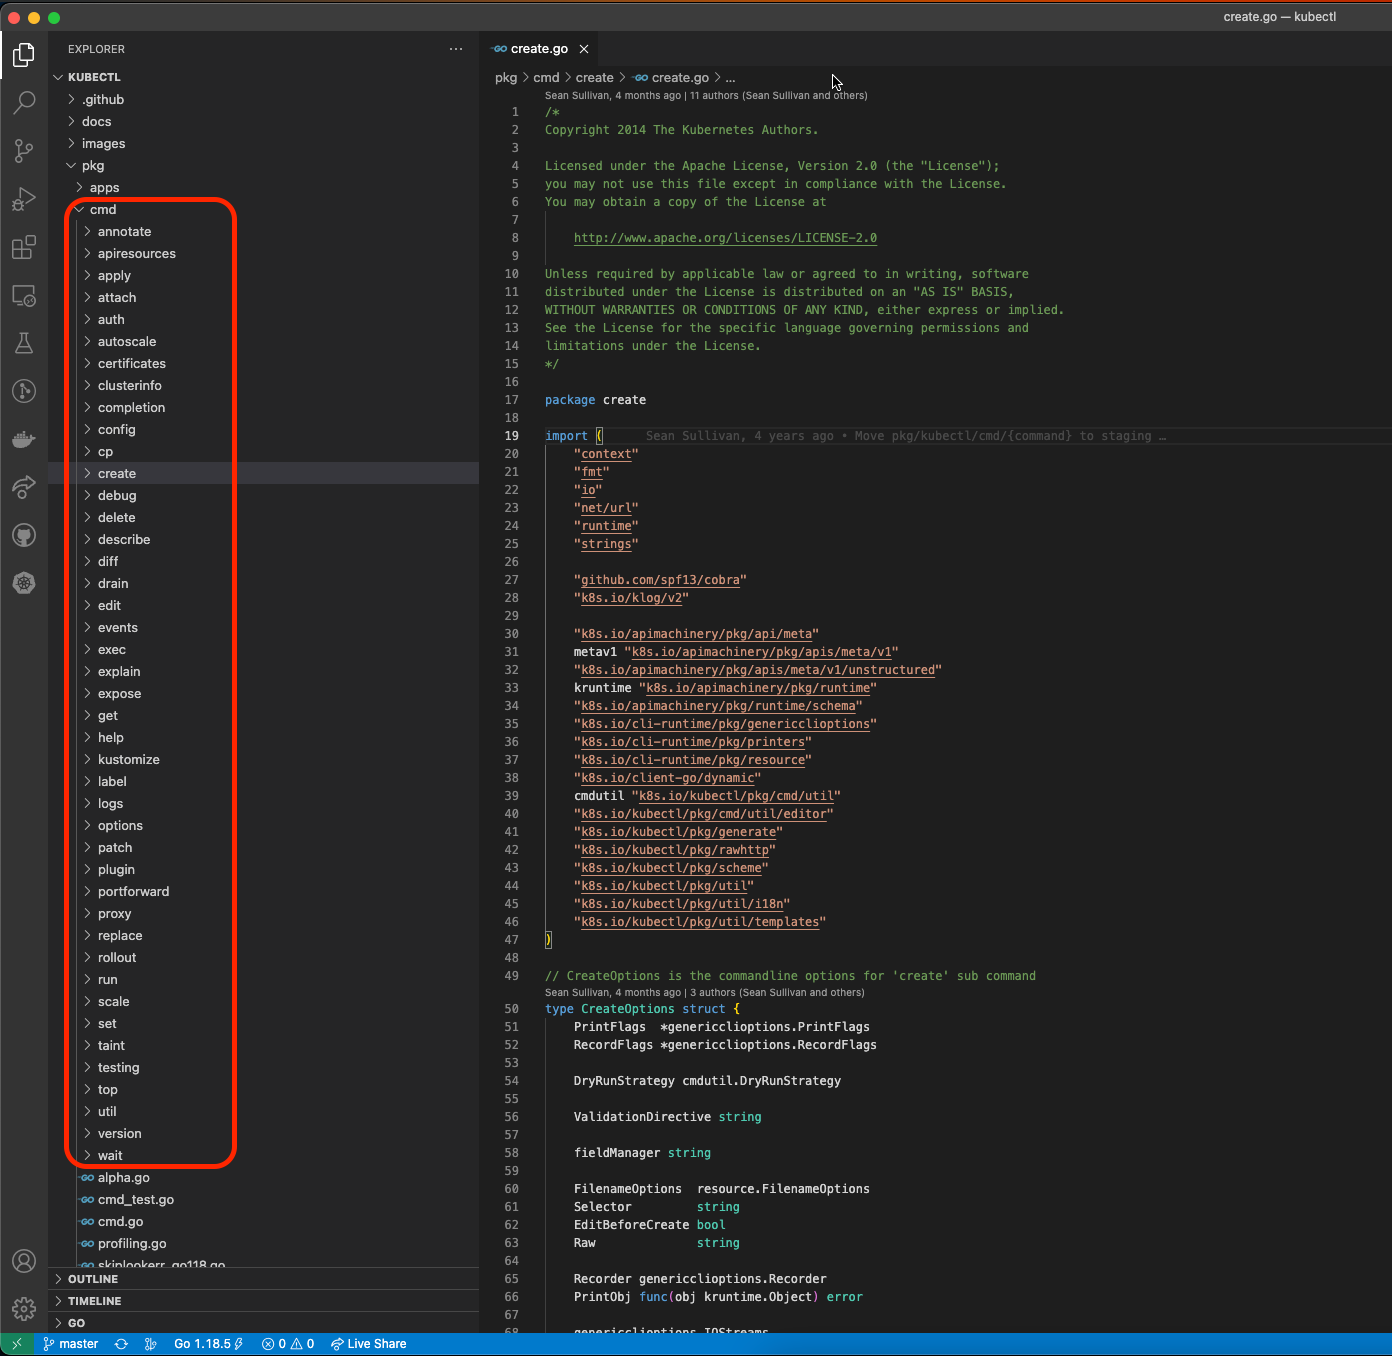
Kubernetes loves the Cobra command framework
Kubernetes commands are implemented using the Cobra command framework. Cobra provides a lot of great features for building command line interfaces and a basic overview of Cobra's capabilities can be found here. As shown in the Figure, one of the nice features of how Kubernetes utilizes Cobra is that it is very easy to locate which file implements each command line option. Furthermore, the Cobra structure puts the command usage message and command descriptions adjacent to the code that runs the command. This is shown in the figure and the actual lines of code. What's great about this structure is that you can go through and look at the descriptions for all the Kubernetes kubectl commands and then quickly jump to the code that implements the commands. As shown in lines 104-121 in the figure, the strings Use, Short, Long, and Example all hold information describing the command and Run points to a function that actually runs the command.
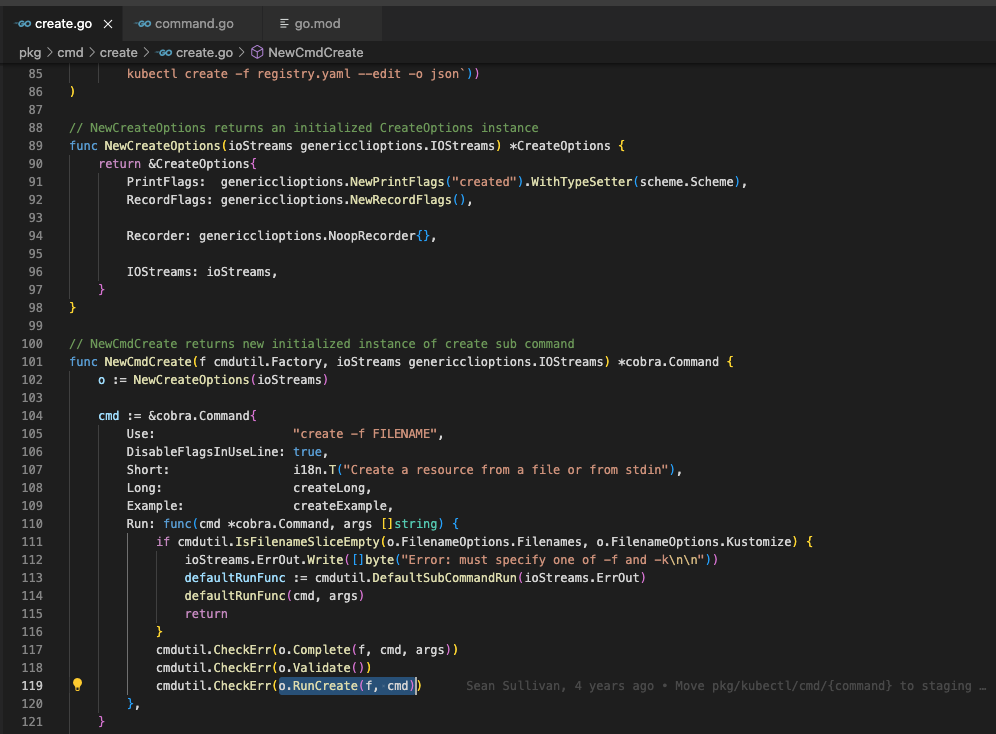
The RunCreate function invoked on line 119 in the above figure is where the bulk of the kubectl create command is implemented. The implementation of this function can be found in the same create.go file. The figure below shows the RunCreate function. On line 250, we added a fmt.Printf just to confirm this code was being called when we thought it would be called. In the Compiling and running Kubernetes section below, we show how you can speed up recompiling the Kubernetes code base when adding debugging statements solely to the kubectl source code.

Builders and visitors abound in Kubernetes
The method chaining shown on lines 251-259 is particularly intimidating to someone new to Go and Kubernetes. It's worth taking some time to explain this section of code in more detail. At a high level, what this code does is take the arguments and parameters from the command line and converts them into a list of resources. It's also responsible for creating a visitor construct that can be used to iterate across all the resources. The code is complex because it uses a variant of the builder pattern where individual functions are each doing a separate portion of the data initialization. The functions Unstructured, Schema, ContinueOnError, NamespaceParam, DefaultNamespace, FilenameParam, LabelSelectorParam, and Flatten all take in a pointer to a Builder struct, perform some form of modification on the Builder struct, and then return the pointer to the Builder struct for the next method in the chain to use when it performs its modifications. All of these methods can be found in the builder.go file but we have included a few below so you can see how they work.
func (b *Builder) Schema(schema ContentValidator) *Builder {
  b.schema = schema
  return b
}

func (b *Builder) ContinueOnError() *Builder {
  b.continueOnError = true
  return b
}

func (b *Builder) Flatten() *Builder {
  b.flatten = true
  return b
}
Once all the initializers have completed, the Do function of the Builder struct is invoked. The Do function is a critical piece as it returns a Result object that will be used to drive the creation of our resource. The Do function also creates a Visitor object that can be used to traverse the list of resources that were associated with this invocation of f.NewBuilder. The Do function implementation is shown below.

As shown above on line 1181, a new DecoratedVisitor is created and stored as part of the Result object that is returned by the Builder.Do() function. The DecoratedVisitor has a Visit function that will call the Visitor function that is passed into it. The implementation of this can be found at github.com/kubernetes/cli-runtime/blob/88d2de9dd3fd0b70d8483d5b5b386bd76d8dbab6/pkg/resource/visitor.go#L322-L342 and is shown below.
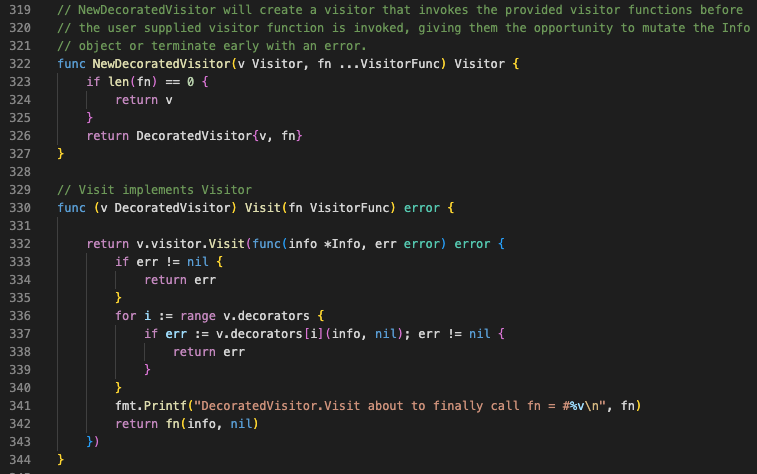
The Result object returned by the Do function has a Visit function that is used to invoke the DecoratedVisitor Visit function. This provides us a path from line 266 in the RunCreate function in create.go to eventually calling the anonymous function that is passed in on line 266 and contains the Create function that will lead us to the code making a REST call to the API server. The implementation of the Result Visit function that is called on line 266 of RunCreate function in create.go is shown below.

Now that we have seen how everything is connected through Visit functions and DecoratedVisitor classes, we see that the inline visitor function on line 266 below invokes the Helper Create function from helper.go on line 284.
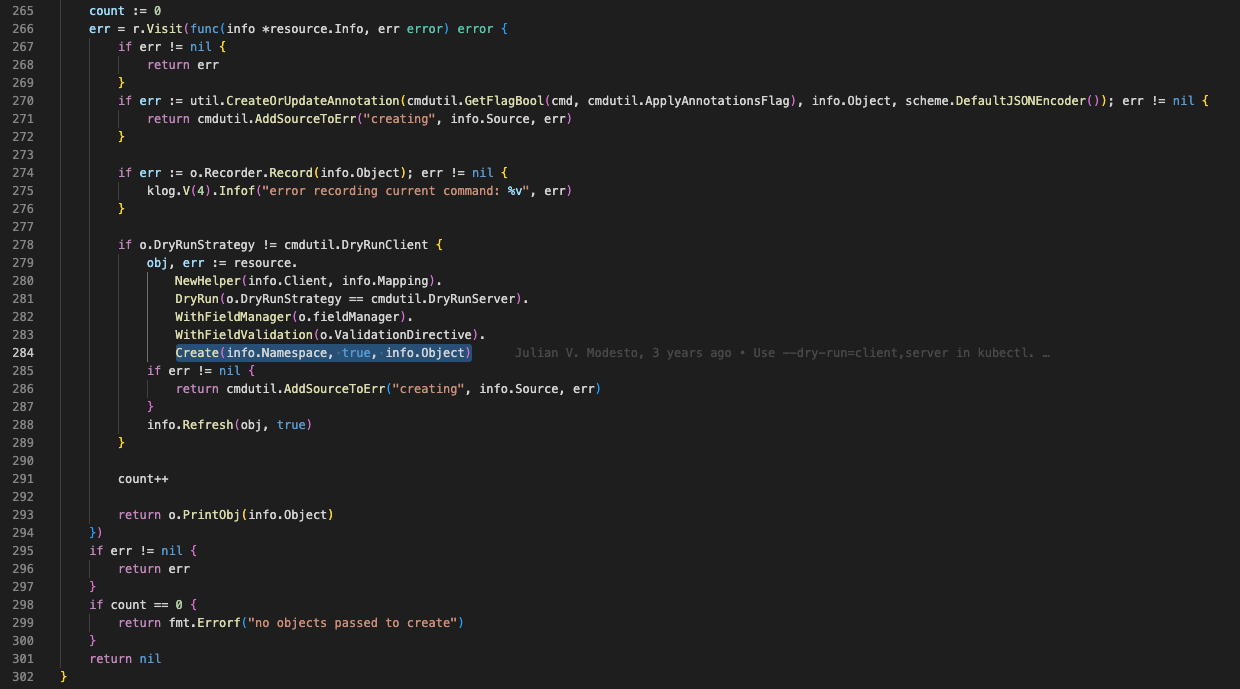
In line 280, the inline visitor function invokes the Resource NewHelper function found in helper.go and this function returns a new Helper object.
Here is the code that returns a new Helper object. It is actually pretty straightforward.
// NewHelper creates a Helper from a ResourceMapping
func NewHelper(client RESTClient, mapping *meta.RESTMapping) *Helper {
  return &Helper{
    Resource:        mapping.Resource.Resource,
    RESTClient:      client,
    NamespaceScoped: mapping.Scope.Name() == meta.RESTScopeNameNamespace,
  }
}
With the Helper created and its Create function invoked on line 284, we finally see that the Create function invokes the CreateWithOptions function followed by the createResource function on line 237 of the Helper CreateWithOptions function. This is shown below. The Helper createResource function, also shown below, performs the actual REST call to the API server to create the resource we defined in our YAML file.

Compiling and running Kubernetes
Now that we have reviewed the code its time to learn how to compile and run the code. In many of the code samples provided above you will see fmt.Printf() calls in the code. All of those calls are debugging statements that we added to the code, and you can add them to your copy of the source code as well. To compile the code we are going to use a special option that informs the Kubernetes build process to only compile the kubectl portion of the code. This will speed up the Kubernetes compilation process dramatically. The make command for doing the optimize compile is:
make WHAT='cmd/kubectl'
Then compile the etcd and install it locally by using the following command:
KUBERNETES_PROVIDER=local hack/install-etcd.sh
When the etcd is compiled and deployed, it will show you a command to add the etcd into your PATH. Please follow the instruction to finish the setup. The command would be like this:
export PATH="<kubernete_source_code>/third_party/etcd:${PATH}"
<kubernete_source_code> is the path where you git clone the kubernetes repository.
Once the etcd is available in your PATH, we can start up our Kubernetes development environment using the following command:
KUBERNETES_PROVIDER=local hack/local-up-cluster.sh
In another terminal window, we can go ahead and run the kubectl command and watch it run with our fmt.Printf included. We do this with the following command:
cluster/kubectl.sh create -f ~/nginx_kube_example/nginx_pod.yaml
The output would look like the following messages with our debugging print statements included:
$ cluster/kubectl.sh create -f ~/nginx_kube_example/nginx_pod.yaml
RunCreate options = &create.CreateOptions{PrintFlags:(*genericclioptions.PrintFlags)(0xc00045d290), RecordFlags:(*genericclioptions.RecordFlags)(0xc000128c60), DryRunStrategy:0, ValidationDirective:"Strict", fieldManager:"kubectl-create", FilenameOptions:resource.FilenameOptions{Filenames:[]string{"/home/yhwang/nginx_kube_example/nginx_pod.yaml"}, Kustomize:"", Recursive:false}, Selector:"", EditBeforeCreate:false, Raw:"", Recorder:genericclioptions.NoopRecorder{}, PrintObj:(func(runtime.Object) error)(0x1988500), IOStreams:genericclioptions.IOStreams{In:(*os.File)(0xc000132000), Out:(*os.File)(0xc000132008), ErrOut:(*os.File)(0xc000132010)}}
Result.Visit about to call visitor.Visit with fn = (resource.VisitorFunc)(0x1988ae0)
DecoratedVisitor.Visit about to finally call fn = #0x1988ae0
Helper.createResource resource = "replicationcontrollers"
Helper.createResource object = &unstructured.Unstructured{Object:map[string]interface {}{"apiVersion":"v1", "kind":"ReplicationController", "metadata":map[string]interface {}{"name":"nginx", "namespace":"kubeflow"}, "spec":map[string]interface {}{"replicas":1, "selector":map[string]interface {}{"app":"nginx"}, "template":map[string]interface {}{"metadata":map[string]interface {}{"labels":map[string]interface {}{"app":"nginx"}, "name":"nginx"}, "spec":map[string]interface {}{"containers":[]interface {}{map[string]interface {}{"image":"nginx", "name":"nginx", "ports":[]interface {}{map[string]interface {}{"containerPort":80}}}}}}}}}
replicationcontroller/nginx created
Code learning tools
With the help of many other developers, we have identified several tools and techniques that can really help accelerate your ability to learn the Kubernetes source code. In this section, we describe my favorite techniques: use of the Chrome Sourcegraph plugin, properly formatted print statements, the use of a Go panic to get desperately needed stack traces, and GitHub blame to travel back in time.
Chrome Sourcegraph plugin
Morgan Bauer (@ibmhb on Twitter) introduced me to one of the coolest tools Brad has seen for learning Kubernetes code. The Chrome Sourcegraph plugin provides several advanced IDE features that make it dramatically easier to understand Kubernetes Go code when browsing GitHub repositories. Here is an example of how it can help. When Brad first started looking at Kubernetes code, he found the following code snippet absolutely depressing to parse through and understand. It had a ton of functions and it was just overwhelming.

When looking at this same piece of code in a Chrome browser with the Sourcegraph extension installed you can hover the mouse over each function and quickly get a description of the function, what is passed into the function and what it returns. This is a huge time saver as you can avoid having to grep the code base to understand where a function is defined and what it does. An example of this is shown in the figure below.

The Chrome Sourcegraph extension also has an advanced view that provides the ability to peek into the function that is being invoked. This extremely useful capability is shown here.

One issue with Chrome Sourcegraph is that sometimes it hangs and fails to pop up the code details. My experience has been that this is easily fixed by simply hitting the refresh button on the browser.
Print statements never go out of style
Adding print statements as shown throughout this article is a huge help to validating that the code is executing in fashion that matches how you are interpreting it. The %#v formatting option shown below typically provides the best debugging information. Don't forget that you may have to add "fmt"to your list of imports if it is not already included in the module.
fmt.Printf("createAndRefresh Info = %#v\n", info)
When in doubt, PANIC
If you are having a difficult time determining how the Create function in helper.go is invoked, consider throwing in a panic into the code to force a stack trace to be generated and printed to the screen. The code below shows how we added a panic to the function. This was a huge help as it helped us to determine which type of Visitor was actually being used to invoke the Create function.
func (m *Helper) Create(namespace string, modify bool, obj runtime.Object) (runtime.Object, error) {
  panic("Want Stack Trace")
  return m.CreateWithOptions(namespace, modify, obj, nil)
}
Visit the past with GitHub blame
Sometimes you look at some lines of source code and you think to yourself, what was the person thinking when they committed those lines of code. Thankfully, the GitHub browser interface has a blame option available as a button on the user interface. The figure below shows the location of the blame button.

When you push the blame button, you are given a view of the code that has the commits responsible for each line of code in the source file. This allows you to go back in time and look at the commit that added a particular line of code and determine what the developer was trying to accomplish when that line of code was added. The figure below illustrates the use of the blame option and on the left hand side all the commits are listed.

Summary
In this article, we have examined several key portions of the Kubernetes code base responsible for running a simple kubectl command and the flow through the code that actually sends a REST call to the API Server. We have also provided examples on how to compile and run the command from a Kubernetes development environment. We concluded with a section that describes several useful tools and techniques for learning the Kubernetes source code.
Hopefully this article has given you the courage to roll up your sleeves and start learning the Kubernetes code base. Every journey starts with a first step!