Learning Path
Why and when to use Kubernetes Operators
It is one thing to understand the reason for Kubernetes Operators and how they work, but the next step is to deploy an operator yourself. This tutorial shows you how to deploy our Credential Rotator Operator to Red Hat OpenShift. After completing this tutorial, you will understand the basic concepts and steps to deploy a Golang-based operator that manages credentials for a back-end application service.
Note: This tutorial can apply to other Kubernetes clusters and public clouds as well. However, the commands may differ slightly.
Prerequisites
This tutorial assumes you have some knowledge of Kubernetes Operator concepts, but little or no experience deploying operators. If you need a refresher, read the Introduction to Kubernetes Operators article.
You need the following tools:
- Go 1.16 or later
- Kustomize 2.0.3 or later
- kubectl 1.18 or later
- Docker 17.03 or later
- Red Hat OpenShift cluster 4.6 or later
- OpenShift CLI 4.6 or later
- IBM Cloud account
- Access to an IBM Cloudant database running as an IBM Cloud service
Note: The steps of this tutorial are written for a Red Hat OpenShift on IBM Cloud cluster. The steps may differ for an OpenShift cluster running on another platform.
Environment setup
Create your environment as shown in the Set up your environment tutorial.
Steps
- Prerequisites
- Steps
- 1. Deploy a web application and IBM Cloudant database
- [Automate by using an operator](#automate-by-using-an-operator) - 2. Clone the Credential Rotator Operator project
- 3. Compile, build, and push
- 4. Deploy the operator to your OpenShift cluster
- 5. Test and verify
- Clean up
- Troubleshooting
- Next steps
1. Deploy a web application and IBM Cloudant database
Automate by using an operator

The application used in this tutorial to demonstrate the Credential Rotator Operator is a sample Node.js application. With this simple web application, you can add names that are stored in a back-end Cloudant database. The web application is deployed to an OpenShift cluster and the Cloudant database runs as an IBM Cloud service. The web app connects to the database by using service credentials from the Cloudant service. These credentials are stored in a Secret on the cluster where the app is deployed so that it can access them.
If you plan to deploy to an OpenShift cluster, log in to your cluster now.
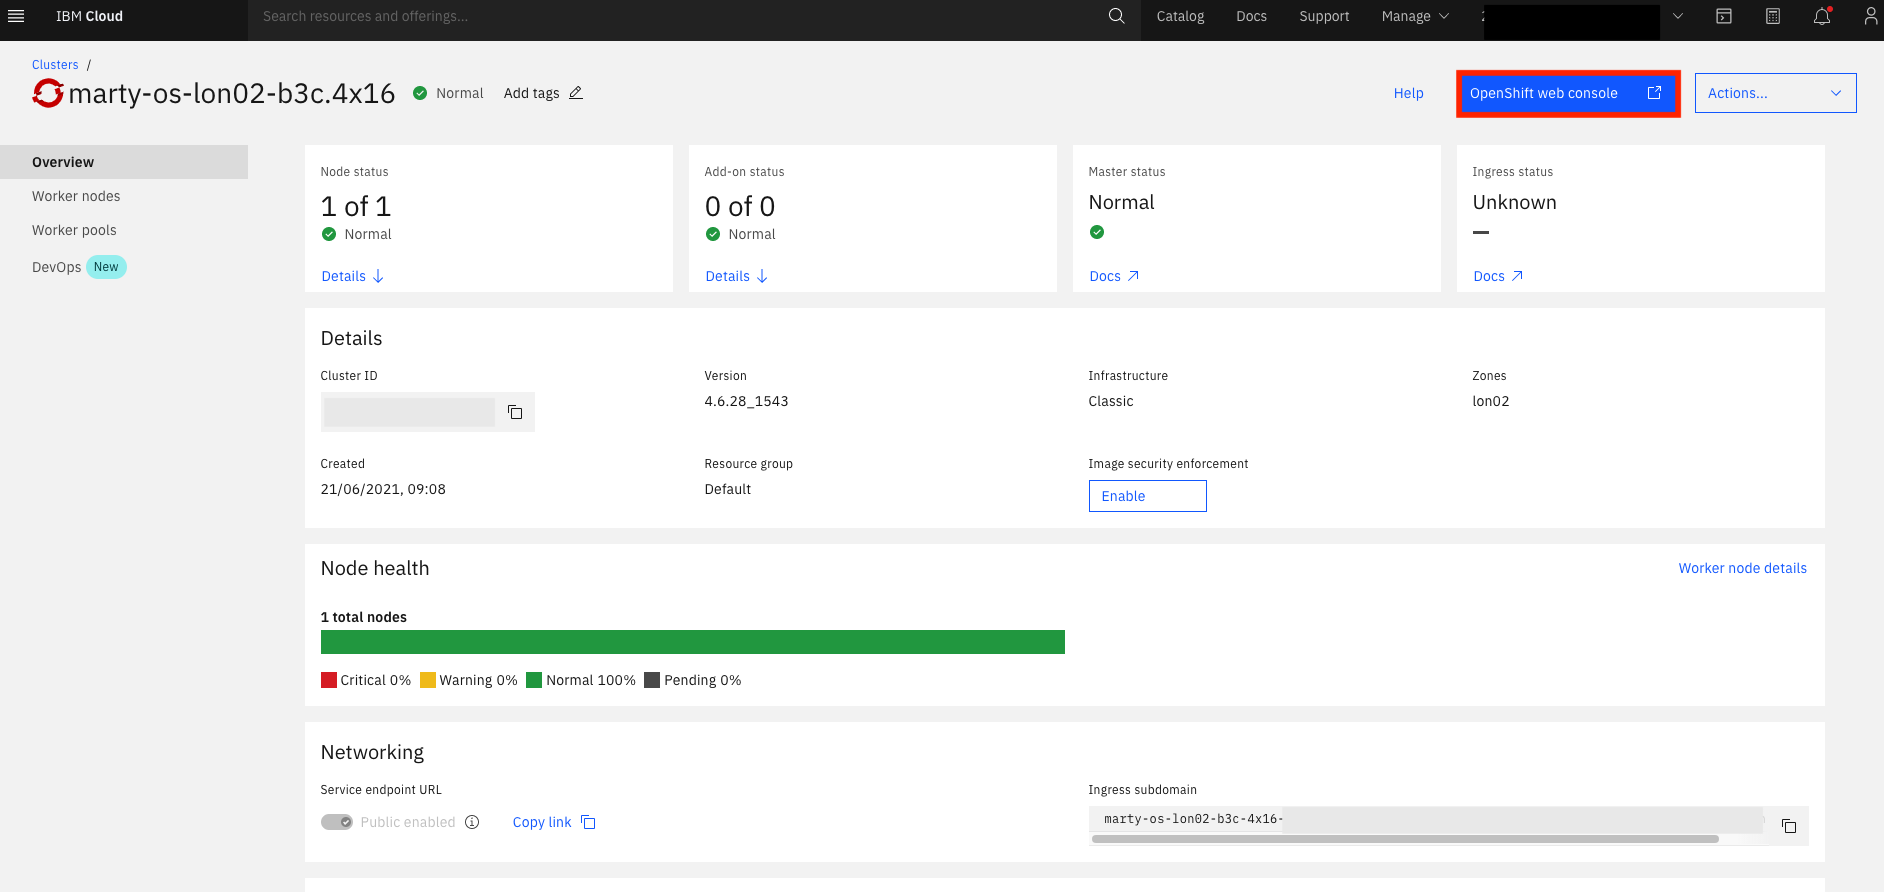
Select the provisioned cluster that you set up during the environment steup.
Click OpenShift web console.
From the OpenShift web console Overview page, click your profile name (such as
IAM#name@email.com) to open the account drop-down menu, and click Copy Login Command.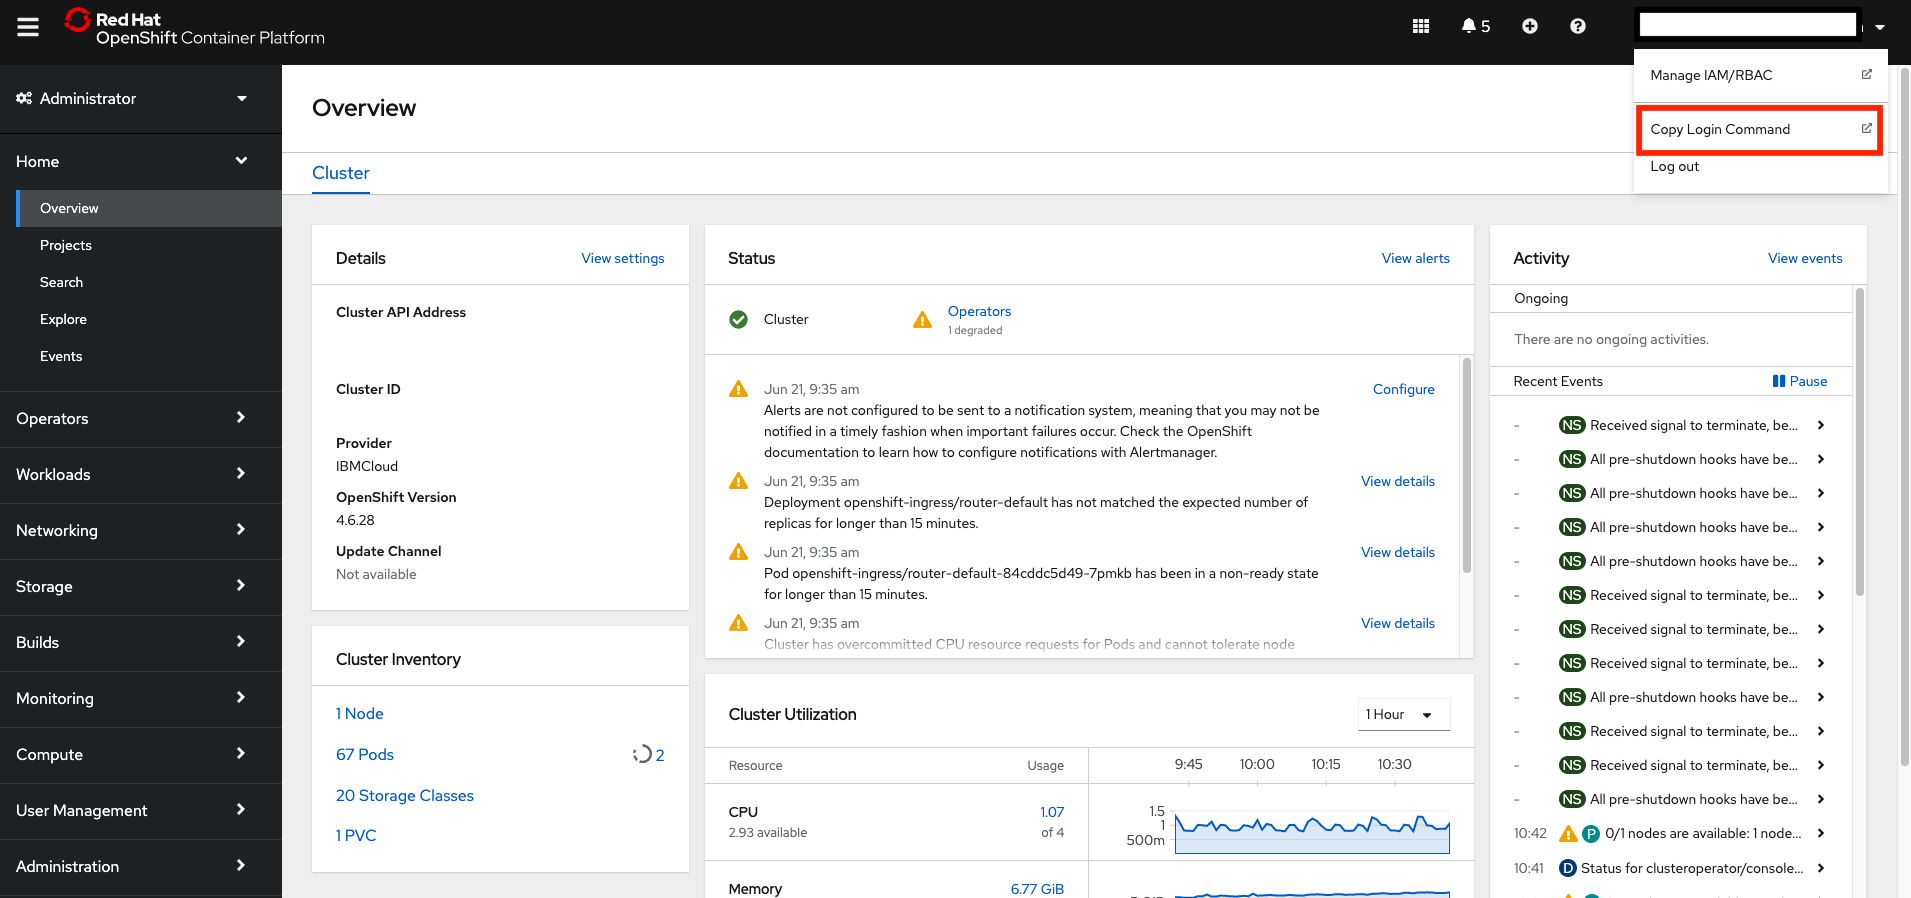
Click Display Token and copy the
oc logincommand.From your terminal, run the
oc logincommand that you copied to log in to your cluster.After you log in, you should see output similar to the following example:
 $ oc login --token=fFQ-HbFVBT4qHKl1n0b*****63U --server=https://c****-e.us-south.containers.cloud.ibm.com:31047
 s-south.containers.cloud.ibm.com:31047

 Logged into "https://c116-e.us-south.containers.cloud.ibm.com:31047" as "IAM#horea.porutiu@ibm.com" using the token provided.

 You have access to 84 projects, the list has been suppressed. You can list all projects with `oc projects`

 Using project "horea-test-scc".
Note: This is extremely important. By running the login command, you should now be able to run
oc projectto see which project you are currently in. The project that you're in is also your namespace. This is important because the application only runs in the namespace that you deploy it to. OpenShift connects to your cluster via this login command, and if you do not do this step properly, you will not be able to deploy the application.Create a new project by using the following command:
oc new-project <new-project-name>After you create a new project, you will be automatically switched to that project, as the following example output demonstrates:
 $ oc new-project get-started-node-project
 Now using project "get-started-node-project" on server "https://c116-e.us-south.containers.cloud.ibm.com:31047".
For the rest of this tutorial, use whatever you named your project as your namespace for the
get-started-nodeapp (for example, we usedget-started-node-projectin the previous example output). Keep in mind that OpenShift considers your project to be your namespace.Follow the steps in the Deploy to Red Hat OpenShift on IBM Cloud instructions to deploy the web app to OpenShift and the Cloudant database to the IBM Cloud.
Note: Remember to pass the project/namespace that you created (for example, we used
get-started-node-projectin the sample) when you deploy the app and run commands in the cluster for it.Note: Do NOT follow the steps in the Clean up section of the instructions since they will remove the web app deployed in your cluster.
Test whether the deployed web app is working by adding a name to see if it is stored in the database.
The app uses the service credentials that you created during the Create a Cloudant database section of the instructions to access the Cloudant service. The Credential Rotator Operator will rotate these credentials later in this tutorial.
2. Clone the Credential Rotator Operator project
Check your Go version by using the
go versioncommand. This tutorial is tested with the following Go version:$ go version go version go1.16.5 darwin/amd64Next, clone the GitHub repository for the Credential Rotator Operator with the following commands:
 git clone git@github.com:IBM/credential-rotator-operator.git
 cd credential-rotator-operator
3. Compile, build, and push
Now you are ready to compile, build the image of the operator, and push that image to an image repository. You can use the image registry of your choice, but this tutorial uses Docker Hub.
In Step 1, you logged in to the OpenShift cluster. You must be logged in for the following steps.
Create a new project by using the following command:
oc new-project <new-project-name>
After you create a new project, you will be automatically switched to that project, as the following sample output demonstrates:
$ oc new-project credential-rotator-project
Now using project "credential-rotator-project" on server "https://c116-e.us-south.containers.cloud.ibm.com:31047".
For the rest of the tutorial, use whatever you named your project as your namespace for the operator (for example, we used credential-rotator-project). The following steps go into more detail about this, but keep in mind that your project is the same as your namespace in terms of OpenShift.
a. Compile the operator
To compile the code, run the following command in the terminal from your project root:
make install
b. Set the operator namespace
Now you must update your config file to tell the operator to run in your own project namespace. Do this by issuing the following Kustomize commands:
export IMG=docker.io/<username>/credential-rotator-operator:<version>
export NAMESPACE=<oc-operator-project-name>

cd config/manager
kustomize edit set namespace "${NAMESPACE}"
cd ../../

cd config/default
kustomize edit set namespace "${NAMESPACE}"
cd ../../
<username>is your image registry (Docker Hub, Quay.io, or such) username.<version>is the version of the operator image that you will deploy. Note that each time you make a change to operator code, it is a good practice to increment the version.NAMESPACEis theocproject name where you plan to deploy the operator. (For the examples in this tutorial, it iscredential-rotator-project.)
c. Build and push your image
Note: You must have an account to a image registry, such as Docker Hub, to be able to push your operator image.
If you are using Docker Hub, log in with the
docker logincommand.To build the Docker image, run the following command. You can also use the regular
docker build -tcommand to build.make docker-build IMG=$IMGPush the Docker image to your registry by using following command from your terminal:
make docker-push IMG=$IMG
4. Deploy the operator to your OpenShift cluster
To deploy the operator, run the following command from your terminal:
make deploy IMG=$IMGThe output of the deployment should look similar to the following example:
 ...go-workspace/src/credential-rotator-operator/bin/controller-gen "crd:trivialVersions=true,preserveUnknownFields=false" rbac:roleName=manager-role webhook paths="./..." output:crd:artifacts:config=config/crd/bases
 cd config/manager && ...go-workspace/src/credential-rotator-operator/bin/kustomize edit set image controller=sanjeevghimire/credential-rotator-operator:v0.0.5
 .../go-workspace/src/credential-rotator-operator/bin/kustomize build config/default | kubectl apply -f -
 Warning: kubectl apply should be used on resource created by either kubectl create --save-config or kubectl apply
 namespace/credential-rotator-project configured
 customresourcedefinition.apiextensions.k8s.io/credentialrotators.security.example.com configured
 role.rbac.authorization.k8s.io/credential-rotator-operator-leader-election-role created
 clusterrole.rbac.authorization.k8s.io/credential-rotator-operator-manager-role configured
 clusterrole.rbac.authorization.k8s.io/credential-rotator-operator-metrics-reader unchanged
 clusterrole.rbac.authorization.k8s.io/credential-rotator-operator-proxy-role unchanged
 rolebinding.rbac.authorization.k8s.io/credential-rotator-operator-leader-election-rolebinding created
 clusterrolebinding.rbac.authorization.k8s.io/credential-rotator-operator-manager-rolebinding configured
 clusterrolebinding.rbac.authorization.k8s.io/credential-rotator-operator-proxy-rolebinding configured
 configmap/credential-rotator-operator-manager-config created
 service/credential-rotator-operator-controller-manager-metrics-service created
 deployment.apps/credential-rotator-operator-controller-manager created
To ensure that everything is working correctly, use the
oc get podscommand. If the operator is up and running, you will see output similar to the following example.$ oc get pods NAME READY STATUS RESTARTS AGE credential-rotator-operator-controller-manager-54c5864f7b-znwws 2/2 Running 0 14s
5. Test and verify
Now it's time to see if the operator can rotate the database credentials and restart the web app instances. This means creating a CR instance.
If you created a Secret that contains your Cloudant credentials to manually test the web application outside of the operator, then you must remove the Secret before you test the operator. You can delete the Secret with the following command:
oc delete secret cloudant -n <new-project-name>For example, the command for our sample is:
$ oc delete secret cloudant -n get-started-node-projectThe operator controller creates a new Secret that is modifiable when the first CR is deployed. The Secret that is created outside of the controller is not compatible with the controller.
Update your CR by modifying the
config/samples/security_v1alpha1_credentialrotator.yamlfile to look similar to the following:apiVersion: security.example.com/v1alpha1 kind: CredentialRotator metadata: name: credentialrotator-sample spec: userAPIKey: "<IBM_USER_API_KEY>" serviceGUID: "<CLOUDANT_SERVICE_GUID>" serviceURL: "<CLOUDANT_SERVICE_ENDPOINT>" appName: "new-app" appNameSpace: "get-started-node-project"<IBM_USER_API_KEY>is the user API key of the IBM Cloud account where the Cloudant service is running.To get the
<IBM_USER_API_KEY>, go to your IBM Cloud Dashboard and click Manage > Access(IAM) > API keys.Note: If you did not copy the key details when you created it, you must create a new identity and access management (IAM) key since the details are only available at the time of creation.
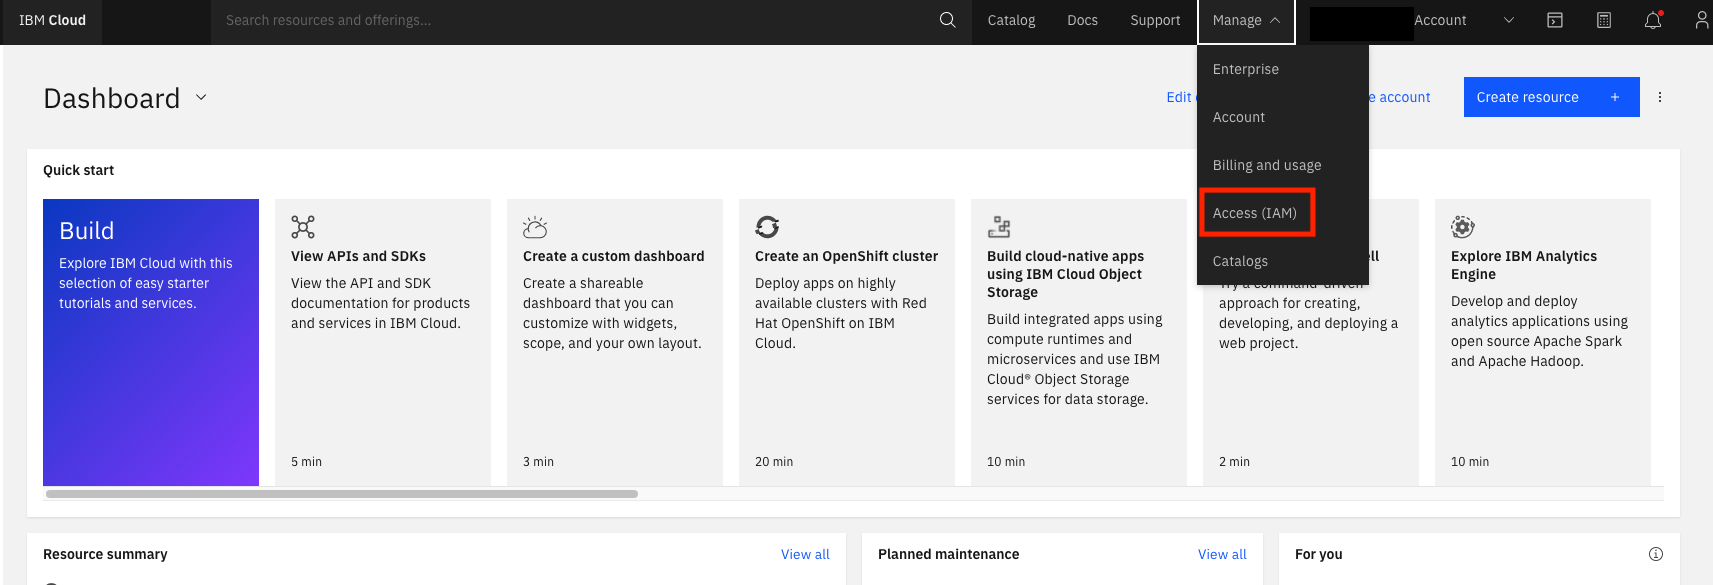
In the Access (IAM) navigation menu, click API keys to open the list of your associated API keys.

<CLOUDANT_SERVICE_GUID>is the globally unique identifier (GUID) of the Cloudant service instance.To find the
<CLOUDANT_SERVICE_GUID>service instance, go to the Resource list page, expand Services and software, and click the name of your Cloudant service. The service properties panel appears, which includesGUIDas a property.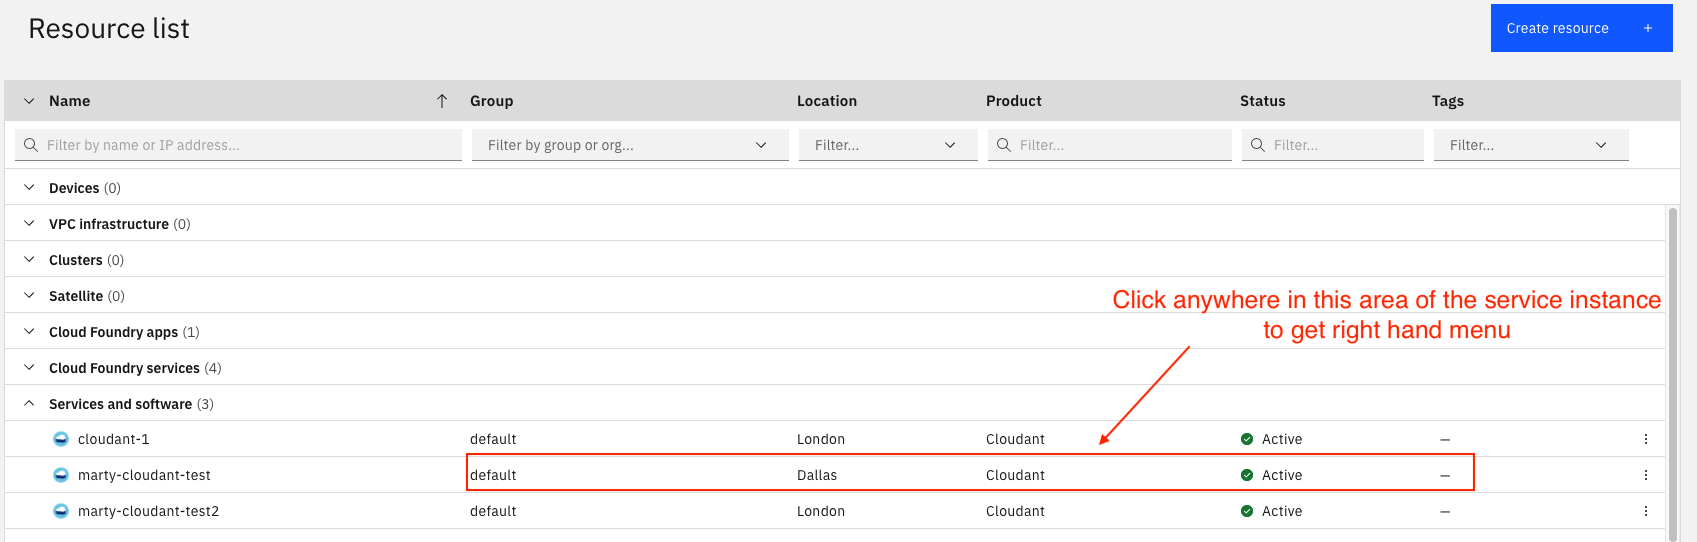
Click the Copy to clipboard icon for the
GUIDproperty.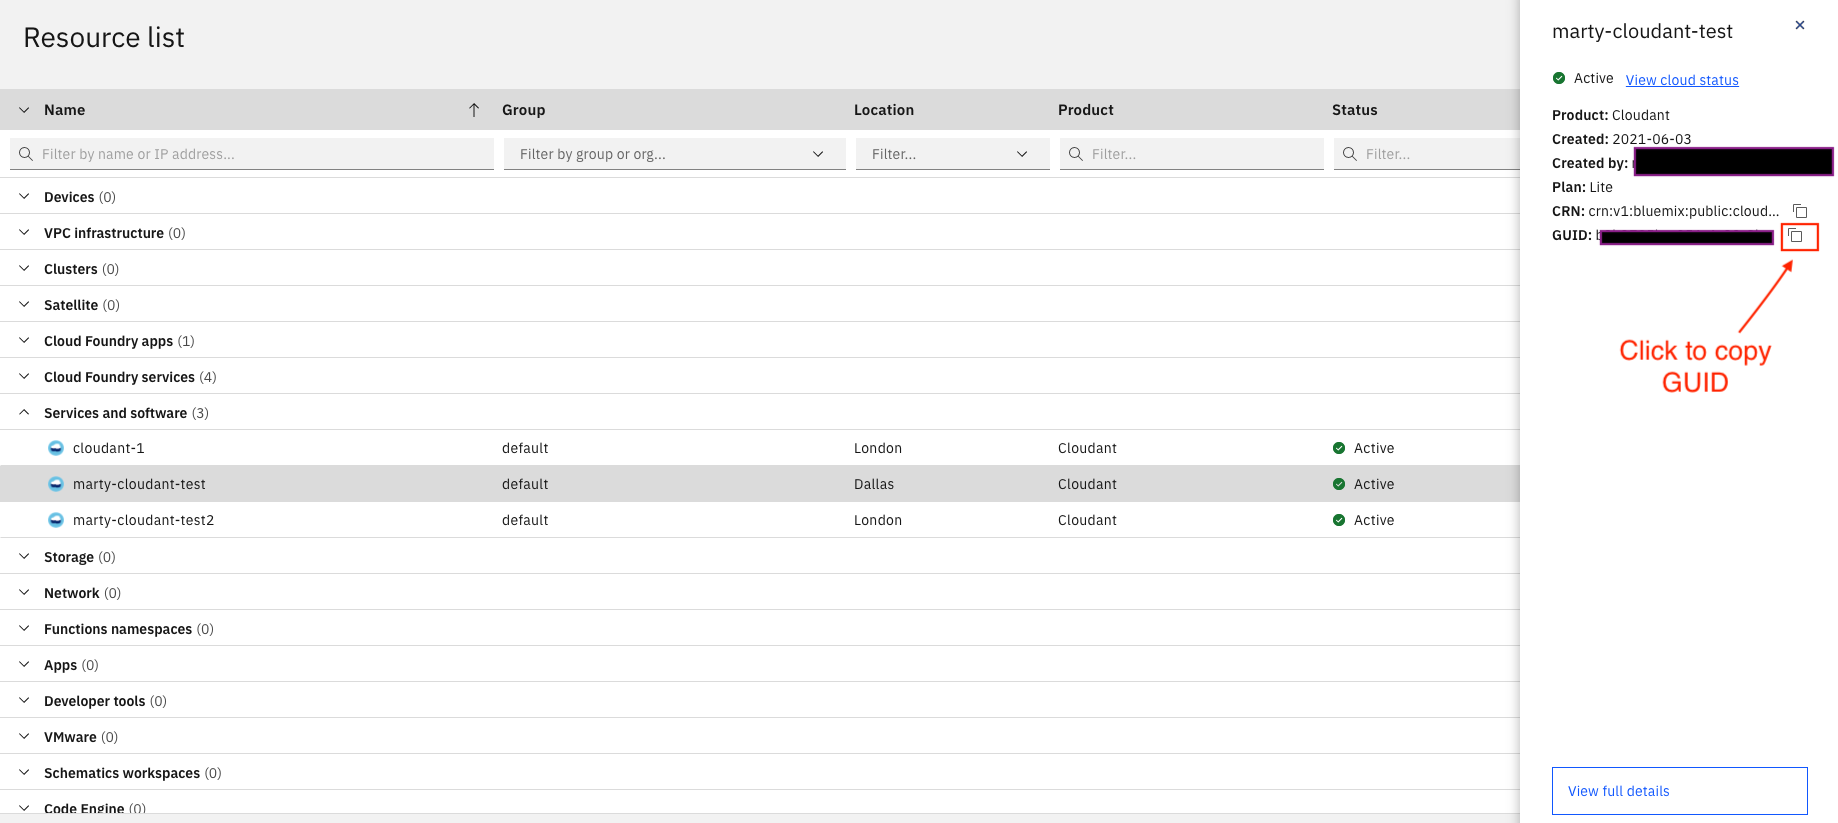
<CLOUDANT_SERVICE_ENDPOINT>is the endpoint of the Cloudant service instance.To find the
<CLOUDANT_SERVICE_ENDPOINT>, click View full details on the same service properties panel where you found theGUIDproperty.In the Manage > Overview tab of the full details pages, copy the URL located in the External endpoint (preferred) field.
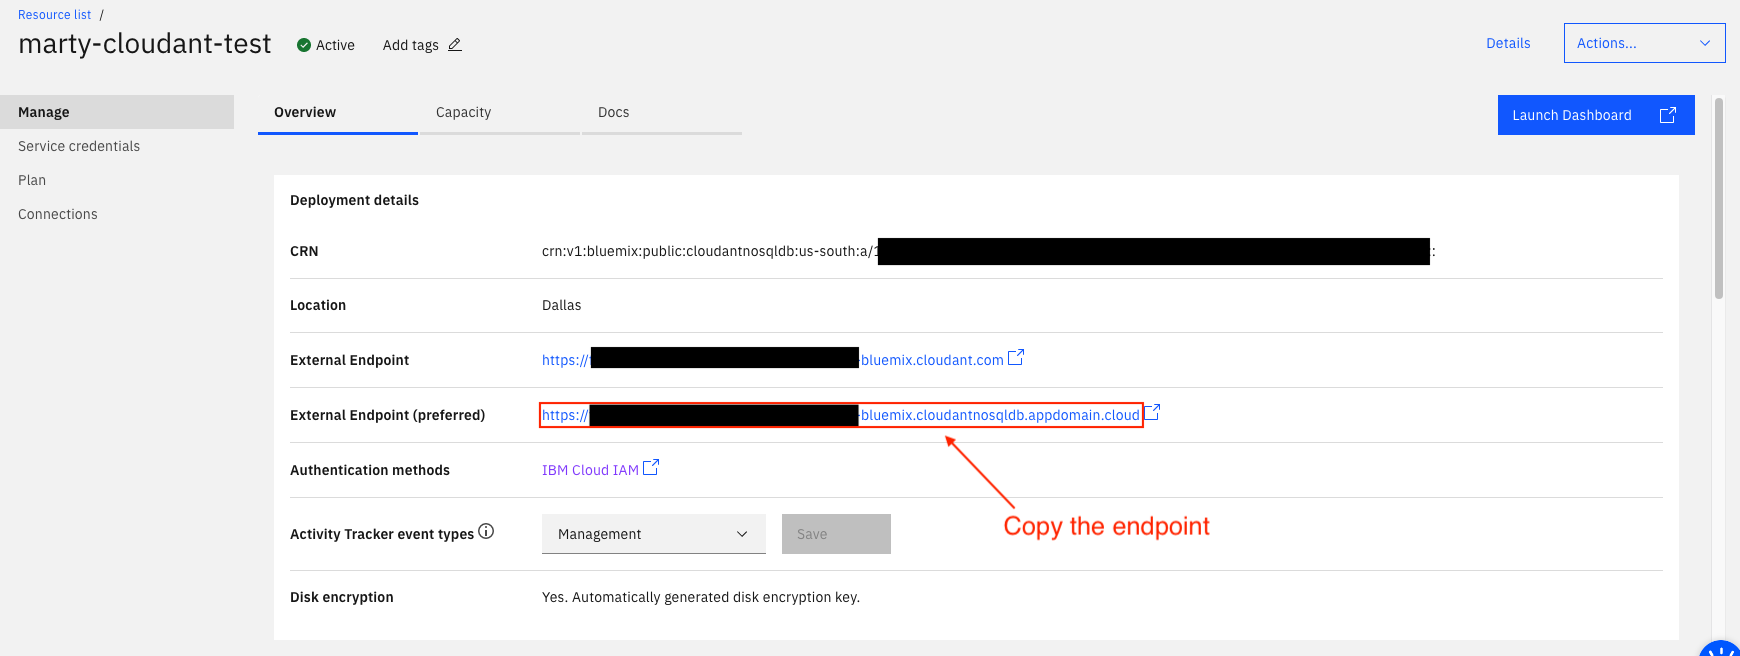
appnameis the name that you set when you deployed theget-started-nodeapplication to OpenShift and the Cloudant database by following the Deploy to Red Hat OpenShift on IBM Cloud instructions.appNameSpaceis the project/namespace that you deployed theget-started-nodeapplication into within Step 1.
Finally, create the CR by running the following command:
oc apply -f config/samples/security_v1alpha1_credentialrotator.yaml
Verify that credential rotation works
Open the web application URL in your browser. (As a reminder, it's in the form of
get-started-node-.....containers.appdomain.cloud.)You should be able to enter and save names to the database.

The web application's Pods should have restarted, as demonstrated by the following sample output:
 $ oc get pods,replicaset -n get-started-node-project

 NAME                                    READY   STATUS    RESTARTS   AGE
 pod/get-started-node-5db584f94b-fc6vr   1/1     Running   0          5m22s

 NAME                                          DESIRED   CURRENT   READY   AGE
 replicaset.apps/get-started-node-5db584f94b   1         1         1       5m23s
 replicaset.apps/get-started-node-9df4dbcbf    0         0         0       14m
Within your Cloudant service's full details pages, select Service credentials from the menu. The list on the Service credentials page should contain a new credential with a timestamp around the time that you created the CR.

Note: You can remove any previous credentials that you don't need. The operator handles the credentials that it creates by replacing the previous credential with the new credential.
Congratulations! You successfully deployed the Credential Rotator Operator and rotated the database credentials for a web application. To learn more about how the operator works, read the Explanation of the Credential Rotator Operator controller code article.
Clean up
The
Makefilepart of the generated project has a target calledundeploy, which deletes all of the resources associated with the operator. You can run it with the following command:make undeployYou can clean up the application by following the steps in Clean up. Note: Remember to pass the project/namespace you created (for example
get-started-node-project) when running commands in the cluster for it.You can delete the Cloudant service similar to Deleting resource in IBM Cloud.
Troubleshooting
To check the progress of the operator controller when handling a request, check the controller manager container log with the following command:
oc logs deployment.apps/credential-rotator-operator-controller-manager -c manager -n <oc-operator-project-name> --tail 1 --followFor example:
$oc logs deployment.apps/credential-rotator-operator-controller-manager -c manager -n credential-rotator-project --tail 1 --followNote: Stream the log by adding
--tail 1 --followflags to the end of thelogscommand.When you deployed your CR, did you receive output that says it is
unchanged, similar to the following example?$ oc apply -f config/samples/security_v1alpha1_credentialrotator.yaml credentialrotator.security.example.com/credentialrotator-sample unchangedThe
unchangedresponse means that Kubernetes already has a CR instancecredentialrotator-sampleof typecredentialrotator.security.example.comand it cannot find any delta between your update and the current instance. Therefore, it will do nothing and the controller will not be called. To get around this, first delete the CR instance as follows:oc delete -f config/samples/security_v1alpha1_credentialrotator.yamlThen reapply it. Alternatively, you can apply an entirely new CR instance.
Next steps
Now that you learned how to write an operator that rotates credentials, as well as how to deploy it, let's finish the learning path with a summary and comparison against other methods of carrying out the same functionality.