Tutorial
Implement hybrid DNS using Red Hat OpenShift on multicloud platforms
Learn how to reuse on-premises DNS records with Red Hat OpenShift on IBM Cloud or other managed cloud servicesWhen your company transitions to a hybrid architecture between on-premises and cloud environments, you may need to reuse your on-premises configurations with those in the cloud to avoid rework or duplication of existing configurations. One of your requirements may be to reuse existing Domain Name System (DNS) configurations with your Red Hat OpenShift cluster running on a managed cloud service, but you may not have infrastructure administration for the platform as a service (PaaS), so other configuration methods are necessary. This tutorial demonstrates how to reuse on-premises DNS records with the Red Hat OpenShift on IBM Cloud managed service. However, the steps are similar for OpenShift running on other cloud hyperscaler platforms, such as AWS and Microsoft Azure.
Following are the high-level steps to reuse your on-premises DNS records in Red Hat OpenShift on IBM Cloud:
- Establish on-premises DNS communication with IBM Cloud either by a virtual private network (VPN) or dedicated link.
- Add the on-premises DNS Internet Protocol (IP) in each worker node of your OpenShift cluster.
- Add the DNS forwarding zone in the OpenShift CoreDNS configuration.
Architecture
In this tutorial scenario, the OpenShift clusters running in IBM Cloud need to use existing records in the on-premises DNS that route applications exposed through an F5 load balancer and deployed in a OpenShift on-premises cluster. Hybrid integration is required so that OpenShift can use the records to avoid connection through static IPs. Following is a diagram of the sample environment architecture.
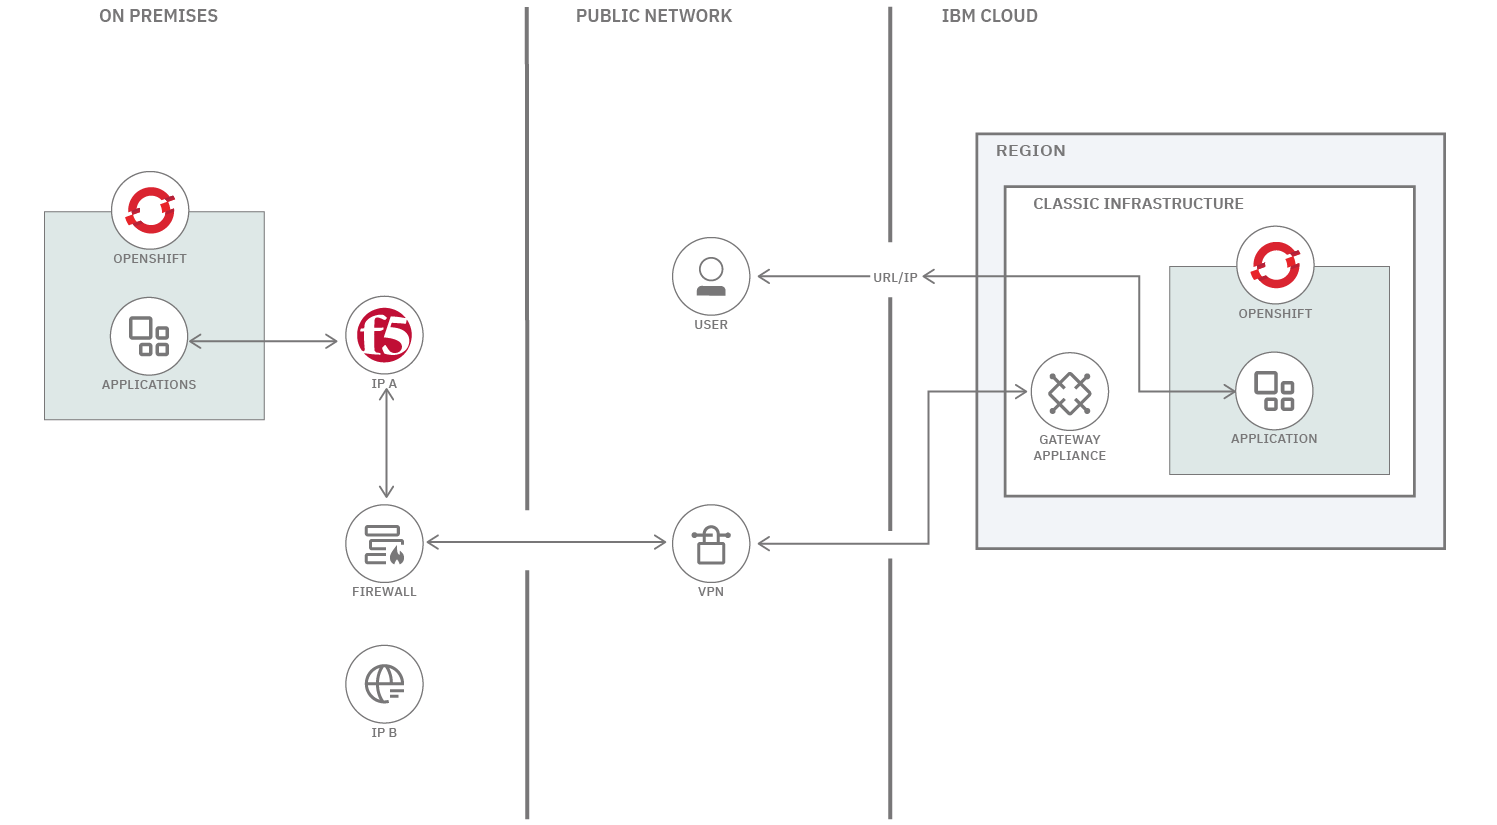
In this scenario, there are two OpenShift clusters, one in the on-premises environment and one in the cloud. Exposure of the applications in the on-premises environment is performed through an F5 balancer with IP A. The cloud cluster must be able to make use of the DNS records found on the server with IP B in order to resolve the virtual IPs exposed by the F5 assigned to IP A. The hybrid connection of both environments is done via VPN using an AT&T Gateway Appliance. End users consume the public URL of Red Hat OpenShift on IBM Cloud to access the applications.
Prerequisites
Before following the configuration steps, you must have the following prerequisites:
- A Red Hat OpenShift on IBM Cloud cluster instance.
- VPN connection between your on-premises environment and IBM Cloud.
- A Linux terminal with IBM Cloud Command Line Interface(CLI) and OpenShift CLI (
oc) installed to connect to the OpenShift cluster. - VPN tunnel access to IP B, which corresponds to your on-premises DNS.
- Previous experience using IBM Cloud CLI,
oc, Red Hat Enterprise Linux (RHEL) administration, and vi editor commands.
Estimated time
You should be able to complete this tutorial in less than 20 minutes.
Steps
Following are the steps to enable hybrid DNS with Red Hat OpenShift on IBM Cloud.
Select your cluster
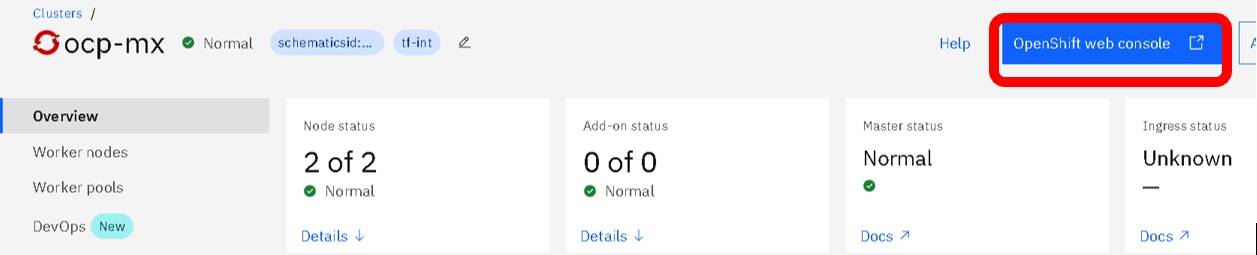
Go to the OpenShift clusters list within IBM Cloud and select the cluster on which you will perform the hybrid DNS configuration.
From the cluster overview page, click OpenShift web console.
Add the DNS on the OpenShift worker nodes
In the following steps, you add the name resolution at the node level of the OpenShift cluster. For each node in the OpenShift cluster, you should enter by Terminal, as demonstrated in the following screen capture images.
From the Administrator menu, click Compute > Nodes.
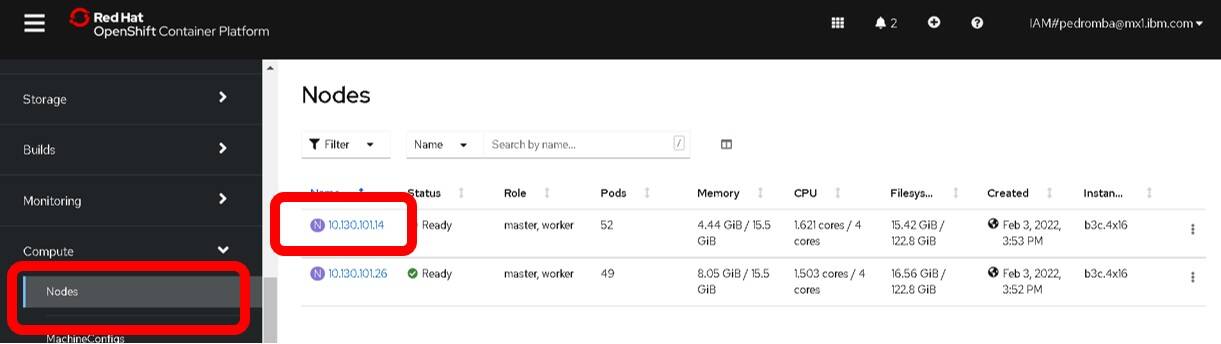
Click a node name to open the Node Details page.
Click the Terminal tab.
Log in to each node and run the command
chroot /hostso that the changes made to the nodes are preserved.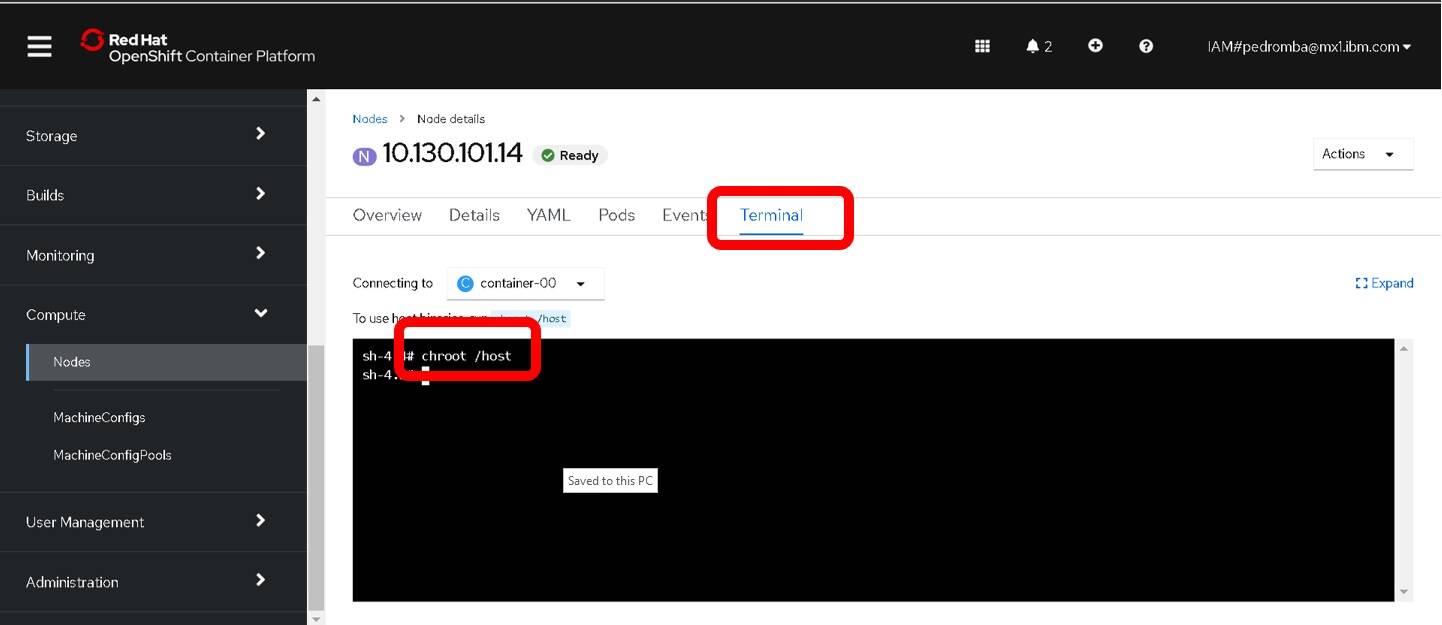
Add the DNS resolution in the
resolv.conffile on each node with the vi editor.Then add the on-premises DNS IP by inserting the
nameservertext where it has to be substituted with your DNS IP by using the vi insert (i) or append (a) commands.The output should be similar to the following:
nameserver 10.0.80.11
nameserver 10.0.80.12
options single-request-reopen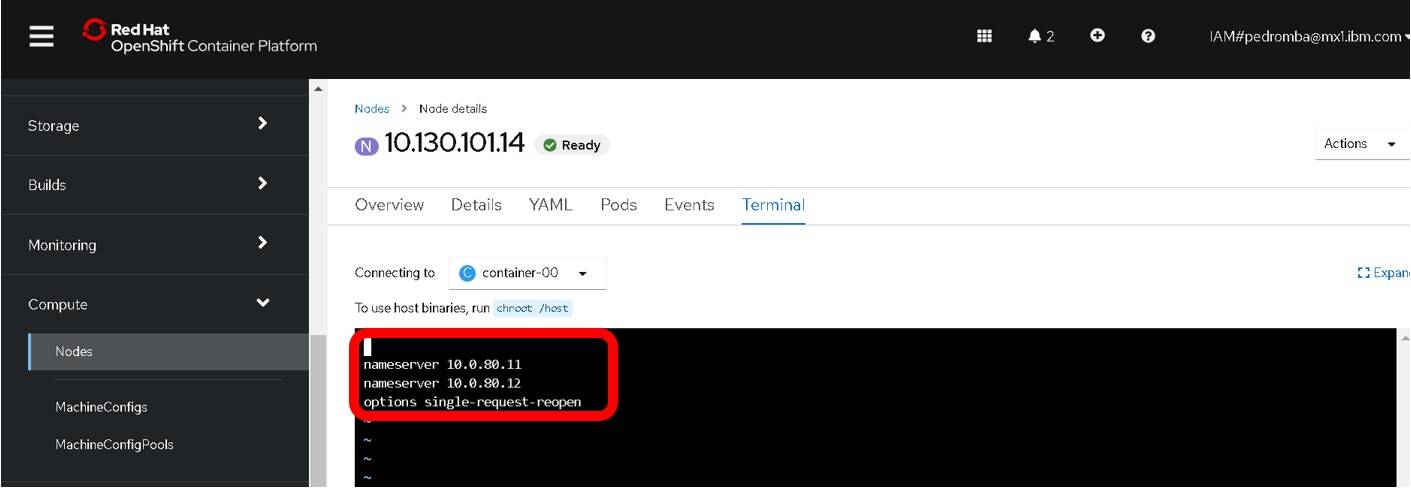
Add the DNS to the pod level in OpenShift
In the following steps, you add the DNS resolution at the pod level.
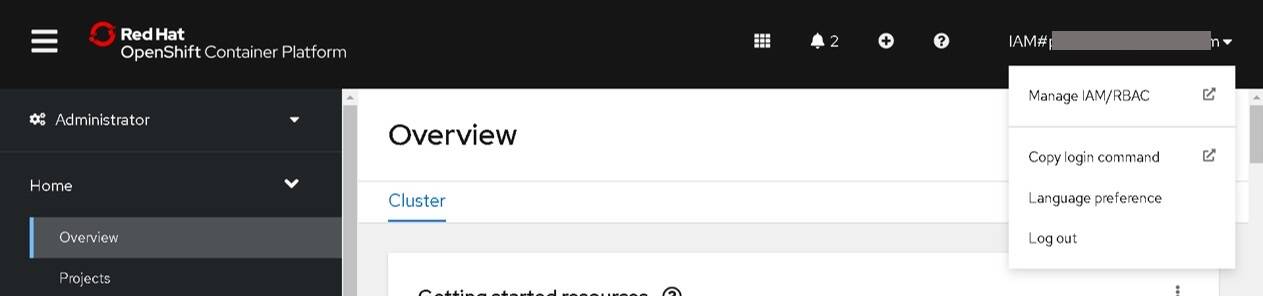
In the OpenShift web console, expand the User menu and click Copy Login Command, as demonstrated in the following screen capture image.
Click Display Token
Copy the authentication token information listed within the Log in with this token section.
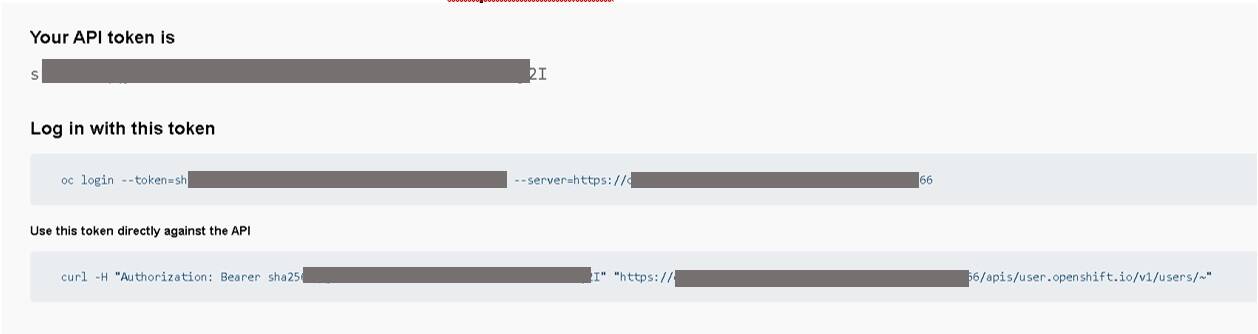
In your operating system terminal, paste in the authentication token code that you previously obtained (the
oc logincommand) to enter OpenShift through the OpenShift CLI.Modify the CoreDNS configuration by using the following command:
oc edit dns.operator/defaultAdd the DNS specification to the CoreDNS corefile in the
specsection as follows and save the configuration:spec: servers: -forwardPlugin: upstreams: -"<IP B>" name: < DNS name> zones: -<wildcard for my domain >Note: Replace the
<IP B>,<DNS name>, and<wildcard for my domain>values with your corresponding on-premises DNS values.Verify that your changes saved by using the following command:
oc get configmap/dns-default -n openshift-dns -o yamlThe output should be similar to the following:
data:
  Corefile: |
    # < DNS name>
    < wildcard for my domain >: 5353 {
        forward. <IP B>
        errors
        bufsize 512
    }
    .: 5353 {
        bufsize 512
        errors
        health {
            lameduck 20s
        }
        ready
        kubernetes cluster.local in-addr.arpa ip6.arpa {
            pods insecure
            fallthrough in-addr.arpa ip6.arpa
        }
        prometheus 127.0.0.1:9153
        forward. /etc/resolv.conf {
            policy sequential
        }
        cache 900 {
            denial 9984 30
        }
        rewatch
    }
Restart CoreDNS
Obtain the pods that correspond to CoreDNS with the following command:
oc get pods -n openshift-dns-operatorThe output should be similar to the following:
# oc get pods -n openshift-dns-operator
NAME READY STATUS RESTARTS AGE
dns-operator-58f99f78c6-ckf4x 2/2 Running 0 4d2h
Restart the pod with the following command:
oc delete pod "name of pod" -n openshift-dns-operatorThe output should be similar to the following:
# oc delete pod dns-operator-58f99f78c6-ckf4x -n openshift-dns-operator
pod "dns-operator-58f99f78c6-ckf4x" deleted
Validate that a new pod was created, which loaded the configuration of your DNS, by using the following command:
oc get pods -n openshift-dns-operatorThe output should be similar to the following:
# oc get pods -n openshift-dns-operator
NAME READY STATUS RESTARTS AGE
dns-operator-58f99f78c6-cstlf 2/2 Running 0 52s
You can now reach the domains discharged in the on-premises DNS.
Summary
In this tutorial, you learned how to reuse your on-premises DNS configuration records in an OpenShift cluster running on a managed cloud service, such as IBM Cloud, AWS, or Microsoft Azure. By following the steps for the sample scenario, you:
- Established hybrid DNS communication between your on-premises environment and Red Hat OpenShift on IBM Cloud.
- Added the on-premises DNS IP in each worker node of your OpenShift cluster.
- Added the DNS forwarding zone in the OpenShift CoreDNS configuration.
Learn more about how DNS works, explore the basics of containers and Kubernetes networking, or expand your knowledge about client-side DNS and TCP/IP configurations by following the Linux networking fundamentals learning path.