Tutorial
Manage certificate authority (CA) and HTTPS certificates on IBM Power eBMC systems
Learn to install, replace, and delete CA and HTTPS certificates on IBM Power eBMC systems using the BMC GUI and OpenSSL commands for Power10 and Power11 platforms to ensure secure, encrypted server management communicationWhen a user visits the enterprise baseboard management controller (eBMC) GUI over HTTPS, the browser doesn’t trust the website directly—it trusts the certificate authority (CA) that issued the certificate and identifies its owner. A valid CA and HTTPS certificate installed on BMC ensures secure HTTPS communication between users and applications on the BMC GUI.
Certificate authority or CA is a trusted, third‑party organization that issues digital certificates consisting of the domain name, public key, certificate authority name, validity period, and CA’s digital signature. After installing the CA and HTTPS certificate, it validates the identity of websites, applications, servers, or users and thus, establishes a trusted and an encrypted HTTPS communication in the customer environment.
This tutorial provides information about certificate operations on the BMC GUI and explains the methods to generate a CA certificate and signed HTTPS certificate using OpenSSL.
Certificate operations on BMC GUI
The following sections provide information about installing, replacing, and deleting a CA or HTTPS certificate on the BMC GUI. This method works well for IBM Power 10 and IBM Power 11 platforms.
Log in to the BMC GUI with valid admin credentials to perform the following operations:
Note: The BMC supports a maximum of 10 installed CA certificates.
Step 1. Install the certificate
- On the left navigation pane click Security and Access → Certificates.
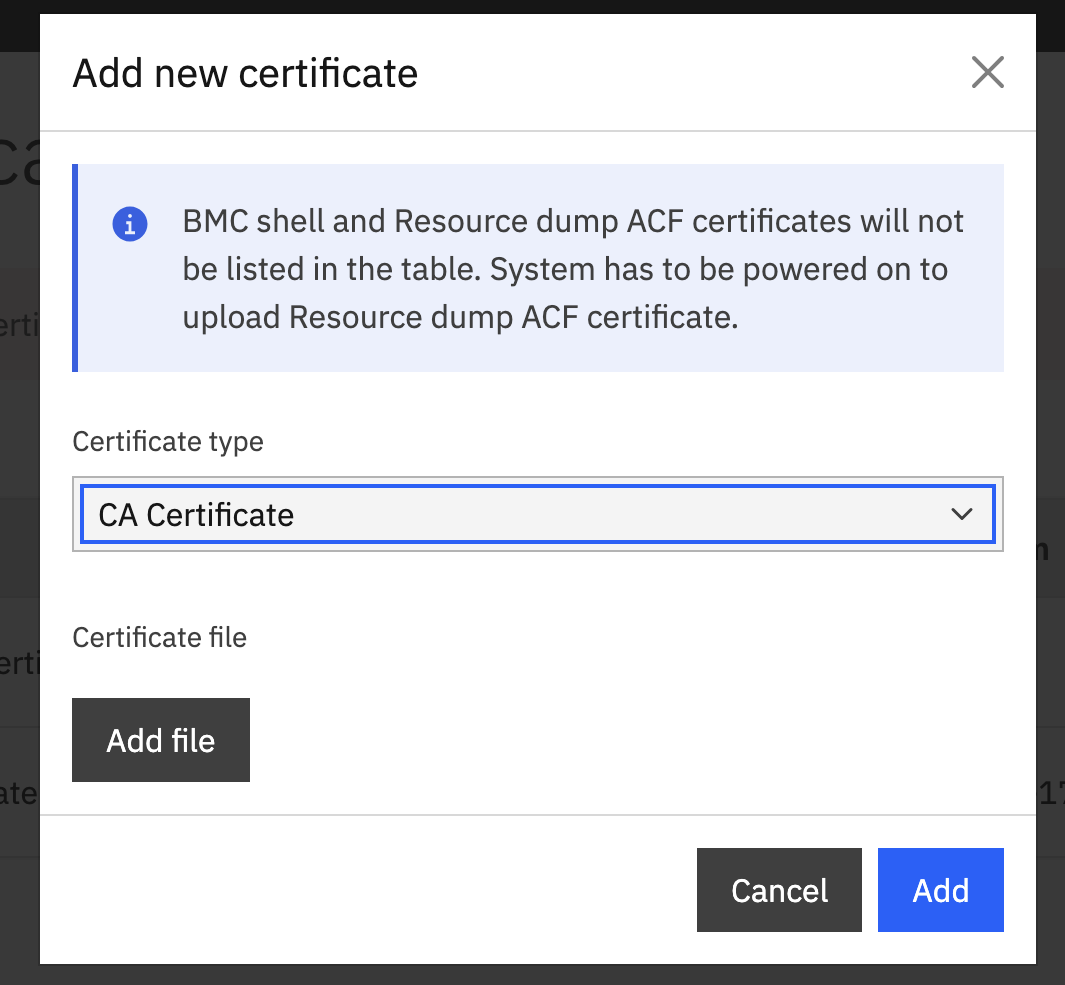
- On the Certificates page, click Add New Certificate.
- Choose CA Certificate or HTTPS Certificate from the Certificate type drop down.
- Click Add File to upload your CA certificate in the. pem format.
Click Add, verify the success message, and check that the certificate appears in the list.
Step 2. Replace the certificate
- On the left navigation pane click Security and Access → Certificates.
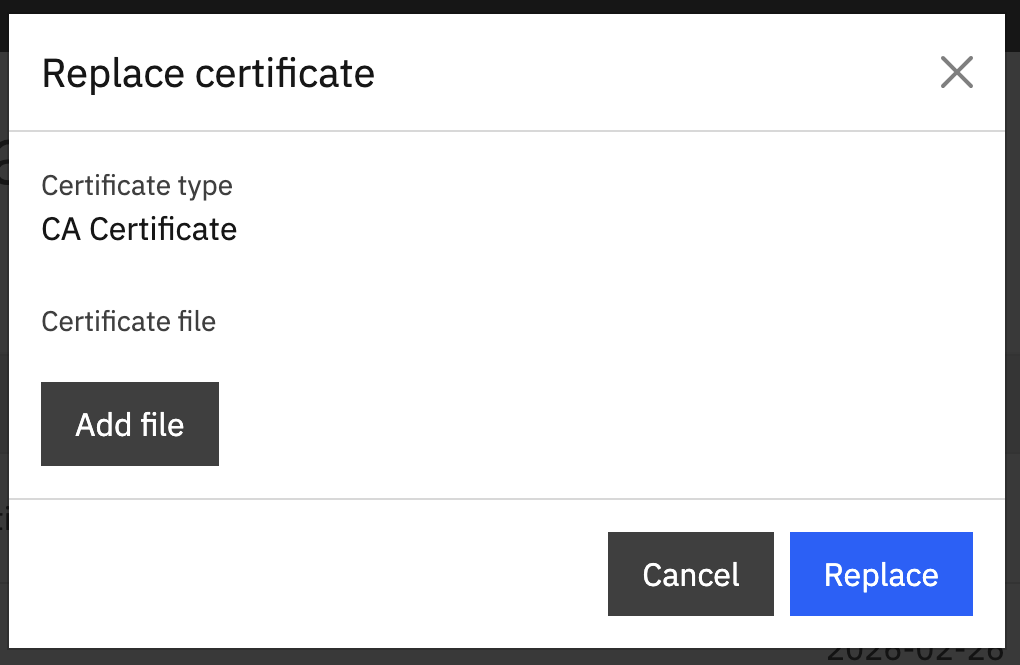
- Click Replace next to the existing CA or HTTPS certificate.
Click Add file and upload the new CA or HTTPS certificate in the. pem format. Click Replace, validate the success message, and notice that the new certificate details are updated in the table.
Step 3. Delete a certificate
Perform the following steps to delete a certificate.
- Navigate to: Security & Access → Certificates.
- Click Delete next to the certificate you want to remove.
- Confirm deletion by clicking Delete button.
A message indicating that the delete operation is successful is displayed and notice that the certificate is removed from the table.

Generate a CA certificate through OpenSSL
You can run OpenSSL commands using command-line interface (CLI) such as Terminal (on Linux/Mac OS) or command prompt (on Microsoft Windows).
Ensure that OpenSSL is supported on the CLI/command prompt by running the basic command, openssl version.
As a user, you must follow this three-step procedure to generate a CA certificate using OpenSSL.
Generate a private key for the CA.
Run the following command to generate a private key:
openssl genrsa -des3 -out rootCA.key 2048Note: Users will be prompted to enter a password for private key generation. This password will be used whenever the private key is used.
Create a root CA certificate using the generated private key.
Run the following command to create a root CA certificate:
openssl req -x509 -new -nodes -key rootCA.key -sha256 -days 1024 -out rootCA.pemThis command generates two files,
rootCA.keyandrootCA.pem.Note:
- rootCA.pem is used as the CA certificate.
- Both rootCA.key and rootCA.pem are used to generate a signed HTTPS certificate.
Add or replace the CA certificate on the BMC GUI with the rootCA.pem file as explained in step 1 and step 2 of the
Certificate operations on BMC GUIsection.Note: BMC typically supports certificates in the PEM (.pem) format and it includes only the CA certificate (not private keys).
Generate and upload an HTTPS certificate to establish full trust
This section shows how to generate a certificate signing request (CSR) of type HTTPS through the BMC GUI and generate a signed HTTPS certificate using openSSL.
Note: Uploading the CA certificate alone does not fully establish browser trust.
Generate a CSR of type HTTPS through BMC GUI
Perform the following steps to generate a CSR of type HTTPS using the BMC GUI:
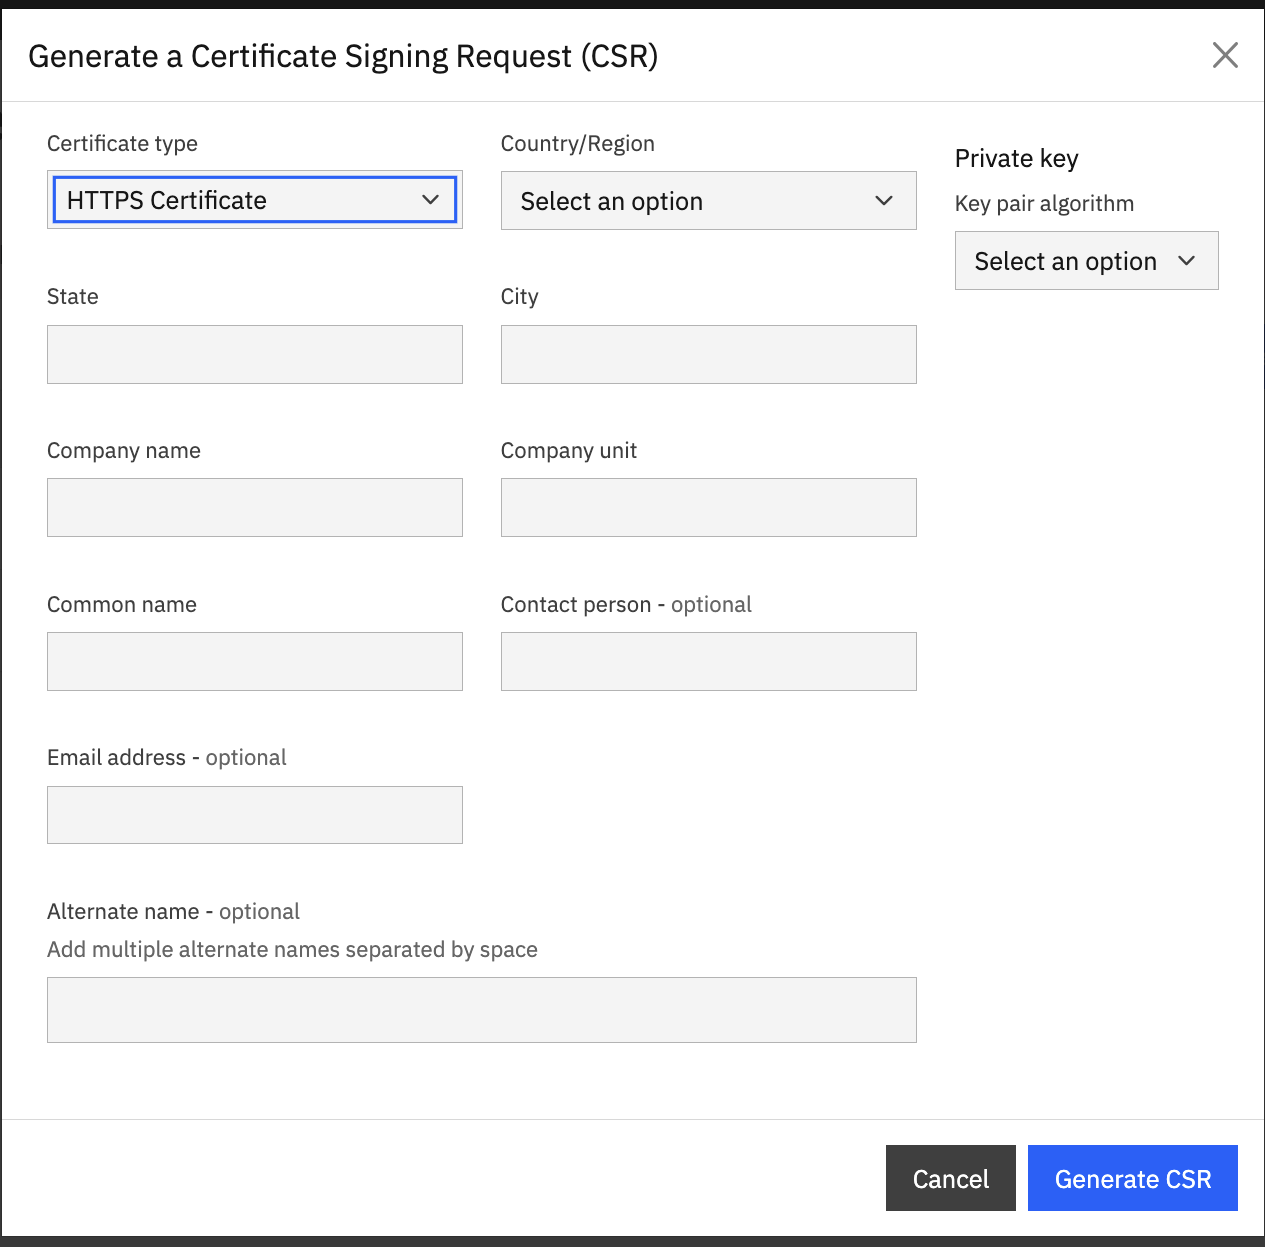
- On the BMC GUI Certificates page, click Generate CSR.
- From the Certificate type drop-down, select HTTPS Certificate.
- Fill the other required details to create the CSR certificate.
- Select the required private key options such as EC/RSA.
- Click Generate CSR to complete certificate generation.
Click Copy and save the contents of the file with .csr extension or click Download to save the CSR certificate and save it in the .csr extension.
Generate the signed HTTPS certificate using OpenSSL
This section explains how to get the signed HTTPS certificate with the generated HTTPS CSR certificate using OpenSSL.
Note: Ensure OpenSSL is supported on the CLI/command prompt by running the basic openssl version command.
On your local system, create a directory and save the generated
rootCA.keyandrootCA.pemfiles.>> mkdir -m 777 certificates_files >>> ls rootCA.key rootCA.pemCopy the
https_certificate.csrfile to the certificate directory.Create a new server_cert_ext.cnf file and save the following data:
# vi server_cert_ext.cnf

basicConstraints = CA:FALSE
nsCertType = server
nsComment = "OpenSSL Generated Server Certificate"
subjectKeyIdentifier = hash
authorityKeyIdentifier = keyid,issuer:always
keyUsage = critical, digitalSignature, keyEncipherment
extendedKeyUsage = serverAuth
Run the following command to generate the signed HTTPS certificate using OpenSSL:
openssl x509 -req -in certificate.csr -CA rootCA.pem -CAkey rootCA.key -out http_server.cert.pem -CAcreateserial -days 365 -sha256 -extfile server_cert_ext.cnfUpload the generated http_server.cert.pem file through the BMC GUI.
Conclusion
Managing CA certificates on a BMC is essential for maintaining a secure and encrypted access to your server management interface. With the CA certificates, you can ensure trusted communication, protection from man‑in‑the‑middle attacks, and compliance with modern security standards. This tutorial explained how users can easily install, replace, and delete CA or HTTPS certificates as part of the regular security maintenance workflow.