Tutorial
Integrate custom LangGraph agents with watsonx Orchestrate runtime environment
Learn how to adapt, import, and run LangGraph agents in watsonx Orchestrate with centralized runtime, security, and model managementA core goal in enterprise AI architecture is to industrialize agentic AI without creating multiple runtimes. Many organizations already have LangGraph agents. The key challenge is not creating these agents. The challenge is running them in a governed, scalable, enterprise runtime.
IBM watsonx Orchestrate solves this problem. It allows you to import LangGraph agents and run them within the watsonx Orchestrate runtime. This approach preserves existing agent logic and removes the need for separate hosting systems. It also consolidates execution, security, model access, governance, and operations in one platform. You can manage all agents, including custom LangGraph agents, within a single enterprise system.
This capability supports enterprise agent ecosystems in several ways:
- Reuse existing LangGraph agents instead of rebuilding them.
- Apply one runtime model to both native agents and imported agents.
- Centralize credentials, model access, and environment settings.
- Strengthen governance, scalability, and operational consistency.
- Reduce cost and complexity from multiple runtimes.
This tutorial explains how to adapt and run a LangGraph agent in watsonx Orchestrate.
First, it shows how to build and run a basic LangGraph agent in stand-alone mode. Then, it shows how to modify the code so the agent can run within the watsonx Orchestrate runtime.
Architecture of LangGraph agents in watsonx Orchestrate
Understanding this architecture helps teams deploy LangGraph agents in watsonx Orchestrate. The diagram shows how a LangGraph agent connects to the watsonx Orchestrate platform. The diagram also shows how the agent uses tools and language models.
The architecture shows how a custom LangGraph agent runs inside the watsonx Orchestrate agent runtime. The agent connects to internal language models or external language models.
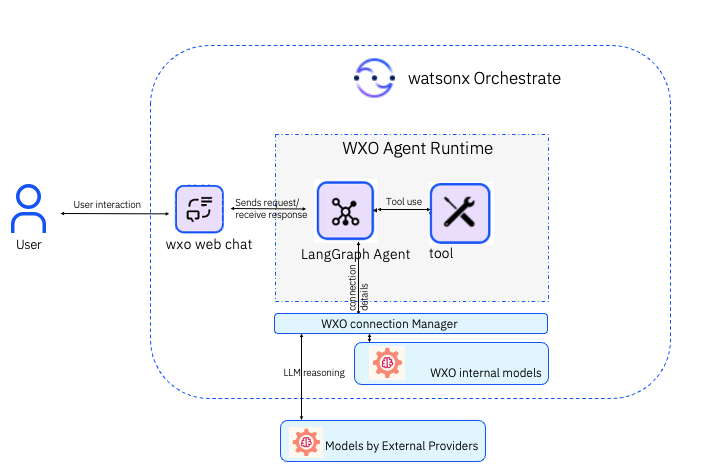
- A user sends a message through the watsonx Orchestrate web chat interface.
- The platform routes the user request to the LangGraph agent.
- The LangGraph agent analyzes the request. The agent uses a language model for reasoning. The agent decides if it needs a tool.
- The agent calls a tool when needed. The tool returns a result to the agent.
- The agent combines the tool output with language model reasoning. The agent creates a final response.
- The platform sends the response back to the user through the chat interface.
Note: The watsonx Orchestrate agent runtime manages the complete agent lifecycle:
- Agent initialization and configuration
- Conversation state management
- Security and authentication
- Scaling and resource management
- Error handling and retry logic
- Logging and monitoring
Advantages of the architecture
- One platform runs all agents. You do not manage separate agent systems.
- The platform supports multiple language model providers. You can switch models as needed.
- The platform stores and manages credentials in one secure location.
- The platform provides built-in scaling, monitoring, and governance controls.
- Shared infrastructure reduces system overhead and operating cost.
Prerequisites
- An active watsonx Orchestrate instance (local developer edition or an IBM Cloud hosted instance).
- A running local environment of the watsonx Agent Development Kit (ADK). If you do not have an active ADK instance, review the getting started with ADK tutorial. This tutorial uses ADK version 2.2.0.
- Install Python version 3.11.x to 3.13.x on your local machine.
- Create an OpenAI API key at Open AI Platform. This key is required for the stand-alone agent example.
Part 1. Create and run a stand-alone LangGraph agent
In this part, create and run a simple LangGraph agent. The agent calculates the annualized rate of return for an investment.
Clone the code base from the LangGraph agent GitHub repository. Open the code in VSCode or an editor of your choice and then navigate to the
i-oic-langgraph-agentdirectory. Set thei-oic-langgraph-agentdirectory as your current working directory.Create and activate a Python virtual environment.
 # Create virtual environment
 python -m venv .venv

 # Activate virtual environment
 # On macOS or Linux
 source .venv/bin/activate

 # On Windows
 .venv\Scripts\activate
Install the required packages.
pip install -r requirements.txtThe command installs all required packages, including the watsonx Orchestrate ADK.
Create a
.envfile to store the API key.# .env OPENAI_API_KEY=your-openai-api-key-hereReview the agent execution flow. The following diagram shows how the code processes each step.
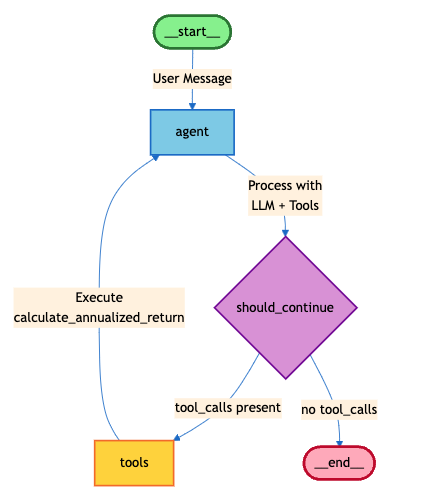
This ReAct pattern combines reasoning and action. The agent analyzes the problem step-by-step. The agent calls tools when needed. The agent repeats this process until it has enough information to generate a complete answer.
Run the agent (main.py) from the terminal.
python main.pyUse sample questions to test the agent:
I invested
$10,000and now it is worth$12,500. The investment period is 18 months. What is the annualized rate of return?Calculate the annualized return for an initial investment of
$5,000, a current value of$6,200, over 24 months.
The agent uses the
calculate_annualized_returntool to perform the calculation and returns a detailed response.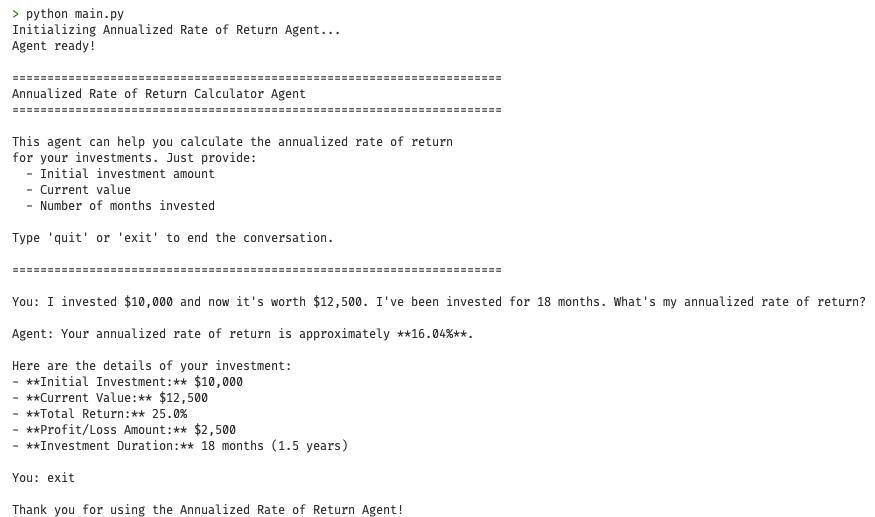
Part 2. Prepare the agent for watsonx Orchestrate
In this part, update the stand-alone agent so it can run in the watsonx Orchestrate runtime.
The my_langraph_agent folder contains the updated code and related files for this step.
Navigate to the
my_langraph_agentdirectory.cd my_langraph_agentReview the inline comments in the code files (agent.py and tools.py). The comments explain the changes that are required for watsonx Orchestrate compatibility.
Make sure that you are connected to your watsonx Orchestrate SaaS instance and run the setup script from the terminal.
./import_to_wxo.shScript actions:
- Prompts for the watsonx Orchestrate instance URL and API key. The script hides the API key input.
- Creates a connection that is named
wxo_langgraphto store credentials. - Configures the connection for Draft environment for development and testing, and live environment for production use.
- Stores credentials securely in the platform connection manager.
- Uploads the agent code and configuration to watsonx Orchestrate.
Links the agent to the connection for runtime access to credentials.
After the script completes, the agent is available in watsonx Orchestrate.
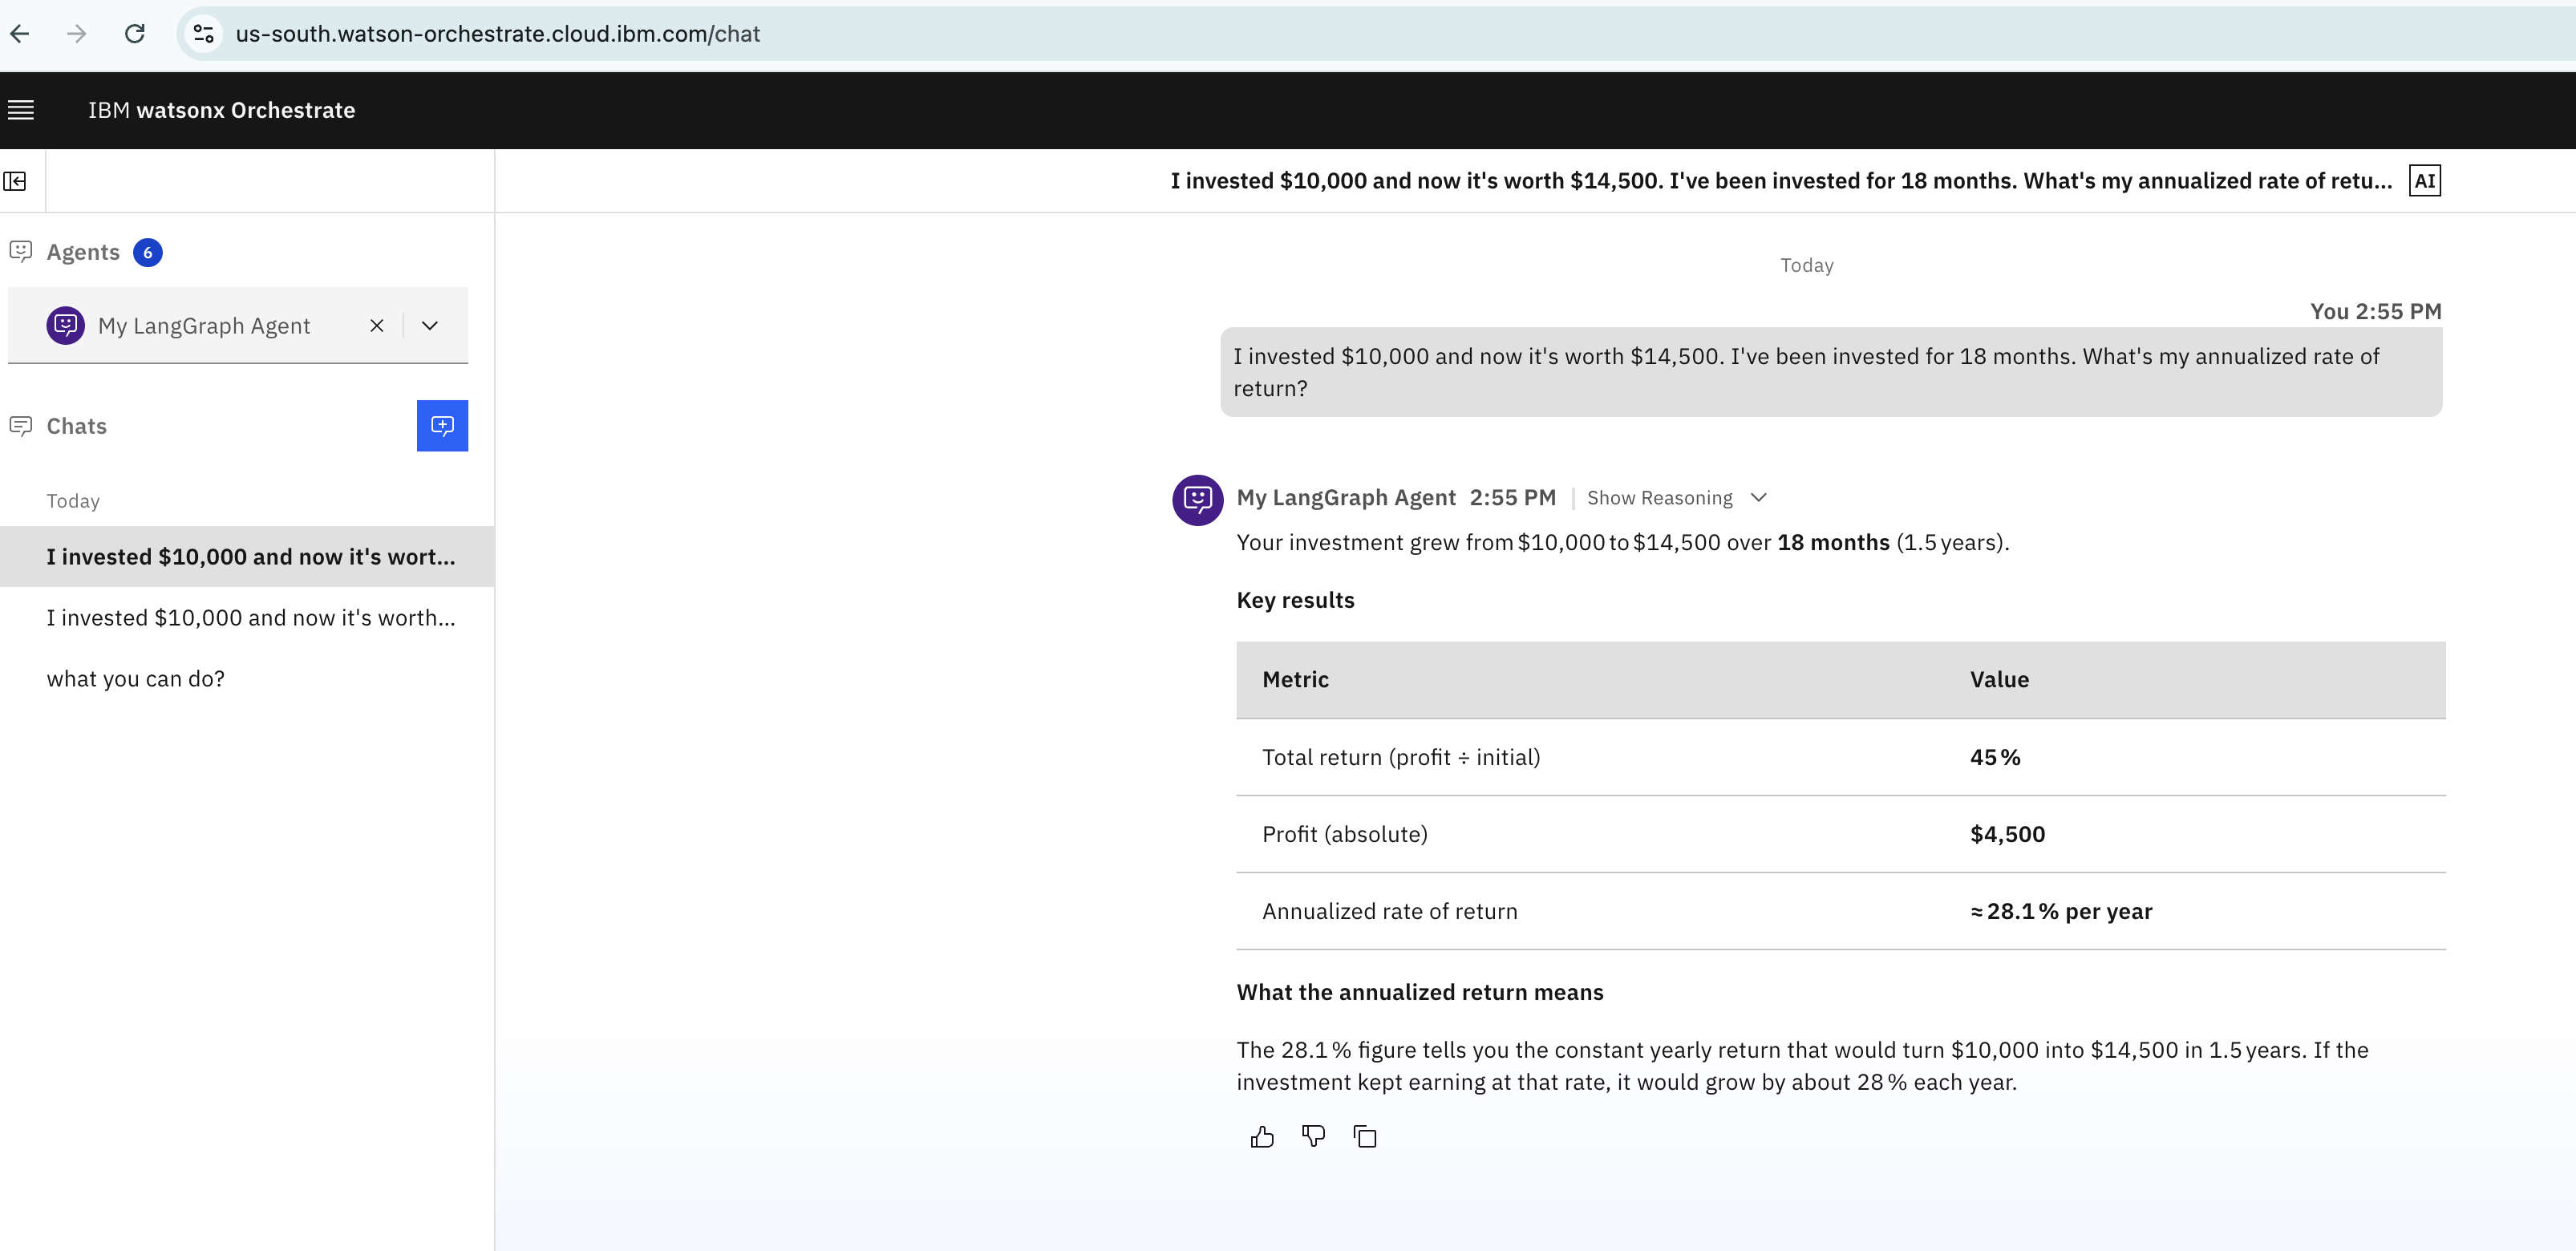
Test the agent in the watsonx Orchestrate user interface:
- Open the watsonx Orchestrate instance.
- Open the Agents section.
- Select my_langraph_agent.
Start a conversation and enter a test query:
I invested $10,000 and now it is worth $12,500. The investment period is 18 months. What is the annualized rate of return?The agent runs within the watsonx Orchestrate runtime. The agent uses the platform model infrastructure and connection management.
Summary
This tutorial showed how to build and deploy a LangGraph agent with watsonx Orchestrate.
First, you created a stand-alone LangGraph agent. This agent calculates investment returns. The agent runs locally and uses its own tools and interface.
Next, you updated the agent to work with watsonx Orchestrate. You connected the agent to the platform model service. You also used the platform credential system. You adjusted the code to match platform requirements. These changes allow the agent to use platform features such as security, scaling, and governance.
Finally, you deployed the agent by using a setup script. The script creates connections, uploads the agent, and configures the runtime. After deployment, the agent runs in a managed environment. The platform provides access, monitoring, and integration with other systems.
This approach keeps the existing agent logic and adds enterprise platform capabilities.
Acknowledgments
This tutorial was produced as part of the IBM Open Innovation Community initiative: Agentic AI (AI for Developers and Ecosystem).
The author deeply appreciates the support of Jerome Joubert, Ela Dixit, and Bindu Umesh for the guidance on reviewing and contributing to this tutorial.